| Understanding Name Resolution and DNS | |
| DNS Architecture | |
| Installing and Configuring DNS Servers | |
| Adding Primary Domain Zones | |
| Adding Reverse Lookup Zones | |
| Connecting DNS to Other DNS Servers | |
| Adding Records to Zones | |
| Adding Secondary Zones |
Since NT 3.5x,the TCP/IP protocol has become more important and in NT 4.0, TCP/IP is the required base protocol. With the ever growing commercial success of the Internet, NT developers have swung on board and offer many of the excellent services that are inherent with TCP/IP. One service that is used throughout the Internet is the Domain Name Server Service (DNS).
All IP-based traffic requires the IP address of the destination. DNS is one method of resolving a host name to a given IP address.
As the size of the Internet grew, a central hosts file became inadequate. DNS is not one central service like the original hosts file. DNS is much more robust and reliable. Every domain name could represent a DNS service zone containing the local hosts and their associated IP addresses. DNS provides a segmented service of small local databases that can pass, along a hierarchical chain, any requests for host name resolution that cannot be resolved locally.
All client machines require the IP address of the server and the name of the zone to which this server is the authority. Optionally, you can configure a client with the IP address of backup (secondary) servers. A secondary server has a local read-only copy of the primary server data and is available as an alternate site for name resolution of the specified domain or zone.
The hierarchical design of DNS is similar to a file tree structure. The root servers provide resolution to the same layer and the next below. Any further layers provide localized data zone authorities. In a private intranet, the domain servers can have any names. In the Internet, the root server names have been around a long time and are expanded all the time to allow for the exponential growth seen in the last few years.
For a Fully Qualified Domain Name, FQDN, like bicycles.phnx.ar.us, this can be interpreted to mean there is a root server somewhere that manages the .us root zone. The next layer of zones is the two-letter state monikers. In this case, ar is for arizona. The next layer represents a short form for the major cities, in this case Phoenix. The left-most part is the host in question, bicycles in Phoenix, Arizona, USA. Note that the names are delimited by periods similar to the format in a file system.
To enable a machine to be a DNS server, you must install the service in the Network applet of the Control Panel. Once installed, you need to create the zone file for the domain being managed and the reverse lookup records. You add one record for each name and IP address, as well as some specialized records for mail, synonyms, etc.
All clients will automatically use DNS when they request a host name for an IP address that is not known locally. The host name request is passed to DNS, which will use all known resources to try to resolve the host name to an IP address. Optionally, you can configure the NT version of DNS to query any configured WINS servers. To configure a WINS server, you must add the WINS server IP address to the properties of the zone file.
On the certification exam you will need to clearly know the difference between WINS and DNS.
WINS DNS
Purpose Resolve NetBIOS name Resolve host name
to an IP address to an IP address
Names Flat in structure and limited Hierarchical structure and
to 15 characters limited to 255 characters
Name registration Dynamic and happens Static and must be done
automatically manually
Replication of Changes are replicated Whole database is replicated
Every network interface card or connection has a unique 48-bit numeric ID called a Media Access Control (MAC) address, commonly displayed as six hexadecimal values. The transport protocols like NetBEUI, TCP/IP, and IPX/SPX hide the MAC address by associating a name and/or number with the host.
The TCP/IP protocols use a 32-bit numeric identification, such as 221.123.34.65, for every host on the network. To make the 32-bit number easier to remember, the 32 bits are split into parts each containing 8 bits. These 4 parts are each separated by a period. Each 8-bit segment can range between 0 and 255. As we learned in Chapter 3, Internet Addressing, there are many rules and restrictions on the number ranges.
Most machines have a host name assigned as well as an IP address. If you use the host name, it must be translated to the IP address for the communication protocols to work. The function of the resolver is to pass a name request to the name server. The name servers take the request and resolve the name to an IP address.
The final requirement of a WAN protocol is to provide full routing capability. Routing is a way for the software to know whether the requested remote host is on the same LAN or on a remote LAN. This is determined based on the Network Mask value, which isolates the bits that represent the network portions from the local and remote hosts’ IP addresses. If these two network portion values are the same, then the remote host can be reached on the local media connection. If the two network portion values are different, then the remote host is reachable through the default gateway, sometimes referred to as the router port. Routers provide a method of forwarding requests between different networks. The default gateway is a local connection point on the network that provides a shuttle service of the packet to another network where it can continue on to the requested host.
The actual packet communication between machines is done at the MAC layer and requires the software to resolve the IP address to a MAC ID. This is accomplished with the Address Resolution Protocol (ARP) request.
To communicate with another machine, you need its MAC address. In most protocols, you associate a name with the node or the IP address number. This requires translation from the name or IP address to the MAC address of the remote host. The TCP/IP software can also use a broadcast method to locate the MAC address associated with the remote host only if the address is on the same local area network.
To access another host, you need to know its IP address or host name. As the number of network addresses increased, there were more and more IP addresses and host names to remember. Thus the need developed for automated name resolution.
For example, rather than have you remember the IP address of the host corpHQftp, you can use the host name:
User command After name resolution
telnet corpHQftp telnet 230.54.36.78
ping ping xxx.yyy.zzz.ccc
One of the first TCP/IP name resolution systems was the hosts file.
Within a TCP/IP network, each host has at least one host name and one or more IP addresses assigned to each network connection. When a user wants to telnet or ftp to another host, the other host is usually referred to by name. This remote request requires that the system resolve the specified host name to an IP address.
Most workstations have just one network connection and one host name. However, you can have more names if desired. Some servers provide many services for many networks and hence require multiple IP addresses, at least one for each port. Optionally, a server may provide more than one network service and each service may have a name associated with it, such as FTP and WWW.
In early TCP/IP networks, all known host names and their associated IP addresses were stored in a simple text file called hosts. In most UNIX installations, the hosts file is located in the /etc directory and is also commonly referred to as /etc/hosts.
The hosts file contained one line for each IP address and at least one associated name. The hosts file design allowed for multiple names for the same IP address, all on one line as shown in Figure 10-1.
206.197.150.11 bigsun BIGSUN ftp www
206.197.150.51 host51 HOST51 jan
206.197.150.52 host52 HOST52 shamir
206.197.150.53 host53 HOST53 diane
206.197.150.54 host54 HOST54 ray
206.197.150.55 host55 HOST55 pat
Figure 1 Typical /etc/hosts File with Multiple Host Names
Figure 10-1 shows a short example of a hosts file. The hosts file provides a static lookup of a host name for the associated IP address. Notice also that the hosts file is flexible, in that multiple names can be associated with one IP address. In the first line of Figure 10-1, there are four names associated with the one IP address on the left. This allows a network user the option of using bigsun, BIGSUN, ftp, or www as reference host names to reach the machine with the IP address 206.197.150.11.
To describe the design and functionality of DNS, our example will be the largest public network in the world, namely the Internet.
Each isolated TCP/IP network has to maintain its own hosts file and make it available, by some copy method, to every other host on the network. In a small network of say less than a hundred, this can be managed centrally by paper and pencil. This design becomes cumbersome if the network is larger than a few hundred. You could not change a host name or IP address without updating the hosts file on every other host in the network.
As networks became more and more complex, not only topologically and geographically, there was a corresponding need to simplify name resolution. In small offices, a host name might reflect the name of the user; the server may reflect the name of the company. But when there are hundreds of servers, spread out in many office locations, and thousands of users pressing the need for central management, the hosts file system revealed its limitations.
As the Internet grew, every time a host was added, every other machine had to add that name to its host file. When this became too cumbersome, the host files were trimmed down to directly reachable hosts. These hosts would then pass the requests on, if they were not destined locally, to the remote hosts of all the other networks that could possibly get the packet to the eventual host. This was like a drop on water, creating a wave of packets heading out in all directions from the server. Since some hosts knew about others who knew about them, the packets sometimes ended up in a circle, routing. This routing loop was controlled with a Time To Live (TTL), value included in each packet.
For example, at a university connected to the Internet, the local administrator would keep a central hosts file that would be propagated out to all other hosts. This file would contain all local host IP addresses as well as possibly some well known and or often-used remote network addresses of other. Imagine if they tried to keep a file of every known network address. Now imagine having to coordinate this with thousands of schools.
In the imaginary set of university names in Figure 10-2, the campus referred to as und has a hosts file that contains all the local hosts and additionally all important hosts from some selected other campuses: unc, ubc, usc, umd, ufs, unv, and udc. This same scenario is repeated at every other campus shown.
unc ubc usc uno uso
![]()
und umd uws uma
ufs unv udc utc umm
Figure 2 Imaginary Internet of Campuses Example
How would a user on a host at the umm campus connect to the ftp server at und, if the host IP is not in the local hosts file and is generally unknown? Each host in the list can resolve to the next host. The user could connect to a host in uma, from there connect to uws, from there connect to umd, and from there get to the ftp site on und. The point of this example is that there are tens of thousands of possible connections and the administrators cannot keep track of every other host in their hosts file.
An early implementation of distributing a set of system files was called Yellow Pages. This service is now called Network Information Services (NIS). NIS provides a centrally managed file distribution system for mainly UNIX based hosts, although there are versions of NIS for other platforms.
NIS had a master domain server, much like the Primary Domain Controller in NT, that maintained the master copy of the files. All other hosts got a local read-only copy. As you can imagine, these networks grew to thousands of users and hosts, and the distribution of one or more very large files became cumbersome and network-intensive.
The hosts file remained the only central location for host name resolution until it became apparent that this centralized management was too inefficient and error-prone with such a large community of networks. However, it is still effective in smaller networks.
The hosts file is simply a long flat file of single-line entries. Each entry represents one IP address and one or more names. Every search of this file starts at the beginning and reads every record until one is matched (or not matched).
The DNS hierarchy is patterned after the file system with smaller, better organized groups. Using directories or folders allowed for easy expansion and no limits to the design. Rather than one big file, records were grouped into common zones of management, something like the groups of files or folders that is the current standard in many file systems like FAT, HPFS, and NTFS.
DNS distributes the information in a standardized hierarchical structure that provides an indexed search path rather than a sequential search of one large file. DNS uses a sequential set of records in data files containing various types of records. Each record represents one host name, one IP address, and the type of record. Some record types allow for more information. This record design allowed for flexibility and extensibility.
A DNS record consists of a name, record type, and an IP address. A set of these records can be associated with a grouping called a domain. The Fully Qualified Domain Name (FQDN) is the name of the host suffixed by a period, followed by the domain name.
For example, the ftp server in the domain mycomp.com would have an FQDN of ftp.mycomp.com. If the IP address is 12.34.56.78, then the DNS record would consist of the FQDN, the IP address, and a record type, in this case an address record type of A:
A 12.34.56.78
Each local database maintains one or more records for a host name and an associated IP address. This adds the flexibility of duplicate names for the same IP address.
As an additional feature, there can also be secondary servers with read-only copies of the database from the primary server.
DNS is a system of interconnected data files representing local host names and their IP addresses. The design provides a well defined hierarchical structure that provides a local name resolution service or the service passes the request up the hierarchical tree. The structured combination of these smaller data files provides the entire set of names of all registered host machines on the network.
All the host names are grouped into smaller, locally managed databases. Each of these databases know about the parent servers above them, called root servers.
The most popular implementation of the DNS protocol was developed at the University of California at Berkeley, and is appropriately called Berkeley Internet Name Domain (BIND). The specifications for DNS are defined in RFCs 974, 1034, and 1035.
Figure 10-3 shows the three basic levels of DNS. The root servers are named A, B, C,
etc. The top-level domains are .com, .edu, .gov, and there are many more.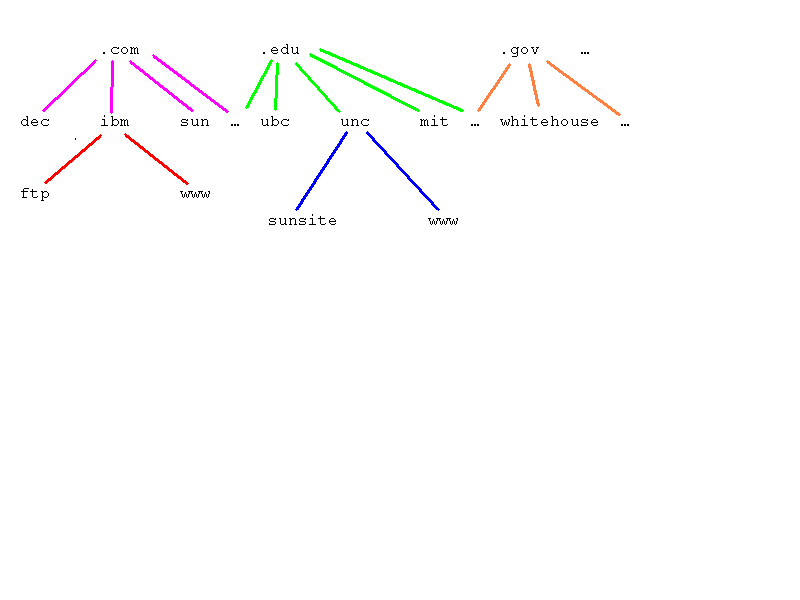
Figure 3 Small Selected DNS Hierarchical Structure from the Internet
Figure 10-4 shows more top-level domains.
-------------------------------------------------------------------------------------------------
NOTE: There is a file supplied with the DNS installation that contains a few records for some of the common root servers. The file and path is:
%systemroot%\system32\DNS\samples\cache
--------------------------------------------------------------------------------------------------
The second level or layer represents the distributed DNS servers for each zone. Each zone maintains its own set of local host records. For instance, the ibm.com domain shows the host and the host names. These are just the registered host records and may or may not be separate physical machines. These records are maintained on the DNS server that manages the ibm.com zone.
The DNS server and the domain are not necessarily one machine. A DNS server may support multiple domains or zones. The DNS hierarchy is just the structure of how the data is supported. The actual DNS server machine is not indicated within the DNS hierarchy. Any machine could provide this DNS domain service for one or more zones.
This hierarchical design for DNS provides an indexed search pattern that does not require looking at every host record. Each domain or zone database has records that point to at least the named root server and possibly other root servers. The local server provides an indexed search of its cached records or its database of records and passes the request up the hierarchy only if needed.
Root domains represent the upper indexed pointers to other DNS servers.
This is the commercial organizations group and is by far the largest group. Almost everyone wants to be here because it is the first default extension for all commercial organizations like DEC, SUN, IBM, Microsoft, etc.
This is for non-commercial organizations.
This is for networking organizations like island.net, nfs.net, and Internet Service Providers like tiac.net.
This is for military organizations like army.mil and navy.mil.
This is for the government offices of the U.S. only.
The Internet started in the U.S. and as such, the organizations normally are located in this country. For the rest of the world, there are country servers based on a two- or three-letter shortcut. Every country has one, including the U.S.
| Canada has the .ca root domain. | |
| United Kingdom uses .uk. | |
| Ireland uses .ie | |
| U.S. uses .us. |
The root servers are used to route the request to the next correct server.
.com .edu .gov .int .mil .net .org … .ca .uk .ie …
… .bc .on .pq …
Figure 10-4 Selected Top-Level Servers Around the World
The root server for Canada, .ca, has another root server or subdomain for each province. A provincial server may or may not have further nested subdomain servers, as required. In other countries, the root servers may have city-based nested subdomains.
Within the .us and .ca root servers are another set of servers for each state / province / region and from there possibly many cities. For example, dallas.tx.us for Dallas, Texas and vancouver.bc.ca for Vancouver, British Columbia, Canada. These are just the domain names. The host names append to these like an information center. For example, the city of Vancouver in British Columbia, Canada could be reached with info.vancouver.bc.ca or www.vancouver.bc.ca. Normally, DNS names are displayed in lowercase. However, the most DNS services are not case sensitive.
There are many root servers, but the .com server is by far the largest and most overloaded. The other root servers offer local access with faster response for local users and make it easier to get a domain name that is not already used by another DNS service.
Root Servers
The root servers provide addresses to the domain servers associated with that root. For example, the .com root server maintains IP address pointer records for all the name.com DNS servers. In turn, each of these name.com domains contain records for all of their local machines only. The root DNS database is maintained locally by a specific authority.
The .com root server knows the .edu, .mil, and all the other root server addresses. When a host name request comes in to a root server, it simply looks at the root portion of the name and passes the name off to this root server. This second root server would then look up the domain name in its database and send the packet on to that specific domain name service. This specific domain name would then provide an answer or an error if nothing was found.
In Figure 10-5, the arg.com server maintains the DNS database of records for its local machines, in this case classroom, sugar, ftp, and www. These are four of possibly hundreds of records. The IP addresses they represent may or may not be different from one another; these are just names in the database. All four host names could be the same or different servers.
.com .edu
… .arg .dec .hp .ibm .sun … … .mit .ubc .unc …
classroom sugar ftp www sunsite ftp
Fig 10-5 Domain Name Structure from Selected Root Servers
When a program requests a host by a single name, like sunsite, the network protocol has a sequence of steps to resolve the name. If the client is DNS-aware, then the DNS service request will append the local domain name to the end of the requested host name and try to resolve this within its database. If this first domain name fails and there are other suffix names configured within DNS, then the name will be appended to each of them successively and tried within the specified DNS service again.
If a Fully Qualified Domain Name (FQDN), is supplied, then the DNS service is queried directly first.
Let’s say a host named classroom.arg.com wants to reach sunsite.unc.edu (see Figure 10-6). This will generate many smaller requests. The first request goes to the local DNS server for arg.com. The host named classroom must have the address of this DNS server already configured in the TCP/IP Protocol information.
The primary DNS server for arg.com first tries to resolve the request locally by checking its own records. The DNS server may have more than one zone database and the TCP/IP protocol properties for alternate suffix search names would have to reflect these alternate domain names.
Some specialized servers are configured to maintain a cache of previous hits so that common requests may not have to repeat the longer full-request process.
If the local DNS server could not provide an address resolution, then it passes the request "'up the ladder" to the .com server, which looks in its local databases. If it does not find the IP address for the host, it passes the record on to the root server of the remote host name, in this case, the .edu root server.
The .edu server passes the request on to the unc.edu DNS zone server, which hopefully has the IP address. The found IP address then passes back through the same chain to the original host. At this point, the original host is finally able to send packets directly to the remote host.
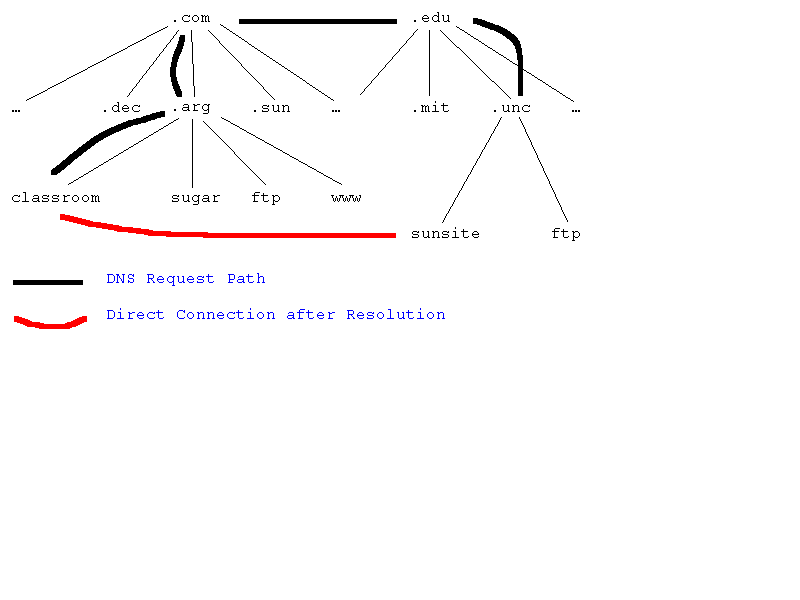
Figure 6 DNS Resolving Process
All DNS information that is maintained in the registry can also be maintained in text file format, if you select Update Data Files from the DNS Menu of DNS Manager. If you are using files from a UNIX BIND version of DNS, you can force the DNS server to not read the registry and just use the files ported over from UNIX. Be aware that the UNIX BIND files may contain some commands that NT DNS will not understand.
The files are located in:
%systemroot%\system32\DNS
After installation, this directory contains the files boot and CACHE.DNS as well as the directory SAMPLES.
The cache is used for additional name resolution. The cache file contains Name Server (NS) type records for additional name servers. This file can be updated from a central file maintained by the Internic (www.internic.net).
The cache file needs to point to other Internet related sites only if you are joining the Internet. If you are just creating your own intranet, then you should change the entries in this file to reflect your own root domain servers.
In most cases, users request a host by name. This results in what is a forward lookup. A remote server gets a packet with the source and destination IP addresses. If the server needs to look up the name of the original source machine, then it sends a request for the host name based on a given IP, the one supplied in the packet received. This is referred to as a reverse lookup request.
To handle reverse lookup requests, a special database, in-addr.arpa, is created for the reverse lookup records. We’ll discuss reverse lookups in more detail later in this chapter.
This section will take you through the steps for installing the DNS service and give you some important secondary information that may be required by some sites.
Your server must already be using TCP/IP and the IP address must be static. You can use DHCP but the IP address would have to be a fixed reservation.
You need to know the IP addresses of any other DNS servers that will be installed as primary or secondary servers and the domain names of the authority they will be servicing.
From Control Panel go to Network Applet to begin the installation process.
During the installation of NT 4.0, the system stores the location of the installation files in the registry. Every time you add another service or update a service, the system will want to verify that the location of the installation files has not changed. Make sure the location is correct and then click Continue.
A display box indicating progress appears for a short time while files are copied to your machine.
Your Services panel now shows the service installed. At this point you have completed the installation of the actual service files for DNS. The network bindings still need to be determined and then a reboot is required.
Exercise 10-1 Client DNS Configuration Parameters
This exercise assumes that this is a first time setup of a client to use your DNS Service, and that you will be using the 'mycomp,com' domain, you must know the IP address of your machine where DNS is installed for this domain.
Before rebooting, there is some further installation required to finish the DNS setup. You need to configure your TCP/IP protocol settings to point to the DNS service and to indicate the domain name that this DNS service provides.
Still within the Network applet of Control Panel, go to the Protocols panel and click on TCP/IP protocol.
You need to click the Properties button to get the Microsoft TCP/IP Properties panel. The TCP/IP Properties setup window has five panels. A sample DNS panel with some input values entered is shown in Figure 10-7.
Click on the DNS tab at the top of the TCP/IP Properties Control sheet to get to the DNS setup panel.
If you are a client only of the DNS service, you would need to enter the domain name and the IP address of the DNS service. Click on the Domain box and enter your domain name, as in arg.com shown in Figure 10-7. You also need to enter the IP address of this service in the DNS Service Search Order table. These are the minimum requirements to be a client of a DNS service.
A secondary DNS server is a backup server with a copy of the zone information from the master server. If there is one or more sSecondary DNS servers for this domain, you would enter one or more additional IP addresses in the DNS Service Search Order table of entries the same way you add the primary DNS server IP address. Press the Add button within this area.
The DNS Service Search Order is a fail-over list, not an additional location. Only if the first one fails to respond after a nominal timeout period, is the next DNS server service list tried with the same request, and so on. These secondary servers must have a valid domain zone file for this to work.
Even though the machine is the DNS server, you still need to establish your domain name and IP address information here for this machine to use DNS.
The NetBIOS name of your machine becomes the host name equivalent. Although you can change this to anything, it is not recommended; DNS can do that for you with multiple name entries.
The Internet is an established network. If you are joining the Internet, you will have to check that the domain name you want to use is not already in use. This can be done through Internic at www.internic.org.
You need to add the domain name that represents the data being managed by this DNS and the IP address for the DNS service.
In our example the arg.com domain is being managed. The IP address of the server managing arg.com is 206.195.150.135, the same IP address as the current host.
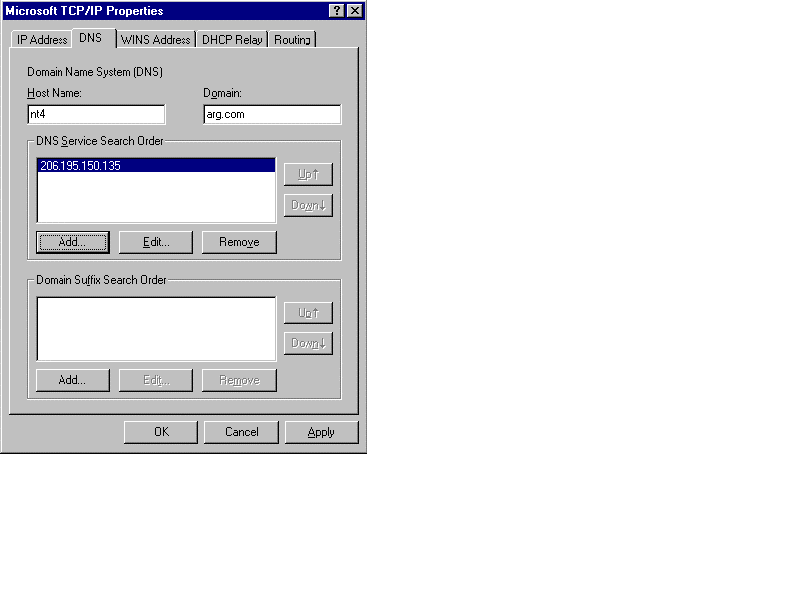
Figure 7 DNS Setup Panel in TCP/IP Properties Input Control Window
If your DNS service will be splitting up the domain information into subdomains like sales.arg.com, mis.arg.com, and staff.arg.com, then you need to add these additional domain suffixes to this list. The request for a single host name with no domain qualification, no periods in the name, will iterate through the main domain suffix and then try each of these additional suffixes to try to resolve the name to an IP address.
To add each additional domain suffix to the list, click the lower Add button in the DNS setup panel. Enter each path with the full domain name structure. No leading period is required; the period will be supplied when the suffix is appended after the host name. Figure 10-8 illustrates the additional three Domain Suffix Search Order entries.
The following domain and server names were used in the figures throughout this chapter.
For example, the arg.com zone data may be subdomained as follows:
subdomain hosts FQDN in subdomain
============================================
sales.arg.com NT01SSvr.sales.arg.com, (.140)
PC141S.sales.arg.com, PC142S.sales.arg.com,
PC143S.sales.arg.com, PC144S.sales.arg.com,
staff.arg.com NT02TSvr.staff.arg.com, (.150)
PC151T.staff.arg.com, PC152T.staff.arg.com,
PC153T.staff.arg.com, PC154T.staff.arg.com,
PC155T.staff.arg.com, PC156T.staff.arg.com
mis.arg.com NT03MSvr.mis.arg.com, (.160)
PC161M.staff.arg.com, PC162M.staff.arg.com,
PC163M.staff.arg.com, PC164M.staff.arg.com
The input display to add domain suffixes has an input box called Domain Suffix. Enter each suffix and press the Add button for each one. You should order these suffixes by "most often used" to "least often used" as they are sequentially checked.
After all subdomains are added, the DNS panel looks like Figure 10-8.
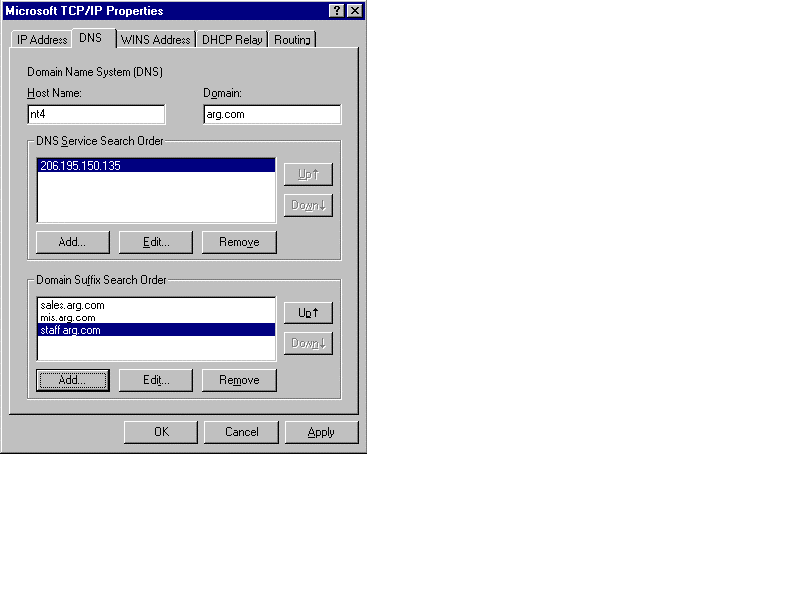
Figure 8 DNS Client Setup Panel with Additional Domain Suffix Search Order Entries
Press the OK button of the DNS panel to finish setup.
You are returned to the Network Applet - Protocols Panel. Press Close to complete the installation.
The bindings screens will flash across the screen showing a progress bar as each binding set is completed. A binding is the list of protocol layer pieces, the path a request might possibly take through all the layers of the network software, starting from the requesting interface software and ending at the MAC layer interfaces.
Finally, you are asked to reboot. Click Yes to reboot.
At this point, the installation of the DNS server is complete. After the reboot, you will need to start up the DNS manager so that you can add your zone or zones and sub-zones, and to add records to the various zones as needed.
Exercise 10-2 Installing DNS Service on the DNS Server
Install the DNS Service from the Network Services panel in Network Applet of Control Panel.
The first database needed is the Primary Zone for your domain. The database represents the records that are managed at this zone of authority. The zone represents the database query object that responds to the Domain name queries. The domain name is something like arg.com or 2dt.com. These are the domains that are referred to as zones of authority.
You can start the DNS Manager utility from the Administrative Tools Menu as follows:
START --> Programs --> Administrative Tools --> DNS Manager
When the Domain Name Service Manager screen appears, the only icon in the display is a Globe with the caption Server List to the right of it. This will always appear in every view of the DNS Manager.
You need to point the manager at a DNS server, including the one on the local machine, by IP address.
To add a new server, you click on the New Server option on the DNS menu. You are prompted for the name or IP address of the DNS server to add to the list.
For example, to add the server at IP address 206.195.150.135, enter this IP address in the DNS Server input box and click OK.
This should bring up a running service if the DNS installation worked correctly.
Exercise 10-3 Configuring DNS with DNS Manager
You must click on the IP address of the DNS service first. The options on the DNS service are related to the object. Alternatively, using the second mouse button will bring up the content menu for the server and you can select the New Zone option. Second sentence. Remove… rewrite. Using the secondary mouse button bring up the content menu and select New Zone.
This menu will use the Create Zone Wizard to add a New Zone database.
This first wizard screen allows you to create either a primary or secondary zone. A primary zone has local unique records making the primary or master source of a zone. A secondary zone is an alternate copy of the same zone data information located on another DNS server. It acts as a backup service to the primary. There does not need to be a secondary server but there can be one or more secondary servers for any zone. However, to provide a DNS service on the Internet, you must provide at least one secondary DNS server service for the domain you manage. This is a requirement of joining and hosting a DNS service on the Internet.
In the second screen, you enter the name of the domain you want to create. Assuming you are joining the Internet and you have decided to create the local zone called 2dt under the .com root server, you would enter 2dt.com as the zone name.
If you press the TAB key to get to the next field, the wizard automatically enters the normal data file name which is a suffix of '.dns' added to the original zone name, in this case 2dt.com.dns as shown in Figure 10-9.
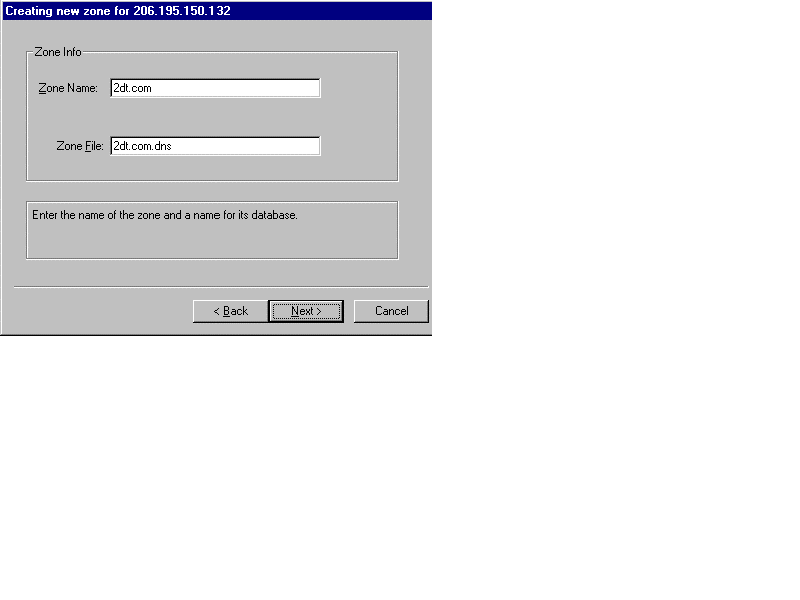
Figure 9 Zone Name and Associated Data File Name for a Primary Zone
Click the next button to continue creating this zone. The zone data file will be created in the following directory with the name entered in the screen above:
%systemroot%\system32\DNS
The directory listing will look something like this after creating the zone 2dt.com and the data file would be 2dt.com.dns:
========================================= From Command Prompt =====================
C:\SVR\system32\DNS > dir
Volume in drive C has no label.
Volume Serial Number is A447-C2B2
Directory of C:\SVR\system32\DNS
01/30/98 11:41a <DIR> .
01/30/98 11:41a <DIR> ..
01/30/98 11:41a 532 2dt.com.dns
01/30/98 11:41a <DIR> backup
01/30/98 11:41a 754 boot
08/08/96 09:30p 2,144 CACHE.DNS
01/30/98 11:41a 851 in-addr.arpa.dns
01/30/98 07:54a <DIR> SAMPLES
8 File 4,281 bytes
316,315,136 bytes free
========================================= From Command Prompt =====================
The last wizard screen simply allows you to either finish and create the zone, cancel creation of the zone, or go back and make changes. Use the Back button on any of the previous screens to make changes.
Exercise 10-4 Creating Primary Zone File
Create the Primary Zone mycomp.com. on the host 213.88.77.16.
The primary zone also requires a reverse address zone to store reverse order records, called PTR records. These records provide host names for a given IP address. The order is reversed so the search mechanism remains the same.
Every DNS server requires the special reverse lookup zone. The name of this zone is in-addr.arpa or z.y.x.in-addr.arpa for a single zone server representing the x.y.z network. The network number order is reversed.
The reverse lookup zone contains an additional record for each registered host record in all locally managed zones. During the creation of the host records, the wizard will create a regular host to IP record in the domain zone and can also create one reverse lookup record in the reverse lookup database. Click on the box to create the Associated PTR Record for automatic record creation. This box appears in both the Add Host and Add Record input screens.
A reverse lookup record has the fields in a different order; the IP address is first, then the pointer type, usually PTR, and then the host name.
A normal host record for zone domain.com would look like this:
www A x.y.z.n
The corresponding reverse lookup record would look like this:
x.y.z.n PTR www.domain.com
There is only one reverse lookup zone needed for all zones managed by the local service. By using the default name of in-addr.arpa all zones can create reverse lookup records there.
If you want to keep them separate, then you need to follow the standard naming convention of reversing the network number in dotted notation followed by in-addr.arpa.
To separate the reverse lookup zones, you need to name these zones according to their IP network number. For instance, if you are creating zones for corp1.com and corp2.com and their IP network addresses are 199.72.26.0 and 199.72.45.0 respectively, then the reverse lookup zones would be named as follows:
Zone Network IP Reverse Database Name
corp1.com 199.72.26.0 26.72.199.in-addr.arpa
corp2.com 199.72.45.0 45.72.199.in-addr.arpa
You create the reverse lookup zone file as a primary type zone as illustrated previously.
The second wizard screen (see Figure 10-10) asks for the zone name, in this case enter in-addr.arpa as the general default reverse lookup zone name. You could be more specific and use the reversed network number prefix if so desired.
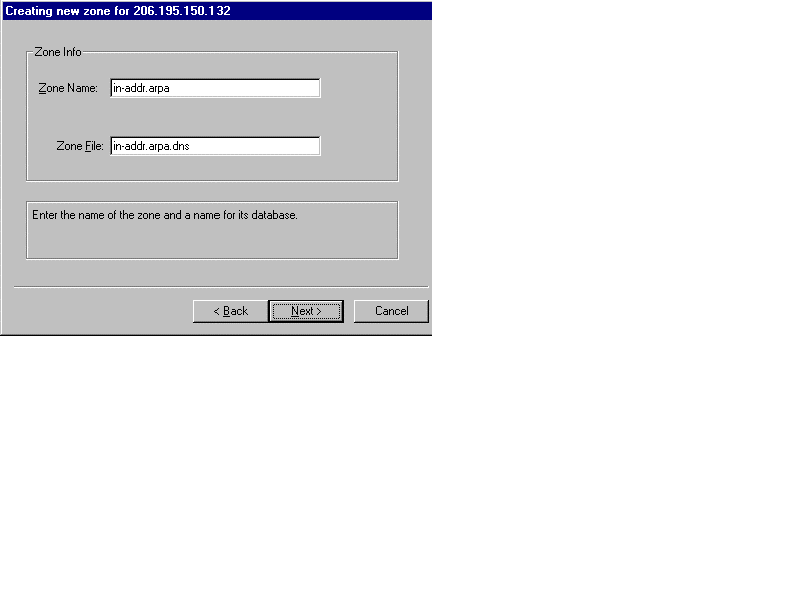
Figure 10 Reverse Lookup Zone and Data File Creation
You complete reverse lookup zone information as previously explained. Simply press the TAB key to get to the next field. The wizard will fill in the file name automatically for you. You can change this name if you wish but it is not necessary. Click Next and then the Finish button on the last screen to complete the zone creation.
In a conventional UNIX version of DNS, all of this information is maintained in local text-based data files. You can have the DNS Manager write this data into data file format as a precaution or as a means of transferring the data to another server at a later time.
To write the data to local disk files in the normal DNS directory, from the DNS Manager, click on the DNS Menu item and then click on Update Server Data Files.
Exercise 10-5 Creating Reverse Lookup Primary Zone File
Create the in-addr.arpa zone for mycomp.com on the host 213.88.77.16.
You can also select the zone and then add a sub-zone (or domain as it is called here). To add a domain (sub-zone) click on the DNS Menu option and then click on Add Domain.
The input screen simply asks for the domain name, subdomain. Enter in the name desired and click on the OK button. You do not need a fully qualified name entered here.
This adds a nested domain to the main zone file, and looks like a subdirector' of the zone directory.
In Figure 10-11, three subdomains were added to the arg.com zone called mis, sales, and staff.
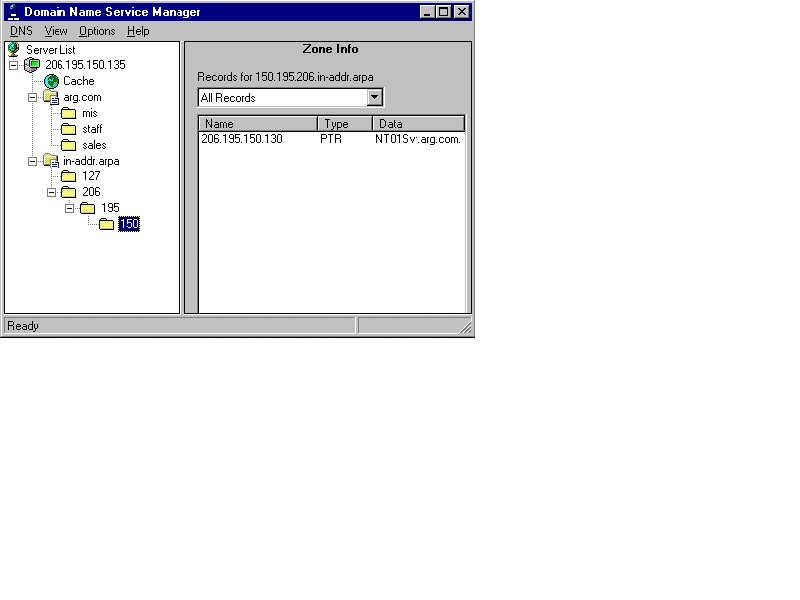
Figure 11 DNS Manager Showing Sub-Domains to Main Zone and Reverse Lookup Sub-Domains with PTR Records
Figure 10-11 shows a basic installation of a single zone with three sub-zone domains. All of this information is maintained in the same zone database.
After adding a few records to each subdomain, the data files look like Figure 10-12.
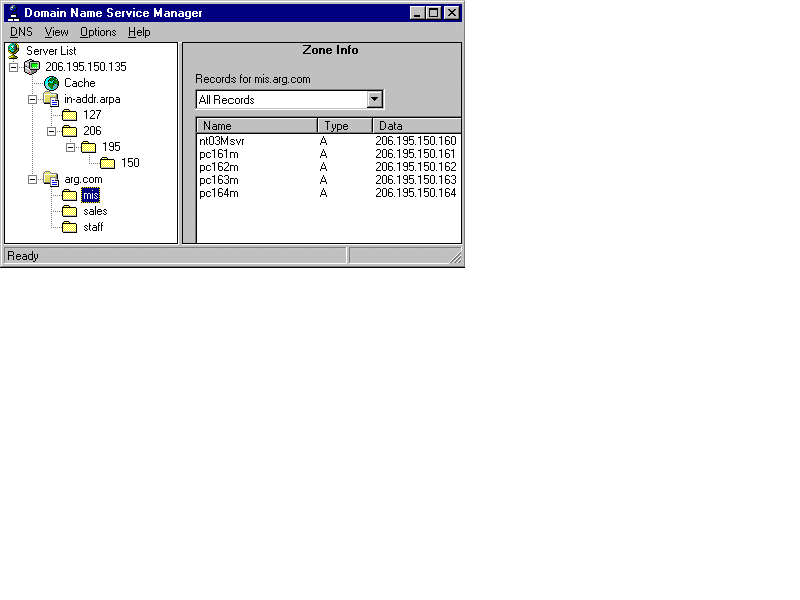
Figure 12 Subdomain Host Address Records and Subdomains of in-addr.arpa Zone
All information added through the DNS Manager is stored in the registry of NT 4.0.
Make sure that you update the data files from the registry. Select Update Server Data Files from the DNS Menu Options.
Your DNS server is now ready to be tested before going into production. You should test at each step of the installation to ensure proper functioning. You can test the data using the nslookup utility, detailed later in this chapter. The nslookup utility is supplied with the TCP/IP protocol installation on NT 4.0. An actual application to test your DNS service would be the telnet service to a multiuser host like a UNIX host and or try the ping utility to connect via an FQDN to a registered host.
To allow any DNS client to use a backup or secondary server, you need to add the alternate server IP address or addresses to the DNS setup of TCP/IP.
From the Network Icon in Control Panel, click on the DNS panel.
In the section marked DNS Server Search Order, click the Add button to add each secondary server in the order of precedence. Precedence may be given to the closest server or the one with the most reliable network access path to it.
This does not preclude this machine from being a secondary server to another zone.
The DNS Manager Utility can manage a local or remote server or just remote servers. You do not have to set up a domain locally. You can use DNS Manager to manage other servers on the network.
Note: Although it would be a nice feature to work with all DNS servers, the DNS Manager Utility is capable of managing only another NT 4.0 DNS service. Like many UNIX flavors, their DNS services may be proprietary, as is this NT 4.0 version.
To add management of another server services you must input the IP address of the new server. If your credentials are accepted, you will be able to manage the other server as if it were local from the DNS Manager Utility.
Select New Server from the DNS Menu and enter the IP address of the other machine in the input box (see Figure 10-13). Press OK when done.
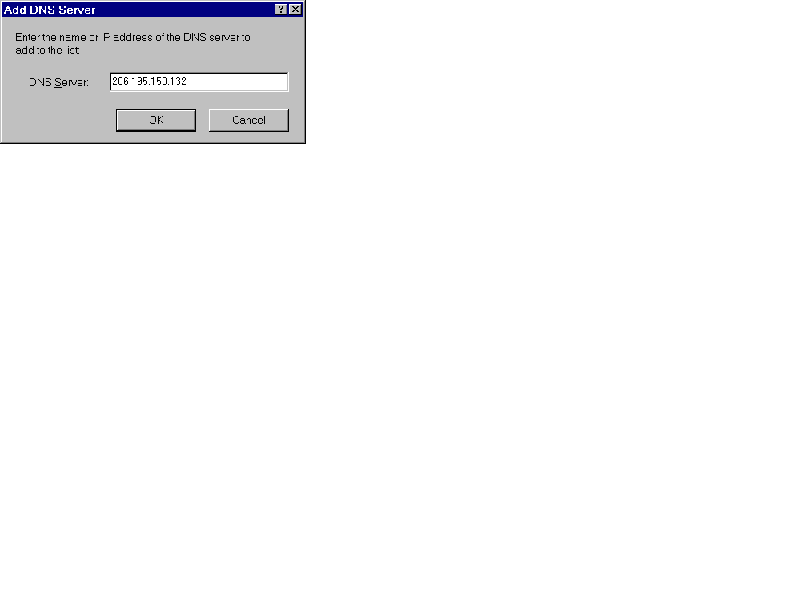
Figure 13 Add DNS Server - Additional Service to Manage
The DNS manager will then try to connect to that service’s IP address. If this is on a remote network, this may take some time. A red question mark will appear during the query. A red X will appear on the server icon if the service is not reachable.
You can use the DNS Manager Utility to add records to either a primary or a secondary zone. The only difference is that the record is stored permanently only in the Primary Zone.
A basic record in a DNS zone file is one host name, one IP address, and a record type. There are many record types for things like mail and other services that are not discussed here. The basic record type used is the address record denoted by an "A" in the data file and a reverse lookup record type denoted by "PTR" in the reverse lookup data file of the zone.
There are many ways to create records depending on the object chosen in the DNS Manager. You must be clicked on a zone (domain name) to add records. You can right-click this object to get a menu specific to the zone or you can select the DNS menu item.
When you create a record, you have the option to create the reverse record at the same time through either of the input screens.
There are two different formats to add records to a zone file. The simple format is called New Host, which allows you to simply enter a host name and the associated IP address. This creates a standard address or A type record. This format also allows for automatic creation of the Associated (Reverse) Pointer Record.
The other format type, New Resource Record, allows for all types of records to be added to the zone file.
The simplest way to add new records to any zone is to click on the zone name in the DNS Manager, then click on the DNS Menu and select the New Host option. Alternatively, you could right-click the zone name in DNS Manager and a menu will pop up with similar options.
The simple format for New Host is displayed in Figure 10-14. This is one way to add a host entry as an A type record. Make sure the Create Associated PTR Record box is selected before clicking the OK button. This will create the reverse lookup record for this file in the in-addr.arpa or z.y.x.in-addr.arpa file, whichever is present. If one of these files is not present or incorrectly named, then an error message will appear indicating this reverse lookup record did not get created. You can create it using the New Resource Record format later if desired.
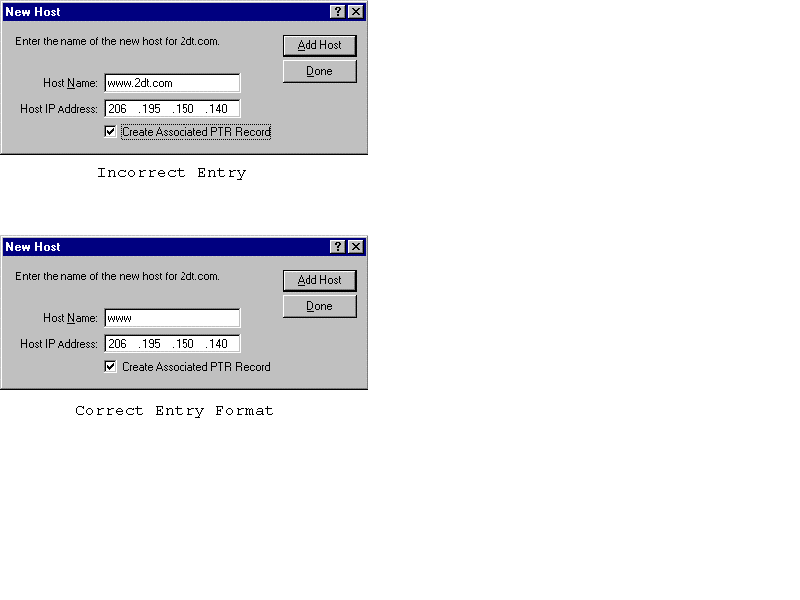
Figure 14 New Host: Correct and Incorrect Entries
Figure 10-14 shows an entry for the www.2dt.com host. This is an incorrect entry. The proper entry would not contain any period characters, which imply some or all of the domain name itself.
The error message would read:
The host name is always relative to the currently selected domain. The host name will be combined with the domain to form the fully qualified domain name for this record.
Click the OK button.
A correct entry would look like the second screenshot in Figure 10-14 and would add the www host to the 2dt.com zone file and create the associated reverse lookup record.
You can continue to add records from this dialog box as it will clear between each record.
Click on the Done button, or press the ESCAPE key, to end input.
To add any type of record, including the default A (Address) record type, you can use the more detailed New Resource Record format. Either right-click on the zone name in DNS Manager, or from the DNS drop-down menu select New Record.
The DNS Manager Utility will display the zone information after you are done adding records. The information is in the registry and you may need to refresh the screen using the F5 key.
If you double-click a record line in the right- side panel, you can get an input screen that allows you to make changes to the record.
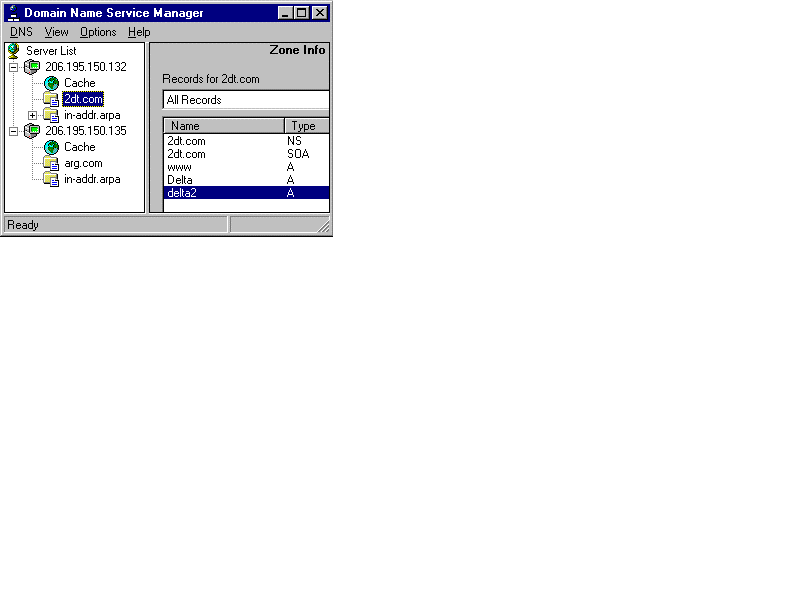
Figure 15 DNS Manager with Two Servers Being Managed
If you double-click the Delta2 entry, you are presented with a screen similar to New Record entry shown in figure 10-16.
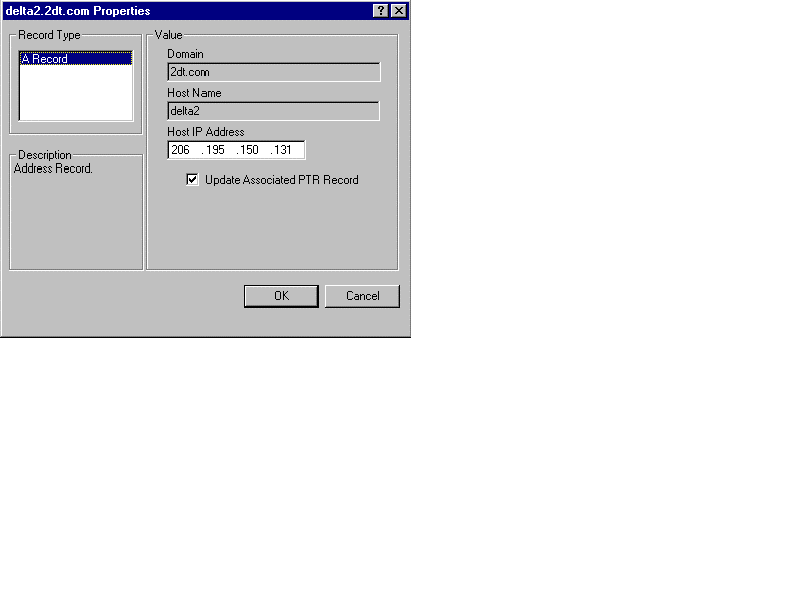
Figure 16 Record Properties Sheet (Can Change Only IP Address and Enable PTR Record)
All records added in the NT version of DNS are stored in the registry and the DNS Manager may not display the record information after an entry is added. You can refresh the screen at any time by pressing the F5 Function Key. You must click on each yellow zone display and press F5 to refresh all displays from all associated registry data.
Double-click the zone to check for the record; both zones should be checked.
The reverse lookup screen will probably need a Refresh from the data so press F5.
Exercise 10-6 Add a Host Record
Add a record for www with the IP address of 213.88.77.17.
If you are managing two different primary zones, you can also make them the backup or secondary service provider for the other. In Figure 10-17, there are two zones being managed. You could create the secondary zone for the 2dt.com zone on the other server and vice versa.
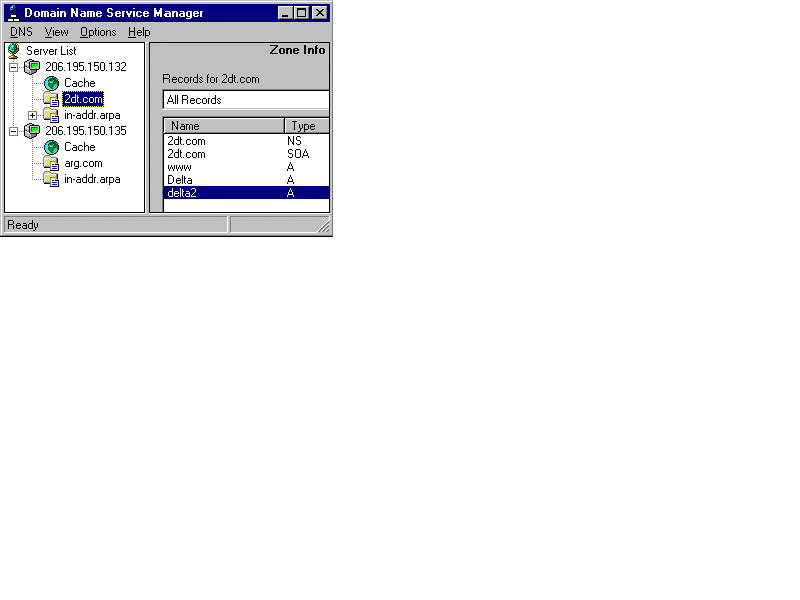
Figure 17 Two Independent Zones Showing Only One Primary Zone Each
The DNS Manager shown in Figure 10-17 has two DNS services. If these servers are within the same company, then they could also act as backup service to the other server by creating a secondary zone to the primary zone on the other server.
In Figure 10-17, 206.195.150.132 manages the 2dt.com zone and could potentially be the secondary server for arg.com on the 206.195.150.135 server. And conversely, the 206.195.150.135 server could have a secondary service for 2dt.com from 206.195.150.132.
Never hit the delete key on a record in a zone, it may delete the reference to the data file in the registry. You lose everything you entered for that zone. The delete action does warn of this impending disaster, but sometimes you may be too quick to hit another OK button, so be careful.
The secondary zone looks the same in the DNS manager except for the caption in the lower right corner, as shown in Figure 10-18. The caption reads Secondary Zone when that zone is highlighted.
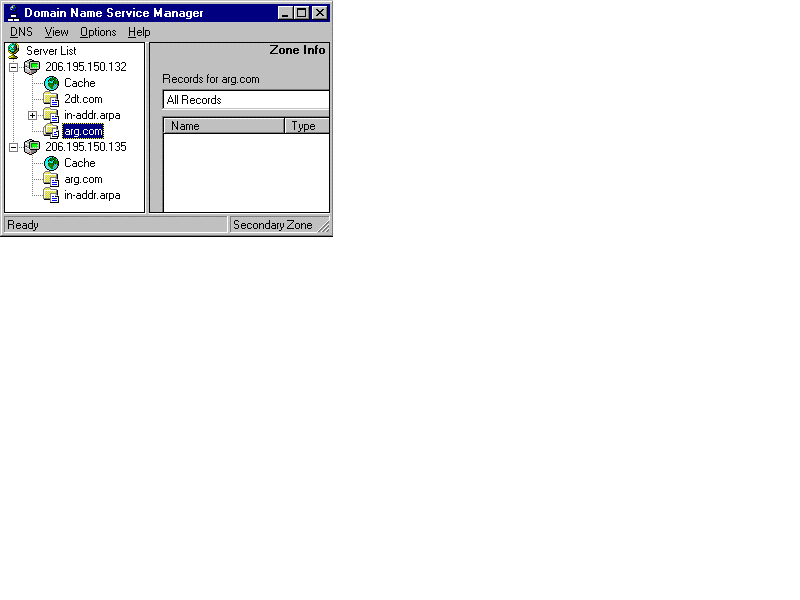
Figure 18 Secondary Zone Indicated in Lower Right Corner
Figure 10-18 shows a secondary zone service for the arg.com zone on the 206.195.150.132 server. For clients to use this feature, their TCP/IP Protocol à DNS setups would require a second IP entry in the DNS server list to reflect this backup service for the same domain, arg.com, as indicated earlier in this chapter.
The DNS manager can connect to other DNS servers and act as a backup server. This is referred to as a secondary zone within DNS. The secondary zone appears the same and is manipulated the same as the primary zone. The only difference is that all changes are made in the primary zone file and then passed along to all secondary zone servers as read-only copies of the data.
To create a secondary zone, the same Creating New Zone Wizard is used from the DNS Menu of the DNS Manager Utility as shown in Figure 10-19.
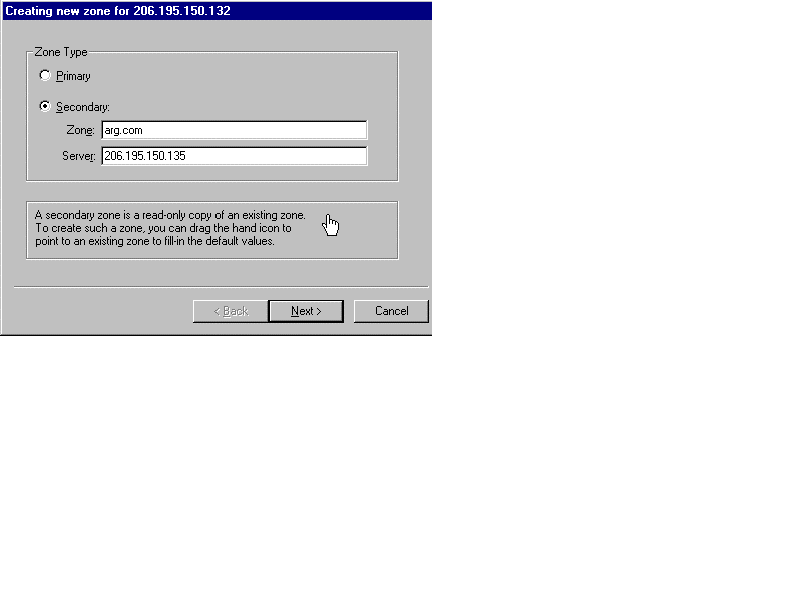
Figure 19 Creating a Secondary Zone
To create a secondary zone to the other machine, you need to know the name of the zone and the IP address of the host server.
In Figure 10-19, the zone on the other host is called arg.com and the host has an IP address of 206.195.150.135.
Click the Next button when the information is correct.
The secondary zone has a specific file that represents the database of records. You enter the name of the zone and then TAB to the next field. The wizard will enter a default name based on the zone name. If this is incorrect, change the zone filename to the correct one.
In our example, the zone is called arg.com and the associated data file would be arg.com.dns by default.
Click Next to continue with the setup.
The secondary zone needs an IP master; use the address of the DNS service.
In this case, the IP master is the same IP as the other DNS service, 206.195.150.135.
Click Finish to update the local zone file with the information. This is actually just a record in the zone file that points to the other service.
Exercise 10-7 Creating Secondary Zone File
Attach to the secondary zone file yourcomp.com on the host with IP 213.56.79.23.
There is a supplied sample boot file that shows the record for a secondary service. This example has been updated with the local information for the sample DNS network used in this chapter.
The DNS manager can manage any number of DNS services (assuming you are authorized). You can add more DNS servers by clicking on the DNS Menu in the DNS Manager and selecting the first option, New Server. You will have to supply a valid username and password for the remote server to get access.
: You can add records to the other DNS servers only as the master control, not through the secondary control. The display will show only ghost connections to the secondary service. The zone properties from the secondary server are greyed out as shown in Figure 10-20; you cannot make changes.
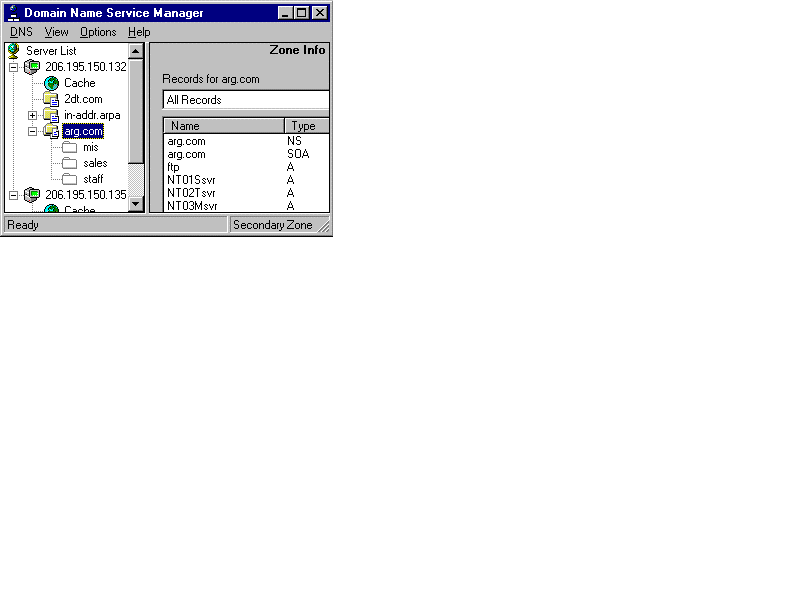
Figure 20 Cannot Update Secondary Zone
To display information about the secondary zone, right-click on Secondary Zone and select Properties, as shown in Figure 10-21.
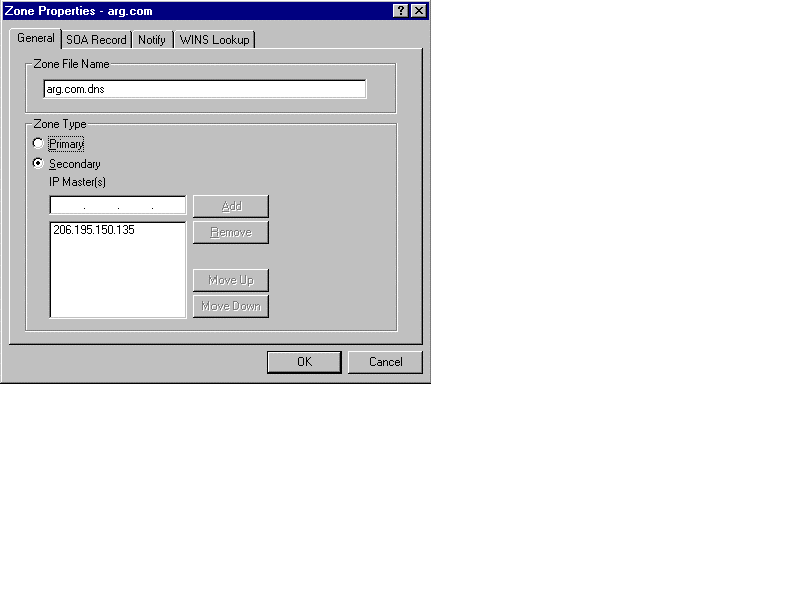
Figure 21 Zone Properties Input Sheet
You can viewthe properties of a managed service either from the DNS Menu or right-click the service and select the Properties option. First select the service to be viewed.
The Properties display has four panels: General, SOA (Start Of Authority), Notify, and WINS Lookup.
If you select the Notify panel, you can add additional servers by their IP addresses to be notified in an emergency.
Every DNS zone file contains a first SOA, Start Of Authority, record which includes the name of the keeper of the DNS service. For NT DNS, this is usually the administrator account. Additional information may include a contact phone number.
The last option of the Zone Properties for a given domain allows a last resort search through any configured WINS servers if the DNS searches all fail. Add at least the IP address of the primary WINS server and optionally add any secondary server IP addresses as well.
If the DNS search fails, and WINS Lookup is enabled and a primary WINS server IP is configured properly, then the DNS service will pass the host name only, no domain name suffix, to WINS. If WINS can resolve the name to an IP address, this is passed back to the requesting host.
At a command prompt, we can test our service using the Name Server Lookup Utility, nslookup.
The nslookup utility has two operation modes, interactive and single query at the command line. The following example shows a single query for the www host record using nslookup.
c:\ > nslookup www
Server: Delta.2dt.com
Address: 206.195.150.132
Name: www.2dt.com
Address: 206.195.150.140
Similarly, you can test the reverse lookup of an IP address to a host name with nslookup as follows:
c:\ > nslookup 206.195.150.140
Server: Delta.2dt.com
Address: 206.195.150.132
Name: www.2dt.com
Address: 206.195.150.140
c:\ >
If any errors occur, then the service is not correctly configured. If you get a response that the server itself is unknown, then you probably do not have a record for the DNS server itself in either the domain zone data or the reverse zone data. You can add these records via the DNS Manager and try your query again.
Exercise 10-8 Using nslookup to Test DNS
Test for the www record entered in the domain for forward and reverse name resolution.
START à Programs à Command Prompt
> nslookup www
(This should provide the server name, server IP address, then the fully qualified host name and host IP address.)
> nslookup 213.88.77.17
(This should provide the server name, server IP address, then the fully qualified host name and host IP address.)
If you are using the Dynamic Host Configuration Protocol (DHCP) service, you can add the option 006 name server with the value of your DNS IP address as a scope or global option. You would need to release and renew all clients for this option to take effect for that scope.
Exercise 10-9 DHCP DNS Options
If the DHCP service is running and you are familiar with DHCP options, you can specify the DNS server IP address for the clients of DHCP.
At a command prompt type:
> IPCONFIG /RELEASE
> IPCONFIG /RENEW
DNS is one of the new services added since NT 3.5x and is now an integral part of the network services. DNS provides an elegant method of decentralizing host name resolution by letting the administration of the host records fall on the system administrator of each attached network rather than on one central authority.
In this chapter, you have been introduced to the DNS Service for NT and some of the aspects of managing and maintaining this service. We saw the basic and installation of the DNS service. We discussed the concept and creation of both a primary and a secondary zone, as well as sub-zones, which are referred to as a domain by the DNS Manager. We learned how to create a reverse lookup zone, how to add basic and advanced records to any zone or sub-zone, and how to create the text files that represent the zone information created in the DNS Manager. Finally, we discussed how to manage more than one primary domain from the DNS Manager Utility.
| Every network interface card or connection has a unique 48-bit numeric ID called a Media Access Control (MAC) address, commonly displayed as six hexadecimal values. | |
| The function of the resolver is to pass a name request to the name server. | |
| The final requirement of a WAN protocol is to provide full routing capability. | |
| To access another host, you need to know its IP address or host name. | |
| Most workstations have just one network connection and one host name. | |
| Each isolated TCP/IP network has to maintain its own hosts file and make it available, by some copy method, to every other host on the network. | |
| NIS provides a centrally managed file distribution system for mainly UNIX based hosts, although there are versions of NIS for other platforms. | |
| The hosts file remained the only central location for host name resolution until it became apparent that this centralized management was too inefficient and error-prone with such a large community of networks. | |
| DNS distributes the information in a standardized hierarchical structure that provides an indexed search path rather than a sequential search of one large file. | |
| A DNS record consists of a name, record type, and an IP address. | |
| The Fully Qualified Domain Name (FQDN) is the name of the host suffixed by a period, followed by the domain name. | |
| DNS is not a dynamic service like WINS or DHCP. | |
| DNS is a system of interconnected data files representing local host names and their IP addresses. | |
| The root servers provide addresses to the domain servers associated with that root. | |
| A secondary DNS server is a backup server with a copy of the zone information from the master server. | |
| The minimum basic installation for both the client and the server as client to use DNS is: a host name, domain name, and the IP address of the DNS primary server for this domain. Optionally you can add secondary server IP addresses and alternate suffix search orders, additional domains, and subdomains managed at the same server. | |
| The first database needed is the Primary Zone for your domain. | |
| The primary zone also requires a reverse address zone to store reverse order records, called PTR records. | |
| To allow any DNS client to use a backup or secondary server, you need to add the alternate server IP address or addresses to the DNS setup of TCP/IP. | |
| The DNS Manager Utility can manage a local or remote server or just remote servers. | |
| You can use the DNS Manager Utility to add records to either a primary or a secondary zone. | |
| A basic record in a DNS zone file is one host name, one IP address, and a record type. | |
| The DNS manager can connect to other DNS servers and act as a backup server. This is referred to as a secondary zone within DNS. |