| Manual or Automatic Address Assignment | |
| DHCP Server and Client Requirements | |
| Installing a DHCP Server | |
| Creating Scopes | |
| Manipulating Client Leases | |
| Creating a DHCP Relay Agent | |
| Maintaining a DHCP Database |
Configuring IP addressing on a large TCP/IP-based network can be a nightmare, especially if users move machines from one subnet to another without consulting you. The Dynamic Host Configuration Protocol (DHCP) can help with configuration problems in these, as well as other situations.
In the first section of this chapter we examine the differences between manual and automatic address assignment. In the second section we discuss the requirements necessary for servers and clients to use DHCP and in the third section we learn how to install and configure a server for DHCP. In the next two sections we learn how to create scopes and how to use a DHCP Relay Agent. In the final two sections, we discuss the purpose of using IPCONFIG and maintaining the DHCP database.
There are two methods of assigning an IP address to a client computer. It can be configured manually by an individual, or automatically by a server computer.
Suppose your boss tells you that 240 computers on your TCP/IP-based network were recently moved from one building to another and that you must reconfigure them all to work properly on the new subnet. This is a tedious process if you are using manual IP addressing. You will have to go to each machine and enter the correct IP address, subnet mask, and default gateway, along with the WINS and DNS addresses if you are using those services on your network.
Not only is this time consuming, it is also vulnerable to human error. If the same IP address is configured for two or more computer systems, then network problems will occur and they can be difficult to trace. Also, an error in entering any of the numbers for the IP address, subnet mask, or default gateway can lead to problems communicating through TCP/IP.
Looking back at the situation with the 240 computers, I imagine that you are groaning, thinking of how long it will take you to accomplish this task manually. Fortunately, there is a better way to handle this situation, by using DHCP. DHCP, as described in RFC 1541, provides a dependable, flexible option to manual TCP/IP configuration.
All items normally configured manually can be assigned to the client system by the DHCP server. At a minimum, a DHCP server provides the DHCP client with the IP address, subnet mask, and usually a default gateway.
The DHCP server issues an IP address to each DHCP client system on the network. Each system connected to a TCP/IP-based network is identified by a unique IP address. As we learned in Chapter 3, the IP address consists of four 8-bit octets separated by periods. The IP address is normally shown in dotted-decimal notation; for example, 127.10.24.62.
The IP address actually consists of two parts, the network ID and the host ID. The subnet mask is used to identify the part of the IP address that is the network ID and the part that is the host ID. Subnet masks assign 1s to the network ID bits and 0s to the host ID bits of the IP address.
A default gateway is required when the client system needs to communicate outside its own subnet. Normally, the default gateway is a router connected to the local subnet, which allows IP packets to be passed to other network segments. If the default gateway is not configured in the DHCP server, then it defaults to 0.0.0.0.
A DHCP scope is a managerial arrangement that identifies the configuration parameters for all of the DHCP clients on a physical subnet. As previously mentioned, the IP address and subnet mask are required items that the DHCP scope must include. Another requirement in the scope is the lease duration. It specifies how long a DHCP client can use an IP address before it must renew it with the DHCP server. It can be set for an unlimited time period or for a predetermined time period. An available option that can be configured within a scope is that a specific IP address can be reserved for a DHCP client or even a system on the network that is not DHCP-enabled.
In addition, there are about sixty DHCP options that can be configured by an administrator. We will examine DHCP options in more detail later in this chapter.
A DHCP client goes through a number of different states during the process of receiving an IP address from the DHCP server as shown in Figure 6-1.
The first state is the initializing state. During the initializing state a DHCP client boots with a null IP address since it does not have an assigned IP address. After booting, the DHCP client broadcasts a DHCPDISCOVER message to its local subnet. The DHCP client’s media access control (MAC) address and computer name are contained in the DHCPDISCOVER message. The DHCPDISCOVER message has a source IP address of 0.0.0.0 and the destination is 255.255.255.255.
The second state is the selecting state. During the selecting state any DHCP server that receives the DHCPDISCOVER message and has a valid configuration for the DHCP client will answer with a DHCPOFFER message. The DHCP server sends the DHCPOFFER message through a broadcast since the DHCP client does not have an IP address. The DHCPOFFER message contains the DHCP client’s MAC address, an offered IP address, the correct subnet mask, the IP address of the DHCP server, and the length of the lease. But what happens if the client does not receive an DHCPOFFER from any DHCP server? In that case, it will retry four times every five minutes. If the DHCP client does not receive a DHCPOFFER after its four attempts, it will wait and retry again in another five minutes.
The third state is the requesting state. During the requesting state the DHCP client sends a DHCPREQUEST message to the DHCP server accepting the offered IP address. The DHCPREQUEST message includes the server identifier from the accepted DHCPOFFER and is sent by broadcast so all other DHCP servers can remove their offers.
The fourth state is the bound state. During the bound state the DHCP server responds to the DHCPREQUEST message with a DHCPACK (ack is short for acknowledgment) message that contains a lease for the IP address as well as any necessary configuration parameters. The DHCPACK message is sent by the DHCP server through a broadcast. When the DHCP client receives the DHCPACK message, it completes initialization of TCP/IP and is now considered a bound DHCP client. The clientcan now use TCP/IP and the IP address it was given to communicate on the network.
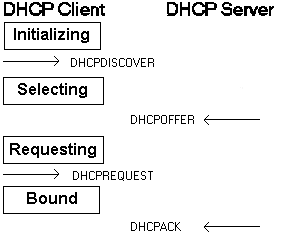
Figure 1: DHCP Client States When Requesting an IP Address from a DHCP Server
DHCP was designed as an extension to the pre-existing bootstrap protocol (BOOTP). BOOTP is used to boot and configure diskless workstations across the network. Originally BOOTP was defined in RFC 951; however, the newest BOOTP RFC, which includes support for DHCP, is RFC 1542. The DHCP message format is almost identical to the BOOTP format. The main difference between the two is that the DHCP message includes new fields not present in the BOOTP message. DHCP also uses some of the existing fields for different purposes. DHCP uses the same User Datagram Protocol (UDP) ports that BOOTP uses, ports 67 and 68.
Since DHCP uses broadcasts to send the DHCP messages it is logical to conclude that each subnet must have its own DHCP server. While this is feasible, it is not necessary. Since the DHCP message is an extension of the BOOTP message then routers that can act as an RFC 1542 (BOOTP) relay agent can be used to relay DHCP messages between multiple subnets. So it is possible to have a single DHCP server providing IP addresses and configuration information for systems on multiple subnets.
It is also possible to turn a Windows NT workstation or server into a DHCP relay agent. The DHCP client sends the request for an IP address and the Windows NT workstation (or server that is acting as a DHCP relay agent) receives the request and forwards the request directly to the correct DHCP server. The DHCP server returns an IP address directly to the requesting client. Later in this chapter you will have the opportunity to configure a DHCP relay agent.
If your network is designed to use only one or two DHCP servers, then you can use a relay agent. It can be a Windows NT system or a router that complies with RFC 1542. The relay agent on the router forwards requests from local DHCP clients to the remote DHCP server and also relays the DHCP server responses back to the DHCP clients.
A DHCP client cannot use an IP address after the lease has expired. This is why a DHCP client mustrenew its lease on the IP address, preferably before the lease has expired or is about to expire. During the process of renewing its lease, a DHCP client goes through a number of different states as shown in Figure 6-2.
The first state encountered while renewing a lease is called the renewing state. During the renewing state a DHCP client, by default, tries to renew their lease when 50% of the lease time has expired. For example, if the lease time is 4 days, then the renewal will first occur on day 2 of the lease. To renew its lease, the DHCP client sends a directed DHCPREQUEST message to the DHCP server from which it obtained the lease. The DHCP server will automatically renew the lease by responding with a DHCPACK message. This DHCPACK message contains the new lease and any configuration parameters so that the DHCP client can update its settings in case any have changed on the scope of the DHCP server. Once the DHCP client has renewed its lease, it returns to the bound state.
It’s possible that the DHCP client will not be able to reach the DHCP server to renew the lease. After 87.5% of the lease time has expired, the DHCP client will attempt to contact any available DHCP server by broadcasting DHCPREQUEST messages so that any DHCP server can renew its lease. Any DHCP server can respond with a DHCPACK message, thereby renewing the lease.
The DHCP client immediately ceases using an IP address if the lease expires or a DHCPNACK (nack is short for no acknowledgement) message is received from any DHCP server. If the lease expires or a DHCPNACK is received, then the DHCP client can return to the initializing state and attempt to obtain another IP address lease.
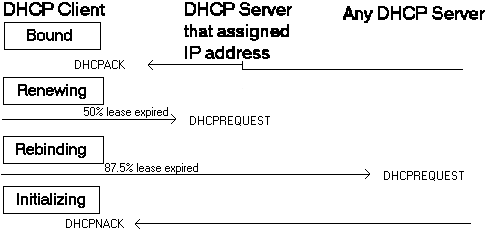
Figure 2: DHCP Client States When Renewing a Lease from a DHCP Server
To successfully use DHCP on your network, your servers and clients must be able to support the protocol. In this section, our discussion centers on Microsoft products. To see if another product supports DHCP, refer to the documentation that comes with the product.
Several versions of Windows NT Server can act as a DHCP server on your network, including versions 3.5, 3.51, and 4.0. But is it necessary to set up each of the servers on your network to support DHCP? Actually, the answer depends on the layout and the needs of your network.
If your network is small, then a single DHCP server may be adequate. The main item to consider if you have multiple subnets is that your routers must comply with RFC 1542 so that the broadcast for an IP address from the DHCP client can be received by the single DHCP server. It is wise to keep in mind that if your single DHCP server goes down and your DHCP clients cannot renew their lease, then your network will cease to function! Of course, this is assuming that TCP/IP is the only protocol used on your network.
One of the benefits from using multiple DHCP servers is redundancy. Redundancy can prevent your network from going down. If you decide to use multiple DHCP servers, you should place them on different subnets to achieve a higher degree of fault tolerance in case one of the subnets becomes unavailable. You can manage multiple servers on different subnets with the DHCP Manager, which we will discuss in more detail in the section on installing the DHCP service.
When using multiple DHCP servers, make sure that address pools do not overlap. If the address pools of the DHCP servers overlap, then it is possible that two DHCP clients can be assigned the same IP address.
The following Microsoft operating systems can perform as DHCP clients on your network:
| Windows NT Server versions 3.5, 3.51, and 4.0 | |
| Windows NT Workstation versions 3.5, 3.51, and 4.0 | |
| Windows 95 | |
| Windows for Workgroups versions 3.11, 3.11a, and 3.11b when using TCP/IP-32 | |
| Microsoft Network Client version 3.0 for MS-DOS | |
| Microsoft LAN Manager Client version 2.2c for MS-DOS |
Of course, DHCP clients are not limited to only Microsoft operating systems. Any system that conforms to RFC 1541 can be a DHCP client.
In order to successfully implement DHCP on your network you have to set up at least one of your servers as a DHCP server. In this section, we cover all the steps necessary to install and configure a DHCP server on your network.
Before a DHCP client can successfully communicate on the network, it has to receive an IP address from a DHCP server, which is a Windows NT server that has the DHCP service installed.
A Windows NT server that is going to be a DHCP server must have a static IP address. A static IP address is one that never changes. If your network does not already use DHCP, then all systems on the network use static IP addresses. DHCP clients depend on being able to locate the DHCP server responsible for leasing it an IP address, so the address for the DHCP server must stay the same.
Installing the DHCP service on your Windows NT server is the same as installing any other service. Figure 6-3 shows the Network Service window with the Microsoft DHCP Server option highlighted. Exercise 1 gives you the opportunity to install the DHCP service on your system.
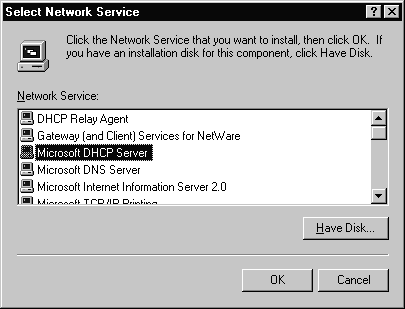
Figure 3: Choosing the Microsoft DHCP Server from the Select Network Service Window
Exercise 6-1 Installing the Microsoft DHCP Server Service
Now that the DHCP service is successfully installed, it is time to create a scope so that it can start being used as a DHCP server on the network. Installing the DHCP service also adds the DHCP Manager to the Administrative Tools menu. The DHCP Manager is used to create scopes and also to manage other DHCP servers on the network. Figure 6-4 shows the DHCP Manager being started for the first time. Local Machine is the DHCP server that the DHCP Manager has been started on. No scopes have been installed on the Local Machine yet.
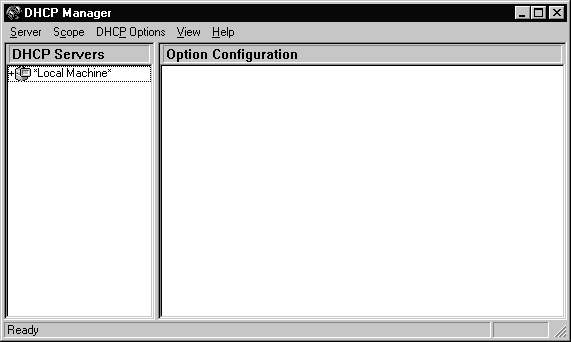
Figure 4: DHCP Manager Started for the First Time
The parameters that are required for you to input into a scope are the starting IP address, the ending IP address, and the subnet mask. Figure 6-5 shows the Create Scope window. Notice that the IP address and subnet mask fall into the IP Address Pool section of the window.
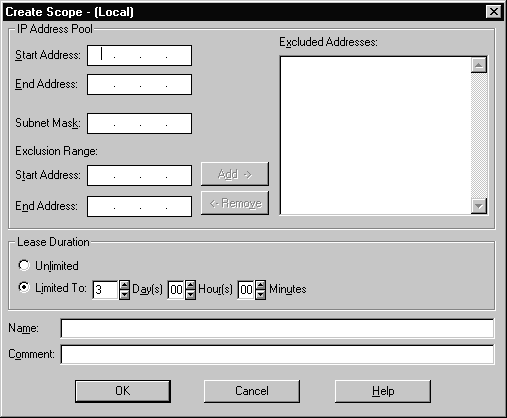
Figure 5: Create Scope Window from the DHCP Manager
Also within the IP Address Pool is the Exclusion Range. The exclusion range should include all IP addresses that are assigned manually to other DHCP servers, diskless workstations, client systems that do not use DHCP, and Remote Access Service (RAS) clients. Once a range of IP addresses have been excluded, they will be displayed in the Excluded Addresses window in the right side of the Create Scope window as shown in Figure 6-6.
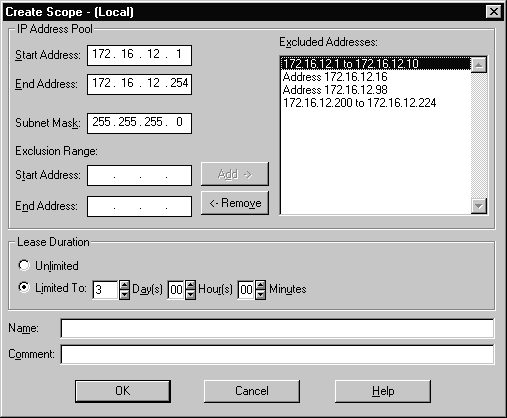
Figure 6: Scope Properties Showing a List of Excluded Addresses
Exercise 6-2 shows you how to create a scope. The scope you create is for educational purposes only and not designed to be used in a production network.
Exercise 6-2 Creating a Scope
After a scope has been successfully created, it is possible to add reservations. A reservation is an IP address that is reserved for a specific DHCP client. The Add Reserved Clients windows has four dialog boxes to input data. The first dialog box is for the IP Address that will be reserved for a client. The second dialog box is used to input a Unique Identifier to identify the correct client that will receive the IP address. The data that goes in the Unique Identifier is the Media Access Control (MAC) address of the client’s network interface card (NIC). The third and fourth dialog boxes are for the Client Name and Client Comment, respectively. The Client Name is used for identification purposes only and does not affect the real computer name of the client. Figure 6-7 shows a reservation for the IP address of 172.16.12.50. Exercise 3 shows you how to add a reservation for an IP address.
Exercise 6-3 Adding a Reservation for an IP Address
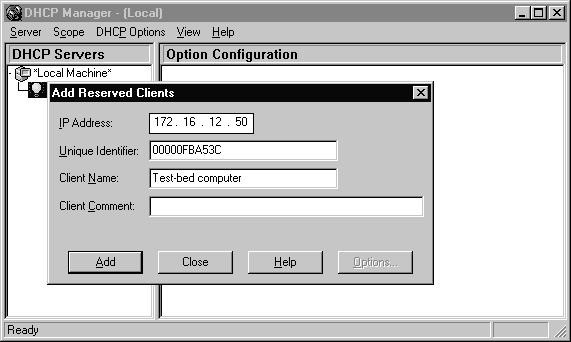
Figure 7: Reserving the IP Address 172.16.12.50 for a Client Computer
As we discussed earlier in the chapter, a DHCP server must provide the DHCP client with a minimum amount of information so the client can successfully use TCP/IP. The minimum requirements are:
| A valid IP address to lease. The address will come from the IP address pool, which is configured when the scope is created. | |
| A valid subnet mask, which is also configured when the scope is created. | |
| A default gateway. If the default gateway is not configured, then it defaults to an IP address of 0.0.0.0. |
The key word is minimum. The three minimum requirements are not the only parameters that can be configured on a DHCP server. There are almost sixty other DHCP options that can be configured using the DHCP Manager. Table 6-1 shows the DHCP options that are available for Windows- and Windows NT-based clients.
Option |
Definition |
003 Router |
Specifies one or more IP addresses for routers on the DHCP client’s subnet. |
006 DNS servers |
Specifies one or more IP addresses for DNS servers available to the client. Multihomed computers have only one set for each computer, not one for each NIC. |
015 Domain name |
Specifies the DNS domain name that the client uses for DNS host name resolution. |
044 WINS/NBNS servers |
Specifies one or more IP addresses for NetBIOS name servers (NBNS). |
046 WINS/NBT node type |
Allows configurable NetBIOS over TCP/IP (NetBT) clients to be configured as described in RFC 1001/1002. A 1 signifies b-node, a 2 signifies p-node, a 4 signifies m-node, and an 8 signifies h-node. On multihomed computers, the node type is assigned to the entire computer, not to each NIC. |
Lease time |
Specifies the time in seconds from address assignment until the client’s lease on the address expires. The Create Scope or Scope Properties dialog box in DHCP Manager is used to specify lease time. It cannot be set directly from the DHCP Options menu. |
Renewal (T1) time value |
Specifies the time in seconds from address assignment until the client enters the renewing state. Renewal time is a function of the lease time option, which is specified in the Create Scope or Scope Properties dialog box of DHCP Manager. It cannot be set directly from the DHCP Options menu. |
Rebinding (T2) time value |
Specifies the time in seconds from address assignment until the client enters the rebinding state. Rebinding time is a function of the lease time option, which is specified in the Create Scope or Scope Properties dialog box of DHCP Manager. It cannot be set directly from the DHCP Options menu. |
Table 1: DHCP Options for Windows- and Windows NT-Based Operating Systems
As you configure the DHCP server, most of the information can be provided by using the DHCP Manager. This information is written to the NT Registry. However, some registry values cannot be configured with the DHCP Manager. You must use the registry editor to modify these configuration values:
| BackupDatabasePath Specifies location of the backup copy of the DHCP database. | |
| DatabaseName Specifies the database filename to be used by the DHCP Server Service |
Default=DHCP.MDB
| DatabasePath Specifies the location of the DHCP database files |
Default = winnt_root\system32\DHCP
| RestoreFlag Specifies whether the DHCP Server should restore from its backup copy |
Default = 0 Set to 1 to force a restore.
| BackupInterval Specifies the default backup interval in minutes |
Default = 60
| DatabaseCleanupInterval Specifies the interval in minutes for the time to remove expired client records from the database |
Default = 864000 (24 hours)
| DatabaseLoggingFlag Specifies whether to record the database changes in the Jet.log file |
Default:= 1 (Logging enabled)
These values are located at:
HKEY_LOCAL_MACHINE\Systems\CurrentControlSet\Services\DHCPServer\Parameters
There are four methods available to set DHCP options:
| Global If you need a DHCP option to affect all the DHCP scopes on the selected DHCP server, then use a global DHCP option. Any option appearing in the DHCP Manager with a globe icon indicates that it is a global DHCP option. | |
| Scope If you need a DHCP option to affect only a specific scope, then use a scope DHCP option. Any option appearing in the DHCP Manager as a series of computer icons indicates that it is a scope DHCP option. | |
| Default You can change the default value for DHCP options. After changing a default value, it will be the one set during administration rather than the DHCP default that was set during installation of DHCP. This probably sounds confusing but will become clear when you change the default for a DHCP option in a later exercise. | |
| Client It is possible to set DHCP options for a specific DHCP client. This works only if the DHCP client has a reserved IP address. |
Exercises 6-4 and 6-5 show you how to add global and scope DHCP options using the DHCP Manager.
Exercise 6-4 Adding a Global Option
Exercise 6-5 Adding a Scope Option
Now that you know how to create scopes in DHCP Manager, here is a quick reference for possible scenario questions, and the appropriate answer:
| "All the DHCP clients on a subnet cannot communicate with anyone outside…" | The gateway is not configured correctly in the scope options. |
| "You have 3 subnets, each with its own scope. None of the DHCP clients can resolve domain names…" | The DNS Server is not correctly configured in the global options. |
| "You try to set a reservation for an IP address and receive the message ‘The specified address is not available’…." | The address is one that was excluded when the scope was created. |
It is not difficult to configure a DHCP server to lease IP addresses to DHCP clients. But a situation may occur in which you need to see what IP addresses are leased, especially if you need to track down a client that has a certain IP address.
You can view the active leases for a scope by choosing Active Leases… from the Scope menu in DHCP Manager. The Active Leases dialog box not only shows you information about active leases for the scope you currently have selected but also several other statistics. The other statistics shown include the total number of addresses in the scope, the number and percentage of addresses that are unavailable because they are active or excluded, and the number and percentage of addresses that are currently available, as shown in Figure 6-8.
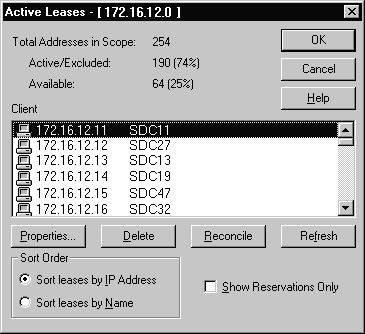
Figure 8: Active Leases for the 172.16.12.0 Subnet
The count of active leases and excluded addresses shown in Active/Excluded is an aggregate so it does not just give you statistics about the active leases. However, when you deactivate a scope, the Active/Excluded count reflects only excluded addresses. If you need to know the number of active leases, then you can compare the Active/Excluded count when the scope is deactivated and activated.
Even though a lease is set for a certain period of time, it does not disappear automatically when the lease expires. The DHCP server database retains the lease for approximately one day after it expires. The expired lease is maintained in the DHCP server database to provide a grace period for the client. Your probably wondering why the client needs a grace period. A few of the reasons are to protect a client’s lease in case the client and server are located in different time zones; it also compensates for a time difference in case the DHCP client’s and DHCP server’s clocks are not synchronized; or in case the client computer was not on the network when the lease expired. Expired leases are identified by a dimmed icon and are included in the list of active clients in the Active Leases dialog box as well as the aggregate Active/Excluded count.
To view when a lease will expire, highlight the client and click the Properties… button. The lease expiration is shown at the bottom of the window as shown in Figure 6-9.
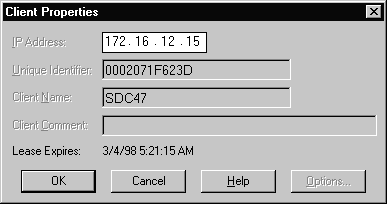
Figure 9: Client Properties Window Showing When the Lease Expires
By highlighting an IP address in the Client window and clicking the Delete button, you can delete the lease for a DHCP client listed in the scope. A lease is normally deleted because it conflicts with an IP address exclusion or a client reservation that you want to add. Deleting a lease causes the same result as if the client’s lease expired. The client has to start the process from the beginning of the initialization state and obtain a new IP address and configuration information from a DHCP server. Be careful when you delete a lease. Make sure that you delete only entries for clients that are no longer using the lease. Deleting a client that is actively using a lease could result in duplicate IP addresses on the network because deleted addresses can be assigned to new clients immediately.
Viewing client reservations is very similar to the method used for viewing active leases. Using DHCP Manager, choose Active Leases… from the Scope menu. Client Reservations are shown in the Client window along with all the active leases for the scope. You can scroll down the list or if you want to isolate only client reservations, you may choose the checkbox located to the left of Show Reservations Only. Figure 6-10 shows the client reservations for the 172.16.12.0 subnet by filtering out the active leases, using Show Reservations Only. The only reservation is the one you created in Exercise 6-3.
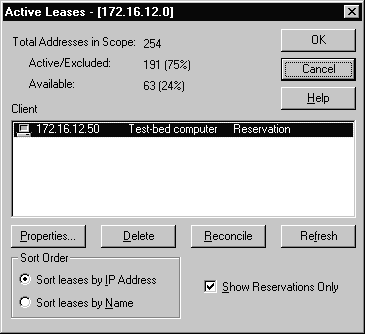
Figure 10: Client Reservations for Only the 172.16.12.0 Subnet
As mentioned earlier, it is possible to set DHCP options for a client that has a reservation. Exercise 6-6 shows you how to add a client option using the DHCP Manager.
Exercise 6-6 Adding a Client Option
The DHCP client that is assigned the IP address of 172.16.12.50 will use exercise6.com as its domain name for client resolutions.
For purposes of the exercise, there was a reserved client already visible when you opened the Active Leases window. On a scope that is used in a production environment you may want to click the check box located to the left of Show Reservations Only so that only the clients with a reservation are displayed.
IPCONFIG is a command-line utility that displays current TCP/IP configuration information for each NIC in a Windows NT system. IPCONFIG is very useful when you need to know the IP address assigned to a Windows NT DHCP client, especially since the client could receive a different IP address every time it boots.
Typing IPCONFIG without any switches will display the IP address, subnet mask, and default gateway for all NICs that are bound to TCP/IP as shown in Figure 6-11.
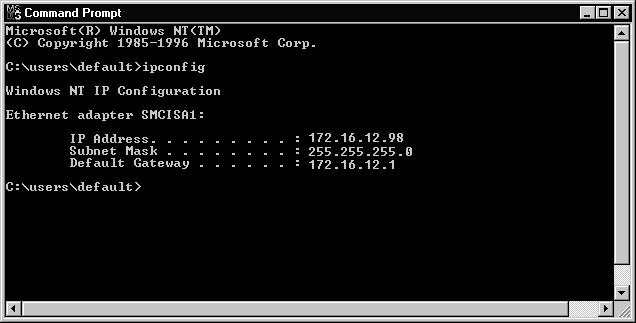
Figure 11: IPCONFIG Showing IP Address Information for a Single NIC System
Using IPCONFIG without any switches may tell you all the information that you want to know. However, there are many other items of information that you can glean from IPCONFIG if you use the /all switch. Using IPCONFIG /all displays all of the TCP/IP configuration information for each NIC, including DHCP information. Figure 6-12 shows the output of using IPCONFIG /all for the same system shown in Figure 6-11.
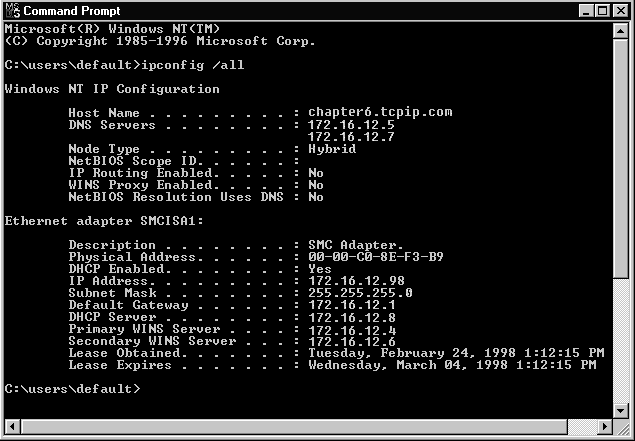
Figure 12: IPCONFIG /all Showing TCP/IP Information for a Single NIC System
There are two other switches that are very useful when using IPCONFIG in a DHCP environment.
The first switch is IPCONFIG /renew. IPCONFIG /renew actually serves two purposes. It can renew an existing lease for an IP address and it can also obtain a new IP address if you have released the address using another switch. If your system has multiple NICs, then you need to specify which NIC to renew the address for by typing IPCONFIG /renew [adapter]. Replace [adapter] with the name of your NIC. Figure 6-13 shows a lease being renewed for a Windows NT DHCP client. Does the output on the screen look familiar? It should, because it is the same as what you see using an IPCONFIG with no switches, however your lease is renewed.
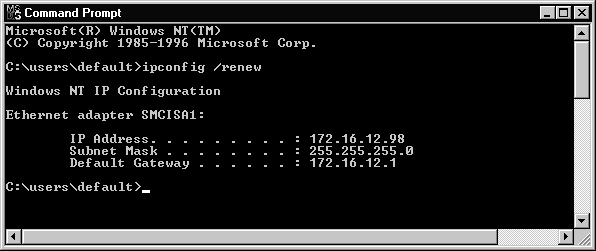
Figure 13: IPCONFIG /renewal for a Windows NT DHCP Client
The second switch is IPCONFIG /release. The /release switch can be used to release the IP address obtained from a DHCP server, so that the NIC no longer has an IP address. If your system has multiple NICs, then you need to specify which NIC to release the address for by typing IPCONFIG /release [adapter]. Replace [adapter] with the name of your NIC. Figure 6-14 shows the IP address being released from a system.
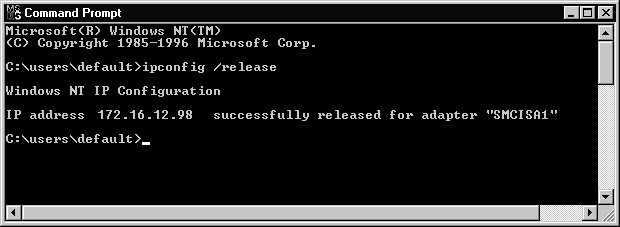
Figure 14: IPCONFIG /renewal for a Windows NT DHCP Client
As discussed earlier in this chapter, any computer running Windows NT workstation or server can be a DHCP Relay Agent. Successful configuration of a DHCP Relay Agent is a two-step process. The first step is the installation of the DHCP Relay Agent service. After installation of the DHCP Relay Agent service, you can move to the second step, which is configuring the parameters for the service. Use the Network applet in the Control Panel to install the service and configure the agent.
The procedure for installing the DHCP Relay Agent is the same as for any other service. Figure 6-15 shows the window for installing network services. Exercise 7 shows you how to install the DHCP Relay Agent service for use on your system.
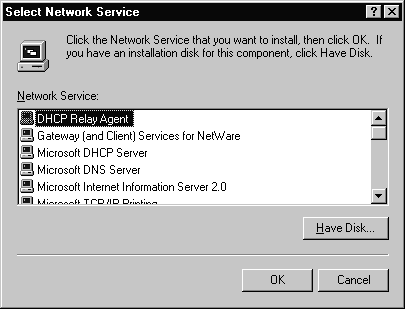
Figure 15: Selecting DHCP Relay Agent Service from the Select Network Service Window
Exercise 6-7 Installing the DHCP Relay Agent Service
Now that the DHCP Relay Agent is installed on your system, it is time to configure it for use on your network. Exercise 6-8 shows you how to configure the DHCP Relay Agent so that it can act as a router for the DHCP broadcast message sent from the clients on the subnet.
Exercise 6-8 Configuring the DHCP Relay Agent
Figure 6-16 shows the DHCP Relay tab with a server identified where all DHCP requests from clients are forwarded.
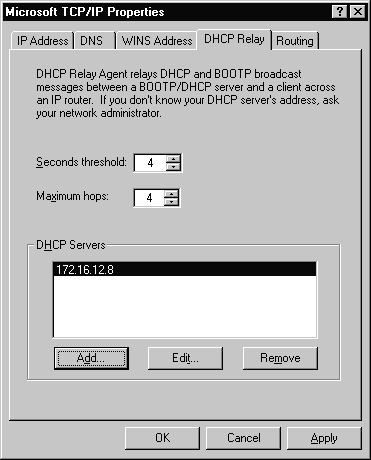
Figure 16: DHCP Relay Tab Showing the IP Address for a DHCP Server
DHCP data, such as active IP address leases and excluded addresses, are stored by the DHCP server service in a database. The following files are located in the %systemroot%\system32\dhcp folder:
| Dhcp.mdb The DHCP database. | |
| J50.log and J50#####.log All log files that track transactions that have occurred in the DHCP database are prefixed with J50. In case of failure, the DHCP server service uses the J50.log and J50#####.log files to recover the dhcp.mdb. The ##### is replaced with numbers; for example, you may have a file named J5000036.log. | |
| J50.chk A checkpoint file. | |
| Dhcp.tmp A temporary file used by the DHCP server service to store database information. | |
| dhcpsrv.log A file showing the event ID, date, time, description, IP address, host name, and MAC address for all DHCP server activity. |
Don’t try to open the DHCP database file using Microsoft Access. Even though the file ends with an .mdb extension, Access does not recognize the format.
The DHCP database is automatically backed up to the %systemroot%\system32\dhcp\backup\jet folder every 60 minutes. The default backup interval can be changed by modifying the following registry key:
\HKEY_LOCAL_MACHINE\SYSTEM\CurrentControlSet\Services\DHCPServer\Parameters\BackupInterval
Microsoft recommends that you compact the DHCP database when it reaches 30Mb. The DHCP database is automatically compacted by Windows NT Server 4.0 so you should not have to run the following procedure very often.
JETPACK is the command-line utility that compacts the DHCP database. The syntax for JETPACK is: JETPACK <DHCP database name> <temp database name>. For example:
c:\>cd %systemroot%\system32\dhcp
c:\>JETPACK dhcp.mdb tmp.mdb
Before you can use JETPACK, the DHCP server service must be stopped.
There are two methods to assign an IP address to a system on your network. The first method is to assign the address by manually entering the correct information for each machine. The second method is to configure a DHCP server and let it automatically issue the IP address to each client connected to the network. Allowing the DHCP server to issue the IP addresses eliminates the possibility of errors that could occurs from manual entry.
A DHCP client goes through a number of different states during the process of receiving an IP address from the DHCP server. During each state, messages are exchanged between the DHCP client and the DHCP server until the DHCP client is fully bound with an IP address.
If you decide to use a single DHCP server across subnets, then the routers must support RFC 1542. This is required so that the broadcasts from the DHCP clients can reach the single DHCP server. Using multiple DHCP servers on different subnets increases redundancy. The multiple DHCP servers can be managed from a central location using the DHCP Manager.
The system that you are using for a DHCP server must have a static IP address. The static IP address is required so that DHCP clients are able to find the DHCP server when renewing their IP address.
A scope is required for each subnet that has DHCP clients. It contains a pool of IP addresses to be issued, as well as other configuration parameters such as a subnet mask and default gateway. Scopes are created using the DHCP Manager and each scope can have different options. Besides scope options, there are also global options, default options, and client options. Client options can be applied only to a DHCP client that has a reserved IP address.
Client leases for a scope can be viewed from the Active Leases window. You can also delete a lease by highlighting the IP address and clicking the delete button while in the Active Leases window.
The IPCONFIG command-line utility can be used to determine the IP address for a DHCP client, as well as other TCP/IP configuration information. You can also renew or release an IP address by using the correct switch with IPCONFIG.
If your routers do not comply with RFC 1542, then it is possible for you to set up a Windows NT workstation or server as a DHCP Relay Agent. Once configured, the DHCP Relay Agent will forward requests for IP addresses from DHCP clients to the correct DHCP server.
The DHCP database is named dhcp.mdb and is located in the %systemroot%\system32\dhcp folder. It is automatically backed up into the %systemroot%\system32\dhcp\backup folder every 15 minutes. If your DHCP database is larger than 30 Mb then you may want to run the JETPACK command-line utility to compact it. Prior to using JETPACK, the DHCP server service must be stopped.
| There are two methods of assigning an IP address to a client computer. | |
| Manual Entry is not only time consuming, it is also vulnerable to human error. | |
| DHCP provides a dependable, flexible option to manual TCP/IP configuration. | |
| DHCP server provides the DHCP client with the IP address, subnet mask, and usually a default gateway. | |
| A DHCP scope is a managerial arrangement that identifies the configuration parameters for all of the DHCP clients on a physical subnet. | |
| During the initializing state a DHCP client boots with a null IP address since it does not have an assigned IP address. | |
| After booting, the DHCP client broadcasts a DHCPDISCOVER message to its local subnet. | |
| During the selecting state any DHCP server that receives the DHCPDISCOVER message and has a valid configuration for the DHCP client will answer with a DHCPOFFER message. | |
| During the requesting state the DHCP client sends a DHCPREQUEST message to the DHCP server accepting the offered IP address. | |
| During the bound state the DHCP server responds to the DHCPREQUEST message with a DHCPACK (ack is short for acknowledgment) message that contains a lease for the IP address as well as any necessary configuration parameters. | |
| BOOTP is used to boot and configure diskless workstations across the network. | |
| Since the DHCP message is an extension of the BOOTP message, the routers that can act as an RFC 1542 (BOOTP) relay agent can be used to relay DHCP messages between multiple subnets. | |
| A DHCP client cannot use an IP address after the lease has expired. | |
| Make sure that you fully understand which message is sent during each of the four states: initializing, selecting, requesting, and bound. | |
| To successfully use DHCP on your network, your servers and clients must be able to support the protocol. | |
| Several versions of Windows NT Server can act as a DHCP server on your network. | |
| Remember that scopes must never overlap when implementing multiple DHCP servers. | |
| In order to successfully implement DHCP on your network you have to set up at least one of your servers as a DHCP server. | |
| The DHCP Manager is used to create scopes and also to manage other DHCP servers on the network. | |
| A reservation is an IP address that is reserved for a specific DHCP client. | |
| There are almost sixty other DHCP options that can be configured using the DHCP Manager. | |
| It is important to remember that client options override scope options, which override global options. | |
| The Active Leases dialog box not only shows you information about active leases for the scope you currently have selected but also several other statistics. | |
| Client Reservations are shown in the Client window along with all the active leases for the scope. | |
| IPCONFIG is a command-line utility that displays current TCP/IP configuration information for each NIC in a Windows NT system. | |
| The procedure for installing the DHCP Relay Agent is the same as for any other service. | |
| DHCP data, such as active IP address leases and excluded addresses, are stored by the DHCP server service in a database. | |
| The DHCP database is automatically backed up to the %systemroot%\system32\dhcp\backup\jet folder every 60 minutes. | |
| JETPACK is the command-line utility that compacts the DHCP database. |