Chapter 6
Understanding Windows NT 4.0 Security
*Windows NT Objects *
Access Control *
Access Tokens and Processes
*File and Directory Security
*Viewing and Changing Permissions *
Exercise 6-1 Changing Access Permissions for a Directory *
Exercise 6-2 Using CACLS to Change Access Permissions *
Transaction Logging *
Ownership *
Exercise 6-3 Taking ownership of a file *
Permissions When Copying and Moving Files *
Share-Level Security
*Exercise 6-4 Sharing a Directory for the First Time from the Desktop *
Assigning Permissions to Shared Directories *
Exercise 6-5 Assigning Directory Permissions *
Exercise 6-6 Connecting to a Shared Resource *
Exercise 6-7 Using Uniform Naming Conventions *
From the Classroom *
Auditing Policy, Account Lock Out, and Registry Keys
*Certification Summary
*Two-Minute Drill
*Self Test
*
Chapter 6
Understanding Windows NT 4.0 Security
![]()
| Windows NT 4.0 Security Model | |
| Access Tokens and Processes | |
| File and Directory Security | |
| Share-level Security | |
| Auditing Policy, Account Lock Out, and Registry Keys |
Security is a key element of a networked operating system, especially one that is put onto the Internet. If a business relies on a networked computer, maintaining the right level of security for that network is vital. Unfortunately, many supervisors consider security to mean that anyone who breaks into their company’s system will be caught. That isn’t good enough. Once a break-in happens, the damage is done. In this chapter, I give you the information you need to take a proactive, not reactive, approach to network security. I know it’s always possible to break into a networked system, but if you take reasonable steps to stop intruders, you increase your safety margin.
Security is a balancing act. There are drawbacks to implementing too much security as well as too little. A company’s need for a secure system must be weighed against its goal of meeting a mission. If you apply so much security that the client company can’t do its job, you’ve failed at applying the proper security. You need to know what level of security is required to safeguard the system, and at what level the mission suffers. This chapter explains NT security and how to implement it. How much security you implement depends on your company’s policies and your ability to sell the need for security.
The NT security model is made up of four main components: logon processes, Local Security Authority (LSA), Security Account Manager (SAM), and the Security Reference Monitor. Figure 6-1 is a graphical representation of the security model. I’ll give a brief explanation of each component. Later we’ll examine their functions in more depth.
| The logon process is the method by which the user gets initial access to the system. There are two kinds of logon processes: interactive logons at the computer console, and remote network logons. | |
| The Local Security Authority is the heart of the security subsystem. It creates security access tokens, authenticates users, and manages the local security policy. | |
| The SAM database maintains all user, group, and workstation accounts in a secure database. The Local Security Authority validates user logons against the SAM database. | |
| The Security Reference Monitor verifies that the user has permissions to access the requested object, then performs that action. It also provides audit messages when needed. |
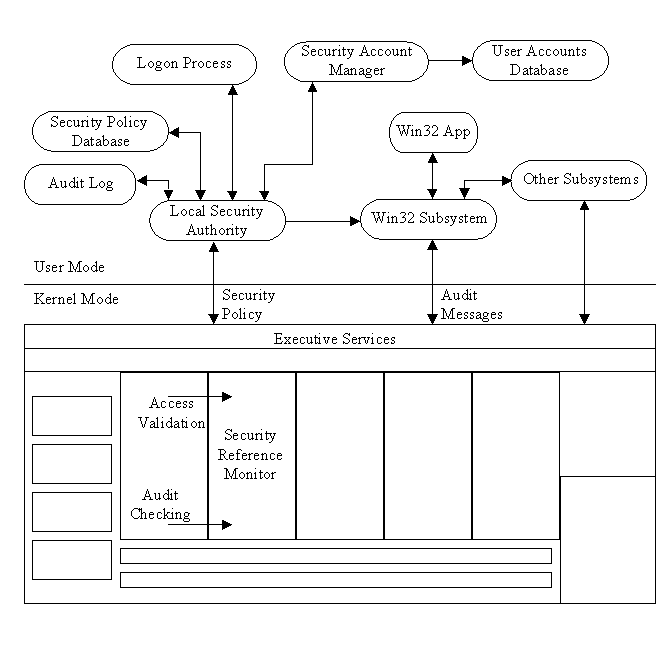
Figure 1: The NT Security model, showing the main components.
Security for NT Workstation starts at logon. The user presses Ctrl-Alt-Del to activate the WINLOGON process. See Figure 6-2 for an illustration WINLOGON’s function. The user is prompted for a username and password. WINLOGON passes this information to the security subsystem. At the heart of the security subsystem is the Local Security Authority. The LSA generates access tokens, manages the local security policy, and provides interactive user authentication services. The LSA also controls audit policy, and logs the audit messages generated by the Security Reference Monitor. The security subsystem verifies usernames and passwords against the Security Access Manager database. SAM is like a hive in the Registry, where all user account information is stored. If the information passes verification, the security subsystem creates an access token and passes it back to the WINLOGON process. WINLOGON calls the win32 subsystem to create a new process and provides the access token, which is attached to the newly created process. The access token then functions as the user’s ID card, so the username and password are no longer needed.
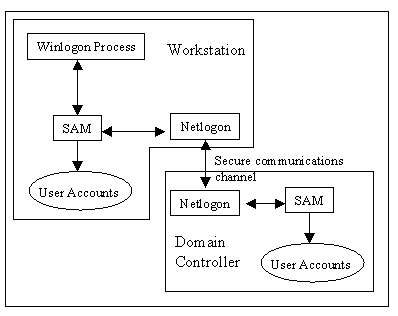
Figure 2: WINLOGON process passes logon information to the security subsystem.
NT supports four logon types: local, remote, domain, and pass-through authentication.
In a local logon, you log onto a computer at that computer’s console by selecting your computer name in the Logon To dialog box.
A remote logon occurs when someone accesses your computer via the network. Your workstation receives an encrypted username and password from the requesting computer via the NETLOGON service. From that point, your workstation’s security subsystem processes the request as if it were a local logon, with the NETLOGON service replacing the WINLOGON process.
To logon to a domain, you must choose which domain you wish to logon to when you enter your username and password. If your workstation is a member of that domain, it logs on using the domain logon method; otherwise, it uses pass-through authentication. Domain logon starts when you submit username, password, and domain name to the WINLOGON process. WINLOGON identifies your request as going to the network, and passes it to the NETLOGON service. The NETLOGON service establishes a secure communications channel with the domain controller. The NETLOGON service on the domain controller then passes the request to the domain controller’s security subsystem, where the username and password are verified against the domain’s SAM database. If the username and password are correct, the domain controller creates an access token and informs your workstation of a successful match.
Pass-through authentication occurs when you logon to a trusted domain—a domain in which your workstation doesn’t have an account. Before the WINLOGON process even begins, NT Workstation creates a secure communications channel with the domain controller of which it is a member. When you logon to a trusted domain, your request is passed to the domain controller where your secure communications channel exists. The domain controller then processes the logon to the trusted domain for you. Your member domain controller notifies your workstation of a successful logon.
Windows NT Logon Security Features
As I’ve stated, NT security starts at logon. NT uses mandatory logon to force everyone to logon before it grants access to the system. It also protects the system by implementing Restricted User Mode, which restricts permissions to the current user.
You need to press Ctrl-Alt-Del to activate the WINLOGON process. This prevents trojan horse viruses from being installed on your system. When you press Ctrl-Alt-Del, NT stops all programs and activates the WINLOGON dialog box. The WINLOGON dialog box then passes your logon information to the security subsystem. Mandatory logon allows NT to perform auditing and setting resource quotas, and allows you to customize your settings and desktop.
NT doesn’t allow users or programs to access the hardware directly. This means that a program must ask the operating system to open the file. The operating system verifies that the program is allowed to read the file. If the program has the proper permissions, NT opens the file for the program. If the program doesn’t have the proper permissions, access is denied to the program and the user.
To really understand NT security, you need to understand the concept of objects. In NT, just about everything is an object. A file is an object and so is a window. NT controls access to objects. A program asks the NT operating system to perform specific tasks to objects. For example, when you open a text file in Notepad called HELP.TXT, Notepad makes a request to NT to open the object HELP.TXT. NT then verifies your access permissions, and if you have the proper permissions it opens HELP.TXT. Programs are not allowed to access the hardware directly. This is why many MS-DOS programs won’t work on NT.
The most common type of object is a file object, but just about everything you can think of is an object; named pipes and processes are also objects. The type of object you are setting permissions for determines the type of permissions that may be set. For example, you can read, write, and delete a file. With a printer, you can manage documents, purge documents, and view the printer queue.
There are two classes of objects: container objects and noncontainer objects. A container object can contain other objects; a noncontainer object doesn’t contain other objects. A container object can inherit permissions from its parent container. I’ll explain this in more detail later in this chapter.
Any object that can be secured has a security descriptor. The security descriptor describes the security attributes for the object. The security descriptor is made up of four parts.
| Owner security ID identifies the owner of the object, which allows that person to change the permissions for the object. | |
| Group security ID is used only by the POSIX subsystem. | |
| Discretionary access control list (ACL) identifies the groups and users who are allowed and denied access. Owners control the discretionary ACL. | |
| System ACL controls the auditing of messages that the system creates. The security administrators set system ACLs. |
Now that you have logged onto the system, how does NT identify you and your permissions level? NT uniquely identifies every user and group on the system. This is necessary for granting permissions to individual users or groups. It also allows you to get very granular with access permissions. To accomplish this, NT uses Security IDs and Group IDs.
A SID is used to uniquely identify each NT Workstation and Server on a network. NT creates a new SID for each user added to the system. The SID is never changed and can never be recreated. Because a SID can never be recreated, you need to be very careful when deleting user accounts. In fact, it is common practice to disable accounts for a period of time before you delete them. This saves you time later if you really didn’t need to delete the account. For example: Betty, a receptionist in marketing, gets mad one day and tells her boss that she quits. Her boss notifies you, the system administrator, that her account must be deleted immediately, since her account has access to sensitive information. You follow your customer’s order and delete her account. The next day, Betty’s replacement, Robert, comes in and needs access to all the same information that Betty had access to. So you create a new account for him, and try to assign him to the same groups and rights that Betty had--this could be a considerable task. What should you have done instead of deleting Betty’s account? You should have disabled the account. This would prevent Betty from logging in and doing unsavory things to her boss’s sensitive files. When her replacement came in, you simply could have renamed the account, changed the password, and then enabled the account. This would give Robert the same access that Betty had, and it would have kept your system secure by preventing Betty from logging on.
NT uses a unique group ID to distinguish each group on your system. The group ID is then placed on the access token created for the user at logon. NT places the ID of each group that the user belongs to on the token. The user keeps that token and its access permissions until he logs off. If the administrator changes the groups the user belongs to while he is still logged on, the changes don’t become effective until he logs off and logs back on. This is very important to remember when you are removing users from a group because they no longer need to have access to that group’s files. Simply removing them from the group doesn’t guarantee that they won’t access the files shared to that group.
NT uses subjects to ensure that a program that a user executes has no more access to objects than the user does. Whatever rights and permissions a user has, so do the programs that the user executes. If a user can delete a file, so can the program. A subject is a combination of the user’s access token and the program that is running on the user’s behalf. Whenever a program is running, it is running in the security context of the user. The security context controls what access the user has to the object. Since NT follows the client/server model, there are two types of subjects:
| Simple subject: A user logs on the process is assigned a security context. | |
| Server subject: A process that runs as a protected server, which has other subjects, called clients. When clients request a process, the server subject takes on the security context of the client. |
In order for a server process to access objects that it doesn’t have permissions to, it uses a technique called impersonation. If the client process has proper access permissions, the server process impersonates the client process in order to access the object.
As I stated earlier in the chapter, ACL stands for Access Control List. An ACL is comprised of Access Control Entries (ACE). The ACE specifies auditing and access permissions for a given object, for a specific user or group of users.
There are three types of ACEs: AccessAllowed, AccessDenied, and SystemAudit. AccessAllowed and AccessDenied are discretionary ACEs, which grant and deny access to a user or group of users. SystemAudit is a system security ACE, which logs security events to the event viewer.
Every ACE must have an access mask. An access mask tells the ACE which attributes are available for a particular object type. The ACE can then grant permissions based on that mask. For example, a file can set Read, Write, Execute, Delete, Take ownership, and Change permissions, because an access mask defines these attributes. See Figure 6-3 for an illustration of the access mask’s role in access validation.
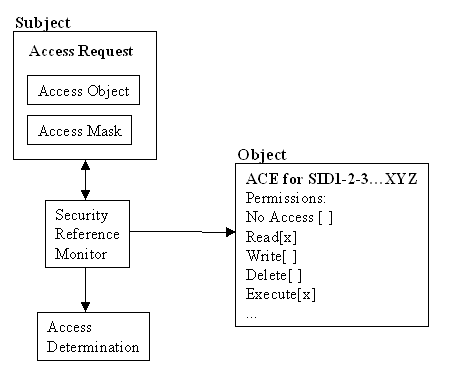
Figure 3: The access validation process. ACEs specify access permissions for an object.
When an ACL is evaluated, every ACE is processed and evaluated in the following order:
- AccessDenied ACEs are processed before AccessAllowed ACEs. The security ID in the user’s security token is evaluated against the security ID in the ACE. If no match occurs, the ACE is not processed.
- If access is denied, the security subsystem checks to see if the original desired access mask contains either a ReadControl or a WRITE_DAC. If it does, the system also checks to see if the user is the owner. If both evaluate to true, access is allowed.
- For an AccessDenied ACE, the ACE access mask and the desired access mask are compared. If there are any accesses in both masks, processing stops, and access is denied. Otherwise, the next ACE is processed.
- For an AccessAllowed ACE, the ACE access mask and the desired access mask are compared. If all accesses in the desired access mask are matched by the ACE, processing stops, and access is granted. Otherwise, the next ACE is processed.
- If the contents of the desired access mask are not completely matched when the end of the ACL is reached, access is denied.
To better explain, here are two examples of the validation process. For the first example, refer to Figure 6-4 as we go through the steps of the process.
Example One: A user, MikeS, wants to delete a file called J:\JESSE\HELP.TXT. Figure 6-4 shows the groups MikeS belongs to, and the discretionary ACL applied to the file.
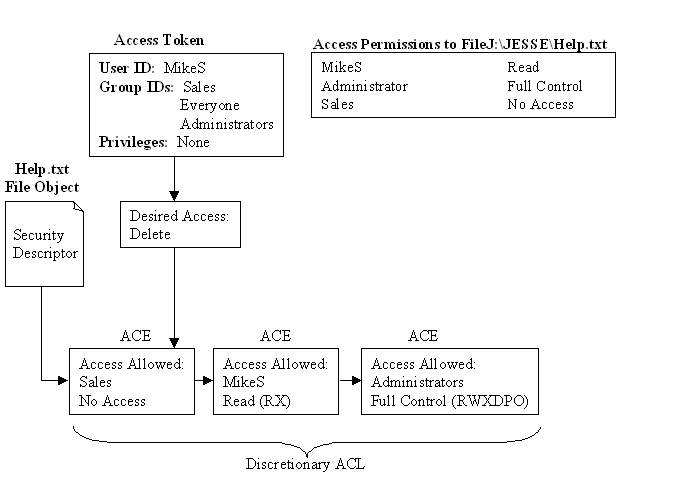
Figure 4: Delete request denied because of the AccessDenied ACE for Sales.
NT reads the discretionary ACL and evaluates it in the following way:
- NT reads MikeS’s desired access mask of Delete for the file HELP.TXT.
- NT reads the AccessDenied ACE to Sales. AccessDenied, by default, is placed at the front of the discretionary ACL. Once an AccessDenied is processed, further processing of the ACL halts.
In Figure 6-5 user MikeS is granted access to delete the file HELP.TXT.
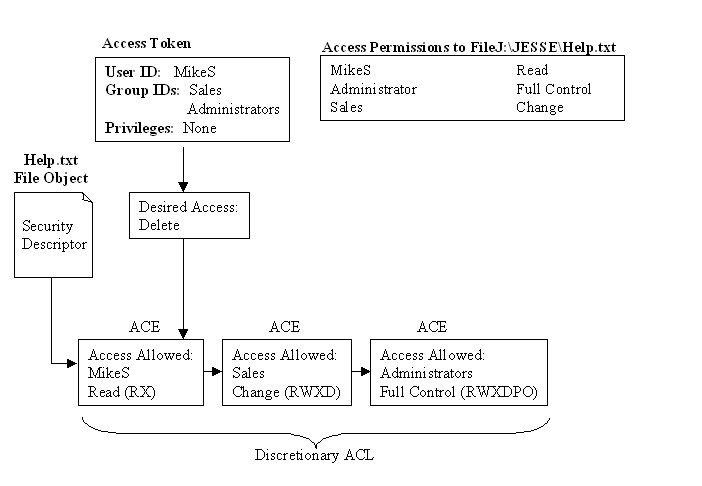
Figure 5: Delete request allowed because of Delete permission in the Sales ACE.
NT reads the discretionary ACL and evaluates it in the following way:
1. NT reads MikeS’s desired access mask to delete the file HELP.TXT.
2. NT processes the request by first looking at MikeS ACE. No match is found.
3. NT then processes the group Sales and matches the Delete request. Further processing of the ACL halts, since the proper access is matched.
Since NT stops processing the ACL as soon as the desired access mask is matched, it is important that the No Access ACE is always processed first.
The type of file system you choose determines what level of security you can use on NT. FAT doesn’t allow folder or file permissions, but NTFS does. Don’t get file and directory security confused with share-level security. Share-level security can be applied to any file system, because it is secured via the network. File and directory security via NTFS secures the files from the actual user, whether it is from the network or from the console. This will be explained in further detail when I discuss share-level security. If you’re concerned about security, NTFS is the file system to use. (Except if you have a RISC processor. RISC systems require the system partition be formatted with FAT. However, other partitions may be formatted with NTFS. For RISC systems you can secure the system partition with Disk Administrator to allow only administrators access to the system partition.)
With NTFS, the owner can set the following permissions for file level permissions.
| No Access. The user cannot access the file at all. This takes precedence over all other permissions. If a user is assigned to a group with Read Access, and a group with No Access, the user will not be able to read the file because No Access always takes precedence. | |
| Read. Allows the user to read or execute the file. No modifications may be made to the file. | |
| Change. Allows the user to read, write, execute, or delete the file. | |
| Full control. Allows the user to read, write, execute, delete, change permissions, and take ownership of the file. |
| Access Level | Permissions |
| No Access Read Change Full Control Special Access… |
None RX RXWD RWXDPO Custom |
Table 1: File Level Permissions
Permissions Key: (R)ead, (W)rite, e(X)ecute, (D)elete, change (P)ermissions, take (O)wnership
The owner can also set folder level permissions. The following permissions are available:
| No Access. Completely restricts the user from accessing the folder and its files. No Access takes precedence over all other permissions set for the user. | |
| List. Allows the user to view the files and folders list within the directory, but the user cannot access the files and folders. | |
| Read. Allows the user to read files within the folder, but doesn’t allow the user to save changes. | |
| Add. The user can’t list or read the files in the folder, but can write new files to that folder. | |
| Add & Read. Allows the user to list, read, and write new files within the folder. The user can read, but not save changes to existing files. | |
| Change. Allows the user to list, read, write new files, modify, and delete existing files within the folder. The user can also change attributes and delete the folder. | |
| Full Control. Allows the user to list, read, change, and delete the folder and the files within the folder. The user also can take ownership and change permissions of the folder and its files. | |
| Special Directory Access. Allows the owner to set custom access to the directory. | |
| Special File Access. Allows the owner to set custom access on the files within the folder. |
| Access Level | Folder Access Permissions | File Access Permissions |
| No Access List Read Add Add & Read Change Full Control Special Directory Access… Special File Access… |
None RX RX WX RXW RWXD RWXDPO Custom Custom |
None N/A RX N/A RX RWXD RXWDPO Custom |
Table 2: Folder Level Permissions
Permissions Key: (R)ead, (W)rite, e(X)ecute, (D)elete, change (P)ermissions, take (O)wnership
Viewing and Changing Permissions
You can set permissions using the GUI interface or the command shell. The GUI is generally easier to learn and remember, but the command shell can be quicker when changing permissions on several files and folders at once. With the GUI, you can view and change permissions using Explorer, Desktop, or even the Open/Save dialog box.
Exercise 6-1 Changing Access Permissions for a Directory
In this exercise you learn how to change permissions on a directory. You will remove the Everyone group from the directory and give your user account full control. Before you begin, you must have an NTFS-formatted volume on your system. If you don’t have an NTFS volume you must run the command:
CONVERT drive: /FS:NTFS
Where drive is the letter of the drive you wish to convert to NTFS.
- Once you have an NTFS volume (Figure 6-6), right-click a directory in that volume and choose Properties.
- Next select the Security tab and then click the Permissions button (Figure 6-7).
- Now click the Remove button to remove the group Everyone from having access to this directory. Warning: Make sure the directory isn’t part of the NT system directory. Then click the Add button (see Figure 6-8). If there is more than one group in the list, ensure that the special group Everone is selected, then click the Remove button.
- Next click the Show Users button. Select your username and click the Add button. On the Type of Access drop-down menu, choose Full Control. Finally, click OK. Select your computername from the List Names From drop-down box (see Figure 6-9).
- At the Directory Permissions screen (see Figure 6-10), you have the option to Replace Permissions on Subdirectories and to Replace Permissions on Existing Files. For this exercise, just choose the default.
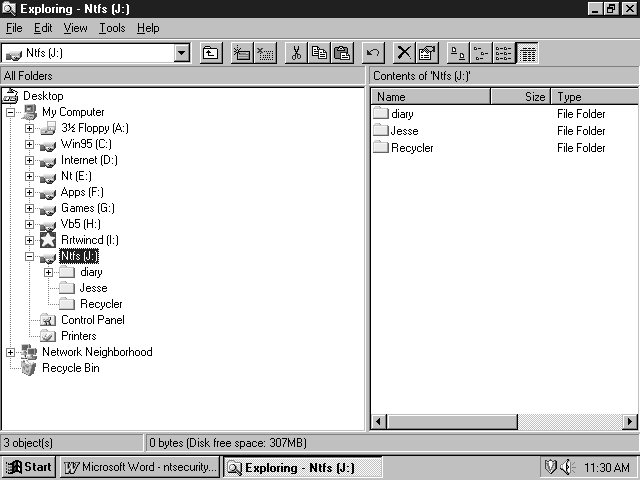
Figure 6: NTFS volume
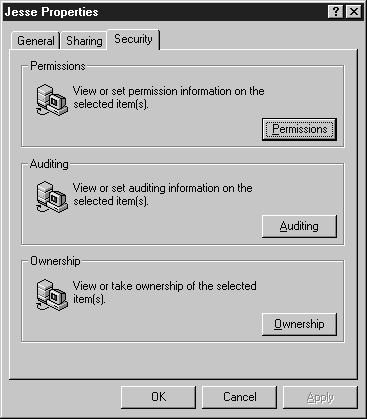
Figure 7: The Security tab in Properties.
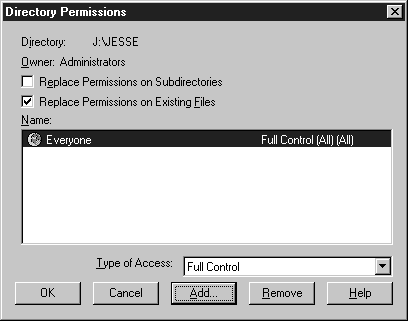
Figure 8: Directory Permissions.
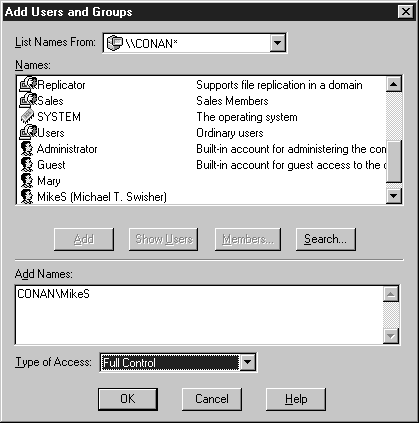
Figure 9: Adding a user.

Figure 10: You have the option to replace permissions.
You also can use the command prompt to change permissions on directories (see Figure 6-11). The NT command shell has a built-in command called CACLS.EXE. The following are the available switches:
CACLS filename [/T] [/E] [/C] [/G user:perm] [/R user [...]] [/P user:perm [...]]
[/D user [...]]
filename Displays ACLs.
/T Changes ACLs of specified files in the current directory and all
subdirectories.
/E Edit ACL instead of replacing it.
/C Continue on access denied errors.
/G user:perm Grant specified user access rights.
Perm can be: R Read
C Change (write)
F Full control
/R user Revoke specified user's access rights (only valid with /E).
/P user:perm Replace specified user's access rights.
Perm can be: N None
R Read
C Change (write)
F Full control
/D user Deny specified user access.
Usage: cacls filename [/t] [/e] [/c] [/g user|group:perm] [/r user|group [...]]
/t Changes ACLs of specified files in the current directory and all
/e Edit ACL instead of replacing it.
You can specify more than one file, user, or group in a command. Wildcard
Group names containing a space need to be contained in double quotes, for
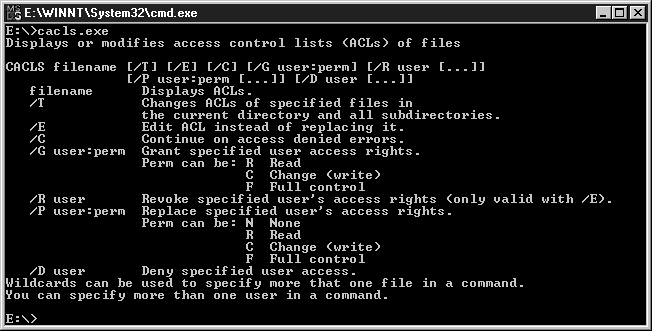
Figure 11: You can change permissions at the command prompt.
Using CACLS to Change Permissions
Now let’s change back the permissions on the folder you changed in Exercise 6-1. You will need to remove your username and put the Everyone group, with full control, on the desired folder.
Exercise 6-2 Using CACLS to Change Access Permissions
This is a two-step process. Step 1 changes the permissions on the folder. In order to change the permissions on every file in that directory, you must use wildcard characters. That is step 2.
- C:\>CACLS J:\JESSE /E /R MikeS /G Everyone:F
- C:\>CACLS J:\JESSE\ *.* /E /R MikeS /G Everyone:F
If you used the /T switch, it would replace the permissions on the files, but it would also replace permissions on all files and subfolders under that directory.
NTFS uses transaction logging for recoverability. NTFS uses a master file table (MFT) to find files on its volume. The first record in the MFT describes the MFT, and the second record is a mirror of the MFT. If the first record is corrupt, the second record is used. The boot sector knows the locations of the MFT and the MFT mirror file. An exact copy of the boot sector is stored at the logical center of the disk. The third record in the MFT is the log file. The log file records all file transaction information. This is the key to recoverability.
When a user changes a file, the log file service records all undo and redo information as a transaction in the log file. Undo information is used to rollback a transaction in case of an error, or if NTFS is unsure a successful transaction occurred, or if a transaction isn’t completed. The redo information is used to repeat a transaction. If your system crashes, NTFS performs three data passes. The first pass is an analysis pass that checks for errors, and determines the cluster number of the error by using the log file. The second pass is a redo pass. NTFS completes transactions from the last checkpoint operation. The final pass is the undo pass. The undo pass rolls back any incomplete transactions.
The log file service maintains two objects, the restart area, and the infinite log file. The restart area is the place where the client’s last checkpoint operation occurred. Two copies of the restart area are maintained for redundancy. The infinite log file is a circular logging file. When new records are added, they are appended to the end of the log file. When the log file is full, the log file service waits for transactions to be completed, so free space will be available for new entries.
Each NTFS file and folder has one user account designated as its owner. The owner of a resource is the only account that has the right to access the resource, modify its properties, and secure it from outside access.
The file’s owner can give an administrator no access to a file, but an administrator can always take ownership of the file. Once the administrator is the owner, he has full control of that file. Normally, a user is the owner of a resource, except when that user is an administrator. When a user with administrator privileges owns a file, the group Administrators is the owner of that resource. Ownership can only be taken; it can never be forced on someone. This helps protect people from malicious administrators.
Who is the owner of a file or folder? The owner is the person who created it, and he is responsible for securing those files and folders. It isn’t only the administrator’s job to ensure security of files and folders. This type of access control is called discretionary access.
Exercise 6-3 Taking ownership of a file
Permissions When Copying and Moving Files
You must be careful when copying and moving files on NTFS partitions. Depending on the type of operation, the permissions change. When you copy a file or folder, the new copy inherits the permissions of its parent folder. As previously mentioned, container objects can inherit permissions from their parent container. These are known as inherited permissions. For example, when you copy a file from a directory with full control to a directory with read permissions, the copied file has read permissions only. This applies to the creation of new files and folders as well. However, when moving files and folders, it isn’t quite that simple. When you move a file or folder on one partition to a different partition, the file or folder inherits the parent folder’s permissions. Here’s the twist: If you move a file or folder within the same partition, it keeps its previous security permissions.
The reason a file moved between partitions doesn’t retain its permissions is that NTFS copies the file to the new partition, then deletes the old file. When NTFS moves a file within the same partition, it simply changes the MFT. Thus, the permissions of the file don’t change.
Share-level security gives other users access to resources on your computer via the network. Any file system that is available on NT can use share-level security. You can share folders many different ways, but using Explorer or My Computer is probably the easiest. In order to share a folder on a Windows NT Workstation computer, you must be a member of the Administrators or Power Users group. This is one right that can’t be modified. You can’t grant any other groups the ability to share folders, nor can you take away the power users’ ability to share folders. Also, you must have permissions to list the directory contents in order to share it. This applies only to NTFS-formatted partitions.
Permissions for Shared Directories
Permissions for shared directories are much like NTFS file permissions, but not as granular. You can’t set special permissions on shares, as you can in NTFS. The four types of share permissions are No Access, Read, Change, and Full Control.
| No Access. The user is allowed to connect to the share, but no files or folders are listed. The user receives the message: You do not have permissions to access this directory. | |
| Read. Allows the user to read or execute files or folders in that shared folder. | |
| Change. Allows the user to read, write, execute, or delete files and folders in that shared directory. | |
| Full control. Allows the user to read, write, execute, delete, change permissions, and take ownership of the files and folders in that share. Change permissions and take ownership of the file only apply to shares on NTFS partitions. |
| Access Level | Permissions |
| No Access Read Change Full Control |
None RX RXWD RWXDPO |
Table 3: Folder Share-Level Permissions
Permissions Key: (R)ead, (W)rite, e(X)ecute, (D)elete, change (P)ermissions, take (O)wnership
Exercise 6-4 Sharing a Directory for the First Time from the Desktop
Let’s share a directory, giving your user account Read access. Use the same directory you used for changing permissions. Assign your user account Read access via a network share.
- Right-click the folder and choose Properties. The window shown in Figure 6-12 appears.
- Choose the Shared As option button. The name of the folder defaults to the share name. Change the User Limit to 1, as in Figure 6-13. (On NT Workstation, the maximum is 10. You should change it to 1, because your account is the only one that will be given access, so there is never any need for more than one connection. This helps improve security by thwarting hackers trying to get into that directory while you are logged on. You will also be alerted of a problem if you try to connect to the share, and you can’t because someone else is connected.) Then Click the Permissions button.
- Remove the Everyone group (see Figure 6-14). Then Press the Add button.
- Click the Show Users button and select your name from the list (see Figure 6-15). Click the Add button. Make sure the Type of Access is set to Read. Then press OK.
- Your screen should look similar to Figure 6-16. Press OK.
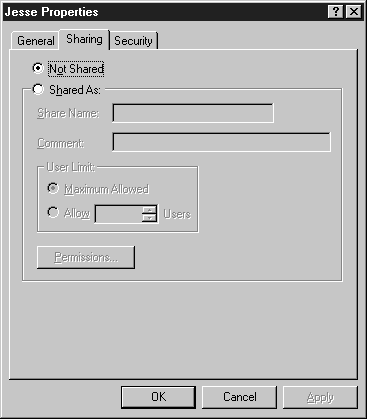
Figure 12: The Sharing tab in Properties.
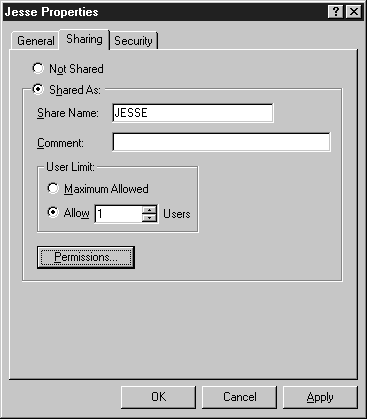
Figure 13: Choosing the Shared As option.
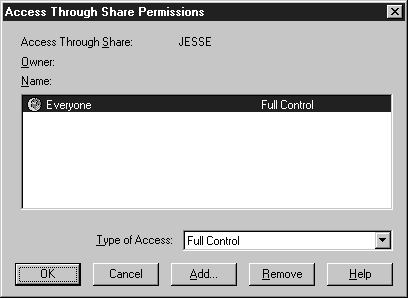
Figure 14: Remove the Everyone group.
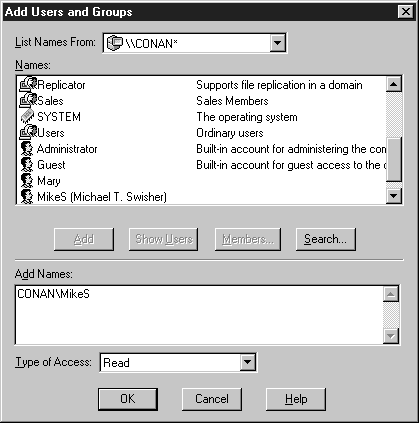
Figure 15: Giving a user account Read access.
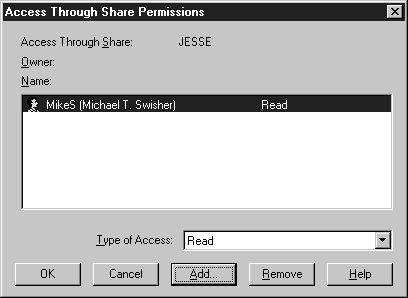
Figure 16: User MikeS now has Read access.
You also can share a directory via the command prompt. To do so, you must use the NET SHARE command.
NET SHARE sharename
sharename=drive:path [/USERS:number | /UNLIMITED]
[/REMARK:"text"]
sharename [/USERS:number | /UNLIMITED]
[/REMARK:"text"]
{sharename | devicename | drive:path} /DELETE
The proper command for sharing the same directory as above is
E:\>net share jesse=J:\jesse /USERS:1
This shares the directory for one user, but it puts it at the default Everyone group with full control.
To delete a share via the command prompt type:
E:\>net share jesse /Delete
Assigning Permissions to Shared Directories
If you share a directory on an NTFS partition you can get more granular with your permissions. You’re still stuck with the four types of share permissions, but you can change permissions on the files and folders for added security.
Exercise 6-5 Assigning Directory Permissions
For this exercise, assume that you need to share a program on your NTFS-formatted hard disk, which surveys your customers. Let’s say that everyone with access to your computer via the network is your customer. In order to conduct your survey, you need to give all the users Read, Write, and Execute permissions. How can you do this without allowing users to delete the files in that directory?
- Create a directory on your NTFS-formatted hard disk. Let’s call it Survey.
- On the folder, set the NTFS security permissions for Add and Read. Be sure that you check the boxes to change the permissions on all subdirectories and files.
- Share that directory, with change permissions, with the Everyone group.
There are several ways to connect to a shared resource. You can map a drive using Explorer or the NET USE command. You also can access shared folders via Network Neighborhood or the Start | Run button.
Exercise 6-6 Connecting to a Shared Resource
For this exercise, we’ll connect to a shared resource by mapping a drive via Explorer. You’ll need two computers networked together, both running NT Workstation.
- Share a folder as described in the preceding exercise, with the share name Survey.
- On the client computer, start Explorer (if the toolbar isn’t showing go to View | Toolbar).
- Click the Map Network Drive icon.
- Choose the drive letter you wish to assign.
- In the path block type \\computername\survey
- Click OK.
If you are wondering what \\computername\sharename is, it’s a universal naming convention (UNC). It has become an accepted standard, since Microsoft created it and they own most of the operating system software. You don’t have to map a network drive to connect to a network share. In step 5 of the previous exercise, you simply typed the name of the computer you want to connect to (computername), and name of the directory share (survey).
Exercise 6-7 Using Uniform Naming Conventions
Instead of mapping a drive, try connecting to a resource using only a UNC. Click your Start button and choose the Run command. Enter \\computername\survey at the command line. A window appears with the directory share at the root level.
Security Insecurities: Understanding how Share security relates to NTFS security
One of the trickiest issues for students and new NT administrators is how share-level permissions relate to the permissions set on an NTFS partition. It’s a common misperception that a user’s effective permission takes precedence over either the share permissions or the NTFS permissions.
We frequently receive calls from clients relating a scenario like this: "One of our users is trying to modify a file and NT won’t let him. I have reset the permissions on the file and folder numerous times, including giving the user Full Control permission. Nothing seems to work. What do I need to do?" We even know of situations where NT administrators have re-installed NT in an attempt to fix the problem!
To help you visualize what is happening, think of a share point on your server as a doorway into the server. (You can set share security permissions in the same manner as setting permissions on other objects.) Now imagine a guard at the doorway, holding a set of keys. When a user accesses a share point, imagine the user standing at the doorway and handing the guard their "invitation," which contains the permissions set for that user. Let’s say the user has Read permission at the share. The guard hands the user a Read key, and the user enters the doorway.
The user then approaches an object (a file) and the NTFS permissions on the file are Read, Write and Delete, Each of these permissions is represented by a "lock." If the user wants to modify the file, the he needs the Write key (Write permission) for the file. But, because the user came to the file through the doorway (the share) with only a Read key, he cannot modify the file. Even if the user himself has Write permission, he didn’t come through the doorway with a Write key. No matter what permissions are set at the file or folder level, this user can’t Write or modify the file.
Another common mistake is setting the share-level permissions to be too restrictive. It’s better to set the broadest permission practical at the share level, and then restrict access at the folder and file level.
The reason that this issue is so confusing is that most of us don’t think of checking the share permissions after the share is created. We tend to concentrate on the NTFS permissions, when the problem is with the share permissions. Remember, this is only an issue when access is remote. If access is local, the user never accesses the share and therefore, share permissions never apply.
Auditing Policy, Account Lock Out, and Registry Keys
There are a few more aspects to security that we should discuss. Viruses are a security risk, so I’ll explain what you can do to help protect against infection. I’ll also talk about auditing, and the effects it has on your system. Then I’ll explain how to lock accounts out if the user fails to enter the correct password. Finally, I’ll show you how to edit the WINLOGON Registry key to make your system more secure. Be very careful when editing the Registry. If you make a mistake your system might become unstable, and you'll need to rebuild your entire computer.
Audit Policy and Virus Protection
After learning about directory and file security, you now have your system file permissions secured as required, but there is one major step missing. You need to audit who is accessing your sensitive files. NTFS allows you to audit your files and directories. Auditing allows you to trace which users accessed files on your system. This is a good way to ensure that your permissions are properly set up on your system. Before you can audit events in NT, you must turn Auditing on. To activate Auditing, you must be a member of the administrators group.
Auditing isn’t a substitution for virus protection, but it can assist you in identifying a virus. If you are auditing write processes to a drive, and you notice an unusual amount of writes to it, you should check to see if it could be a virus. You’ll still need a good virus protection program, but new viruses are being developed every day, and auditing can be a useful tool for identifying them.
You should take care when planning your audit policy. How much you should audit depends on your security requirements. If you have no security requirements at all, you don’t need to audit. But if you have very sensitive files requiring great security, you should audit every applicable event. Be careful when auditing, because it slows your system down and it causes your hard drive to fill up with audit logs.
Figure 6-17 is the screen you’ll see when you enable Auditing. Start User Manager, then on the menu bar choose Policies | Audit. Choose the Audit These Events option button. Then choose what types of functions you wish to audit. See Table 6-4 for audit event details.
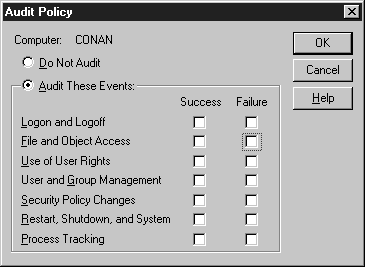
Figure 17: From the Audit Policy window, choose which functions you wish to audit.
| Event | Definition |
| Logon and Logoff | Logs all logons and logoffs, both local and remote |
| File and Object Access |
Logs successful actions to file, folder, and printer objects. Must be on NTFS to audit file and folder objects. |
| Use of User Rights | Use of anything requiring user rights |
| User and Group Management | Any user accounts or groups created, changed, or deleted. Any user accounts that are renamed, disabled, or enabled. Any passwords set or changed. |
| Security Policy Changes | Any changes to user rights or audit policies |
| Restart, Shutdown, and System | Logs all shutdowns and restarts of the local system |
| Process Tracking | Tracks program activation, handle duplication, indirect object access, and process exit |
Table 4: Audit Event Success/Failure
In the next exercise, you’ll see how to turn auditing on and how to check if someone takes ownership of the file.
Exercise 6-8 Auditing Attempts to Take Ownership
In this exercise we are going to audit for anyone taking ownership on J:\JESSE\HELP.TXT file.
- In User Manager turn on auditing for Successful Use of User Rights.
- Access the Security tab of the file J:\JESSE\HELP.TXT (or any file you wish to audit on an NTFS partition) by going to the file’s property sheet.
- Click the Auditing button.
- Set the properties to match the screenshot in Figure 6-18.
- Now logon with a different username (make sure the user has the right to Take Ownership).
- Repeat steps 1 and 2.
- Click the Ownership button.
- Click the Take Ownership button (see Figure 6-19).
- Now run Event View and look at Security Log.
- In Figure 6-20, look at Event ID: 578.
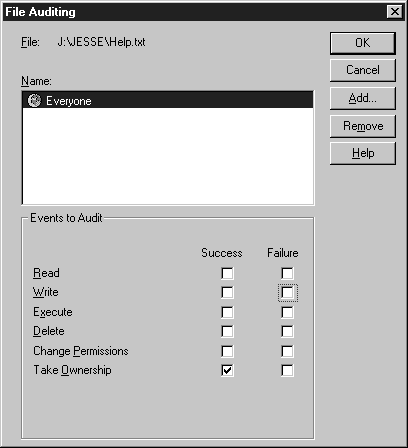
Figure 18: Setting the File Auditing properties.
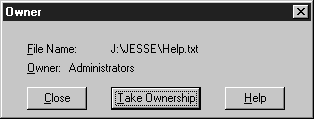
Figure 19: Choosing Take Ownership
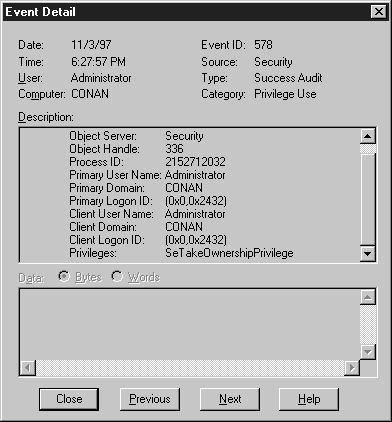
Figure 20: The Event Detail screen shows the Event ID.
You can set NT to lock out an account after a certain number of bad logon attempts. Three bad logon attempts is a good limit to use. This prevents hackers from breaking into your account with a program that uses wordlists and brute-strength password crackers. You can set the account to be locked out forever—an administrator would have to unlock it—or you can have it automatically reset after a certain period of time.
Exercise 6-9 Changing Account Lockout Settings and Viewing Their Effect
To set the account lockout feature start User Manager. On the menu bar choose Policies | Account. You will see the screen in Figure 6-21.
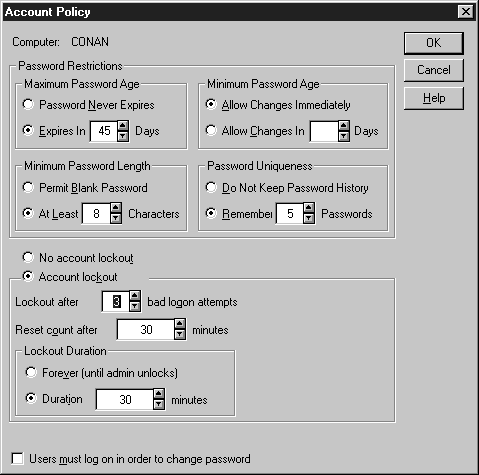
Figure 21: Changing account lockout settings.
Check the Account Lockout option button in the middle of the window. The Lockout After option sets the limit of bad attempts. The Reset Count After option sets the amount of time that must pass before the counter resets to zero. Simply put, if you log on with a bad password, NT remembers for 30 minutes (if that’s the time you set) that you entered a bad password. Lockout Duration can be forever, or for a certain amount of time. Lockout Duration goes into effect after the limit of bad attempts has been reached.
Disabling the Default Username
Another security measure is not to display the username of the last logged-on user. You need two things to break into an account: a username and a password. Security is improved when an intruder has to guess at both. Exercise 6-10 teaches you how to disable the default username. Before editing the Registry, make sure you run RDISK to back up your current system configuration.
Exercise 6-10 Disabling the Default Username
Adding a Security Warning Message
You can have NT give a security notice before logging on to your system. This will be important if you ever want to prosecute a hacker. The government once lost a case against a computer hacker, because the logon screen said Welcome. Exercise 6-11 explains how to enter a security notice.
Exercise 6-11 Changing the WINLOGON Security Notice
By default, NT Workstation allows users to press Ctrl-Alt-Del and shutdown the system. You can disable this by editing a Registry key. You may be thinking, Why would I ever want to disable the shutdown button? Well, what if you had a computer in a public place—say, out on the sales floor? Anyone could just press Ctrl-Alt-Del and click Shutdown. By disabling this feature you can help protect your system against unauthorized shutdowns.
Exercise 6-12 Disabling the WINLOGON Shutdown Button
You can automate logons by editing the Registry. I don’t recommend this, because then anyone could get into your computer. But in case you need to do this, here are the steps required.
Exercise 6-13 Automating logons by editing the Registry
In this chapter we discussed the NT security model and its four components. I explained how logons occur, and the role that the Local Security Authority plays in the logon process. You learned about the four logon types: local, remote, domain, and pass-through. We discussed ACLs and ACEs, and how they interact with access tokens.
File and directory security is an important topic that you will continuously apply as you use NT. This is how you protect shared resources on the network. There are various levels of permissions for files and directories, but you need an NTFS-formatted partition to use them. Another type of security is shared security. Shared security can be applied to any type of file system. Sometimes you need to combine shared security with NTFS file and directory security to get the right level of permissions assigned.
Finally, we discussed auditing, and making your system more secure by editing the WINLOGON Registry key. Take what you’ve learned in this chapter with you after you pass the exam. As the Internet grows and more companies put their networks on the Internet, those systems become more vulnerable to attack. We must apply security to our systems before we are attacked; otherwise it is too late.
| The NT security model is made up of four main components: logon processes, Local Security Authority, Security Account Manager (SAM), and the Security Reference Monitor. | |
| There are four types of logons that NT supports: local, remote, domain, and pass-through authentication. | |
| NT uses mandatory logon to force everyone to logon before they can access the system. It also protects the system by implementing Restricted User mode. | |
| NT uniquely identifies every user and group on the system. To accomplish this, it uses Security IDs and Group IDs. | |
| Whatever rights and permissions a user has, so does the programs that the user executes. | |
| The type of file system you choose determines what level of security you can use on NT. FAT does not allow folder or file permissions. NTFS allows permissions on folders and individual files. | |
| File Delete Child is a POSIX function that allows a user who has full control of a folder to delete a top-level file within that folder, even though the user doesn’t have permissions to delete that file. | |
| A file’s owner can give an administrator no access to a file. However, an administrator can always take ownership of the file. | |
| When you copy a file or folder, the new copy inherits the permissions of its parent folder. | |
| Any file system that is available on NT can use share-level security. | |
| Be sure to understand which permissions are applied when a user connects through a network share. The most restrictive permissions always take precedence. | |
| Auditing allows you to trace which users accessed files on your system. This is a good way to ensure that your permissions are properly set up on your system. | |
| You can set NT to lock out an account after a certain number of bad logon attempts. |
- The _______________ creates security access tokens,
authenticates users, and manages the local security policy.
- What maintains the database of
all user, group, and workstation accounts?
- NT supports which of the following
logons? (Choose all that apply)
B) pass-through authentication
- Why must you press
Ctrl-Alt-Del to logon to NT?
A) reboot the system to refresh the memory
B) reboot the system to clear the security logs
C) prevent trojan horse viruses
D) erase the last username from the logon dialog box
- Which of the following is an
object? (Choose all that apply)
- A __________ is used to uniquely identify
each user account.
- If you delete a user account,
how can you get it back?
A) You can’t undelete an account. You must create a new account.
B) Choose undelete from the file menu.
C) Run the command ACCOUNT /UNDELETE.
- A program always runs in the _______________ of the user.
- User JesseS belongs to the local
group Marketing. The permissions on the file DICTIONARY.DOC are as follows: JesseS has
Change(RWXD) permission and the Marketing group has No Access permissions. When user
JesseS tries to read the file, what access will he be granted?
- Which ACE does NT process first?
- User MaryS is assigned to the local
group Sales. Mary has Read permissions for all files on your system. The group Sales has
special permissions of Write on all the files in the folder called Reports. If Mary
requests Read and Write permissions at the same time, what will happen?
A) Access will be denied, since she doesn’t have enough access in any individual group.
D) Access will be granted, but an administrator must approve it first.
- If you want to limit the
people who can access your system when they log on locally, how must your hard disk
partition be formatted?
- Why is there a special utility to
secure the boot partition of RISC computers?
A) RISC computers can’t be physically secured, so the partition requires extra protection.
C) RISC systems must boot on a FAT partition.
D) Microsoft just hasn’t compiled the utility to other systems yet.
- What command allows the user to
change file permissions from a command shell?
- If you want to audit access
to files stored on your NTFS-formatted hard disk, what must you do first?
A) Turn Auditing on in User Manager.
B) Turn Auditing on for the folder by using Explorer.
C) Do nothing. NT automatically audits all file access once NTFS is installed.
- What does transaction logging
provide for NTFS?
B) Remote access to your system
C) Network connections made to your computer
- Who is the owner of a new
file on a FAT partition?
D) FAT doesn’t support Owners.
- Who is the owner of a new
file on an NTFS partition?
- (True/False) Only administrators can give someone ownership of a file.
- When moving a folder from drive C: to drive D:, what
permissions will the folder have? (Both drives are formatted with NTFS.)
A) The folder will keep its original permissions.
B) The folder will inherit the permissions of drive D:
C) NTFS will reset the folder to Everyone Full Control.
D) NTFS doesn’t support permissions between drives.
- Which file systems support
share-level security?
- Which one is NOT a type of
share permission on an NTFS partition?
- How can you share a folder
on the network to allow everyone to read, write, and execute files, but not delete any
files?
B) Give everyone group Change share permissions.
C) Give everyone group Read, Write, and Execute share permissions.
- Which of the following
are negative results from auditing all file object accesses on your system? (Choose
all that apply)
A) Slows your computer’s processor down
C) Fills your security log up too fast
- What must be turned on to
allow you to audit writes to your NTFS directories?
- User RyanB is given share-level access of Full Control to share SalesRPT. However, the NTFS permissions are set to Read for the group Sales. RyanB is a member of the group Sales. When she connects to the share SalesRPT, what type of access will she have?