![]()
Chapter 12
*Printing
*Print Router *
Print Spooler *
Print Processor *
Exercise 12-1 Change the default data type for a printer *
Print Monitors *
Print Jobs *
Installing and Configuring Printers
*Configuring Printers
*Print Test Page *
Ports Tab *
Scheduling Tab *
Exam Watch *
Sharing Tab *
Security Tab *
Permissions *
Auditing *
Ownership *
Device Setting Tab *
Managing Print Jobs
*Troubleshooting Printers
*Certification Summary
*Two-Minute Drill
*Self Test
*
Chapter 12
![]()
| Overview of Printing | |
| Installing and Configuring Printers | |
| Configuring Printers | |
| Managing Print Jobs | |
| Troubleshooting Printers |
This chapter covers printing using NT Workstation. First, we’ll discuss terminology. NT uses a slightly different definition for printers and print queues than you are probably used to. We'll take a look at the NT print model and how it uses print drivers and print processors. Then we will discuss how to create, share, and connect to printers. After creating a printer, I'll explain in depth the configuration options, including editing the Registry to change some settings. Finally, we'll look into troubleshooting print problems.
Microsoft defines printing terms a little differently than you probably have in the past. To begin a discussion about printing using NT, you must first understand some key definitions.
Printing devices are what we commonly refer to as printers. It's the actual hardware that prints the document. Why did they change printer to printing device? Because they use the term printer to mean the software that manages the printing devices.
Printing software is considered the printer. A printer is software that manages a specific printing device (or devices, in case of printer pooling). The printer determines how the print job gets to the printing device. Does it go directly to parallel port, serial port, or via the network? One printer can manage multiple printing devices or just one. NetWare refers to this as the print queue, but Microsoft considers the print queue to be the actual documents waiting to be sent to the printing device via the printer.
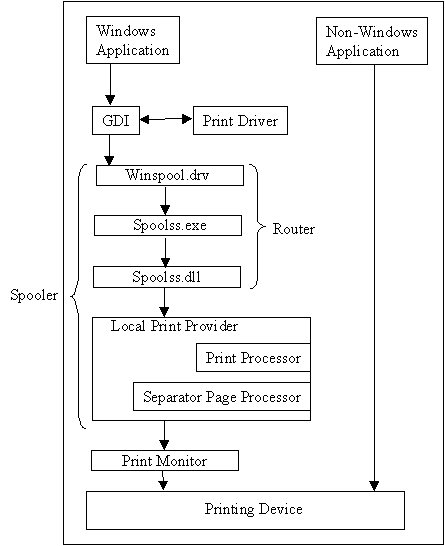
Figure 1: A graph of the printing process in NT.
The GDI controls the display of graphics on the monitor and printers. It provides a set of standard functions that let applications communicate with graphics devices, without knowing anything about the devices. The GDI enables application code to be independent of the hardware devices and their drivers. Hardware vendors only have to write a mini-driver to interact between the GDI and their hardware. The application sends commands to the GDI and the GDI sends commands to the hardware via the mini-driver.
Print drivers are the software that allows an application to communicate with printing devices. Print drivers are composed of three files, which act together as a printing unit.
| Printer Graphics Driver. The printer graphics driver is always called by the GDI and provides the rendering portion of the printer driver. | |
| Printer Interface Driver. The printer interface driver provides the user interface for configuration management of the print driver. | |
| Characterization Data File. The characterization data file contains all the printing device-specific information, such as page protection, graphics resolution, memory, paper size and orientation, and printing on both sides of the paper. The printer interface and the printer graphics driver use this file whenever they need printing device-specific information. |
Print drivers usually are not binary-compatible. This means that each different type of operating system and hardware platform that prints to a printing device has to have a print driver compiled for it. You can't use a Windows 95 print driver on a Windows NT machine, nor can you use a Windows NT 3.51 print driver on a Windows NT 4.0 machine. However, because the core components of NT Workstation and NT Servers are identical, these two operating systems can use the same print drivers, but they have to have the same hardware platform. (In other words, Intel print drivers can't be used for an Alpha.)
Windows NT provides three generic print drivers to support the three basic types of print devices. The three basic types of print devices are raster, PostScript, and plotter. The three generic print drivers are as follows:
| Universal print driver (unidriver) is also known as the raster driver because it provides raster graphics printing. The unidriver carries out requests on most types of printers. Each hardware vendor writes a printing device minidriver that operates with the unidriver to communicate with its print devices. | |
| PostScript print driver uses Adobe version 4.2-compatible PostScript printer description (PPD) files. The PPD files are the only printer driver files that are binary-compatible across operating systems. | |
| HP-GL/2 plotter driver supports several different plotters that use the HP-GL/2 language. It doesn't support the HP-GL language. |
The print router routes the print job from the spooler to the appropriate print processor.
The print spooler is a service that actually manages the print process. It's responsible for the following:
| Tracking what print jobs are going to which printing device | |
| Tracking which ports are connected to which printing device | |
| Routing print jobs to the proper port | |
| Managing pooled printers | |
| Prioritizing print jobs |
The spool file folder is located at %systemroot%\system32\spool\printers folder. To stop and start the spooler service, you can use the Control Panel Service application, or use the NET START SPOOLER or NET STOP SPOOLER command
The print processor completes the rendering process. Rendering is the process of translating print data into a form that a printing device can read. Since each type of client creates print jobs differently, different print server services are required to receive and prepare the jobs. The print processor performs different tasks, depending on the data type. The default data type is Enhanced Metafile for PCL printers and RAW for PostScript printers. Exercise 12-1 explains how to change the default data type.
Exercise 12-1 Change the default data type for a printer
Windows NT provides two print processors: Windows print processor and Macintosh print processor. Printing device vendors can develop a custom print processor, if needed.
WINPRINT.DLL performs the print processor functions. It supports five data types:
- EMF: Print jobs received from NT clients are Enhanced Metafiles (EMF). In contrast to RAW printer data being generated by the printer driver, EMF information is generated by the GDI before spooling. After the EMF is created, control returns to the user. The EMF is interpreted in the background on a 32-bit printing subsystem spooler thread and sent to the print driver. Two advantages of EMF are: It returns control of the application to the user more quickly than printer calls can be directly interpreted by the print driver; and EMF files can be printed on any printing device.
- RAW: Raw files are fully rendered print data, which require no processing from the print processor. Encapsulated PostScript (EPS) is an example of a raw data type, because it doesn't need print processor interpretation. EPS files are sent directly to the spooler for routing to the graphics engine.
- RAW (FF Auto): This type tells the spooler to append a form feed character to the end of each job if it isn't already present. This is used to print the last page on a PCL printing device, if the application doesn't send a form feed.
- RAW (FF Appended): Like RAW (FF Auto) this data type appends a form feed character to the end of the job. The difference is, it always adds a form feed character even if one is already present.
- TEXT: Raw text with minimal formatting. The print job is in ANSI text. It uses the printing device's factory defaults for printing the document. This is used for printing devices that can't accept simple text jobs, like PostScript printers.
This print processor (SFMPSPRT) is installed when Services for Macintosh is installed. It supports the PSCRIPT1 data type. It indicates that the print job is level 1 PostScript code, but the printing device isn't a PostScript printer. The images are converted into monochrome raster graphics for printing to the printing device.
Print monitors control access to the printing device, monitor the status of the device, and communicate with the spooler, which relays this information via the user interface. They controls the data going to a printer port by opening, closing, configuring, writing, reading, and releasing the port.
NT has the following print monitors built in:
| Local Port: LPT1, LPT2, Com1, Com2, and so on. | |
| Digital Network Port: Supports both TCP/IP and DECnet protocols for digital network printing devices. DECnet protocol doesn't ship with NT. | |
| Lexmark DLC Port: Supports Lexmark DLC printing devices | |
| Lexmark TCP/IP Port: Supports Lexmark TCP/IP printing devices | |
| LPR Port: Supports printing to UNIX LPD printing devices | |
| Hewlett-Packard Network Interface: Supports printing to HP Jet Direct enabled printers | |
| Macintosh printer port: Supports printing to AppleTalk printers | |
| PJL Language Monitor |
Print jobs are source code consisting of both data and commands for print processing. All print jobs are classified into data types. The data type tells the spooler what modifications need to be made to the print job so it can print correctly on the printing device.
Installing and Configuring Printers
You can create printers two ways in NT. You can use the Add Printer Wizard or you can use Point and Print. To manage printing, you use the Printers folder. The Add Printer Wizard is located inside the Printers folder. There are three ways to access the Printers folder:
| Click Start | Settings | Printers | |
| In Control Panel, double-click the Printers Folder shortcut | |
| In My Computer, double-click Printers Folder |
A local printer can be connected directly to a port on your computer or a printing device directly connected on the network. Don't confuse a printing device directly connected to the network with a shared network printer. The reason a printing device connected directly to the network may be a local printer is because your spooler can send jobs directly to the printing device. If the printing device is connected directly to the network, but you first send the print job to a different computer, it is then considered a shared network printer. Exercise 12-2 teaches you how to create a local printer.
Exercise 12-2 Creating a Local Printer
Sharing a printer on the network allows other users to print to a printing device connected to your computer. Users' workstations will first spool the print job to their spooler, then it will be sent to your spooler for final processing and printing.
Before you can share a printer on the network, you first must create it locally on your computer. (See exercise 12-2 for creating a local printer.) You can share the printer when you create it locally, or later after it's already created. Exercise 12-3 will show you how to share a printer on the network after it has already been created locally on your system.
Exercise 12-3 Sharing a Printer on the Network
Connecting to a Remote Printer
To connect to a remote printer on another NT Workstation, you only need to double-click the Printer icon to install that printer on your system (assuming the correct drivers are loaded). This is called Point and Print. Another way is to use the Add Printer wizard. In Exercise 12-4 we'll connect to a remote printer using Point and Print. First, you need to have a printer shared on another Windows NT 4.0 Workstation or server. If it has a different hardware platform, the appropriate driver for your system must be installed on the shared printer's server. (See Exercise 12-3 to share a printer.)
Exercise 12-4 Connecting to a shared printer
A network printer is a printer that attaches directly to your network. It isn't connected to a computer’s serial or parallel port. NT supports Hewlett-Packard JetDirect cards using the DLC protocol, DEC network printing devices using DECnet or TCP/IP protocols, Lexmark network printing devices with DLC or TCP/IP protocols, and any other device that supports LPD using TCP/IP. You can set printers on all your workstations to print directly to a networked printer, but it is common practice to set up a print server to print to the printers, and share that printer out using NT network shares. This improves performance on the workstations by not requiring additional protocols to be loaded on the clients.
Be sure to understand that Hewlett-Packard JetDirect cards require the DLC protocol to be loaded on your system. DLC is not a routable protocol, so the print server and the printing device must be on the same side of a router.
The options you can configure depend on the printing device you have and the driver that manages it. Some printing devices allow printing on both sides, printing from different paper trays, different fonts, and various other options. These options are configured using the Device Settings tab. Although some options differ from driver to driver, there are several common options that can be configured on all printers. To configure the common options, use the following tabs: General, Ports, Scheduling, Sharing, and Security.
The General tab, shown in Figure 12-2, is used for settting which driver you want to use, describing the printer, and telling network users where it's located. It also allows you to select a separator page, change the print processor, and print a test page.
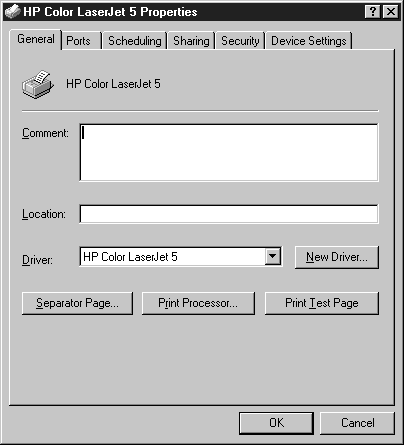
Figure 2: The General tab on a printer properties window.
The separator page, shown in Figure 12-3, is used to identify the start of a print job. It helps users identify where their print job stops, and the next one begins. A separator page also is used to switch between PostScript and PCL printing. By default, NT does not print a separator page. You must first configure a separator file. NT provides three separator files:
| PCL.SEP: Switches Hewlett-Packard printers to PCL mode for printers not capable of auto-switching. It also prints a separator page before each document. It's located at %systemroot%\system32. | |
| PSCRIPT.SEP: Switches Hewlett-Packard printers to PostScript mode for printers not capable of auto-switching. It's located at %systemroot%\system32. | |
| SYSPRINT.SEP: Prints a separator page for PostScript printers. It's located at %systemroot%\system32. |
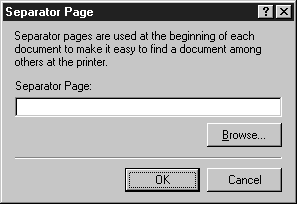
Figure 3: The Separator Page identifies the start of a print job.
Printing a test page prints a document to the printing device. The document lists the .DLLs the print driver uses. Windows NT asks you whether the document printed correctly. If you answer No, a step-by-step Help feature appears, to assist you in troubleshooting the problem.
The Printer Properties Ports tab, shown in Figure 12-4, lets you choose a port for the printer, and allows you to add or delete ports from your system. This is also where you enable printer pooling. The Configure Port button lets you specify the Transmission Retry Timeout setting. This is the amount of time that printer is allowed not to respond, before NT sends the user notification.
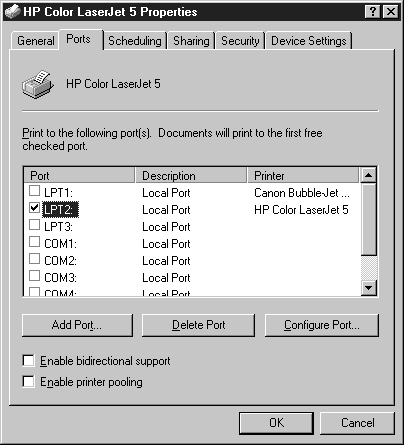
Figure 4: Choose, add and delete ports at the Ports tab.
Printer pooling is an efficient way to streamline the printing process. It sends print jobs to a pool of printing devices, in which only one printing device actually prints the document. In order to use printer pooling, you need at least two printing devices that can use the same print driver. The printing devices should be located next to each other, since users aren't notified which printing device actually prints the document.
To create a printer pool, check the Enable Printer Pooling check box and select more than one port to print. Be sure the ports you choose have printing devices that use the same print drivers attached.
The Scheduling tab, shown in Figure 12-5, lets you specify the times the printer is available, and allows you to set the printer’s priority. This tab also provides an option to change the way the printer spools.
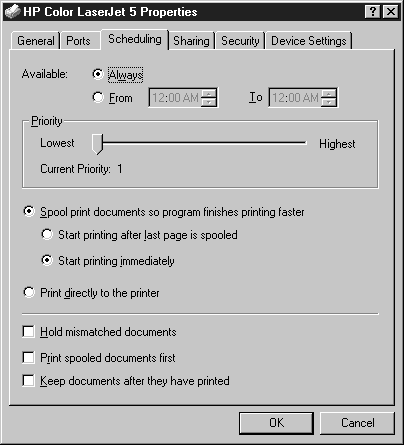
Figure 5: Set a printer’s priority at the Scheduling tab.
Your priority choice tells NT which printer gets to print to the printing device first. Printers with higher priority print before printers with a lower priority. The printer priority can be range from 1 (the default) to 99. This does not affect the document priority. It is only useful when you have more than one printer printing to the same printing device. A good use of printer priority would be to give the most important users a printer with the highest priority. Then, for less important users, create another printer that has a lower priority. Set the proper permissions (discussed later) and the important people will be given access to the printing device first.
Be sure to understand that changing the priority of a printer doesn't affect the priority of the print queue. When you use two printers, printing to the same printer device, a printer with a higher priority will print to the device, when it's available, before a printer with a lower priority. If the lower-priority printer is busy printing a document, it finishes printing the job before releasing control to a higher-priority printer.
You can change the spooling options to troubleshoot or speed up your print jobs. The default is optimized for typical print jobs.
Spool print documents vs. Print directly to the printer
Spooling print documents is the default, and normally shouldn't be changed. However, if you are troubleshooting a print problem, it might help to print directly to the printer. If you can print directly to the printer, except when you spool, you probably have a spooling problem. Spooling is more efficient than printing directly to the printer, because the printer and the computer don't have to wait for each other. When you select spooling, you can have the print job start immediately (default) or after the last page is spooled. Printing after the last page is spooled might seem like a better choice than starting immediately, but if a user is sending a big print job, it may take a long time before the printer starts printing. It is more efficient to start printing immediately.
Hold Mismatched Documents
If a print job is sent to the printer that doesn't match the printing device's configuration, it can cause the printer to hang with an error. To prevent this, choose the Hold Mismatched Documents check box. NT will examine the configuration of the print job and the printing device to make sure that they are in sync before sending the print job to the printing device.
Print Spooled Documents First
By default, NT prints documents on a first-come, first-served basis. By checking the Print Spooled Documents First box, you can have NT print documents that are completely spooled while another document is still spooling, even when the spooling document arrived first.
Keep Documents after They Have Printed
This keeps the document in the printer’s queue window, even after the print job is finished printing. This allows all users access to see what print jobs have printed.
The Sharing tab, shown in Figure 12-6, is used to share your printer on a network.
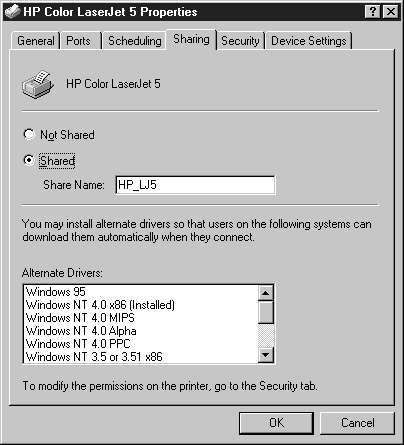
Figure 6: Use the Sharing tab to share your printer on a network.
The Security tab, shown in Figure 12-7, is where you set permissions for users who print to your printer. It also allows you to enable auditing (if you have auditing turned on in User Manager), and it allows you to take ownership of the printer if you have the proper permissions to do so.
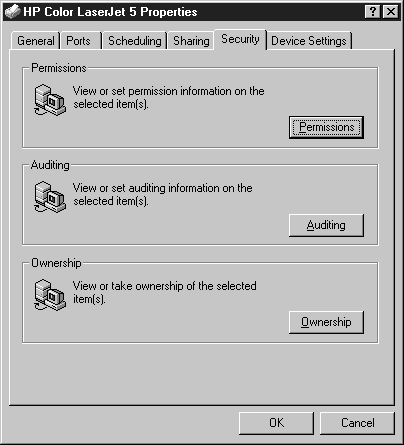
Figure 7: Set permissions, enable auditing, and take ownership at the Security tab.
Printers are objects that have access control lists. To set permissions, a user must be an administrator, owner, power user, or a user who has Full Control permissions assigned. At the Printer Permissions window, shown in Figure 12-8, you can assign four types of permissions to printer objects.
| No Access. The user isn’t able to access the printer at all. This takes precedence over all other permissions. If a user is assigned to a group that is allowed Print Access, and a group with No Access, the user cannot print, because No Access always takes precedence. | |
| Print. Allows users to print, and to control the setting and print status of their own print jobs. | |
| Manage Documents. Allows the user to print, and to control the settings and print status for all print jobs. | |
| Full control-- Allows the user to print, and to control the settings and print status for all print jobs, including the printer itself. Users with full control can share, stop sharing, change permissions, take ownership, and delete the printer. |
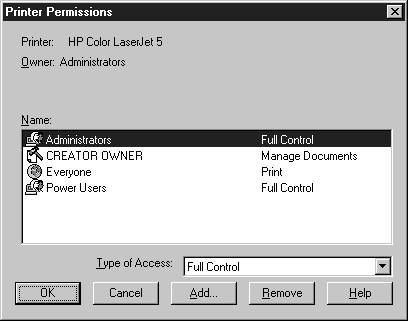
Figure 8: Assigning printer permissions.
The default permissions for printers, both local and shared, are as follows:
| Administrators | Full Control |
| Creator Owner | Manage Documents |
| Everyone | |
| Power Users | Full Control |
Click the Auditing button to audit print events. Figure 12-9 shows the Printer Auditing screen. Just add the users or groups you want to audit, and select which events you want to audit. Audit events show up in the Event Viewer Security Log. Before you can audit, you must turn auditing on using User Manger.
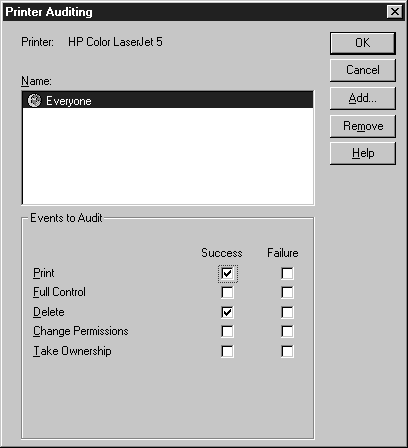
Figure 9: At the Printer Auditing screen add users, group and events to be audited.
To take ownership of a printer, just click the Ownership button, then click the Take Ownership button. Once you take ownership, you can't give it back.
The Device Setting tab offers various options, depending on which print driver you are using. Figure 12-10 shows the Device Settings tab for an HP LaserJet 5, and Figure 12-11 shows the Device Settings tab for a Cannon BJC-4100.
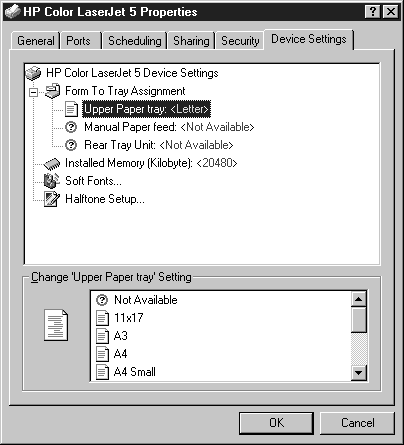
Figure 10: Device Setting Tab for HP LaserJet 5.
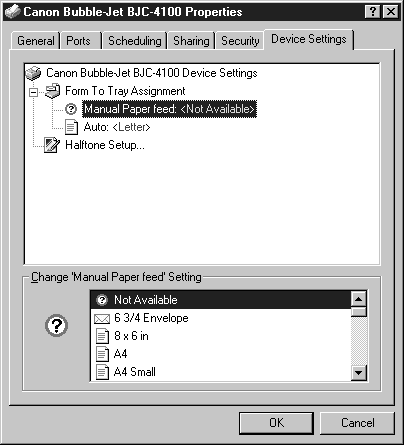
Figure 11: Device Setting Tab for BJC-4100.
By default, the creator owner of a print job can manage his own print job. Figure 12-12 depicts what the screen looks like when you manage a print queue. Exercise 12-5 will teach you how to manage a print queue.

Figure 12: Managing a queue of print jobs.
Exercise 12-5 Managing Print Jobs
If you've worked with computers and networks for any length of time, you know how troublesome printers can be. NT handles printing better than most operating systems, but there can still be problems.
A common problem is the printer spool file located at %systemroot%\system32\printers folder runs out of disk space. To prevent this, make sure the drive the spooler is on has plenty of available space. You should also defragment your hard disk. NT doesn't provide a defrag utility, so you'll need to purchase a third party-program. You can move the default spooler location by editing the Registry. Use extreme caution when editing the Registry. Add the value called DefaultSpoolDirectory with type REG_SZ with the new path to the following key:
HKEY_LOCAL_MACHINE\System\CurrentControlset\Control\Print\Printers
You also can change the spool directory for a specific printer by adding the value called DefaultSpoolDirectory with type REG_SZ with the new path to the following key:
HKEY_LOCAL_MACHINE\System\CurrentControlset\Control\Print\Printers\<printer>
Where <printer> is the name of the printer you want to change.
After making these changes, you have to stop and restart the spooler service.
If your system crashes while it had a print job in its spool, it tries to complete the print job after the computer restarts. Sometimes when a system crashes the spooled file becomes corrupt and remains in the spool directory. When this happens you'll need to stop the spooler service, go to the spooling directory, and delete the files that won't print. To determine which files are old, check the time date stamp on the files.
If you have NT Workstation acting as a print server and it appears to be running slowly, you can increase the priority of the spooler service. By default, NT Workstation assigns a priority of 7 to the spooler service. To change the priority for the spooler service, you'll have to edit the Registry. Add a value called PriorityClass with type REG_DWORD with the value of the priority you want to the following Registry key:
HKEY_LOCAL_MACHINE\System\CurrentControlset\Control\Print
You also can use the Printer-Troubleshooting wizard. To start the troubleshooting wizard, print a test page and answer No to the question Did the Test Page Print Correctly?
In this chapter you learned that NT refers to printers as the software that manages the process of sending print jobs to the printing device. You learned how the spooler service manages the process of printing. You also learned about print monitors, print drivers, print processors, print routers and print jobs.
I took you through the steps of creating a local printer and connecting to a remote printer. I explained the difference between a network printer that attaches directly to the network, and a shared network printer that prints via a share on an NT Workstation.
We configured printers to use a separator page, changed the default data type, and shared a printer on the network. We also looked at how to apply permissions security and audit printing.
Finally, I explained some troubleshooting techniques you can use to identify print problems, like changing the default spooling folder.
| Printing software is considered the printer. A printer is software that manages a specific printing device (or devices, in case of printer pooling). | |
| The printer determines how the print job gets to the printing device. | |
| The Graphics Device Interface controls the display of graphics on the monitor and printers. | |
| Print drivers are the software that allows an application to communicate with printing devices. | |
| The print router routes the print job from the spooler to the appropriate print processor. | |
| The print spooler is the service that actually manages the print process. | |
| Rendering is the process of translating print data into a form that a printing device can read. | |
| Print monitors control access to the printing device, monitor the status of the device, and communicate with the spooler, which relays this information via the user interface. | |
| Print jobs are source code, consisting of both data and commands for print processing. | |
| There are two ways to create printers in NT. You can use the Add Printer wizard or you can use Point and Print. | |
| Don't confuse a printing device directly connected to the network, with a shared network printer. | |
| Before you can share a printer on the network, you first must create it locally on your computer. | |
| A network printer is a printer that attaches directly to your network. It isn't connected to a computer’s serial or parallel port. | |
| Hewlett-Packard JetDirect cards require the DLC protocol to be loaded on your system. DLC is not a routable protocol. Therefore, the print server and the printing device must be on the same side of a router. | |
| How you configure print options depends on the printing device you have and the driver that manages it. Options are configured using the Device Settings tab. | |
| Printer pooling is an efficient way to streamline the printing process. It sends print jobs to a pool of printing devices, in which only one printing device actually prints the document. | |
| Changing the priority of a printer doesn't affect the priority of the print queue. | |
| You can change the spooling options to troubleshoot or speed up your print jobs. | |
| Printers are objects that have access control lists. To set permissions, a user must be an administrator, owner, power user, or a user who has Full Control permissions assigned. | |
| To take ownership of a printer, click the Ownership button, then click the Take Ownership button. Once you take ownership, you can't give it back. | |
| A common printing problem occurs when the printer spool file, located at %systemroot%\system32\printers folder, runs out of disk space. | |
| You should defrag your hard disk to prevent problems. | |
| Use extreme caution when editing the Registry. |
A) It requires less bandwidth to print over the network.
B) It returns control of the application to the user more quickly.
C) EMF files can be printed on any printer.
D) EMF files are in PSCRIPT1 format.
A) Windows Print Processor (WINPRINT.DLL)
B) PostScript Print Processor (PSCRIPT1.DLL)
C) Macintosh Print Processor (SFMPSPRT)
D) UNIX Print Processor (LPD)
A) Install DLC protocol on your computer.
B) Configure the DLC protocol address on the printer.
C) Print a test page to get the MAC address of the JetDirect Card.
D) Install AppleTalk on your computer.
A) Share the printer on an NT Server, because Workstation can't provide the correct drivers.
B) Give them the proper access permissions.
C) Install an appropriate Windows 95 print driver on your workstation.
D) Change the default data type to RAW.
A) You can set up a printer for each printing device, then add a third printer to manage the two independent printers.
B) Install DLC protocol to bridge the printing drivers.
C) Add both printing devices to the Ports Property page and check Enable Printer Pooling.
D) You can't, because they have to share a common driver.
A) Share the printer and give him full control of the printer
B) Set the printer to print directly to the printer.
C) Create two printers. On one printer give your boss permissions to print, and set the priority to 99. On the second printer give everyone else permissions to print and set the priority to 1.
D) Create one printer, but share it out twice. On one share give your boss permissions to print, and on the other share give everyone permissions to print.
A) Double-click the Printer icon and select her print job, then press the Delete button.
B) She should tell the administrator to delete the print job for her.
C) There is nothing she can do.
D) She should turn off the printer as soon as the 200-page report finishes printing.
A) Administrators
B) Creator Owner
C) Power Users
D) Users
A) Use Disk Administrator to combine the two drives as one logical drive.
B) Use Explorer and move your WINNT directory to the D: drive.
C) Move the printer spooler to the D: drive.
D) Move the print monitor to the D: drive.