![]()
![]()
![]()
| Chapter 10 * |
| NetWare Integration * |
| Certification Objectives * |
| Planning NetWare Connectivity * |
| Connectivity Options * |
| Method #1: Two Redirectors on Each Client * |
| Method #2: Windows NT Server as a Gateway to NetWare * |
| Method #3 Windows NT Server Emulating NetWare * |
| NWLink * |
| Installing and Configuring NWLink * |
| Exercise 10-1: Installing NWLink * |
| Configuring the Ethernet Frame Type and IPX Network Number * |
| Exercise 10-2: Configuring NWLink * |
| Using GSNW and CSNW * |
| Migration Tool for NetWare * |
| File and Print Services for NetWare (FPNW) * |
| Directory Services Manager for NetWare (DSMN) * |
| Migration Strategies * |
| Data First, Users Second * |
| Users First, Data Second * |
| Two Redirectors on Client Computers * |
| Gateway Service for NetWare (GSNW) * |
| Installing GSNW * |
| Removing NetWare Redirectors * |
| Installing GSNW on Windows NT Server * |
| Exercise 10-3: Installing Gateway Services for NetWare * |
| Configuring GSNW * |
| Configuring the Preferred Logon * |
| Exercise 10-4: Configuring the Preferred Logon * |
| Configuring the NetWare Server * |
| Enabling the Gateway * |
| Creating Gateway Shares to NetWare Directories * |
| Exercise 10-5: Creating a Gateway Directory Share * |
| Creating Gateway Shares to NetWare Print Queues * |
| Exercise 10-6: Creating a Gateway Printer Share * |
| Setting Permissions for Gateway Shares * |
| Exercise 10-7: Setting Permissions on Directory Gateway Shares * |
| Exercise 10-8: Setting Permissions on Print Queue Gateway Shares * |
| Accessing Gateway Shared Resources * |
| Using Remote Access Service (RAS) with GSNW * |
| Security Issues with GSNW * |
| Connecting to NetWare Services with Explorer * |
| Exercise 10-9: Connecting to a NetWare Directory * |
| Exercise 10-10: Connecting to a NetWare Printer Queue * |
| Connecting to NetWare Services with the Command Line * |
| NetWare Specific Applications * |
| NetWare Utilities * |
| Supported Utilities * |
| Unsupported Utilities * |
| The Migration Tool for NetWare * |
| Migrating User Accounts and Groups * |
| Transferring Volumes and Files * |
| Configuring the Migration * |
| Exercise 10-11: Migrating a NetWare Server to Windows NT Server * |
| Answers to Chapter 10 Self Test * |
| Planning NetWare Connectivity | |
| Gateway Service for NetWare (GSNW) | |
| The Migration Tool for NetWare |
Windows NT Server includes a number of tools, services, and protocols to facilitate migrating from NetWare, as well as existing peacefully with it. Networks maintaining both NetWare and Windows NT Server will benefit greatly from the well-planned use of these NetWare interoperability components included with Windows NT Server. These component are covered in this chapter, which includes the following topics:
Whether you are migrating from NetWare to Windows NT Server or you are adding Windows NT Servers to a NetWare network, your implementation will be much more enjoyable for all parties involved if it is carefully planned. Unfortunately, network administrators are often given deadlines that do not allow adequate time for planning. In addition to time, good planning requires a thorough understanding of the network’s needs, and the tools available to meet those needs. Although your network’s specific needs cannot be addressed in this book, the Windows NT Server tools that can be used in your environment are covered.
Passing the Windows NT Server exam is not the only reason you need to learn about these tools. At some point in your career, you may be faced with a project deadline that does not allow ample time for researching both the needs and the solutions. If you already understand the NetWare integration capabilities of Windows NT Server, a significant part of the research is done before you even get the project. This will enable you to spend more time developing an implementation plan. In turn, your project will be more successful than it would have been if you hadn’t known about the NetWare tools included with Windows NT Server.
There are as many reasons to use both NetWare and Windows NT servers as there are organizations using them—and that’s a lot! Some examples are:
| A government office has been required to migrate from NetWare to Windows NT in order to implement C-2 security. | |
| Two companies, one using Windows NT Server and one using NetWare, have merged; management decides not to convert either network, due to major application software changes that would be necessary. | |
| A school has been using NetWare for file and print services, but an administrative software package built on SQL Server, which runs only on Windows NT Server, is being implemented. | |
| A firm’s critical time-reporting system requires a NetWare server, but Windows NT was selected to establish an Internet firewall and proxy server. |
NetWare servers have been successfully providing file and print services to millions of users for a number of years. NetWare is a very mature product that was designed to deliver file and print services with speed. Network administrators and managers are not going to discount the established performance of NetWare and migrate to Windows NT just because Windows NT has a graphical user interface (well, not all of them, anyway). However, Windows NT Server has several features, besides the GUI, that set it apart from NetWare and make it the network operating system of choice for many applications. Table 10-1 shows a comparison of the capabilities of NetWare and Windows NT Server.
NetWare |
Windows NT Server |
|
| File and Print | Fast, Reliable, Mature | Reliable, Easy, Flexible |
| Application Server | Crash-prone, Few apps | Stable, Many apps |
| Messaging Server | Good for small entity | Scales to enterprise |
| Internet/Intranet | Difficult, Weak | Easy, Strong |
| Remote Access | Add-on package | Built-in |
| Faster CPUs | Supports Intel only | Supports Intel and Alpha |
Table 1: NetWare and Windows NT Server Comparison.
As you can see, Windows NT Server can easily find its way into many NetWare environments, especially since it is less costly than NetWare. While some networks are migrating from NetWare to Windows NT so that they can benefit from the added functionality of Windows NT while having only one network operating system to manage, others are opting to keep the NetWare servers for file and print services permanently. Network administrators in both environments need to understand and use the NetWare tools provided by Windows NT Server.
Client-to-server connectivity in a mixed Windows NT and NetWare environment can be approached in three ways:
Since each network’s environment and needs are different, there are dozens of ways in which these three methods can be applied. You may find that you need to use the second or third method for the short-term, as you work to implement the first. You might also find it best to use method #2 for some users, while using method #1 for others.
Client computers participating in an environment where NetWare and Windows NT Server are permanent residents may need client software for both types of networks. Windows for Workgroups, Windows 95, and Windows NT are all designed to enable two network clients to be used simultaneously. The memory limitations of DOS make it impractical at best to use both NetWare and Microsoft network clients at the same time. The additional resources required to run two redirectors will also very likely have a significant negative impact on the performance of Windows for Workgroup computers. Windows 95 and Windows NT, however, should have no trouble, except in instances where the computer has only the minimum required RAM to run the operating system.
Although each client system has to use precious resources to run a second redirector, this method of integration should result in the best performance for users, since each client computer can directly access each type of server. The other options require Windows NT Server to emulate or act as a gateway to NetWare servers. These server-side processes cause responses from the server to be slower than if the client is communicating with the NetWare server natively.
The NetWare client redirector that comes with Windows NT is called Client Service for NetWare (CSNW) and is included with both Windows NT Workstation and Windows NT Server. CSNW is installed on Windows NT Server by installing the Gateway Service for NetWare (GSNW). Windows NT computers with CSNW installed are able to log on to NetWare servers to use file, print, and application services.
Although the two-redirector method results in the best overall performance, it also requires the greatest amount of time to implement and maintain. Each PC must be configured to use both network redirectors, and may need to have additional protocols installed and configured as well. Each user must also have an account on each network, which doubles account creation and maintenance chores.
With GSNW, Microsoft Network clients can access files and printers on NetWare servers through gateway shares on Windows NT Server computers, without using any NetWare-compatible protocol or client. With this method of connectivity, only one network redirector, Client for Microsoft Networks, is necessary on client computers, and it is not necessary to load NWLink on client PCs. Clients only need one protocol in common with the Windows NT GSNW server to make use of the server’s gateway shares.
Another benefit of this method is that each user has only one user account to create and maintain. The disadvantages of GSNW include increased network traffic that may adversely affect NetWare connectivity performance to the extent that users notice, and the significant resources on the gateway server required to run GSNW.
If your physical network’s bandwidth utilization is already high, implementing GSNW may cause serious problems, since each gateway file transfer and print job hits the network twice. Likewise, if a Windows NT Server computer is already straining under its workload, using it as a host for GSNW could cause performance problems in some circumstances. While GSNW can be installed and configured in a very short time, a poorly planned implementation has the potential to turn a precarious situation into a disastrous one. Due to the performance and utilization issues, GSNW is not considered a good permanent solution for most mixed environments. It is typically used as a short-term solution while method #1 is being implemented.
The third method employs the use of Windows NT Server’s File and Print Services for NetWare (FPNW). FPNW is a part of Microsoft Services for NetWare, an add-on package available for Windows NT Server. To NetWare clients, a Windows NT Server with FPNW looks and acts just like a NetWare server, and client computers need only one network redirector, a NetWare client, in order to access NetWare servers and Windows NT servers running FPNW. See Figure 10-1 for a diagram of this setup.
Figure 1: Client Connectivity Options with One Redirector.
Like GSNW, FPNW is not considered to be a good permanent solution. It is, however, helpful in NetWare to Windows NT migration environments. When the first Windows NT server is brought online, FPNW can be installed to enable all NetWare clients to use files and printers on it immediately. When all of the NetWare servers have been converted to Windows NT, the Client for Microsoft Networks can be loaded on each client and then FPNW can be removed from the Windows NT servers.
Windows NT computers must use NWLink, an IPX/SPX-compatible transport protocol, to communicate with NetWare servers. Since it is merely a transport protocol, loading NWLink by itself does not enable client PCs to use NetWare file and print services. NetWare Core Protocol (NCP) is the file and print sharing language of NetWare, while NWLink is simply the delivery agent for NCP messages between NetWare clients and servers.
NWLink is a relatively fast and efficient protocol and should always be considered as an option when determining which protocol is best for a given network. Since IPX/SPX is routable, NWLink can also be used to communicate across WANs.
NetWare connectivity services on Windows NT are completely dependent on NWLink. If it is not already present, NWLink will be installed automatically when any NetWare component is installed, and attempts to remove NWLink without first removing NetWare components will be unsuccessful.
NWLink is installed from the Protocols tab in the Network Properties dialog box. NWLink is very easy to install and requires no configuration at the time of installation. NWLink NetBIOS also appears as an installed protocol when NWLink is installed on a computer.
NWLink NetBIOS enables Windows NT computers to use Novell NetBIOS to communicate with Novell servers and other Windows NT machines using NWLink. The NWLink NetBIOS item cannot be removed separately from NWLink or configured in any way. Microsoft’s NWLink NetBIOS includes some features not available in Novell’s IPX/SPX NetBIOS. Consequently, these features are not used when a Windows NT machine communicates with a NetWare server.
NetWare has a number of different frame types that can be used with Ethernet, and while Windows NT can automatically detect which one is in use, it may be necessary at times to force a certain frame type to be used. If the frame type specified on the computer does not match the frame type in use on the network, communication fails. The following four frame types can be selected if you wish to manually configure NWLink:
| Ethernet 802.2 | |
| Ethernet 802.3 | |
| Ethernet II | |
| Ethernet SNAP |
When Auto Frame Type Detection is selected, Windows NT listens for each frame type in the order listed above. If none of these is detected, Windows NT uses the Ethernet 802.2 frame type by default.
In the NWLink IPX/SPX Properties dialog box, you can’t see which frame type was detected and used when Auto Frame Type Detection is selected. To see this information you must use the IPXROUTE CONFIG command which tells you which frame type is being used, and to which network adapters each frame type is bound. The IPXROUTE command has other functions as well, such as displaying the Service Advertising Protocol (SAP) table and viewing IPX statistics. You can see the available options by entering IPXROUTE /? from the command line.
Frame types, network numbers, and the internal network number can be changed from the NWLink IPX/SPX Properties dialog box. It is possible to use more than one frame type at once, and doing so is a rather common practice. However, just as the use of multiple protocols diminishes network performance, using two or more frame types also causes network performance degradation. Windows NT Server can also be enabled to route IPX/SPX traffic between networks.
The IPX network number is an eight-digit hexadecimal number used to identify uniquely the physical network segment attached to the computer, so that IPX traffic can be routed. Each physical network segment in an IPX environment must have one or more unique network numbers. Windows NT Server automatically detects the IPX network number in use on the attached segment, if Auto Frame Type Detection is selected or 0 (zero) is entered as the network number.
The internal network number, also an eight-digit hexadecimal number, is a number that must be unique for each NetWare server in a given network. Windows NT Server uses 00000000 as the default, so you need to change this if you have more than one Windows NT Server using NWLink, or if 00000000 is already in use by a NetWare server.
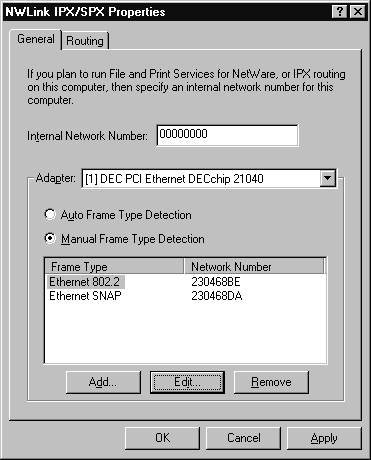
Figure 2: Configuring NWLink. The Internal Network Number shown is the default.
Figure 3: Adding Frame Types to NWLink.
The Gateway Service for NetWare (GSNW) is an important tool that comes with Windows NT Server and is installed as a network service. This service enables administrators to create shares on the Windows NT Server for files and print queues that exist on NetWare servers. Microsoft network clients that are not using NWLink or a NetWare client can then access files and print queues on NetWare servers through gateway shares created on a Windows NT Server running the GSNW. GSNW is completely dependent on NWLink. If it is not already present, NWLink is automatically installed when GSNW is installed. Attempts to remove NWLink without first removing GSNW will be unsuccessful.
GSNW also includes the client functionality of Windows NT’s Client Service for NetWare (CSNW), which enables a Windows NT computer to access NetWare servers to use files and print queues. When GSNW is installed, the service selection reads "Gateway (and Client) Services for NetWare." CSNW enables Windows NT computers to connect to NetWare services, while GSNW provides the ability to share the NetWare connections to Microsoft clients.
The Migration Tool for NetWare is a powerful tool included with Windows NT Server that can copy user accounts, groups, and data from NetWare servers using bindery services. It is a copy mechanism only and does not modify the files or user account information on the NetWare servers. The Migration Tool doesn’t work with Novell Directory Services objects. Used in conjunction with FPNW or GSNW, the Migration Tool can make the immense tasks of creating new user accounts and copying data much less of a chore.
File and Print Services for NetWare is part of Microsoft Services for NetWare, an add-on package available for Windows NT Server. FPNW enables Windows NT servers to emulate NetWare servers so that NetWare clients, using only NetWare client software, can use files and printers on the FPNW server.
Memory and processor requirements for FPNW to run on Windows NT Server are quite significant, so you’ll need a faster CPU and more memory to get acceptable performace. Putting FPNW on a server that has minimal memory or a slow processor, or that is already highly utilized, is not considered a good idea.
A Windows NT server running FPNW cannot completely replace a NetWare server. For example, NetWare Loadable Modules (NLMs) will not work on a Windows NT Server, nor will Transaction Tracking System (TTS). While FPNW does a good job of emulating NetWare for basic file and print services, counting on it for much more than that is not recommended.
Directory Services Manager for NetWare is the second component of Microsoft Services for NetWare. DSMN copies user accounts from NetWare servers to Windows NT servers and then propagates any password changes back to the NetWare servers. This allows user accounts on both networks to be administered from a single database. DSMN works with binderies on NetWare 2.x and 3.x servers and must be installed on a Windows NT primary domain controller. Using DSMN to manage user accounts facilitates a single authentication, not only for Microsoft and NetWare networks, but for NetWare servers as well.
Many entities are migrating to Windows NT Server from NetWare, each for its own reasons. For the smallest networks, migration might require only a few minutes of planning, while larger ones benefit from several weeks of planning and preparation. A number of factors come into play to determine the best migration strategies for different networks. These include, but are not limited to, the following:
| The size of the network and the number of servers to migrate | |
| Deadlines for completion | |
| Administrative and support personnel available for the project | |
| Hardware available for temporary and permanent use | |
| Network performance during the migration | |
| Security concerns | |
| Funds available for additional software purchases | |
| Additional requirements dictated by management |
Having few simple plans from which to choose suffices for small networks, while large networks require custom plans unique to each environment. The same basic migration plans used for small networks, however, can be the basis for planning large migration projects. Regardless of the plan you have at the start of your migration, it should be constantly evaluated and modified to meet the goals of the project.
One migration method is to move all data from NetWare servers to Windows NT servers running FPNW, and then install the Client for Microsoft Networks on the client PCs as you remove the NetWare client software. After all of the clients have been converted, remove FPNW from the Windows NT servers. User accounts must be created on the Windows NT network before you can start moving data, of course, and can be copied from the NetWare servers using the Migration Tool or integrated with DSMN.
Creating user accounts on Windows NT with the Migration Tool or DSMN is the first step in this method, as well. One or more Windows NT servers configured with GSNW can be built, and as client PCs are converted to the Microsoft networking model, they can access the data on the NetWare servers via GSNW. After all of the client computers are migrated, data can be moved from the NetWare servers to the Windows NT servers. If you plan carefully, you can keep the new native share names the same as the old gateway share names, so that client drive mappings remain valid.
While this method offers the most flexibility, it also requires the most administration. As with the other two methods, user accounts are created on the Windows NT network as the first step. The Client for Microsoft Networks is then added to the client computers, enabling them to access both NetWare and Windows NT servers natively. After all the data is moved, network clients must be touched again to remove the NetWare client software. This method is labor-intensive, but it provides better performance, data availability, and server stability than the other techniques.
The Gateway Service for NetWare included with Windows NT Server enables files and print queues on NetWare servers to be shared through Windows NT Server computers. While the benefits that can be derived from this capability may be obvious, the liabilities are not. For this reason, it is not recommended that GSNW be used as a permanent solution for providing NetWare connectivity to network clients. The following points should be kept in mind when considering the use of GSNW on your network:
| The translation of protocols that is necessary for GSNW to operate have a negative impact on the performance of activity between the clients and the NetWare server. | |
| Each request using GSNW creates twice as much network traffic, since the client communicates with the Windows NT Server, which then communicates with the NetWare server. The NetWare server then responds to the Windows NT Server, which then responds to the client. | |
| Since client requests must be translated from Microsoft’s SMB to Novell’s NCP, a Windows NT Server with GSNW is busier than one might expect. A server that is already experiencing high CPU utilization should not be configured with GSNW. | |
| Each gateway directory share requires a drive letter on the server, so the number of gateway shares on each Windows NT server is limited to 26 minus the number of physical drives. |
GSNW is easy to install and configure; the most difficult part is the long NDS path names required for directories on NetWare 4.x servers. A GSNW gateway could be installed and configured in a matter of minutes. Creating gateway shares and assigning permissions takes only a few minutes more. A network administrator’s total time to install, configure, and go live with the first GSNW shares could be well under an hour.
Before attempting to install GSNW, it is necessary to remove any other NetWare client software that might be on the Windows NT Server computer. Novell develops and distributes its own NetWare client software for Windows NT; if any version of this is already installed, Windows NT informs you that it must be removed, and the computer rebooted, before you can install GSNW.
GSNW is installed from the Services tab in the Network properties dialog box. As mentioned earlier, CSNW is installed automatically as a part of GSNW. NWLink, Windows NT’s IPX/SPX-compatible transport protocol, is also installed automatically when GSNW is installed, if it is not already present.
After the GSNW service is installed, Windows NT prompts each user for preferred logon information the first time they log on. A GSNW icon, which invokes the GSNW dialog box, is also added to the Control Panel. (See Figure 10-4 for an illustration of this icon.) This is where you can change the preferred logon information after the first logon and configure gateway shares.
Configuring the preferred logon for GSNW is exactly like configuring the preferred logon for CSNW in Windows NT Workstation. The only difference is that the icon in Control Panel says GSNW instead of CSNW.
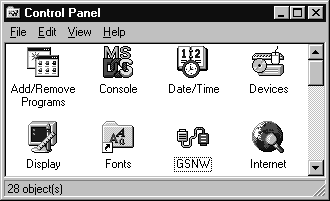
Figure 4: The GSNW icon added to Control Panel
The username and password used for your Windows NT logon are passed to the preferred server or tree. If a user account with the same password exists on the NetWare server or tree, you are logged on accordingly. If the user name does not exist, or if the password supplied by Windows NT is incorrect, you are prompted to supply the correct information to complete the logon.
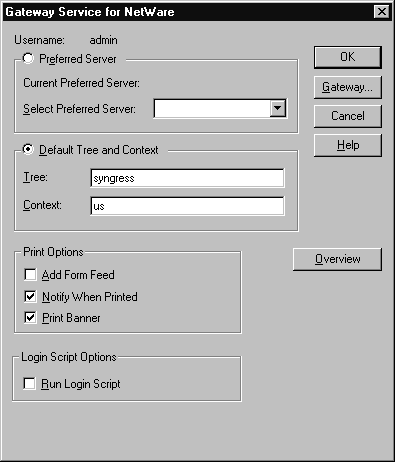
Figure 5: Configure the logon at Gateway Service for NetWare.
Before you can successfully create a gateway share, a group named NTGATEWAY must exist on the NetWare server or NDS tree to which you are logging on. A user account that you want to use as the gateway account must be a member of this group. The group and user can be created with the SYSCON utility or NWAdmin, depending on whether your NetWare servers are using bindery services or NDS
There are no restrictions on the name of the gateway account, and you can use the admin or supervisor accounts if you wish. Whatever account you use, it must have appropriate permissions to the files or print queues that are going to be accessed via the gateway share on the Windows NT server.
Windows NT needs to know the name of the gateway account that you created on the NetWare network as well as the password for that account. Once Windows NT has this information, it authenticates to the NetWare network with these credentials to retrieve files and submit print jobs for clients who are using the gateway shares. You will notice that a Gateway button appears on the GSNW properties dialog box. Except for this button, the GSNW properties dialog box is identical to the CSNW properties dialog box in Windows NT Workstation.
To create a gateway share to a NetWare directory, you must be logged on to the NetWare network with an account that has permissions to the NetWare resources the gateway share will access. This is in addition to the gateway account that is used by the Gateway Service.
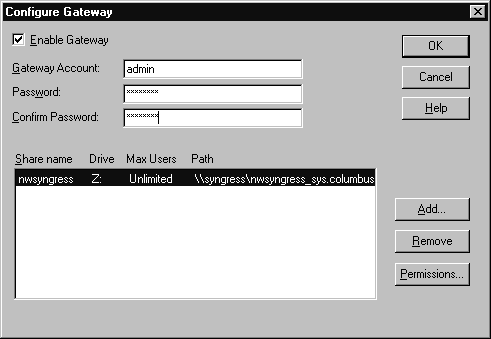
Figure 6: Configuring the Gateway Service.
Setting up a gateway share to a NetWare print queue is very similar to sharing a Windows NT printer. It involves setting up a NetWare print queue as you would for normal use, and then clicking one radio button to share it. The Enable Gateway check box in the Configure Gateway dialog box must be checked before gateway print shares can be created.
Setting permissions on gateway shares is very similar to setting permissions on native Windows NT shares. The only difference is the location of the Permissions button for directory shares. Default permissions for directory and print queue gateway shares are the same as the default permissions for native Windows NT directory and printer shares.
After the gateway shares are created, users can map network drives to gateway directory shares and set up network printers in the same way they use native Windows NT shared resources. The only thing that might tip a user off to the fact that the files are on a NetWare server is that the Security tab does not appear when a file or directory’s properties are viewed with a Windows NT computer. Users would not be able to distinguish the difference between a native Windows NT printer and a gateway printer.
When clients access a NetWare server directly, they can map network drives to any subdirectory on the server, since NetWare shares every directory by default. When a Windows NT Server gateway share is used, however, the client can only map a drive to the share name, since Windows NT does not share all the subdirectories below a share.
Clients connecting to the network with RAS can use gateway shares just as if they were connected to the network locally. Remote clients do not need any additional protocols or services beyond what is necessary to use native Windows NT shares on the gateway server.
Since the Gateway Service connects to the NetWare server with just one user account, the gateway account, permissions for gateway users can’t be controlled on the NetWare server. Share-level security at the Windows NT Server computer is the only point of security configuration, and since share-level security is less extensive than NetWare’s file permissions you lose some granularity in the level of access you can permit. Additionally, since a Windows NT server can only host about 23 gateway shares, you can only provide that many users with secure home directories through gateway shares. Due to this limitation, you should plan to move user home directories to a Windows NT server as soon as your migration plan can allow.
Since the gateway account on the NetWare server must have access to all of the data that is accessed through the Windows NT Server gateway, keeping the account name and password secure is a must. This is by far the most important security concern regarding GSNW.
Mapping network drives and browsing files on a NetWare server with Windows NT Explorer is the same as mapping drives and browsing files on a Windows NT Server. The most significant difference is that NetWare servers appear under the NetWare Compatible Network in the Network Neighborhood, while Windows NT Servers appear under the Microsoft Windows Network.
Connecting to NetWare print queues is just like connecting to shared printers on Windows NT computers. Three print queue configuration options are available in the GSNW dialog box, which is started with the GSNW icon in the Control Panel. If you want to eject a page at the end of each print job, check the Add Form Feed option; choose Notify When Printed to receive notification that your document has been printed; and select Print Banner for a banner page to be printed before each print job. The options selected apply to all NetWare printers used by the Windows NT computer.
Mapping network drives and connecting to print queues on NetWare servers with the command line is different depending on whether the server is using bindery services or NDS. Listed below are examples of how to use command-line utilities to make drive and printer connections with either bindery or NDS servers.
| I want to use the command line to map a drive to a NetWare server using bindery services… | NET USE G: \\SERVER\VOLUME\DIRECTORY |
| I want to use the command line to map a drive to a NetWare server using NDS… | NET USE G: \\TREE\VOLUME.ORGUNIT.ORGUNIT |
| I want to use the command line to connect to NetWare print queue using bindery services… | NET USE LPT1 \\SERVER\PRINTQUEUE |
| I want to use the command line to connect to a NetWare print queue using NDS… | NET USE LPT1 \\TREE\PRINTQUEUE.ORGUNIT.ORGUNIT |
Most NetWare-aware applications operate correctly running on Windows NT Server, although they may require extra steps for setup and configuration. They typically require the NetWare dynamic link libraries (.DLL files) that are included with the NetWare client for Windows. To get these NetWare-aware applications to operate correctly, install the NetWare client for Windows onto a Windows NT Server computer, copy the .DLL files from the NetWare client directory to the Windows NT system32 directory, and then delete the NetWare client directory. The nwdoc.hlp file contains documentation for a few common MS-DOS and Windows NetWare-aware applications, including Btrieve and Lotus Notes.
As Windows NT becomes more common as a network client, software developers are recognizing the need to provide Windows NT-compatible software and documentation. Before attempting to make an application work on Windows NT, consult the software documentation and any technical support from the software vendor. It is likely that step-by-step instructions are available to solve the problems you are encountering. Checking for a newer version of the software is always a good idea also. Many software companies are requiring any new software they release to be compatible with Windows NT. Much of the PC software released prior to 1995 was not developed for, or tested on, the Windows NT platform. The latest version of any software is more likely to be compatible with Windows NT than an earlier version of the same software.
NetWare provides command-line utilities for connecting to NetWare resources and managing NetWare servers. Novell designed these utilities for computers using DOS or OS/2 and the NetWare clients that Novell provides for those platforms. Since Windows NT does a good job of emulating DOS, most of the utilities operate as expected on Windows NT computers.
Almost all of the file and server management utilities provided with NetWare function with no problem with Windows NT. Only two utilities, SESSION and VOLINFO, have specific problems when used. When executed from a Windows NT Server computer, the SESSION command does not support search mapping and always maps as root, and the VOLINFO command runs very slowly if the update interval is set to five.
Some NetWare utilities do not function properly unless a network drive is mapped to the NetWare SYS/PUBLIC directory. If you plan to use NetWare utilities it’s a good idea to use a logon script to map a drive accordingly.
A Windows NT Help file states that the NetWare RCONSOLE command has some known problems running on Windows NT Server. However, the RCONSOLE command functions normally with Windows NT, and you should have no problems with it. The following is a list of supported NetWare commands:
| CHKVOL | COLORPAL | DSPACE |
| FLAG | FLAGDIR | FCONSOLE |
| FILER | GRANT | HELP |
| LISTDIR | MAP | NCOPY |
| NDIR | PCONSOLE | PSC |
| PSTAT | RCONSOLE | REMOVE |
| REVOKE | RIGHTS | SECURITY |
| SEND | SESSION | SETPASS |
| SETTTS | SLIST | SYSCON |
| TLIST | USERLIST | VOLINFO |
| WHOAMI |
Four NetWare commands are not supported on Windows NT. Everything that is accomplished with these NetWare commands, however, can be done in Windows Explorer or from the command line with the NET command. Table 10-2 presents the four inoperative NetWare commands and the equivalent Windows NT command. The specific syntax to use can be found by using the /? switch after the command (for example, NET LOGON /?).
| NetWare Command | Windows NT Command |
| Login | net use device: \\server\path /user:username |
| Logout | net use device: /delete |
| Attach | net use device: \\server\path |
| Capture | net use lpt1: \\server\queue |
Table 2: NetWare Utilities Not Supported on Windows NT.
The Migration Tool for NetWare is automatically installed when GSNW is installed on Windows NT Server. The Migration Tool copies data, users, and groups from NetWare 2.x and 3.x servers to Windows NT servers. Once you have the Client for Microsoft Networks loaded on workstations, you are ready to use the Migration Tool to quickly copy the users and data from NetWare servers to the Window NT environment.
One of the best features of the Migration Tool is the ability to execute a trial migration. Logs are created which enable you to see any errors encountered during the trial migration, so they can be addressed before the real migration is attempted.
User and group accounts are copied to the Windows NT server from the NetWare server, and group memberships are retained in the process. Passwords, however, cannot be migrated. The Migration Tool allows you to set the password for migrated users to blank, the username, something else you wish to specify, or to use a mapping file to create unique passwords for each user. You can also set an option to force each new user to change his password the first time he logs on to the Windows NT server.
Account policies in effect on the NetWare server can also be transferred by selecting the Use Supervisor Defaults option on the Defaults tab in the User Options dialog box. This option is the only one in the Migration Tool that is quite misleading. All other options are plainly labeled and easily understood.
If you want to migrate the users and groups to a trusted domain, the Migration Tool allows you to do this, too. This enables you to migrate the files to a server in a resource domain and create the accounts in a master domain, if that best suits your needs.
The Migration Tool allows you to select which volumes and files on the NetWare server you want to migrate. It automatically creates a share on the Windows NT server to which it copies the data from the NetWare server. The path for this share can be changed within the Migration Tool, or you can choose to move the data to an existing share on the server.
Files transferred to an NTFS partition retain the effective rights they were assigned on the NetWare server. The translation of NetWare directory rights to Windows NT permissions is given in table 10-3, and NetWare file rights converted to NT permissions are shown in table 10-4. Basic file attributes are retained as indicated in table 10-5, but file attributes unique to NetWare’s file system are ignored.
| NetWare Directory Rights | NT Folder Permissions |
| Supervisor | Full Control (All) |
| Read (R) | Read (RX) |
| Write (W) | Change (RWXD) |
| Create (C) | Add (WX) |
| Erase (E) | Change (RWXD) |
| Modify (M) | Change (RWXD) |
| File Scan (F) | List (RX) |
| Access Control (A) | Change Permission (P) |
Table 3: NetWare Folder Rights Translated to NT Permissions.
| NetWare File Rights | NT File Permissions |
| Supervisor | Full Control (All) |
| Read (R) | Read (RX) |
| Write (W) | Change (RWXD) |
| Erase (E) | Change (RWXD) |
| Modify (M) | Change (RWXD) |
| Access Control (A) | Change Permission (P) |
| Create (C) | Not Transferred |
| File Scan (F) | Not Transferred |
Table 4: NetWare File Rights Translated to NT Permissions.
| NetWare File Attributes | NT File Attributes |
| Read Only (Ro) | Read Only (R) |
| Archive (A) | Archive (A) |
| System (Sy) | System |
| Hidden (H) | Hidden (H) |
| Read Write (Rw) | None |
| Copy Inhibit (C) | Not Transferred |
| Delete Inhibit (D) | Not Transferred |
| Execute Only (X) | Not Transferred |
| Indexed (I) | Not Transferred |
| Purge (P) | Not Transferred |
| Rename Inhibit (R) | Not Transferred |
| Read Audit (Ra) | Not Transferred |
| Shareable (SH) | Not Transferred |
| Transactional (T) | Not Transferred |
| Write Audit (Wa) | Not Transferred |
Table 5: NetWare File Attributes Translated to NT Attributes.
Once you have determined your strategy for passwords, file migration, account polices, and any other issues, you can run the Migration Tool, configure the migration, and execute a trial migration. After you review the logs from the trial, you can change any parameters necessary to achieve the desired results, and test your new configuration. It probably won’t take more than two or three trials to get your migration configured for success, and then you are ready to start the migration.
The options available in the Migration Tool are relatively straightforward, except for the account policies option mentioned earlier. Walking through each step of Exercise 10-11 will familiarize you with the options available and make you comfortable with the tool. Use the Help buttons to get additional information on the options available in each dialog box.
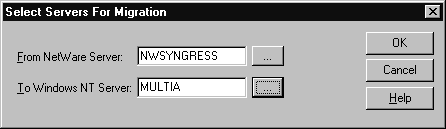
Figure 7: Selecting Source and Destination Servers for Migration.

Figure 8: Configuring User and Group Options for Migration.
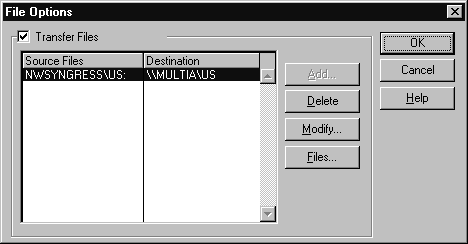
Figure 9: Configuring File Options for Migration.
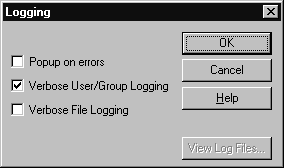
Figure 10: Logging Options in the Migration Tool.
Unfortunately, you cannot save the log files from the LogView applet, but you can highlight all of the text in a log and press Ctrl-C to copy it to the clipboard. You can then paste it into Notepad or a word processor, and save it from there.
Windows NT Server has two NetWare integration components included with the operating system: GSNW and the Migration Tool for NetWare. GSNW has the functionality of CSNW and enables gateway shares to be created that access files and print queues on NetWare servers. The Migration Tool copies user accounts, groups, and data from NetWare 2.x and 3.x servers to Windows NT servers, and has a number of configuration options to optimize the process. NWLink is the IPX/SPX-compatible protocol that Windows NT uses to communicate with NetWare servers. Frame types, network numbers, and the internal network number can all be manually configured, or Windows NT can automatically detect the frame type and network number, which is the default setting.
Microsoft Services for NetWare is an add-on package available for Windows NT Server that includes FPNW and DSMN. FPNW enables a Windows NT server to emulate a NetWare server, while DSMN creates a user account database, which it incrementally propagates to selected NetWare 2.x and 3.x servers, enabling centralized administration of user accounts on both networks from a Windows NT domain. This enables network administrators to provide users with a single logon for the Windows NT domain and NetWare servers in their environment.
Careful planning and a working knowledge of the Windows NT tools available enables a migration project to move quickly, while keeping data available to users. The smallest migration projects may not need to use any of the tools, but large migrations benefit greatly from their use.
| The NetWare client redirector that comes with Windows NT is called Client Service for NetWare (CSNW) and is included with both Windows NT Workstation and Windows NT Server. | |
| CSNW is installed on Windows NT Server by installing the Gateway Service for NetWare (GSNW). | |
| Loading two network redirectors on each client PC enables clients to directly access both Windows NT and NetWare resources. | |
| Configuring Windows NT Server as a gateway to NetWare servers allows Microsoft Networking clients to access NetWare servers through a Windows NT Server. | |
| Setting up Windows NT Server to emulate NetWare servers permits NetWare clients to use resources on Windows NT servers. | |
| Windows for Workgroups, Windows 95, and Windows NT are all designed to enable two network clients to be used simultaneously. | |
| Windows NT Server’s File and Print Services for NetWare (FPNW) is a part of Microsoft Services for NetWare, an add-on package available for Windows NT Server. | |
| Directory Services Manager for NetWare (DSMN) copies user accounts from NetWare servers to Windows NT servers and then propagates any password changes back to the NetWare servers. | |
| Each gateway directory share requires a drive letter on the server, so the number of gateway shares on each Windows NT server is limited to 26 minus the number of physical drives. | |
| GSNW is installed from the Services tab in the Network properties dialog box. CSNW is installed automatically as a part of GSNW. | |
| Before you can successfully create a gateway share, a group named NTGATEWAY must exist on the NetWare server or NDS tree to which you are logging on. | |
| When executed from a Windows NT Server computer, the NetWare SESSION command does not support search mapping and always maps as root, and the NetWare VOLINFO command runs very slowly if the update interval is set to five. |
3. Microsoft Services for NetWare includes which two products?
4. (True/False) Loading two network redirectors on client PCs is the only way users can access both Windows NT and NetWare servers.
5. What is the name of the group that must be created on the NetWare server for GSNW to operate?
6. (True/False) GSNW and FPNW do not create much load on the server, or traffic on the network.
7. (True/False) The Migration Tool for NetWare allows you to copy users and groups, but account policies cannot be migrated.
8. (True/False) Remote users cannot access gateway shares when they dial in through RAS.
9. (True/False) An unlimited number of gateway shares can be created on a Windows NT Server with GSNW.
10. (True/False) NetWare file permissions are an effective way to restrict GSNW users from accessing each other’s data.
11. (True/False) NWLink is not necessary for GSNW if the NetWare server is using TCP/IP.
12. (True/False) Permissions cannot be set on gateway shares, so security is greatly compromised when using GSNW.
13. Passwords for migrated accounts can be set to which of the following with the Migration Tool?
14. (True/False) The Migration Tool can only copy entire volumes, you cannot select specific directories to be migrated.
15. (True/False) Windows NT and NetWare offer pretty much the same functionality, and there isn’t much reason to choose one over the other.