![]()
![]()
![]()
| Chapter 13 * |
| Windows NT 4.0 Monitoring and Performance Tuning * |
| Certification Objectives * |
| Performance Tuning * |
| Bottlenecks * |
| Detecting Bottlenecks * |
| Eliminating Bottlenecks * |
| Self-Tuning Mechanisms * |
| Methods to Avoid Fragmentation of Physical Memory * |
| Methods to Utilize Multiple Pagefiles * |
| Exercise 13-1: Splitting the paging file among multiple disks * |
| Multiprocessing Capabilities * |
| Thread and Process Prioritization * |
| Caching Disk Requests * |
| Network Tuning * |
| Network Interface Card * |
| Optimizing Applications * |
| Windows NT Task Manager * |
| Exercise 13-2: Viewing applications, processes, and threads * |
| Foreground Application Performance Boost * |
| Exercise 13-3: Changing the responsiveness of foreground applications * |
| Exercise 13-4: Changing the priority of a running process * |
| Exercise 13-5: Starting processes with other than normal priority * |
| Performance Monitor * |
| Exercise 13-6: Starting the Performance Monitor * |
| Chart * |
| Creating a Performance Monitor Chart * |
| Creating a Performance Monitor Alert * |
| Creating a Performance Monitor Report * |
| Creating a Performance Monitor Log * |
| Exercise 13-7: Create a log where recorded metrics are stored * |
| Exercise 13-8: Viewing logs * |
| Performance Monitor Capabilities * |
| Processor Performance * |
| Processor:%Processor Time * |
| Exercise 13-9 Adding Processor: %Processor Time to the Performance Monitor * |
| Processor:Interrupts/sec * |
| System:Processor Queue Length * |
| Processor Performance Troubleshooting * |
| Disk Drive Performance * |
| Exercise 13-10: Enabling the disk drive performance counters * |
| Memory:Pages/sec * |
| %Disk Time * |
| Disk Bytes/sec * |
| Exercise 13-11: Adding LogicalDisk: Disk Bytes/sec to the Performance Monitor * |
| Average Disk Bytes/transfer * |
| Disk Queue Length * |
| Exercise 13-12: Disabling the disk drive performance counters * |
| Disk Drive Performance Troubleshooting * |
| Memory Performance * |
| Memory:Pages/sec * |
| Memory:Page Faults/sec * |
| Exercise 13-13: Adding Memory:Page Faults/sec to the Performance Monitor * |
| Memory:Pages Input/sec * |
| Memory:Page Reads/sec * |
| Memory Performance Troubleshooting * |
| From the Classroom * |
| You Too Can Have Fun and Gain Human Potential with Performance Monitor * |
| Event Viewer * |
| Log Files * |
| Log File Events * |
| Log Event Details * |
| Windows NT Diagnostics * |
| Version * |
| System * |
| Display * |
| Drives * |
| Memory * |
| Services * |
| Resources * |
| Environment * |
| Network * |
| Exercise 13-14: Using the Windows NT diagnostic tools * |
| Network Monitor * |
| Exercise 13-15: Installing the Network Monitor * |
| Exercise 13-16: Manually initiating a data capture * |
| Exercise 13-17: Setting Network Monitor passwords * |
| Answers to Chapter 13 Self Test * |
| Performance Tuning | |
| Optimizing Applications | |
| Performance Monitor | |
| Event Viewer | |
| Windows NT Diagnostics | |
| Network Monitor |
One might ask, "Why do you need to tune your automobile?" One might just as well ask," Why do you need to tune your Windows NT Server system?" Just as you tune your vehicle for maximum efficiency, you should also optimize your Windows NT system to maximize its potential.
Before optimizing your Windows NT system, you must be able to recognize where bottlenecks may exist. The first part of this chapter will examine what a bottleneck is and suggest some methods for detecting and eliminating them. It will describe some self-tuning mechanisms thatWindows NT Server can use to optimize its own performance and network performance.
The next part of the chapter describes the Performance Monitor application—a very valuable tool in assisting you with diagnosing bottlenecks within your system. The remaining sections describe other tools that Windows NT Server provides for monitoring your system and network: Event Viewer, Windows NT Diagnostics, and Network Monitor.
Performance tuning Windows NT Server is the art of taking your existing configuration and maximizing its performance to achieve the optimal outcome. It is a systematic approach that starts by locating the primary process that is hindering your system and resolving it. However, tuning your system does not stop there: it is an ongoing process.
This section will examine what a bottleneck is, then describe ways to detect and eliminate bottlenecks. It will also explore some specific mechanisms Windows NT Server provides to help your machine run smoothly.
Just as the neck is the narrowest part of a bottle, which restricts the flow of the bottle's contents, a computer bottleneck is the component that impedes the system as a whole from operating at its maximum potential. One useful way to define a bottleneck is to locate the resource that consumes the most time while a task is executing. You know you have a bottleneck if one resource has a high rate of use while other resources have relatively low usage.
All computer systems have bottlenecks that impede their performance capabilities. Depending on how you use your system, you may never notice what your bottlenecks are. If you routinely use your system as a stand-alone server,it may perform quickly enough that you do not notice a problem. On the other hand, if you use your system as the primary domain controller for a 15000-node network and it slows down immensely while validating client logons, you will definitely notice that you have a bottleneck.
However, just knowing that your system is running slowly does not help you to identify the resource responsible. Is it the physical memory, hard disk drive, processor, or possibly a Windows NT service or application? If you have to constantly fetch data from your paging file, is the hard drive causing the problem or is it a lack of memory in your system? If your system slows to a crawl, is it due to processor-intensive calculations or an application that is stealing processor time? At this point only a psychic could guess the reason, because any of these items could be slowing your system.
To locate a bottleneck in your system you must evaluate a set of metrics based upon the number of requests for service, the arrival time of the requests, and the amount of time requested. Typically the resource with the lowest maximum throughput capability becomes the bottleneck when it is in high demand. It is important to realize that a resource need not be at 100% utilization for a bottleneck to occur. Later in this chapter, when we begin using the performance monitor, we will discuss different levels of utilization that typically indicate a bottleneck.
Once you recognize that a bottleneck exists, you are halfway to solving your problem and speeding up your system. The steps you take to eliminate the bottleneck will vary, depending on what type of bottleneck you have. In various situations you may need to add more memory to the system, add a faster hard drive, or add more processors.
Once you have eliminated the most significant bottleneck in your system, try to find the next bottleneck and eliminate that one. Performance tuning is a constant cycle of improvement; there will always be some bottleneck to overcome unless your system becomes so fast that you do not perceive any slowdowns.
Windows NT Server provides several mechanisms to help optimize your system performance automatically. These include:
| Methods to avoid fragmentation of physical memory | |
| Methods to utilize multiple pagefiles | |
| Multiprocessing capability | |
| Thread and process prioritization | |
| Caching disk requests |
Windows NT Server utilizes two types of memory, physical memory, which is the actual RAM (random access memory), and virtual memory, which is hard drive space acting as though it is additional RAM. Virtual memory is used when the amount of physical memory is not enough to run the current applications, processes, and threads. Data is transferred transparently between physical memory and virtual memory under the control of the virtual memory manager, which swaps unused data from RAM to the hard drive and from the hard drive to RAM so that it can be accessed faster.
The smallest portion of memory that can be managed is 4KB (kilobyte). This 4KB section of memory is called a page. Both physical memory and virtual memory (the file stored on the hard drive is called pagefile.sys) have the same page size. This allows the virtual memory manager to manipulate data that is being moved either from physical memory to virtual memory or vice versa in standard data blocks. Any available space in physical memory or virtual memory can be used for the transferred page without fear of fragmentation.Fragmentation occurs when there is unused space within contiguous pages. If there is sufficient fragmentation in a system, it has areas of memory that cannot be used by other applications. This means that memory is wasted.
Other operating systems use much larger pages—up to 64KB in size. Let's compare data storage using a Windows NT 4KB page and another operating system that has a 64KB page size. If there were 3KB of information stored using 64KB pages, then 61KB of that memory will be wasted. Howeve,r if that same 3KB of data were stored in Windows NT pages, there would only be 1KB of unused memory. Or take another example where a thread (which allows a process to run different portions of its program concurrently) ) that needs 26KB of memory is executing. On Windows NT it uses 7 pages (7 x 4KB = 28KB), leaving only 2KB being unused. On the operating system that uses 64KB pages, this single thread wastes 38KB of memory. Keep in mind that this example is for only one thread; normally there are numerous threads running on a system, so the waste would be multiplied.
By optimizing the size of the pages in this manner Windows NT Server leaves more physical memory available for your application, but it does not have to do as much swapping to virtual memory. It is still important to have as much physical memory in your system as possible to reduce the page swapping that the virtual memory manager will have to perform.
It is not always possible to add more memory to your system to reduce paging, but the virtual memory manger within Windows NT can recognize more than one pagefile. When you first launched the Windows NT Setup program, it created a file called pagefile.sys on the physical drive where the operating system was being installed. The default size of pagefile.sys is the amount of physical RAM or, if the system has less than 22MB of physical RAM, the pagefile.sys is 22 MB or the amount of available space, whichever is less.
If you have multiple logical or physical drives, it is possible to have more than one pagefile. Windows NT supports up to a maximum of 16 pagefiles per system. There can be one pagefile per logical disk but, for maximum efficiency you should create additional pagefiles (one per physical disk). By placing the additional pagefiles on separate physical drives, you can significantly increase levels of I/O (input/output) if your hard drive controller is capable of reading and writing to multiple hard drives at the same time. If you place additional pagefiles on logical drives, you may notice a slowdown in your system because the drive head is having to move between the multiple pagefiles on the physical drive that hosts the logical drives. Exercise 13-1 shows you how to split your paging file among multiple hard drives. Keep in mind that to perform this exercise you must have more than one physical drive in your system.
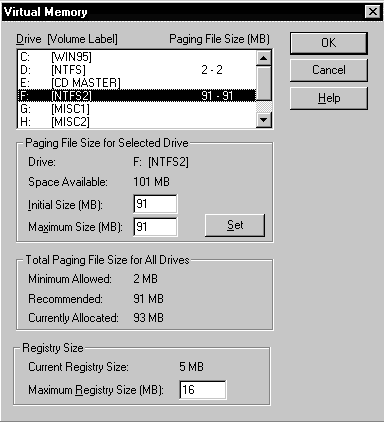
Figure 13-1 shows multiple pagefiles in use on a Windows NT Server system. Notice that the minimum pagefile size Windows NT allows is 2MB.
Windows NT is an operating system that can increase the performance of your system by taking advantage of more than one processor in a system. In a single-processor system, only one thread can be executed at a time. In a multiprocessor system, each processor can handle one thread—thereby improving performance.
Multiprocessing systems are not all created equally. A multiprocessing system can fit into one of two different categories—asymmetric or symmetric. An asymmetric multiprocessing (ASMP) system assigns specific threads to a specific processor, which could lead to wasted processor time if one processor is waiting for a thread that is not being executed. An example of asymmetric multiprocessing is a situation where the operating system is running on one processor and applications are running on the other processor. When applications are not running, the processor are sitting idle and not effectively used. Figure 13-2 shows an ASMP system with four processors. As you can see, processor 1 is being used for the operating system and processor 3 for an application. Processors 2 and 4 are not being used; they are being wasted. By contrast, in a symmetric multiprocessing (SMP) system, available processors are used as needed. Windows NT supports SMP, which allows it to distribute application needs and system load evenly across all the available processors. Figure 13-3 shows an SMP system with four processors. Each processor is sharing in the load of the operating system and the application.

Figure 2: Asymmetric multiprocessing
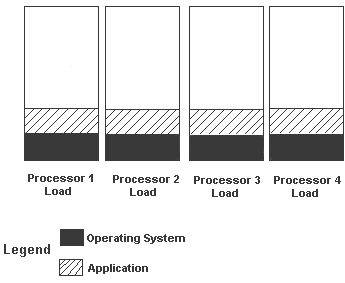
Figure 3: Symmetric multiprocessing
Multiprocessing systems do not simply double the performance capability of your two-processor system as you might think. There is overhead for resource sharing and scheduling that must be factored in. It is generally accepted that two processors will give you roughly 150 percent the performance of one processor, but this depends on how your system is being used.
As shipped, Windows NT Server supports four processors. If you need support for more than four processors (up to a maximum of thirty-two), contact your computer manufacturer to acquire the appropriate files to support additional processors.
As discussed earlier in this chapter, a process can be made up of multiple threads that are executed at the same time in a multiprocessing system. However, if you look at a preemptive multitasking operating system, it only appears that the threads are being processed at the same time. In reality, the threads are processed based upon their priority. Since Windows NT is a preemptive multitasking operating system, there must be a way to manipulate the priorities of the processes and threads. Windows NT always schedules the highest priority thread to run, even if it has to interrupt a lower priority thread. This keeps the processor running the highest priority task.
The priorities within Windows NT are handled in a hierarchical manner, with a number range of 0 to 31 and four base priority classes. Table 13-1 illustrates the four classes and the priority numbers associated with them. Each process starts with a base priority of 8, which is within the normal base priority. The threads of a process inherit the base priority of the process. Windows NT can raise or lower this number by two priority levels, which allows the system to prioritize itself as it is running.
| Base Priority | Number Range |
| Low | 0-6 |
| Normal | 7-10 |
| High | 11-15 |
| Real-time | 16-31 |
Table 1: Base Priorities for Processes and Threads
If there are two or more threads running at the same priority, they share the processor by taking equal turns until the threads have finished. Periodically all threads receive a priority boost from Windows NT. This helps to prevent the lower-priority threads from locking onto a shared resource that may be needed by a higher-priority thread. It also gives the lower-priority thread a chance to use the processor.
Dynamic applications use priority levels 0-15, while real-time applications operate with the priority levels from 16-31. Examples of dynamic applications are user applications or operating system components that are not critical to the performance of the system; these applications may be written to the pagefile. A real-time application would be a mouse driver that is critical to system performance and therefore cannot be written to the pagefile. Real-time applications must access the processor quite frequently, in order to respond to a real-time event such as a user's moving the mouse cursor across the monitor screen.
To start a process with a priority higher than 23, you must be an administrator. This is because a process running at such a high priority dramatically slows the entire system; it changes even a simple task such as moving the mouse cursor into a slow, painful procedure.
As discussed, Windows NT can automatically change the priority of processes as they run. For example, if you bring an application to the foreground, the operating system automatically raises the priority level of the running processes to make sure that it responds to your requests quickly. Priorities 0-15 only have the processor for a time slice, whereas priorities 16-31 use the processor until completed or until a higher priority needs the processor. Later in the chapter you'll learn how to optimize application responsiveness in a variety of ways.
Windows NT Server improves the performance of your system through disk caching which is controlled by the disk cache manager.The disk cache manager helps by reducing the amount of I/O traffic to your hard drive. It does this by storing frequently used data in physical memory rather than having to read it each time from your hard drive. Reducing the amount of I/O increases your system performance.
When a new process starts, the cached memory is changed because the process acquires a working set, thereby reducing the amount of RAM for caching. Windows NT is designed to maximize the usage of physical memory; memory not being used by a process is used by Windows NT for disk caching to improve performance.
It is not possible to manually configure cache size since that is determined by all the applications that are running on the system. The best way to optimize the size of the disk cache is to have as much physical memory as possible in the system. This gives Windows NT sufficient resources to manage itself optimally.
All networks are not created equal, nor does each Windows NT Server have the same mission on every network. That means that each machine must be tuned for the job it is going to perform. We will discuss two methods to perform network tuning via the Network applet in Control Panel. The first method is to choose the appropriate optimization setting for the Windows NT Server service. Figure 13-4 shows the four possible settings that can be applied. Depending upon which option you choose, the amount of memory allocated to the server service can differ dramatically.
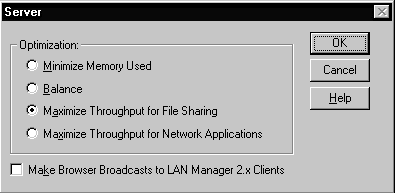
Figure 4: Server service optimization levels
Options for NT Server service optimization are:
| Minimize Memory Used, which can handle up to 10 users simultaneously using Windows NT Server. You should not use this option on a file server unless the network is very small. | |
| Balance, which serves up to 64 users and is useful for departmental servers. | |
| Maximize Throughput for File Sharing, which is for 64 or more users. When you choose this option, access to the file cache has priority over user application access to memory. It also allocates as much memory as is required for file sharing. This option is the default setting. | |
| Maximize Throughput for Network Applications, which is for 64 or more users. This option allows users’ application access to have priority over file cache access to memory. This setting is a good choice for servers that run primarily network applications. |
The second way to perform network tuning is to set the binding order based upon the protocols most used on your network. If the protocol used on the machines that you will connect to is first in the binding list, then the average connection time decreases. However, changing the binding order of the server service does not impact server performance. The Server service listens on all protocols and responds when it gets a connection request regardless of the binding order. Figure 13-5 shows the Bindings tab from the Network applet.
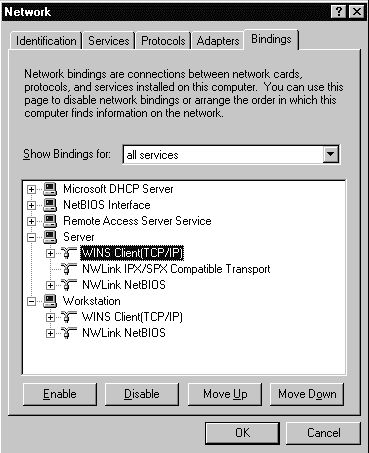
Figure 5: Bindings tab from the Network applet
Choosing the correct network interface card (NIC) for your system can substantially increase system performance. You should choose a NIC that will take advantage of the full width of your systems I/O bus. For example, compare the performance of a low-bit card and a high-bit card: an 8 bit NIC card on an ISA bus transfers data at 400KB, while a 32 bit NIC on a PCI bus transfers 1.14MB in the same time period.
In most situations the self-tuning that Windows NT performs on itself and the network tuning you perform will be sufficient to have an optimally configured system. However, if self-tuning or network tuning does not solve your problem, you will need to turn to other methods of optimization such as the Task Manager or the Performance Monitor.
It is possible that an application will not be as responsive as you need it to be. This may be caused by another application that creates a bottleneck or it may indicate a need to change the performance boost assigned to foreground applications. This section describes how you can optimize applications by using the Windows NT Task Manager.
The Windows NT Task Manager is a useful tool for short-term monitoring of your system. It can be extremely valuable in detecting an application or Windows NT service that may have become a memory or CPU (central processing unit) bottleneck. The Task Manager enables you to review applications, processes, and performance statistics in your NT Server at any given moment.
The Task Manager contains three tabs:
| Applications | |
| Processes | |
| Performance |
The Application and Processes tabs list everything that is running on your system. The Performance tab provides a summary of the overall system by listing CPU and memory usage, as well as other performance information such as the number of threads that are running. An application is listed under the Application tab and also listed in the Processes tab—along with other processes such as Windows NT services and drivers. Figure 13-6 displays the Task Manager's Processes tab. One currrent process is consuming more memory than it should, thereby slowing the system. Can you identify it?
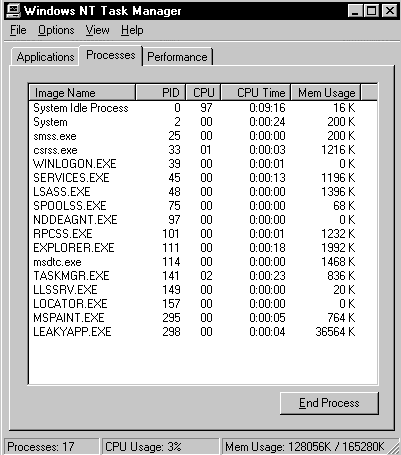
Figure 6: Windows NT Task Manager
If you said that leakyapp.exe looks like it is using more memory than it should, you are correct! This is just one way that the Task Manager can help you quickly identify bottlenecks within your system.
Now it is your turn to start up the Task Manager and take a look at what is happening in your own system. Exercise 13-2 helps you to start up a few applications and look at all three tabs under Task Manager, in order to identify bottlenecks in your own system.
Later in the chapter you will use the Windows NT Task Manager to change the responsiveness of processes that are running, but first let's look at how changing the foreground application affects performance characteristics.
You can change the responsiveness of the foreground application by adjusting the Application Performance Boost slider. Figure 13-7 shows the Performance tab from the System Properties screen. As indicated by the hash marks under the slider, there are three possible slider settings that will boost the foreground application. The Maximum setting increases the foreground application by two priorities. If you have an application that started with a priority of 8 and have the slider in the Maximum position, it will raise it to a priority level of 10 as long as the application is in the foreground. The middle setting increases the priority of the foreground application by one level. With the slider set to the None position, the foreground and background applications run with the same priority level. Exercise 13-3 shows how to change foreground application priority levels.
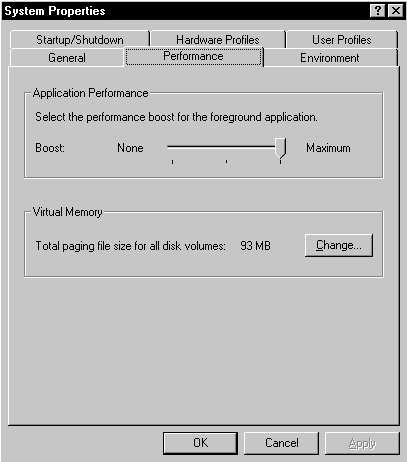
Figure 7: Performance tab from System Properties screen
Be sure to set the Application Performance Boost slider back to Maximum after you have finished experimenting with the None setting.
If you have several applications running and you want them all to operate at a high priority level regardless of which application is in the foreground, you can adjust the behavior of Windows NT by manually changing the applications while they are running or before they start.
To manually change the priority of an application that is already running you utilize the Task Manager as discussed earlier in the chapter. Priority levels changed with the Task Manager remain in effect as long as the process is running. Figure 13-8 shows an example of changing the priority for TCPSVCS.EXE. Exercise 13-4 shows you how to use the Task Manager to change the priority of an application that is already running.
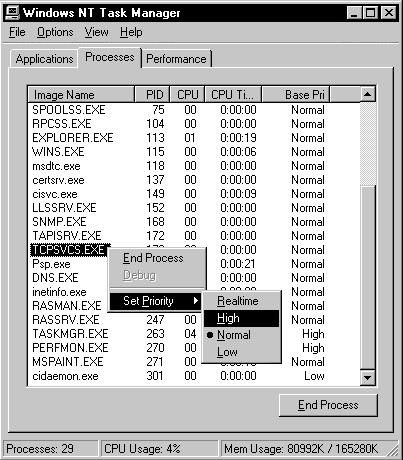
Figure 8: Changing the priority of a process using the Task Manager
If you want to start a process at a different priority from what it would normally have, you can start it from a command prompt using one of the switches listed in Table 13-2. Exercise 13-5 shows you how to start a process with a priority other than normal.
| Switch | Priority Level |
| /LOW | 4 |
| /NORMAL | 8 |
| /HIGH | 13 |
| /REALTIME | 24 |
Table 2: Command Line Switch Settings to Change Process Starting Priority
The Performance Monitor is a tool, included with Windows NT 4.0, that tracks the usage of resources by the system components and applications. By tracking different components of your system it can greatly help you to see what is degrading the performance. The Performance Monitor can be used for a variety of reasons including:
| Identifying bottlenecks in CPU, Memory, Disk I/O, or Network I/O | |
| Identifying trends over a period of time | |
| Monitoring real-time system performance | |
| Monitoring system performance history | |
| Determining the capacity the system can handle | |
| Monitoring system configuration changes |
The Performance Monitor is used to establish a baseline of your system. A baseline is a snapshot of your system under normal operating conditions and a yardstick to measure future abnormalities. When you start Performance Monitor, as with any application, you use a portion of processor time to run the program. If you turn on the switch that allows disk monitoring, that task will minimally affect I/O for the hard drive. This should, in essence, have no effect on the results of the measurements you are taking. Figure 13-9 shows the Performance Monitor just after it has been started. Exercise 13-6 shows you how to start the Performance Monitor on your system. It is best to make sure that your hard drive has finished all startup processing before starting the Performance Monitor. This ensures that your results do not include any of the startup processing.
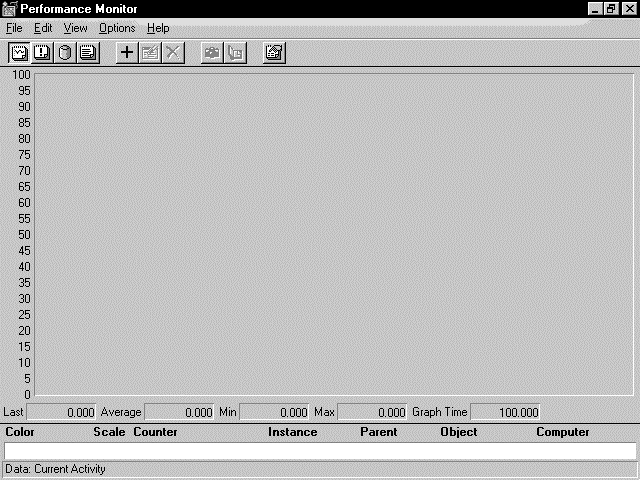
Figure 9: Performance Monitor screen
Performance Monitor utilizes three different types of items to view the system. They are objects, counters and instances.
| Objects are system components such as memory, processor, or disk. See Table 13-3 for other objects. | |
| Counters are specific features of objects; for example, the %Processor Time is a counter for the processor object. Objects can contain many different counters. | |
| An instance is a single occurrence of a counter activity. For example, if your system has two processors, you have two instances of the process counters. |
Measurements are always occurring throughout the processes running on your Windows NT system—with the exception of the disk counters, which are turned off by default. The Performance Monitor is the tool that displays this measurement, based upon the objects you choose.
Counters are incremented each time an object performs its functions. For example, each time the processor services a request from an I/O device, the interrupts/sec counter would be incremented.
Many of the counters are used by Windows NT so that it may monitor itself and perform self-tuning for maximum optimization. Table 13-3 lists several of the objects that can be measured with Performance Monitor. This list is not inclusive and your applications may be written to let the system monitor their performance via objects.
| Object Name | Description |
| Browser | Monitors browser activity for the domain or workgroup to include elections and announcements |
| Cache | Monitors the disk cache usage |
| LogicalDisk | Monitors hard drive partitions |
| Monitors the subpartitions of a extended partition | |
| Memory | Monitors memory usage and performance for both physical and virtual memory |
| Paging File | Monitors the usage of pagefiles |
| PhysicalDisk | Monitors a hard drive that contains one or more partitions. This object can be used to monitor the whole drive instead of individually monitoring partitions. |
| Process | Monitors all processes that are running on the system. |
| Processor | Monitors each processor in the system |
| System | Monitors counters that affect all hardware and software in the system. |
| Monitors all processors on the system as a group | |
| Thread | Monitors all threads running in the system |
Table 3: Description of Objects Measured by Performance Monitor
The Performance Monitor can display the following views:
| Alert | |
| Report | |
| Log |
The following sections describe these four views and explain where each can be useful in monitoring your system.
A Performance Monitor chart measures the objects that you designate; it reflects the current activity with a real-time look at the counters chosen. Once you create a display with the counters you want to view, you can save the counters into a file on a regular basis so you don’t have to rebuild the display each time. Figure 13-10 shows the Add to Chart dialog box.
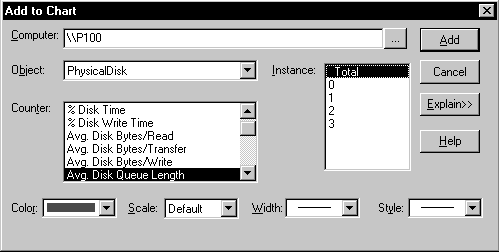
Figure 10: Add to Chart dialog box
As Figure 13-10 indicates, you can vary the color, scale, width, and style of each counter that you add to the chart. When Performance Monitor is started, it uses a default scale. However, if you are viewing more than a single counter, you may want to use a different scale for each counter in order to see the data clearly.
Figure 13-11 shows the chart options available in Performance Monitor. The Chart Options dialog box allows you to customize your charts and change the manner used for updating chart values. Some of the items you can change include the time interval that is used for graphing information from the counters and changing the display from a graph to a histogram.
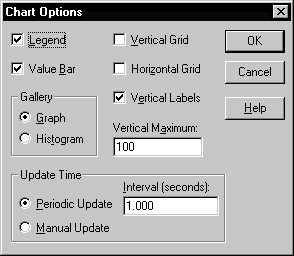
Figure 13-11: Chart Options dialog box
A chart like that shown in Figure 13-9 shows the activity of each object, counter and instance that is being monitored. The scale on the left of the chart is displayed by default and always starts at zero. The scale can be changed if your activity goes above one hundred. The default time interval is set to one second for each counter. Table 13-4 describes the other values displayed by the Performance Monitor chart.
| Value | Purpose |
| Last | Displays the counter's value during the last poll |
| Average | A running average of the counter during the chart's history |
| Minimum | The minimum value of the counter during the chart's history |
| Maximum | The maximum value of the counter during the chart's history |
| Graph Time | The total amount of time it takes for a complete chart to be created across the screen |
Table 4: Performance Monitor Chart value bar descriptions
A Performance Monitor Alert tracks events and notifies a user or a computer depending on the parameters you set. You can set the alert log to monitor several counters; an alert is triggered when a threshold setting is reached. Two options that allow you flexibility in defining alerts are the Alert If and Run Program on Alert. Figure 13-12 shows the Add to Alert dialog box.
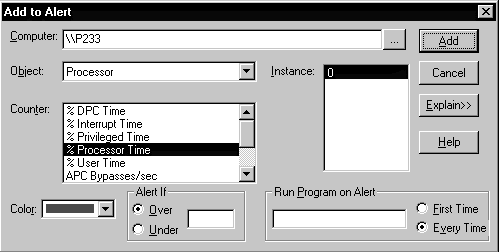
Figure 12: Add to Alert dialog box
Figure 13-13 shows the alert options that are available in Performance Monitor. The Alert Options dialog box allows you to customize your alerts by switching to Alert view, logging the event in the application log, changing the update time, and sending a network message to a user account or a computer on the network. The messenger service must be started before the network message will function.
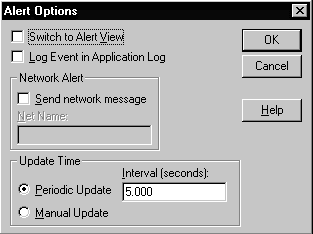
Figure 13: Alert Options dialog box
The Report view lets you display constantly changing counter and instance values for selected objects. Values appear in columns for each instance. You can adjust report intervals, print snapshots, and export data. For example, you could create a report on all the counters for a given object, then watch how they change under various loads. Figure 13-14 shows the report options available in Performance Monitor. As you can see, the only option available with the Report view is the update time. It can be updated either periodically or manually.
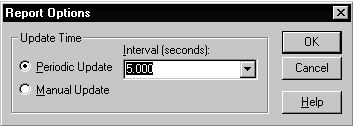
Figure 14: Report Options dialog box
Log files, which are in binary format, provide a way to save the counter information and then later run it through the Performance Monitor application. They enable you to track counters over a long time period and provide a very reliable method for documenting your system's performance. Figure 13-15 shows a log view that is monitoring several counters. The log file is set to collect data every 5 seconds and store it in a file called D: \temp.log.
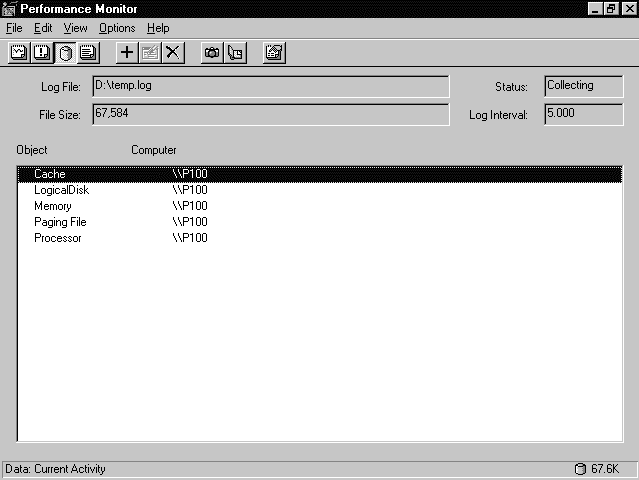
Figure 15: Performance Monitor showing Log view
One advantage of using a log file, instead of extracting information live from the system, is the ability to adjust the start and stop times that will be displayed. It is important to note that you cannot move around the log file while logging is occurring. However, you can use the Time Window option from the Edit menu to change the starting and stopping points by moving the corresponding end of the time interval slide bar as illustrated in Figure 13-16. It is also possible to use bookmarks to change the start and stop points.
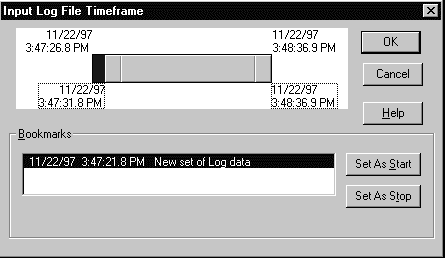
Figure 16: Input Log File Timeframe window
Figure 13-17 shows the log options that are available when viewing a saved log file. Within this window you can change the update time, the log filename, and also start and stop logging. Exercise 13-7 gives you a chance to create and view a log file on your system.
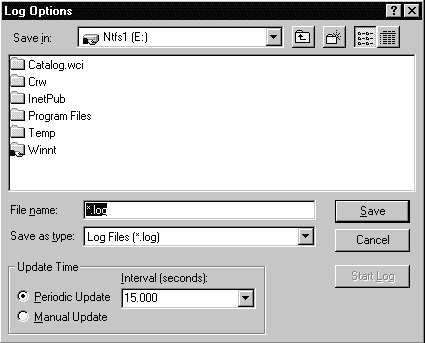
Figure 17: Log Options dialog box
Now use Exercise 13-8 to review the log file just created.
Now that you have seen the different views available in Performance Monitor, let's look at how it can help you enhance your system's performance.
It is important to monitor all actions that may cause bottlenecks in your system. In the following sections you will use Performance Monitor to examine processor performance, disk drive performance, and memory performance. As you will see, things are not as they always appear at first. The suspected culprit may in fact be disguising the real bottleneck.
Normally the processor is the fastest component in your computer; it tends to waste a lot of time waiting for other processes. The processor is usually not the bottleneck in a modern system unless you are using applications that are graphics- or math-intensive. However, you may want to measure the performance of your processor to ensure that a bottleneck is not present, especially if your processor pre-dates the Pentium family.
When monitoring processor performance, there are three important counters to observe:
| Processor:%Processor Time | |
| Processor:Interrupts/sec | |
| System:Processor Queue Length |
This counter indicates how busy the processor in your system is. There is no need to be alarmed if your processor has spikes of 100%; this is expected in some situations, such as when starting up an application. However, a bottleneck can occur if your processor is so busy that it does not respond to service requests for time. If you are experiencing a consistent processor load of 80% or more, you have a processor bottleneck. Exercise 13-9 leads you through the steps necessary to add the counter to the Performance Monitor.
Let your system sit idle for a few seconds, then open up any application such as Notepad. What happens to your Performance Monitor chart? You should see quite a bit of %Processor Time measurement being recorded as the application starts up.
The Interrupts/sec counter measures the rate of service requests from I/O devices. If you see a significant increase in the value of this counter without an equal increase in system activity, then a hardware problem exists; in other words, a component is not working properly. This counter should not normally be above 1000; however, an occasional spike above 2000 is acceptable.
This counter, which monitors the number of threads that are asking for processor time, is an important indicator of system performance. Each thread requires a certain number of processor cycles. If the demand for processor cycles exceeds what the processor can supply, a long processor queue develops. Such a queue degrades system performance. You should never have a sustained processor queue that is greater than two. If you do, there are too many threads waiting for the processor and the processor has become a bottleneck.
Once you have determined that the processor in your system is causing the bottleneck, do not automatically go out and buy a new processor. There are other parts of the system you can check first.
| Check to see if the processor only becomes a bottleneck when a certain application is running. If so, then find a new application to replace it (if feasible). Screensavers, especially OpenGL screensavers, are very processor intensive. | |
| Check to see if you are using low-bit network or disk adapter circuit cards. An 8-bit card will use more processor time than a 16-bit card, and a 16-bit card will use more processor time than a 32-bit card. Using a 32-bit card will provide the most efficiency for your system since it will transfer the most bits of data on each transfer from the card to memory. |
After checking the above items, if you still have a processor bottleneck, you may have no other choice but to replace the processor in your system. If your mainboard supports multiprocessing, add another processor.
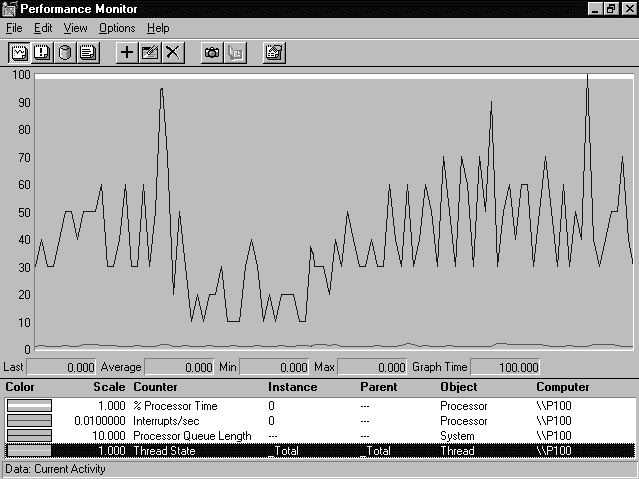
Figure 13-18 shows a processor bottleneck caused by a screensaver. The %Processor Time counter is the white line. As you can see, the screensaver kept the processor in use 100% of the time, which would prevent other tasks from operating efficiently.
The I/O capacity of the disk drive is usually the first resource to reach its limit and create a bottleneck on your system. The hard drive in your system participates in everything from booting your system and loading applications, to storing and retrieving data from your hard drive and pagefile. With your hard drive involved in all these processes, you can see that the speed of your drive can impact the performance of your system.
The first sign that you may have a disk drive bottleneck could be the amount of time that the disk drive indicator stays illuminated. However, this should be verified by using the Performance Monitor. If Performance Monitor shows sustained periods of disk activity above 80%, then a disk drive bottleneck is present. Keep in mind that the disk drive may not be the root cause of the bottleneck: you will need to investigate further to make a final determination.
Table 13-3 showed you a sampling of objects that can be monitored with Performance Monitor. Remember that there were two objects related to disk drive performance, LogicalDisk and PhysicalDisk. The LogicalDisk Object measures performance at a much higher level than the PhysicalDisk Object does.
The LogicalDisk Object can measure the performance of a partition of a hard disk drive that has been assigned a drive letter such as C: or D:. A good use of LogicalDisk is to monitor which partition may be busy due to a particular application.
The PhysicalDisk Object measures real transfers to and from actual hard disk drives, not just partitions. You use this object when you want to isolate differences in performance between drives in your system or if you want very detailed information about the performance of a specific drive. In looking for disk bottlenecks it is best if you start first at the PhysicalDisk. After you identify a PhysicalDisk that has a bottleneck, you isolate the LogicalDisk on that physical disk drive; then, if necessary, you determine which application on the logical drive is generating the I/O activity.
To monitor either LogicalDisk or PhysicalDisk performance you must enable the disk drive performance counters by running the Diskperf utility. These counters are disabled by default because they degrade overall system performance by interrupting the processor during I/O. The counters should only be enabled when you want to monitor disk performance and should be immediately disabled when monitoring is complete. When you enable the counters, Diskperf installs the Disk Drive Performance Statistics Driver that actually collects the data for Performance Monitor, as well as a high precision timer that times each disk drive transfer. The driver and timer have been measured to take between 1% - 2% of overhead on Intel-based processor systems.
In order to run the Diskperf utility you must belong to the Administrators local group. Exercises 13-10 shows you how to enable the disk drive performance counters.
When monitoring disk drive performance there are five important counters to observe:
| Memory:Pages/sec | |
| %Disk Time (Applies to both LogicalDisk and PhysicalDisk Objects) | |
| Disk Bytes/sec (Applies to both LogicalDisk and PhysicalDisk Objects) | |
| Average Disk Bytes/transfer | |
| Current Disk Queue Length (applies to both LogicalDisk and PhysicalDisk Objects) |
This counter watches pages that are swapped and written to your disk drive. Remember that the virtual memory of your system is kept in a file named pagefile.sys that is located on your disk drive. If you monitor this counter and the %Disk Time counter you will see how much the pagefile.sys affects the overall performance of your system. The Memory:Pages/sec value should be <5.
The %Disk Time counter shows the amount of time the disk drive is busy. It can be a broad indicator on whether your disk drive is a bottleneck. If you use this counter in addition to the Processor:%Processor Time counter described earlier, you can see if disk requests are using up your processor time. The %Disk Time value should be <50.
The Disk Bytes/sec counter shows you how fast your disk drives are transferring bytes to and from the disk. The larger the value, the better. This is the primary measure of disk throughput. Exercise 13-11 shows you how to add this counter to Performance Monitor.
If you have more than one disk drive, copy a few large files from one disk drive to another disk drive while you monitor the Disk Bytes/sec counter to see the speed at which your drives are performing.
The Average Disk Bytes/transfer measures throughput of your disk drive. The larger the transfer size, the greater the disk drive efficiency and system execution speed.
This counter shows how much data is waiting to be transferred to the disk drive. It counts the number of requests, not time. It includes the request currently being serviced and those waiting. A disk queue of more than two may indicate that the disk drive is a bottleneck.
Now that you have completed your measurements,, it is time to disable the disk drive performance counters so they do not degrade system performance. Exercise 13-12 shows you how to disable the counters.
If you have determined that the disk drive in your system is causing the bottleneck, do not go out immediately to buy another disk drive. There are some other parts of the system to check first.
| Check to see that you have plenty of physical memory in your system. By having as much physical memory as possible you increase the amount of disk caching and reduce the amount of paging to the hard drive. This will increase the performance of your system immensely. Normally when you increase physical memory you also increase the size of the pagefile, especially if you write a dump file when the system crashes. | |
| Check to see if you can move your pagefile.sys file from your system partition to another available partition. | |
| Check your disk drive controller card. If you have a card that transfers in 8-bit or 16-bit increments you will see a drastic improvement by switching to a 32-bit controller card. If possible make sure that the 32-bit controller card is a bus mastering, direct memory access (DMA) controller rather than a controller that uses programmed I/O. Programmed I/O uses the processor to set up disk drive transfers. A bus mastering DMA controller uses the disk drive controller to manage the I/O bus and the DMA controller to manage the DMA operation. This frees the processor for other uses. |
If you have determined that you do need another disk drive and you plan to add it to your existing disk drive configuration, place the drives on separate I/O buses to ensure maximum performance potential.
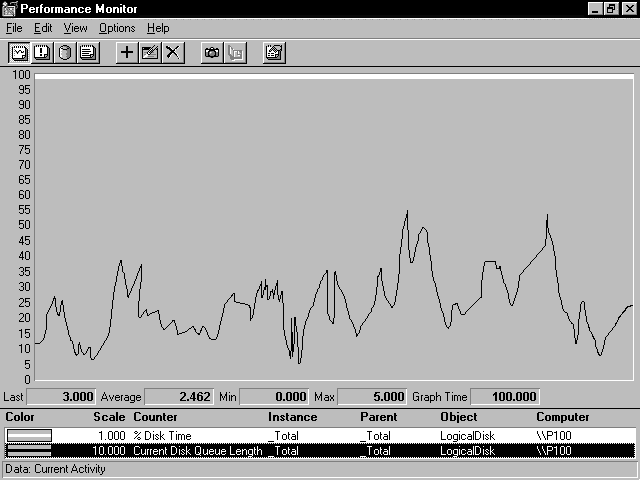
Figure 13-19 shows an example of a situation where a faster disk drive is needed. The white line displays %Disk Time at a sustained rate of 100%. The black line is the Current Disk Queue Length, which has had a maximum of 5 items in the queue with an average of about 2.5 items.
Memory can contribute significantly to system bottlenecks; some claim it is the most common bottleneck you will encounter. Windows NT is a virtual memory operating system, which combines two items: physical memory and space on the disk drive (pagefile.sys). Data is stored on the disk drive until needed, then moved into physical memory on demand. In such a scheme, data that is not being actively used is written back to the disk drive. However, if a system has too little physical memory, data must be moved into and out of the disk drive more frequently—which can be a very slow process. Data pages that have recently been referenced by a process are stored in physical memory in a working set. If the process needs data that is not in the working set it will create a page fault and the memory manager will add new pages to the working set.
The first step you should take in investigating a suspected memory problem is to measure the amount of paging that is occurring. There are four important counters you should use when you investigate a memory bottleneck. They will indicate how often processes have to look outside of their working set to find data they need. The four counters are:
| Memory:Pages/sec | |
| Memory:Page Faults/sec | |
| Memory:Pages Input/sec | |
| Memory:Page Reads/sec |
This is the primary counter used to detect a memory bottleneck. It measures the number of requested pages that were not immediately available in physical memory and had to be accessed from the disk drive, or had to be written to the disk to make room in physical memory for other pages. If this value has extended periods where the number of pages per second is greater than five, memory may be a bottleneck in the system.
This counter measures the number of times that data is not found in a process’s working set. This includes both hard page faults, in which additional disk drive I/O is required, and soft page faults, in which the pages are located elsewhere in memory. If your system repeatedly fails to find data in the process’s working set, then the amount of memory is probably too limited. The best indicator of a memory bottleneck is a continuous, high rate of hard page faults. Exercise 13-13 shows you how to add this counter to Performance Monitor.
This counter is used to see how many pages are retrieved from the disk drive to satisfy page faults. This counter can be used in conjunction with Memory:Page Faults/sec to see how many faults are being satisfied by reading from your disk drive and how many may be coming from elsewhere, such as other locations in memory.
This counter reflects how often the system is reading from your disk drive due to page faults. If you sustain more than 5 pages or more per second, you have a shortage of physical memory.
Once you have determined that the memory in your system is causing the bottleneck, you may decide to add physical memory. Although it never hurts to have as much physical memory as your system can handle, there are some things you can check within your system to alleviate the problem.
| Check to see if you have any drivers or protocols that are running but not being used. They use space in all memory pools even if they are idle. | |
| Check to see if you have additional space on your disk drive that you could use to expand the size of your pagefile. Normally, the bigger the initial size of your pagefile the better, in performance terms. |
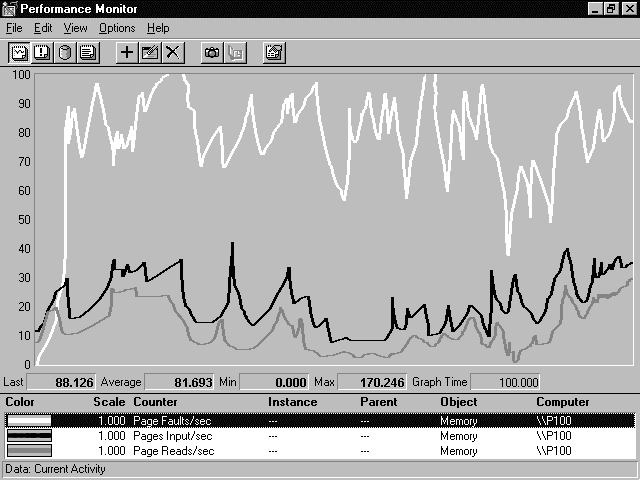
Figure 13-20 shows an example of three memory counters discussed in this section. The white line is the Page Faults/sec, which is the total page fault rate during this measurement; it averages 81 per second. One hard fault won’t slow down your system so that you would notice it. However, a large ratio of hard page faults to soft page faults would slow down your system so that you could notice a performance hit. The black line is Pages Input/sec; it measures the hard page faults by counting the number of pages that have to be taken from disk drive to satisfy the fault. The area between the white and black lines shows the number of soft page faults during this measurement. (Recall that a soft page fault is a page that is found elsewhere in physical memory, such as cache memory.) The dark gray line is the Page Reads/sec, which is the number of times the disk drive had to be read to satisfy a page fault.
Now that you have seen what Performance Monitor can do, let's look at some other monitoring tools available in Windows NT Server.
We tell students they can find out almost everything they want to know about their NT server performance just by using Performance Monitor. On its face, this is a true statement. In the classroom, mostly due to time constraints, we give them a few simple exercises to demonstrate the power and potential of Performance Monitor. But there is much more to this tool than can be covered in a few short classroom drills. Students want to become more familiar with Performance Monitor when they get back to work. Here are some ideas.
First, establish a baseline of performance before you put your server into production. It is most helpful to know what the no-load performance characteristics of you server are.
Save the performance information that you collect every time you run Performance Monitor. Even more important than the absolute performance of your server is its relative performance over time—in comparison to its no-load baseline.
When you run Performance Monitor, always measure the same core objects and counters. You can add other objects and counters as necessary to measure specifics, but always include these core objects and counters so that you have a consistent frame of reference. We suggest that you select objects and counters from the categories of CPU, memory, disk and network. The objects and counters you select really depends on your configuration, but choose some from all four categories and include them in every test.
Remember the disk performance counters are disabled by default, and you want them that way for normal operation. Enable them at the command line by running "diskperf –y" and rebooting. Don’t forget to disable them when you are done. The command is "diskperf –n" and reboot.
The Event Viewer, located under the Administration submenu, lets you examine various events generated by audited user actions or the Windows NT system, services, and applications. Figure 13-21 shows an example from the Event Viewer.
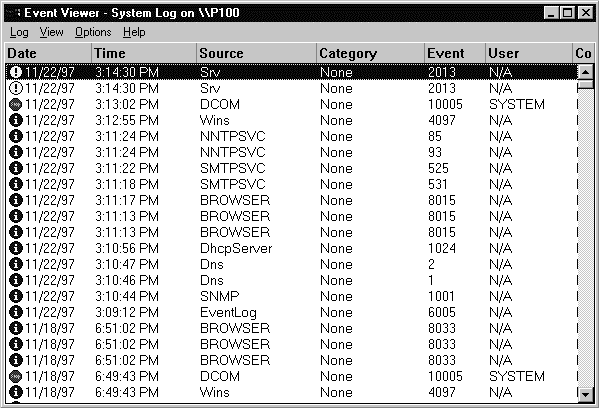
Figure 21: Event Viewer
The event viewer can display three separate logs. The log you open depends upon the type of items you need to view.
| The System Log contains events that are provided by the Windows NT internal services and drivers. | |
| The Security Log contains all security related events when auditing has been enabled. | |
| The Application Log contains events that have been generated by applications. |
By default, each log file is a maximum of 512 kilobytes in size and overwrites events older than seven days. However, these parameters can be reset by changing the Maximum Log Size and Event Log Wrapping options in each of the three individual log files. The maximum size of the log can be changed in 64 kilobyte increments. The three event log wrapping options are: overwrite events as needed; overwrite events older than ‘number’ days; and do not overwrite events (clear log manually).
Event log files may be saved in three different formats; event log file with the .evt extension, text file with the .txt extension, or a comma-delimited text file with the .txt extension. The .evt file is a binary file that can be read only by the event viewer utility. Any ASCII editor can read the text files. If you save the log file, the text description will be saved regardless of the format in which you save the file. However, the hexadecimal data will be saved only if you use the .evt format.
There are five types of event recorded in the various logs. A unique icon identifies each event type, so that you can rapidly locate the type of event you are seeking. Table 13-5 describes each of the event types.
| Icon | Event | Description |
| Illustration 1
|
Error | A significant problem has occurred; for example, a service may not have started properly. |
| Illustration 2
|
Warning | An event has occurred that is not currently detrimental to the system, but it may indicate a possible future problem. |
| Illustration 3
|
Information | A significant event has occurred successfully. For example, a service that starts successfully may trigger this type of event. |
| Illustration 4
|
Audit Success | An audited security access attempt was successful. For example, access to an audited directory was granted. |
| Illustration 5
|
Audit Failure | An audited security access attempt was not successful. For example, a login attempt failed. |
Table 5: Types of Events Displayed in the Event Viewer
Events can be seen in greater detail by using the mouse to double-click on an event or by highlighting the event and choosing Detail from the View menu. The Detail dialog box displays a text description that may help in analyzing the event. Hexadecimal information may also be provided, depending on the event. Figure 13-22 shows the event details for an event from the System log.
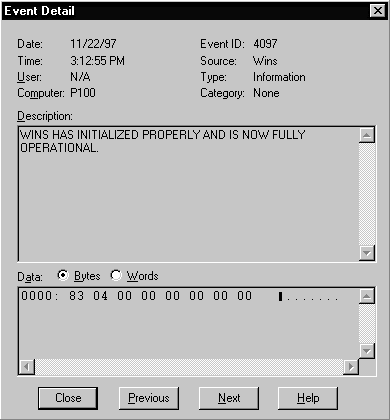
Figure 22: Event Detail from the System log
Windows NT Diagnostics (also called WinMSD) has several tabs that contain a great deal of information about your Windows NT Server system. Figure 13-23 shows Windows NT Diagnostics just after it has been started.
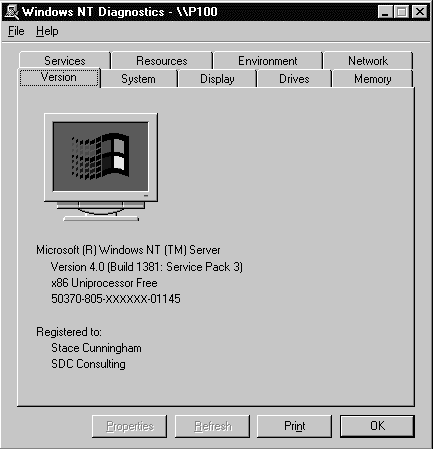
Figure 23: Windows NT Diagnostics opening window
The Version tab shows the NT version number, build and type, CPU architecture, and multiprocessor support. The serial number and the name of the registered user for this copy of Windows NT are also displayed.
The System tab shows system-level information about the hardware, including vendor ID, Hardware Abstraction Layer (HAL) type, BIOS date, and a description of the CPU.
The Dsplay tab shows the video BIOS date, display processor, video resolution, quantity of video RAM, vendor, Digital to Analog (DAC) type, and driver type and revision.
The Drives tab provides a tree display that can be sorted by drive letter or drive type for each logical disk drive. Selecting any drive brings up a Properties window that shows information such as the drive letter, serial number, disk space available and how much disk space is in use. A File System tab on the Properties window gives information about the file system being used, including the maximum number of characters in a filename. The File System tab also shows whether the case will be preserved in filenames, the support of case-sensitive filenames, support for Unicode in a filename, file-based compression, and security preservation and enforcement.
The Memory tab shows in-depth details on memory utilization in your system to include the total number of processes, handles, and threads in use. This tab also displays the total amount of physical memory and the page file space available and currently in use.
The Services tab displays information on all services and devices on your Windows NT Server. Highlighting a selection and selecting the properties button brings up a Service Properties dialog box for the service or device. The information includes the executable file associated with the service or device, the start type, the user account with which it is associated, and any error associated with it. Also displayed are the service flags, which indicate whether it will run in its own memory space, whether it is a kernel driver, and whether it can interact with the Windows NT desktop. A Dependencies tab shows you if the highlighted choice depends on another service or device. If it does depend on another service or device, that information may help you in troubleshooting why the service or device failed to start.
The Resources tab displays information about hardware resources, including interrupt requests (IRQ), I/O ports, direct memory access (DMA), physical memory; and device drivers. If you select an item, it displays a dialog box to indicate the associated device driver, bus, and bus type. A check box on this tab allows you to choose whether you want resources owned by the NT HAL to be displayed on the list.
The Environment tab displays all environment variables and values. It can display either values for the system or values for the local user for user-specific entries.
The Network tab provides a great deal of information including the number of logged-on users, transport protocols that are in use along with the media access control (MAC) address of each transport, internal network settings, and system statistics which include server bytes sent, hung sessions, and many others.
Now that you are familiar with all the tabs offered by Windows NT Diagnostics, use Exercise 13-14 to see how your system is functioning.
The Network Monitor is an outstanding tool for monitoring the network performance of your system. The Network Monitor that comes with Windows NT Server will only display the frames that are sent to or from your system. It will not monitor your entire network segment. A frame is an amount of information that has been divided into smaller pieces by the network software to be sent out across the wire. A frame consists of the following items:
| The source address of the system that sent the frame. | |
| The destination address of the system that received the frame. | |
| The header for the protocol that sent the frame. | |
| The actual data that was sent. |
The Network Monitor is not installed by default when you load Windows NT Server. It is implemented as a network service. Exercise 13-15 leads you through the steps needed to install Network Monitor on your system.
When you start the Network Monitor, it displays an empty capture window like the one shown in Figure 13-24.
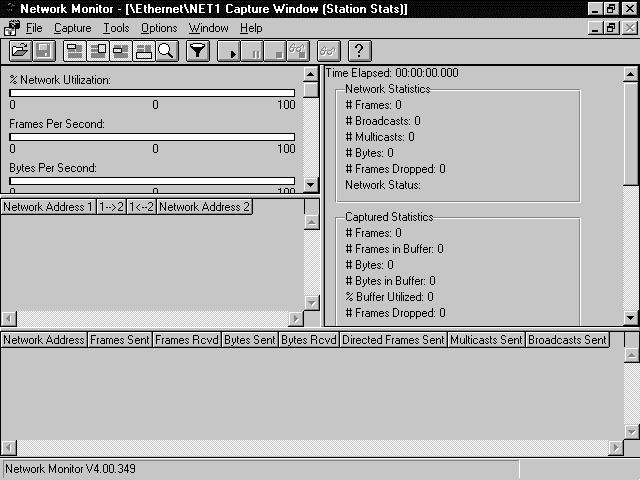
Figure 24: Network Monitor when first started
Now that Network Monitor is installed, let's capture some data to see what your system is doing on the network. Exercise 13-16 shows you how to capture data from your system. The exercise works best when performed on a system that is on a busy network.
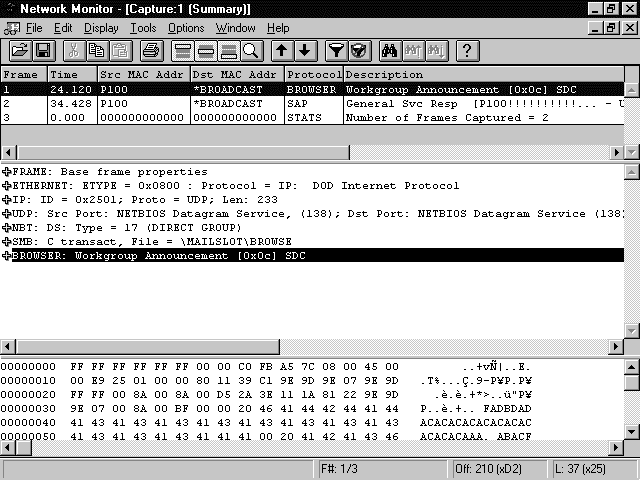
Figure 25: Capture window from Network Monitor
As you can imagine, there is a lot of valuable information to be gleaned from a Network Monitor capture. Remember, however, that Network Monitor can be a huge security risk as you or anyone else with access to the Administrative Tools group will have the ability to analyze frames sent to or from your Windows NT Server. It would not be a good situation if someone were able to capture e-mail that was meant for only you. Fortunately, a couple of precautions exist to help control security. First, the Network Monitor that comes with Windows NT Server cannot be operated remotely; you must be physically present and logged in at the server in order to use it. Second, special passwords for capture and display can be set in such a way that only the people who know those passwords can use the Network Monitor. Exercise 13-17 shows you how to set these passwords for your system.
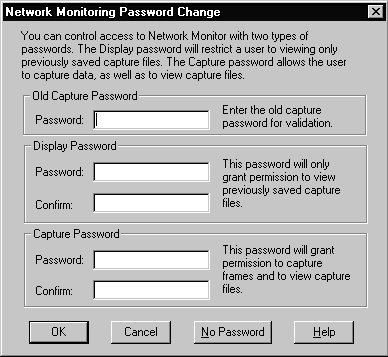
Figure 26: Network Monitor Password Change dialog box
(6)Certification Summary
To optimize your Windows NT system, it is important to use all the available tools to improve performance capability. Windows NT assists you in this endeavor by providing counters for every object that the operating system can measure. You can ask Windows NT to use the counters for automatic self-tuning or you can tune performance manually with Performance Monitor.
Some of the self-tuning that Windows NT performs automatically are thread and process prioritization, caching disk requests, multiprocessing capability, utilization of multiple pagefiles, and techniques to avoid fragmentation of physical memory.
It is possible to optimize applications by using the Task Manager to manually change an application's response. You can also change the priority level of foreground applications by using the Performance tab of the System Properties screen.
The Performance Monitor tool shipped with Windows NT allows you to be very granular when investigating the performance of your system by measuring individual objects and counters. The Performance Monitor displays in real-time what is occurring within your system and helps you to rapidly isolate a bottleneck. Performance Monitor can also be used to send alerts when thresholds have been met or to log data for long-term monitoring of your system.
A bottleneck is some element of your system that prohibits it from operating at peak efficiency. The three main areas to target in looking for a bottleneck are processor performance, disk drive performance, and memory performance.
The Event Viewer is a useful tool that helps you monitor security events, application events, and system events. Other useful monitoring tools are contained in Windows NT Diagnostics, which allows you to see many parameters of your system,and the Network Monitor, which allows you to detect network traffic sent and received by your system.
Performance tuning a Windows NT system is an ongoing process that starts with finding and resolving the most significant bottleneck. After resolving the most significant bottleneck, you locate the next most significant bottleneck and repeat until you resolve all possible bottlenecks.
(6)Two-Minute Drill
| Performance tuning Windows NT Server is the art of taking your existing configuration and maximizing its performance to achieve the optimal outcome. | |
| You know you have a bottleneck if one resource has a high rate of use while other resources have relatively low usage. | |
| To locate a bottleneck in your system you must evaluate a set of metrics based upon the number of requests for service, the arrival time of the requests, and the amount of time requested. | |
| NT Workstation, as shipped, supports only two processors, while NT Server supports four. | |
| The first way to perform network tuning via the Network applet in Control Panel is to choose the appropriate optimization setting for the Windows NT Server service. | |
| The second way to perform network tuning is to set the binding order based upon the protocols most used on your network. | |
| The Task Manager enables you to review applications, processes, and performance statistics in your NT Server at any given moment. | |
| The Performance Monitor is a tool, included with Windows NT 4.0, that tracks the usage of resources by the system components and applications. | |
| Performance Monitor utilizes three different types of items to view the system. They are objects, counters and instances. | |
| A Performance Monitor chart measures the objects that you designate; it reflects the current activity with a real-time look at the counters chosen. | |
| A Performance Monitor Alert tracks events and notifies a user or a computer depending on the parameters you set. | |
| A program might not work correctly when you use Run Program on Alert because Performance Monitor passes the Alert condition as a parameter to the program. If it does not work correctly, you should create a batch file to run the program and call the batch file from Performance Monitor. | |
| The Performance Monitor Report view lets you display constantly changing counter and instance values for selected objects. | |
| The Performance Monitor Log files, which are in binary format, provide a way to save the counter information and then later run it through the Performance Monitor application. | |
| You may want to measure the performance of your processor to ensure that a bottleneck is not present, especially if your processor pre-dates the Pentium family. | |
| The I/O capacity of the disk drive is usually the first resource to reach its limit and create a bottleneck on your system. | |
| You must use diskperf –ye to monitor a physical drive in a RAID set. Using diskperf –ye installs the Disk Drive Performance Statistics Driver low in the disk driver stack so that it can see individual physical disks before they are logically combined. | |
| Memory can contribute significantly to system bottlenecks; some claim it is the most common bottleneck you will encounter. | |
| The Event Viewer, located under the Administration submenu, lets you examine various events generated by audited user actions or the Windows NT system, services, and applications. | |
| Windows NT Diagnostics (also called WinMSD) has several tabs that contain a great deal of information about your Windows NT Server system. | |
| The Network Monitor is an outstanding tool for monitoring the network performance of your system. |
The following questions will help you measure your understanding of the material presented in this chapter. Read all the choices carefully, as there may be more than one correct answer. Choose all correct answers for each question.
7. (True/False) The Network Monitor that comes with Windows NT Server can be used to collect data for your entire network segment.
8. When the /HIGH switch is used to launch an application from the command prompt at what priority will the application start?
9. While using the Processor:%Processor Time counter in Performance Monitor, you see it spike to 100% when starting an application, but then it drops to 43%. What do you need to do?
10. Windows NT divides memory into ____ pages.
11. Windows NT Server supports ____ processors.
12. (True/False) It is not possible to change the priority of the foreground application so that it will run at the same priority as all background applications.
13. How many levels can Windows NT automatically adjust the priority of an application?
14. You suspect a disk drive is creating a bottleneck within your system. You use the LogicalDisk:%Disk Time counter to take measurements but have a consistent reading of zero. What is the problem?
15. Multiprocessing supported by Windows NT is ____ .
16. (True/False) Using two processors in your Windows NT system will double its performance capability.
17. Where does Windows NT perform automatic self-tuning optimizations?
18. The cache system used by Windows NT is ____ .
19. What utility is used to enable the disk drive performance counters?
20. (True/False) The Task Manager cannot be used to change the priority of a thread.
21. Performance Monitor shows that you have a disk drive bottleneck. What action could alleviate this problem?
22. Performance Monitor indicates that you are encountering a memory bottleneck. What action will eliminate it?
23. (True/False) Hard page faults are more detrimental to system performance than soft page faults.
24. (True/False) Once you have manually performance tuned your system you will never have to do it again.
25. (True/False) Disk drive performance counters should only be enabled when monitoring disk drive performance.
26. What would you use to change the priority of an application that is already running?
8. B. Table 13-2 illustrates the four switch possibilities and their associated priority level.
9. D. The processor becomes a bottleneck only if the sustained utilization rate is 80% or higher.
10. B. Windows NT uses a 4KB page size to help avoid fragmentation of memory.
11. D. As shipped, Windows NT Server supports 4 processors. If you need to support more processors you need to contact your computer system manufacturer.
12. False. It is possible to make the foreground application equal to background applications by moving the slider to None on the Performance tab of System Properties.
13. C. Windows NT can automatically raise or lower priority by up to 2 levels.
14. D. You must enable the disk drive performance counters prior to using either the LogicalDisk or PhysicalDisk Objects.
15. B. Windows NT supports symmetrical processing so that it can effectively share the load among all the processors.
16. False. Overhead for resource sharing and scheduling between two processors prevents system performance from doubling; the improvement is normally more like 150 percent.
17. A, C, D. Windows NT adjusts thread and process priority, swapping among multiple pagefiles, and caching disk requests as part of its self-tuning optimizations.
18. C. Windows NT uses a dynamic cache so that it can adjust itself for maximum performance.
19. C. Diskperf is the utility used to enable and disable the disk drive performance counters.
20. True. Task Manager can change the priority of processes, not threads.
21. B. Adding more physical memory to a system can alleviate a disk drive bottleneck by minimizing the amount of paging to the disk drive if physical memory is low.
22. A, C. If your pagefile is too small it can appear to be a memory bottleneck. Unloading unused drivers will free memory that the system can use.
23. True. Hard page faults indicate that additional I/O has occurred, and soft page faults indicate the data was located elsewhere in memory.
24. False. Performance tuning your system is an ongoing process.
25. True. The disk drive performance counters degrade overall system performance by interrupting the processor during I/O. They should only be enabled when you are using them to measure disk drive performance.
26.D. The Task Manager can change the priority of an application that is running. If you stop and restart the application it will be back to the original priority.