![]()
![]()
| Chapter 14 * |
| Troubleshooting * |
| Certification Objectives * |
| Installation Problems * |
| Execise 14-1: Creating a NTHQ floppy disk * |
| Configuration Errors * |
| Boot Failures * |
| Exercise 14-2: Creating a Windows NT boot floppy for Intel-based machines * |
| Using the Last Known Good Configuration * |
| Exercise 14-3: Booting Windows NT with the Last Known Good configuration * |
| Using the Emergency Repair Disk * |
| Exercise 14-4: Creating an Emergency Repair Disk * |
| Exercise 14-5: Using the Emergency Repair Disk with the NT Setup disks * |
| The Event Viewer * |
| Windows NT Diagnostics * |
| Disk Problems * |
| Unknown Volume * |
| Extended Partition Problem * |
| Troubleshooting RAID Problems * |
| Regenerating a Stripe Set with Parity * |
| Fixing a Mirror Set * |
| Exercise 14-6: Breaking a mirror set (RAID 1) * |
| Fault-Tolerant Boot Disks * |
| ARC Naming Convention * |
| SCSI(n) or multi(n) * |
| Disk(n) * |
| Rdisk(n) * |
| Partition(n) * |
| \ path * |
| Printing Problems * |
| Remote Access Service Problems * |
| Network Problems * |
| Permission Problems * |
| Taking Ownership of a Resource * |
| Exercise 14-7 Taking Ownership of a Resource * |
| Server Crashes * |
| System Recovery Utility * |
| Exercise 14-8 Configuring for memory dumps * |
| Task Manager * |
| Exercise 14-9 Shutting down a task with Task Manager * |
| STOP Error—the "Blue Screen of Death" * |
| From the Classroom * |
| Troubleshooting to Fix Actual Problems (What a Novel Idea!) * |
| Using Microsoft Resources * |
| Microsoft Web and FTP sites * |
| Microsoft Service Packs * |
| Obtaining a Service Pack * |
| Service Pack Pre-Installation * |
| Installing a Service Pack * |
| Exercise 14-10: Installing a Service Pack * |
| Reapplying a Service Pack * |
| Removing a Service Pack * |
| Exercise 14-11 Removing a Service Pack * |
| The Knowledge Base * |
| TechNet CD-ROM * |
| Resource Kits * |
| Help * |
| Exercise 14-12: Opening Help files * |
| Answers to Chapter 14 Self Test * |
| Installation Problems | |
| Configuration Errors | |
| Disk Problems | |
| Troubleshooting RAID Problems | |
| Printing Problems | |
| Remote Access Service Problems | |
| Network Problems | |
| Permission Problems | |
| Server Crashes | |
| Using Microsoft Resources |
Wouldn’t life be wonderful if you could install a network operating system and never have to worry that it might fail to work correctly? In years of dealing with a varied number of operating systems, we have never encountered one that didn’t need coaxing at some point in time. Windows NT Server is no exception, so it is very important that you learn to troubleshoot various problems that can occur.
The chapter begins with installation problems and configuration errors that you may encounter. Disk problems can be frustrating to troubleshoot—especially when dealing with a RAID configuration. Next we examine problems that you may see with printers and remote access service. Then, because network problems can be very difficult to isolate, we describe some of the more common problems that can occur, including problems with permissions. Of course, no chapter on troubleshooting Windows NT Server would be complete without a discussion of server crashes—better known as the "blue screen of death."
There are a variety of resources available to help you keep your Windows NT Server system operating smoothly. The final section of the chapter describes the most important of these resources.
When troubleshooting any problem, a logical approach works best. You need to look at what is working and what isn’t. Then you need to study the relationship of the things that do and don’t work. Check to see if the things that don’t work have ever worked on the system. If they once worked, check to see what has changed since the last time they worked.
You may encounter difficulties during Windows NT Server installation, but with proper planning most of these problems can be avoided. One common cause of installation problems is trying to use hardware that is not on Microsoft's Hardware Compatibility List (HCL). The HCL is a compilation of computer systems and hardware that have been tested for compatibility with Windows NT. Before installing any hardware, you should check to make sure that all your hardware is on the HCL.
Here's one reason why it's important to comply with the HCL. The first part of a Windows NT Server installation is referred to as character-based Setup or text-based Setup. During this phase Windows NT Server performs an in-depth examination of your system, and it is vital that the information gathered by Windows NT Server is accurate. Windows NT Server may have problems identifying controllers and settings if your system uses proprietary parts that do not meet industry standards. If Windows NT Server gathers incorrect information, your installation will probably fail at some point. Incorrect detection is a common basis for a hardware or configuration problem. Because Windows NT Server has been designed to communicate with specified hardware, compatibility problems are more likely to be critical than they might be under a different operating system.
The second part of a Windows NT Server installation is referred to as the graphical mode. When the graphical mode starts, Setup is running under the Windows NT Server operating system.
Table 14-1 lists some of the problems you may encounter during installation of Windows NT Server.
| Installation Problem | Possible Resolution |
| Media errors | Try other media or another method such as a network installation. |
| Not enough disk space | Use the Setup program to format an existing partition to create more disk space or remove existing partitions and create new ones that are large enough to install into. |
| Setup finds no hard drives on your computer. | Scan the drive for viruses. If the Master Boot Record is infected, Windows NT Server may not see the hard disk drive. If the hard drive is SCSI, use SCSITOOL to obtain SCSI information. Check to see if there is a valid boot sector on the drive. Check that all SCSI devices are properly terminated. |
| Setup hangs during text-based Setup while copying files to the hard drive. | Use a different Hardware Abstraction Layer (HAL). Make sure Setup is not using reserved memory. |
| The Dependency service failed to start. | Return to the Network Settings dialog box. Verify that the correct protocol and network adapter are installed, that the network adapter has the proper settings, and that the computer name is unique on the network. |
| While rebooting from text mode to graphical mode, you receive the error message, "NTOSKRNL.EXE is missing or corrupt" | Edit the BOOT.INI file and change the partition number for Windows NT Server. The BOOT.INI file is discussed in depth later in the chapter. |
| Non-supported SCSI adapter | Boot your computer under another operating system that can read from the SCSI adapter and CD-ROM drive, thenrun WINNT.EXE from the I386 directory. |
| During graphical mode Setup, the screen hangs at random intervals—either during file copies or between screens. | This usually indicates problems with computer interrupt conflicts, video, or the SCSI bus. |
Table 1: Installation Problems and Possible Resolutions
Windows NT Server ships with two utilities to support the installation process—NTHQ and SCSITOOL.
NTHQ is an NT utility that identifies what hardware is installed in your computer, including PCI, EISA, ISA, and MCA devices. NTHQ inspects your computer for hardware incompatibilities without installing the operating system. It also helps to determine whether the hardware is on the HCL. Exercise 14-1 shows you how to make a floppy disk for NTHQ.
SCSITOOL currently reports information for only Adaptec and Buslogic SCSI adapters. You create a SCSITOOL floppy disk just as you created the NTHQ disk. The tools used to create a SCSITOOL floppy disk are located in the X:\Support\Scsitool directory. (Again, replace X with the drive letter of your own CD-ROM drive.)
After you have successfully installed Windows NT Server, you may encounter other problems during normal operation.. We'll examine some typical problems, starting with configuration errors you may run into.
Configuration errors can be very frustrating when you are attempting to troubleshoot your system because there are many areas where something could go wrong. In this section you will discover how to fix your system when it has a boot failure, the purpose of the Last Known Good configuration, and how to use your Emergency Repair Disk.
Boot failures can take many different paths that lead your system to failure. Anything from a corrupted boot file to a bad video driver can prevent your system from booting successfully. The following paragraphs will explore a few of the possibilities when dealing with boot failures on systems that do not use RAID. Later in the chapter, we'll tackle RAID problems.
First, you need to ensure that you have a Windows NT boot floppy in case one of the boot files for your system ever gets deleted. Aboot floppy can help you get your system back up quickly and it may enable you to copy the missing or corrupt file back to your hard drive. You must use a boot disk that has been formatted on a Windows NT system.
Exercise 14-2 takes you through the steps in creating a Windows NT boot floppy for an Intel-based machine.
Table 14-2 shows some common symptoms and boot error messages.
Symptom |
Boot Error Message |
| If the NTLDR file is missing, this message appears before the Boot Loader Operating System Selection menu. | BOOT: Couldn’t find NTLDR Please insert another disk. |
| If NTDETECT.COM is missing, this message appears after the Boot Loader Operating System Selection menu. | NTDETECT V4.0 Checking Hardware… NTDETECT failed |
| If NTOSKRNL.EXE is missing, this message appears after the LastKnownGood prompt. | Windows NT could not start because the following file is
missing or corrupt: %systemroot%\system32\ntoskrnl.exe Please re-install a copy of the above file. |
| If BOOTSECT.DOS is missing in a boot loader configuration, this message appears after the Boot Loader Operating System Selection menu when the second operating system is attempted to be booted. | I/O Error accessing boot sector file multi(0)disk(0)rdisk(0)partition:\bootsect.dos NOTE: BOOTSECT.DOS stores partition information that is specific to that system. You cannot use BOOTSECT.DOS from another system. |
Table 2: Common Boot Error Symptoms and Messages
While the Windows NT boot disk can save you from several boot problems, it will not solve them all.
What happens if you load a new device driver that does not function correctly and it stops the system from booting correctly? Do you have to reload Windows NT? Let's hope you answered with a resounding NO! You can get around this problem by reverting to the Last Known Good configuration. Last Known Good is the configuration that was saved to a special control set in the registry after the last successful logon to Windows NT. Instead of reloading the entire operating system you can restart the computer without logging on, then select Last Known Good during the boot sequence. This will load the previously known good control set, and bypass the bad device driver. Last Known Good can also be initiated if Windows NT has a fatal error at boot time. Exercise 14-3 leads you through the process of booting using the Last Known Good configuration.
The Last Known Good configuration will not help you in all situations. For example, Last Known Good cannot solve problems such as user profiles and file permissions, which are not related to changes in control set information. Nor can it solve startup failures caused by hardware failures or corrupted files.
So, while the Last Known Good configuration may save the day in some situations, like the Windows NT boot floppy it will not work in all cases. Another tool you'll need is the Emergency Repair Disk.
The Emergency Repair Disk (ERD) can be used to restore a Windows NT system back to the configuration it had the last time you updated your Emergency Repair Disk. This disk can repair missing Windows NT files and restore the registry to include disk configuration and security information. To create an ERD you use the Repair Disk Utility. Figure 14-1 shows the Repair Disk Utility after it has been started.
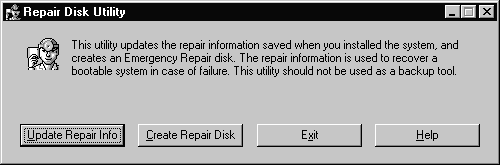
Figure 1: Repair Disk Utility screen
If you choose the Update Repair Info button, the Repair Disk Utility will overwrite some of the files located in the %systemroot%\Repair directory. After the %systemroot%\Repair directory has been updated the program prompts you to create an Emergency Repair Disk. The disk it creates is the same as if you had chosen the Create Repair Disk option.
If you choose the Create Repair Disk button, the Repair Disk Utility formats the disk, then creates the ERD. This will occur whether you use a prior ERD or a new one. Exercise 14-4 shows you how to create an ERD.
If you look at the files on the ERD, you will notice some of them end with the characters ._. This indicates that those files have been compressed. You can decompress them using the expand utility that comes with Windows NT.
Now that you have an up-to-date Emergency Repair Disk, it is time to use it in the Emergency Repair Process. The Emergency Repair Process is needed when your system will not function correctly and using the Last Known Good configuration does not solve your problem. This process requires the original installation disks used when you first installed Windows NT Server. You also need the ERD that you created in the last exercise. Please note that ERD’s are computer-specific, so don’t get them mixed up if you have several systems. Exercise 14-5 shows you how to complete the Emergency Repair Process.
It is vital that you regularly update the system repair information in the %systemroot%\Repair directory on your disk drive and remember to create and maintain an up-to-date Emergency Repair Disk. Your system repair information needs to include new configuration information such as drive letter assignments, stripe sets, volume sets, mirrors, and so on. Otherwise, you may not be able to access your drive in the event of a system failure.
As you recall, the Event Viewer was described in Chapter 13. It is worth mentioning again here because it can be an immense help in troubleshooting your system—especially when server services do not start. Figure 14-2 shows an example from the System Log. The first red flag you encounter deals with Service Control Manager. By showing the Event Details for that log entry, as displayed in Figure 14-3, you can see that the network adapter driver service failed to start. Based upon the error you received, you can quickly isolate the malfunction.
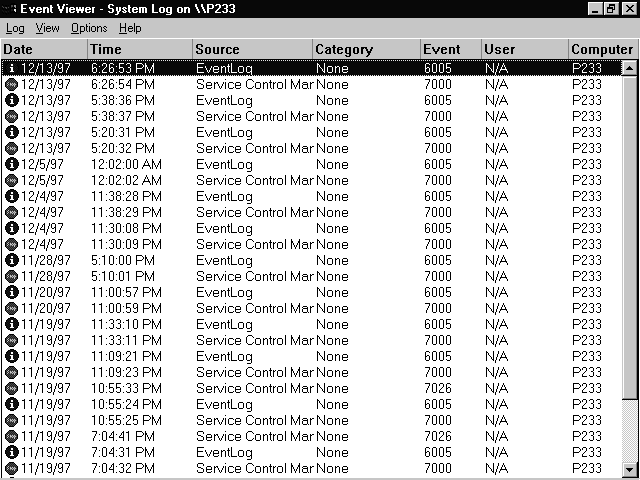
Figure 2: System Log from the Event Viewer
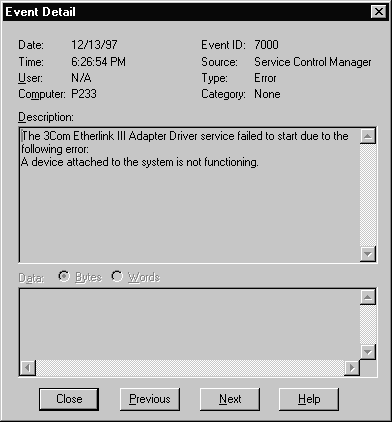
Figure 3: Event Detail for the Service Control Manager Error
The Windows NT Diagnostics tool was also discussed in Chapter 13. It is one of the most overlooked tools for troubleshooting Windows NT systems. Windows NT Diagnostics enables you to view currently loaded device drivers, IRQ values, and much more. It also provides a view of detected hardware, including the processor that is in your system. Best of all, it can be used over a network to examine a remote system. This works because Windows NT Diagnostics is actually reporting information from the registry. Figure 14-4 re-acquaints you with the main Windows NT Diagnostics screen.
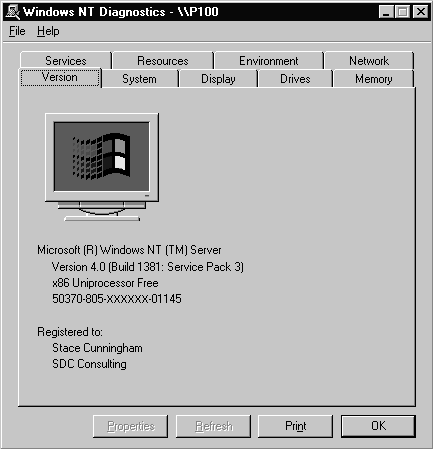
Figure 4: Windows NT Diagnostics Version tab
It is possible that you will successfully log on to your system before encountering an error of any type. This section will consider how to troubleshoot disk problems of this nature. Let's start with a situation where a volume is displayed as unknown in Disk Administrator.
If you have created and formatted a volume with FAT, but you can no longer access files on it, and Disk Administrator displays the volume as Unknown, the Partition Boot Sector (PBS) for the volume might be bad. The PBS can be corrupted by viruses. Corruption problems can also occur if you have a dual-boot configuration with Windows 95 and you use the Windows 95 Fdisk.
If you have created and formatted a volume with NTFS, but you can no longer access files on it, and Disk Administrator displays the volume as Unknown, the PBS for the volume might be bad, permissions for the volume may have been changed, or the Master File Table (MFT) is corrupt.
If a logical drive within an extended partition becomes corrupt within the Partition Table, Windows NT will not be able to access that volume, or any volumes that follow it on the disk. It might be possible to rebuild an extended partition when it becomes corrupt by using a sector editor or partition table editor.
It is more likely on a Windows NT Server that at some point in time you will encounter RAID problems. The next section describes some errors you are likely to encounter.
The procedure for detecting and recovering from errors for software fault-tolerant volumes is comparable for both mirror sets (RAID 1) and stripe sets with parity (RAID 5). Windows NT Server's response to the problem depends uponwhen the problem occurred and whether the loss is due to failure of a member of a set or the failure of the system partition. A member of a RAID 1 or RAID 5 set is one of the physical disk partitions that make up the set.
If a member disk that is part of a mirror set or a stripe set with parity fails during normal operation, it becomes an orphan. When the fault-tolerant driver (FtDisk) determines that a disk has been orphaned, it directs all reads and writes to the other disk in the set. Figure 14-5 shows the window that is displayed when Windows NT Server detects a fault-tolerant problem during normal operation.
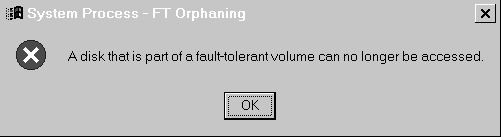
Figure 5: FT Orphaning dialog box
During system initialization, if Windows NT Server cannot locate a member partition in a mirror set or a stripe set with parity, it logs a severe error in the event log, marks the partition as an orphan, and uses the remaining partition of the RAID 1 or RAID 5 sets. The system continues to function by using the fault-tolerant capabilities built into the RAID volumes.
The process of orphaning a partition does not occur during a read operation—only during a write operation. This makes sense, because a read operation does not change any data on the disk.
When a member of a stripe set with parity fails, you can continue to use the computer to access all the data. However you will see a system degradation because it will be regenerating the data in physical memory as the data is needed.
Once a new member drive has been added, you can return the computer to its normal RAID 5 configuration by regenerating the data for the orphaned member. (Specifically, it is reconstructed from the parity data on the remaining members.) Once regenerated, the data is once again available on disk and need not be regenerated in physical memory. The following steps indicate how you would regenerate a stripe set with parity if the need arose.
After you restart the computer, the FtDisk reads the information from the stripes of the remaining members and recreates the data of the orphaned member that was removed to the new member. Your system can be used while the reconstruction is occurring as the process occurs in the background. If you open Disk Administrator, the message in the status bar is: Stripe set with parity [INITIALIZING].
It is possible that you may receive the following error message when attempting to reconstruct a RAID 5 set: The drive cannot be locked for exclusive use... You will receive this error if Disk Administrator does not have exclusive access to the RAID 5 set. You might receive this message if pagefile.sys or some other system service is accessing the disk. You must move the pagefile to another partition and shut down these services to successfully regenerate the stripe set with parity.
If a member of a RAID 1 set fails, the fault tolerance driver directs all I/O to the remaining drive in the mirror set.
When a member of a mirror set fails you need to take the following steps:
Exercise 14-6 shows you how to break a RAID 1 mirror set. In order to perform this exercise your system must be set up with a mirror set.
All the procedures described above work fine—as long as you're dealing with a member of a RAID set. The story changes when the failure involves the system partition on the primary physical drive. In that case, you need to use a fault-tolerant boot disk to restart your system. This boot disk is the key to recovery in case of a physical disk failure and you should create this disk immediately whenever you mirror the boot partition of a Windows NT Server. Creating the fault-tolerant boot disk uses the same procedure that you used to create the boot disk in Exercise 14-2—with one exception. In this case, you must modify the Advanced RISC Computing (ARC) path in the boot.ini so it points to the mirrored copy of the boot partition. This is why it is very important that you have knowledge of ARC names. Let’s review the ARC naming convention so you have a better understanding of the layout of the boot.ini file.
The ARC naming convention comes from the RISC world. It is useful in identifying partition information on multidisk/multipartition machines. For instance, look at Figure 14-6.
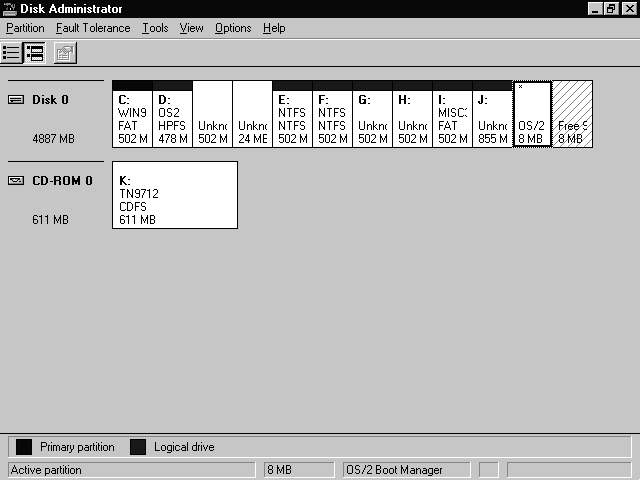
Figure 6: Disk Administrator showing the disk layout of a particular machine
If we look at the boot.ini for this machine, we see:
[boot loader]
timeout=15
default=multi(0)disk(0)rdisk(0)partition(6)\WINNT
[operating systems]
multi(0)disk(0)rdisk(0)partition(6)\WINNT="Windows NT Server Version 4.00"
multi(0)disk(0)rdisk(0)partition(6)\WINNT="Windows NT Server Version 4.00 [VGA mode]" /basevideo /sos
multi(0)disk(0)rdisk(0)partition\WINNTWS="Windows NT Workstation Version 4.00"
multi(0)disk(0)rdisk(0)partition\WINNTWS="Windows NT Workstation Version 4.00 [VGA mode]" /basevideo /sos
C:\="Windows 95"
From this we can see the boot partition is on partition number six. But what is all this other stuff? Let’s look and see.
A SCSI controller that has its resident BIOS disabled uses the SCSI ARC name. All other controllers (both IDE and SCSI controllers with their BIOS enabled) are listed as multi. The numbers that follow SCSI or multi start counting with 0. In the example shown above, the multi(0) indicates it is the first controller (either IDE or SCSI with the BIOS enabled).
Disk is always part of the ARC name, but it is only actively used if SCSI is listed as the first word of the ARC path. If Disk is actively used, then the SCSI bus number is used here. It starts counting with 0. If you have multi in the first space, then Disk will always be 0.
Rdisk indicates either the SCSI LUN (Logical Unit Number) when SCSI is the first word in the ARC path, or the ordinal number of the disk if it is multi. Remember the counting here also starts with 0.
This is simply the partition number on the disk. The important thing here is that the counting starts with one! In Figure 14-1, even though the OS/2 Boot Manager is at the physical end of the drive, it is counted as the number one partition since the system boots from it, then it moves up in count from the C: drive.
To put this all together, if we have the following ARC:
multi(0)disk(0)rdisk(0)partition(6)\ WINNT="Windows NT Server Version 4.00"
it is either an IDE controller or a SCSI controller with the BIOS enabled. It is the first controller on the system. Disk (0) in this instance is ignored. Rdisk (0) means that it is the first drive on the system. Partition (6) means that Windows NT Server is located on the sixth partition.
Please note that if changes are made to the system, and this section of the boot.ini is not updated, then Windows NT will not load on the next boot.
In case you were wondering about the "unknown" partitions shown in Figure 14-1, they are valid paritions that are unknown to Windows NT 4 Server because it does not recognize OS/2, Linux, or FAT32 partitions.
The path listed in the boot.ini above is simply the path to the location of each operating system.
If the system partition in a mirror set no longer functions, then the mirror set cannot be booted. However, the data is not lost. It can be recovered because the boot partition, where the system files are stored, is still accessible as long as you have a fault-tolerant boot disk. To recover a mirror set, you would need to perform the following steps.
It can be very difficult to troubleshoot Windows NT Server printing problems. The process can become complicated because of the many variables involved in printing and the diverse number of clients and print devices that Windows NT Server supports. Some general guidelines that can help isolate printer problems are given here.
Table 14-3 lists some of the more common printing problems you may encounter.
Problem |
Solution |
| Disk drive starts thrashing and print job never completes | Out of hard disk space for spooling. Either create more room or move the spooler to another partition. |
| No one can print to the server; there is a job at the server that will not print and it cannot be deleted. | The print spooler is stalled. Go to Services from Control Panel, stop the spooler service, and then restart it. |
| The print job does not print completely or comes out garbled. | Incorrect printer driver is being used. Replace it with the correct printer driver. |
| A printer has stopped functioning, but people are still printing to it. | Add the Universal Naming Convention name of the replacement printer to the port on the printer that stopped functioning. |
| Applications running on the system seem to be slowing down the printing process. | The spooler priority is not set high enough. Adjust the PriorityClass registry entry contained in HKEY_LOCAL_MACHINE\System\CurrentControlSet\Control\Print. |
Table 3: Common Printer Problems and Solutions
This section describes troubleshooting techniques to be used with Remote Access Service (RAS).
If you have a Dial Up Networking (DUN) client that has difficulties being authenticated over RAS, the first thing you should try is to change the security option on both the server and client to "allow any authentication including clear text." Because of the wide variety of DUN clients that are available, the clients may not support the same encryption methods that Windows NT Server supports. Switching to the "allow any authentication including clear text" option allows you to try the lowest authentication method on each side. If you have success with that setting, you can start increasing the authentication options to reach a determination of the highest level of authentication that can be used between the client and server.
If a DUN client is having problems with authentication over Point to Point Protocol (PPP), a PPP.LOG file can be a very handy way to troubleshoot the problem. The PPP.LOG file is not enabled by default. To enable the PPP.LOG file you need to change the following Registry entry to a 1.
\HKEY_LOCAL_MACHINE\System\CurrentControlSet\Services\Rasman\PPP\Logging
The PPP.LOG file is stored in the %systemroot%SYSTEM32\RAS folder. An example of a PPP.LOG file follows.
<PPP packet sent at 12/25/1997 20:25:46:933
<Protocol = LCP, Type = Configure-Ack, Length = 0x19, Id = 0x2, Port = 0
<C0 21 02 02 00 17 01 04 05 F4 02 06 00 0A 00 00 |.!..............|
<03 05 C2 23 05 07 02 08 02 |...#..... |
>PPP packet received at 12/25/1997 20:25:46:943
>Protocol = LCP, Type = Configure-Ack, Length = 0x16, Id = 0x1, Port = 0
>C0 21 02 01 00 14 02 06 00 00 00 00 05 06 00 00 |.!..............|
>04 A0 07 02 08 02 |...... |
FsmThisLayerUp called for protocol = c021, port = 0
LCP Local Options-------------
MRU=1500,ACCM=0,Auth=0,MagicNumber=1184,PFC=ON,ACFC=ON
Recv Framing = PPP,SSHF=OFF,MRRU=1500
LCP Remote Options-------------
MRU=1524,ACCM=655360,Auth=c223,MagicNumber=0,PFC=ON,ACFC=ON
Send Framing = PPP,SSHF=OFF,MRRU=1500
LCP Configured successfully
<PPP packet sent at 12/25/1997 20:25:46:943
<Protocol = LCP, Type = Identification, Length = 0x14, Id = 0x2, Port = 0
<C0 21 0C 02 00 12 00 00 04 A0 4D 53 52 41 53 56 |.!........MSRASV|
<34 2E 30 30 |4.00 |
Another log file that can be very useful in troubleshooting RAS, especially if it is a modem problem, is the DEVICE.LOG. The DEVICE.LOG captures the initialization information between the system and the modem. The DEVICE.LOG contains entries that show RAS issuing the initialization string, the modem echoing the command, and the modem responding with OK. This can be very helpful if RAS cannot dial or if it returns hardware-related errors. Like the PPP.LOG, the DEVICE.LOG is not enabled by default and must be turned on by changing the following Registry entry to a value of 1.
\HKEY_LOCAL_MACHINE\System\CurrentControlSet\Services\Rasman\Parameters\Logging
The change will not take effect until RAS has been stopped and restarted. After restarting RAS the DEVICE.LOG will be created in the %systemroot%SYSTEM32\RAS folder. An example of a DEVICE.LOG file follows.
Remote Access Service Device Log 12/14/97 19:24:06
---------------------------------------------------
Port Handle: 108 Command to Device:
Port Handle: 108 Command to Device:ATS0=1
Port Handle: 108 Echo from Device:ATS0=1
Port Handle: 108 Response from Device:
OK
After the "Response from Device" line you should see a positive response from the device. If the DEVICE.LOG does not show the modem responding, you probably have RAS configured for the wrong modem or the modem has a hardware configuration problem.
We could easily fill an entire book with information on troubleshooting network problems! They can be the toughest type of problem to troubleshoot because there are so many components where something can go wrong. Worse yet, the path causing the problem may not be active when you arrive to troubleshoot the problem. Table 14-4 lists some of the more common problems and their solutions.
Problem |
Solution |
| Adapter cable loose | Check to make sure the network cable is plugged into the network adapter card. This might sound obvious, but it happens more than you might think. |
| Network interface card failure | Check the Event Viewer System log for errors related to the network adapter, the workstation, and the server components. If you are using TCP/IP, use PING to determine if the system is getting out on the wire. |
| Protocol mismatch | If two machines are active on the same network but still cannot communicate, it is possible they are using different protocols. Use the Network applet from Control Panel to determine which protocols are in use on each machine. Keep in mind that NetBEUI is not a routable protocol so it will not transverse any routers on your network. |
| System on IPX/SPX network cannot communicate. | Make sure the system is using the correct frame type. |
| External network problem | If the hardware on the local system is functioning correctly and you are using TCP/IP, use PING to attempt to isolate the problem. Attempt to PING in increasing distances until you see a problem.You may want to use Network Monitor to help locate congestion and broadcast storms. |
| System on a TCP/IP network cannot communicate outside the local subnet. | It is using the wrong gateway settings. |
Table 4: Common Network Problems and Solutions
Table 14-4 mentioned using Network Monitor to help solve some network problems. Network Monitor, as described in Chapter 13, has some built-in limitations. The Network Monitor that ships with Windows NT Server does not support promiscuous mode. Promiscuous mode allows the capture of any packet that goes over the wire, whether it was intended for your machine or not. The version of Network Monitor that comes with Windows NT Server can capture only packets sent from or to one of your server’s network cards. If you need to monitor traffic on all of your network you will need to use a different tool. The Network Monitor that comes with Systems Management Server (SMS) does support promiscuous mode.
The biggest problem with permissions is shared permissions versus local permissions. When you share resources on an NTFS partition, you limit remote access by combining two sets of permissions—the network share permissions and the local NTFS permissions. All shared permissions except for No Access are evaluated by accumulation and all NTFS permissions except for No Access are evaluated by accumulation. Then the system looks at both the shared result and the NTFS result and uses the most restrictive. The most effective permissions are those that are the most restrictive. Table 14-5 demonstrates this concept.
Assigned Permissions |
Joe’s Permissions |
|
| Share Permission for C:\Stuff | Everyone: Read Joe: Change |
Change (RXWD) |
| Local NTFS Permissions for C:\Stuff | Everyone: Read Joe: Read |
Read (RX) |
| Effective Permissions for Joe | Read (RX) |
Table 5: Share Permissions versus Local Permissions
It is inevitable that someone will lose access to a resource. Of course this can only happen if you are using the NTFS file system. Assuming you have Administrator privileges, you can easily solve the dilemma by taking ownership of the resource and then sharing it (with full control) to the person who needs access so they can gain ownership of the resource. This action normally occurs when someone leaves an organization. Exercise 14-7 shows you how to gain ownership of a resource and then allow someone else to take ownership of it. In the exercise Steven is the person who quits the organization and Marissa is the new employee.
Server crashes are the worst thing that can happen to your Windows NT Server—especially if it is the Primary Domain Controller (PDC) in your network and you have no Backup Domain Controllers (BDC) to fall back on. This section describes how to use the System Recovery Utility and Task Manager to assist you when your system crashes.
Windows NT features a Recovery utility that can perform selected tasks in the event of a STOP error. You configure the recovery options on the Startup/Shutdown tab of System Properties, which is shown in Figure 14-7.

Figure 7: System Recovery options on the System Startup/Shutdown tab
Most of the Recovery options are self-explanatory; however one option is worth singling out. Automatically reboot allows your system to quickly return to normal operation after a system crash and eliminates the need to reboot manually.
The most important part of the Recovery utility to use for troubleshooting is the option Write debugging information to. When this option is checked and a STOP error occurs, the entire contents of memory are dumped to the pagefile. When your system restarts this information is copied automatically from the pagefile to the filename you specified in the Recovery option block.
Since the entire contents of your system’s memory are dumped to the pagefile, the pagefile must be as large as the amount of physical memory installed in your system. So, a system that has 64 megabytes of physical memory needs to have a pagefile that is at least 64 megabytes. One other caveat is that the pagefile must be located on the boot partition. Exercise 14-8 gives you a chance to configure your system for memory dumps.
At this point the Task Manager should be very familiar to you. Let's look at one more function that it can perform to help in troubleshooting your system. It has the capability to end a task that may be causing your system to hang. Under normal operating conditions you will see the word "Running" in the status column, as shown in Figure 14-8. If a task is no longer responding then the words "Not responding" are in the status column. Exercise 14-9 leads you through the process of shutting down a task.
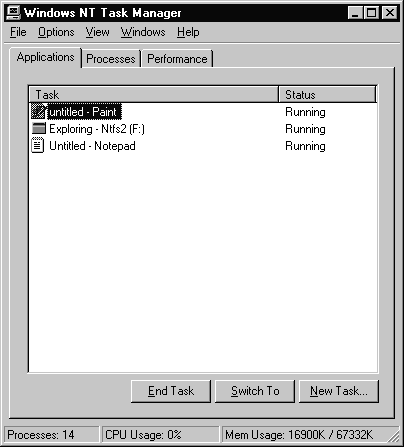
Figure 8: Applications tab of the Task Manager
The words "blue screen of death" are about the worst thing you can tell someone about their Windows NT Server. The blue screens are actually text mode STOP messages that identify hardware and software problems that have occurred while running Windows NT Server. The reason for producing the blue screen is to visibly alert users to the fact that an error message has been generated. The blue screen is intended to provide information to help in troubleshooting the problem, rather than allowing the system to fail in an "invisible" manner. As shown in Figure 14-9, the "blue screen of death" consists of a STOP message, the text translation, the addresses of the violating call, and the drivers loaded at the time of the STOP screen. If you have configured your system to write debugging information, it will also generate that file.
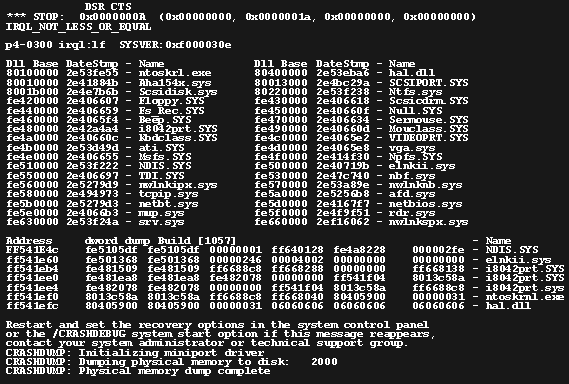
Figure 9: A typical "blue screen of death"
Even though the "blue screen of death" can look intimidating, in most cases you need to use only a small amount of the displayed data to help determine the cause of the error. The further interpretation of STOP errors is beyond the scope of this book.
We have many opportunities to see students and clients troubleshoot real live problems. It can really be an interesting experience. We have probably learned most about what to do—and what not to do—as we watched our clients try to troubleshoot problems. We are always amazed at how thoroughly students can "hose" (that’s technical talk for "render inoperable") their classroom computers! And even when the instructors have no idea what is wrong or how to fix it, they must restore the machine, so that the students can continue the class exercises. In these cases, we tell the students not to worry—in the Saturday makeup class (the one that starts at 6:00 a.m.) we'll show them how to not do what they just did.
Not surprisingly, the most critical part of troubleshooting is to identify the problem. Many people waste countless hours troubleshooting issues that are not the real problem or not even related to the problem. This is the number one "gotcha." To identify the problem, you first have to collect information—even before you begin to act. For example, let's say data is continually corrupted on your hard drive. What is the problem? In an actual case, we watched a client troubleshoot the drives and the controller, even to the extent of replacing both several times, without ever fixing the "problem." The real problem was that memory was being used for write cache. The original drive and controller were good.
A closely related tactic is troubleshooting the symptom rather than the problem. This is the number two "gotcha." In one vivid example (and our personal favorite), a user called to say they were unable to connect to a remote server. To address this problem, the technician repeatedly connected their own computer to the remote server. Now most of you just said, "Well, what's wrong with that?" But the technician was troubleshooting the symptom (the user could not connect to the server), not the problem. They found out it was possible to connect. So what? How did that help the user? And did that help find the problem? You're probably saying, "At least they eliminated the 'server is down' issue." But was that an issue? If the server were down, you would have much more evidence than this single user's complaint. In this case, we finally checked the System log on the user’s computer and found that the protocol did not initialize, because the adapter drive failed to bind, because the NIC had failed. The failure of the network card was the "problem." The user's inability to connect to the server was only a symptom.
One huge "gotcha" is breaking the rule to "change only one thing at a time." When troubleshooting any problem, change only one simple variable. Study the effects of that change. If there is no change, reset that variable to its original state, change another variable, and re-test. This step-by-step approach lets you isolate what went wrong so you'll be able to correct it. But just as important as correcting the problem is learning from the experience. When technical people are surveyed and ask to identify the most important factor in successful troubleshooting, more than half say that prior experience with the problem is the most helpful piece of information they need. You get prior experience by successfully fixing the problem. That means you learned what was wrong and what you did to fix it. If you changed multiple variables and the problem went away, you did not learn what the problem was—or even what you did to fix it! The next time the problem occurs, you won’t know any more than you did before.
Good Luck! Just remember—troubleshooting can be fun!
Having access to a variety of troubleshooting resources will make your life much easier when dealing with Windows NT Server. This section describes some resources that are available to you.
Microsoft maintains World Wide Web (WWW) servers and FTP (File Transfer Protocol) servers that can provide you with updated drivers, current product information and more. The WWW address is www.microsoft.com and the FTP address is ftp.microsoft.com. The FTP site allows anonymous logons, so feel free to explore the site.
Microsoft periodically issues a Service Pack to fix bugs that have been detected in the Windows NT operating system. At the time of this writing the latest service pack issued was Service Pack 3.
The latest Service Pack can be ordered by phone from Microsoft or obtained from their FTP site. The FTP address for Intel-based machines is ftp.microsoft.com/bussys/winnt/winnt-public/fixes/usa/nt40/ussp3/i386.
There are several measures you should take to prepare your system for installing a Service Pack.
| Back up the entire system, including the Registry | |
| Update the ERD | |
| Save the disk configuration | |
| Disconnect users, exit applications, and stop unnecessary services |
Another thing you need to do before installing a Service Pack is to read the README.TXT file that comes in the archive to see what bugs have been fixed and if there are any peculiarities that may affect the installation on your system. Installing a Service Pack is not a complex task. There are only a couple of decisions that need to be made; if in doubt, it is wise to err on the side of caution because a Service Pack can render your machine inoperable. Exercise 14-10 shows you how to install Service Pack 3.
Do not delete the Service Pack archive from your system because any time you change hardware or software on the system you must reapply the Service Pack. When you reapply it you also need to tell the program to create a new Uninstall directory.
You may find that the Service Pack does not function correctly on your system. If this happens you will need to remove it from your system. Keep in mind that you can only uninstall the Service Pack if you originally installed the Service Pack with the Uninstall directory option selected. Exercise 14-11 shows you how to remove a Service Pack from your system.
The Knowledge Base contains support information developed by Microsoft Product Support Specialists for problems that they have solved. We cannot stress enough the value that the Knowledge Base can provide. It is often the first place we will look when faced with an unusual problem. If we are having this problem there's a good chance that someone else has already encountered it. The Knowledge Base is available in many different places. It can be accessed on Microsoft’s WWW site, the TechNet CD’s, and Resource Kit CD’s.
The TechNet CD’s are an invaluable tool for supporting any Microsoft product. We have already mentioned the TechNet CD’s in earlier discussions of troubleshooting. There are more than 1.5 million pages of technical documentation available on the TechNet CD’s—along with drivers, updates, and Service Packs. TechNet is available by yearly subscription and delivers new CD’s to you every month as they are updated.
The Resource Kits contain detailed information that is an in-depth, technical supplement to the documentation included with the product. Resource kits also come with a CD that is full of very useful utilities. Resource Kits can be obtained from your local dealer; they are also included on the TechNet CD’s.
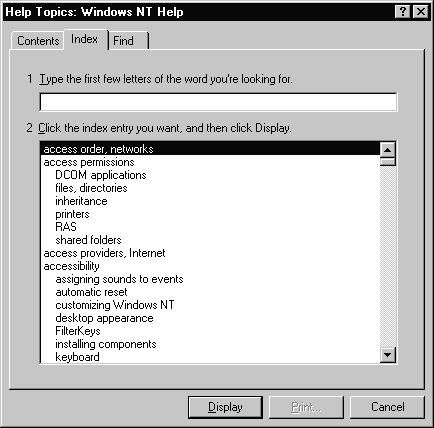
Windows NT Help is just a few mouse clicks away. Help is available in three different contexts. You can use the Contents tab in Help to find topics grouped by subject, use the Index tab to find specific topics listed alphabetically, or use the Find tab to search for information by typing in a subject, title, specific word or phrase. Figure 14-10 displays the Help Index tab. Exercise 14-12 gives you an opportunity to use Help to find a specific phrase.
Figure 10: The Index tab of Help
(6)Certification Summary
When you install Windows NT Server it is essential to verify that your hardware is on the Hardware Compatibility List. Installation errors can occur either during the text-based mode or the graphical mode of Setup. Windows NT Server comes with two utilities that can help identify hardware prior to installation—NTHQ and SCSITOOL.
Troubleshooting configuration errors can be a frustrating process. Problems can include a variety of boot failures in which you may need to use the Last Known Good configuration or the Emergency Repair Disk. Other tools available to help with troubleshooting Windows NT Server are the Event Viewer and Windows NT Diagnostics (WinMSD).
Disk problems can cause difficulties even after you are logged on to your system. Two of the most common errors are encountering unknown volumes and extended partition problems.
If you have a fault-tolerant configuration, you may have to recover from a RAID problem. These problems affect both RAID 1 and RAID 5 sets. Regenerating a stripe set with parity will reconstruct the data from the remaining members to a new drive. The method you use to fix a mirror set depends on whether it is the member or system partition that no longer functions correctly.
Printing problems can be difficult to troubleshoot because of the many variables involved.Two particularly complicating factors are the number of diverse clients supported by NT server and the number and variety of print devices supported. One of the most common printing problems is running out of hard disk space for the spooler.
Remote Access Service troubleshooting for Dial-Up Networking clients can be improved by enabling two log files via your Registry—PPP.LOG and DEVICE.LOG.
Network problems can be very tough to troubleshoot because there are many components where something can go wrong. Some of the more common malfunctions include protocol mismatches between systems and the use of incorrect frame types on an IPX/SPX network.Permission problems often become a problem when you create a share on the network that uses NTFS. You have to be cognizant of not only the share permissions but also the NTFS permissions. In some situations you may need to take ownership of a resource to clear up an existing security and permission problem.
System recovery can actually help in troubleshooting by providing a dump of your physical memory that can be further analyzed when appropriate. If you have an application that stops responding, you can use the Task Manager to shut it down. The STOP error, better known as the "blue screen of death", identifies hardware and software problems that have occurred. The "blue screen of death" can be very intimidating and is something that no one who deals with Windows NT looks forward to seeing. It reflects that a serious problem has occurred, but it does provide a good deal of information to help you find out what caused the STOP error.
There are many resources available to help you keep Windows NT Server running successfully. One of the most valuable is the Microsoft Service Pack, which is issued periodically after a significant number of bugs have been fixed. Service Packs can be obtained from the Microsoft FTP site. Installing a Service Pack is not an especially complex task, but you should make a backup of your system and examine the readme.txt file before you begin the installation. Other resources available include Microsoft’s World Wide Web and FRP sites, the Microsoft Knowledge Base, the TechNet CD subscription, and the on-line Help files included with Windows NT.
| One source of installation problems is trying to use hardware that is not on the Hardware Compatibility List (HCL). | |
| Boot failures can take many different paths to lead your system to failure. | |
| Ensure that you have a Windows NT boot floppy, in case one of the boot files for your system is ever deleted. | |
| Last Known Good is the configuration that was saved to a special control set in the registry after the last successful logon to Windows NT. | |
| The Emergency Repair Disk (ERD) can be used to return a Windows NT system to the configuration it had when you last updated the ERD. | |
| The Security Accounts Manager (SAM) and Security files are not automatically updated by rdisk. To update those files you need to use the /S switch in conjunction with rdisk. | |
| The Event Viewer can be an immense help in troubleshooting your system. | |
| Windows NT Diagnostics enables you to view currently loaded device drivers, IRQ values, and much more. It provides a view of detected hardware and can be used over a network to examine a remote system. | |
| The procedure for detecting and recovering from errors for software fault-tolerant volumes is comparable for both mirror sets (RAID 1) and stripe sets with parity (RAID 5). | |
| When a member of a stripe set with parity fails, you can continue to use the computer to access all the data; however you will see a system degradation. | |
| As with a RAID 5 set,if a member of a RAID 1 set fails, the fault tolerance driver will direct all I/O to the remaining drive in the mirror set. | |
| Printing problems can become complicated to resolve because there are a number of variables involved in printing , as well as a diverse number of clients and print devices supported by Windows NT Server. | |
| If you have a Dial Up Networking (DUN) client that is having difficulty being authenticated over RAS, the first thing you should try is to change the security option on both the server and client to "allow any authentication including clear text". | |
| Use Network Monitor to help diagnose some network problems. | |
| The biggest problem encountered with access problems is shared permissions versus local permissions. | |
| With Administrator privileges you can easily solve access problems by taking ownership of the resource and then sharing it (with full control) to the person who needs access so they can gain ownership of the resource. | |
| Windows NT features a Recovery utility that can perform selected tasks in the event of a STOP error. | |
| Task Manager can end a task that may be causing your system to hang. | |
| The "blue screen of death" are actually text-mode STOP messages that identify hardware and software problems that have occurred while Windows NT Server is running. | |
| Accessing a variety of Microsoft Resources can make your troubleshooting much easier when dealing with Windows NT Server. |
The following questions will help you measure your understanding of the material presented in this chapter. Read all the choices carefully, as there may be more than one correct answer. Choose all correct answers for each question.