![]()
![]()
![]()
| Chapter 8 * |
| Replication and Data Synchronization * |
| Certification Objectives * |
| Directory Replication * |
| Exercise 8-1: Adding a Directory Replicator account * |
| Export Server and Import Computers * |
| Export Server * |
| Import Computers * |
| Export and Import Directories * |
| Directory Replicator Service * |
| Exercise 8-2 Configuring the Directory Replicator Service * |
| Exercise 8-3: Starting the Directory Replicator service on the export server * |
| Exercise 8-4: Starting the Directory Replicator service on the import computer * |
| Exercise 8-5: Verifying directory replication * |
| Managing Replication * |
| Exercise 8-6: Managing a replication * |
| Exercise 8-7: Viewing directory replication status * |
| Replicating System and Domain Files * |
| User Accounts Database * |
| Partial and Full Synchronization * |
| Synchronizing Domain Controllers * |
| Domain Synchronization Over a Slow Wide Area Network (WAN) Link * |
| Exercise 8-8: Setting synchronization intervals (PDC to BDC's) * |
| Logon Scripts * |
| System Policy Files * |
| Widely Used Files * |
| From the Classroom * |
| To Replicate or Not To Replicate: That is the Question * |
| Using My Briefcase to Synchronize Files * |
| Exercise 8-9: Enabling My Briefcase * |
| Exercise 8-10: Adding documents to My Briefcase * |
| Exercise 8-11: Synchronizing files through My Briefcase * |
| Answers to Chapter 8 Self Test * |
| Directory Replication | |
| Replicating System and Domain Files | |
| Using My Briefcase to Synchronize Files |
In a Windows NT domain, it is imperative that the data, such as the user accounts database, be synchronized between the Primary Domain Controller (PDC) and all Backup Domain Controllers ( BDC's) to maintain smooth operation throughout the domain. It is also important that data such as the user login scripts and profiles be replicated so they can be readily available when a user logs into the domain. This chapter examines methods by which this can be accomplished—including directory replication and domain synchronization. It also describes the use of My Briefcase to transfer updated files from one computer to another.
Directory replication is a service of Windows NT that allows you to set up and automatically maintain identical directory trees on many computer systems. Updates made to the files within the directories on the export server are periodically replicated to import computers. (Export servers and import computers in are described in more detail later in the chapter.) Using replication in this manner means you to only have to maintain one up-to-date copy of the files that are within the export directories, rather than having to update each copy on all the machines where it may exist.
Replication can be very useful, especially for load balancing among servers. For example, if a file is used by several users and it is located on a single server, that server could become overburdened and slow user access. However, if identical copies of the file are located on multiple servers, the load is spread as users access the file.
If possible, replication should be used for read-only information, to prevent replication of any files that are open for revision. Furthermore, because the import computer directories that contain the replicated files are overwritten each time replication occurs, any changes made to files in those directories will be lost the next time replication from the export server occurs.
Replication can occur between computers in different domains. The export server can export to a domain name and the import computers can import from that domain name. This method is very convenient in cases where many computers are involved in the replication process; you only need to specify a domain name for export or import, instead of using a long list of computer names.
Before you can use the Directory Replicator service, you must create a special user account required by the Directory Replicator service. The Directory Replicator service on each participating computer uses the same user account. Figure 8-1 shows the User Manager for Domains window where you will create this account.
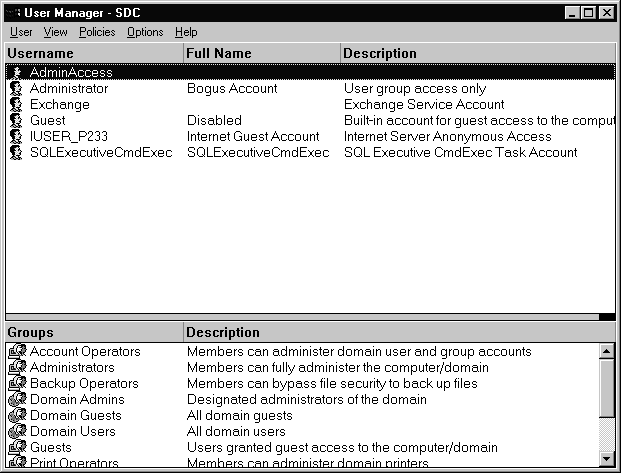
Figure 8-1: User Manager window with Username accounts
Figure 8-2 displays the New User dialog box where you will create the Directory Replicator service account. Be sure to place a check next to the Password Never Expires block when you create this account.
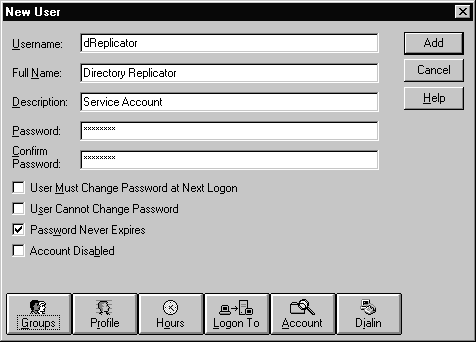
Figure 8-2: New User dialog box for the dReplicator account
Figure 8-3 shows the group membership for the dReplicator account. When you create this account, be sure to put it in both the Replicator and the Backup Operators groups.
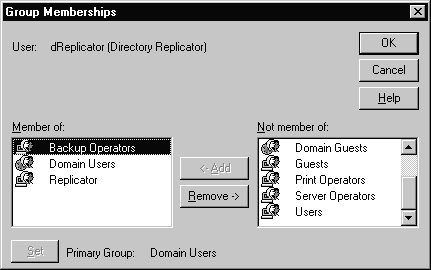
Figure 8-3: Group Memberships for the dReplicator account
In Exercise 8-1 you'll create the Directory Replicator account that you will use for the rest of this chapter.
Now that you have created the necessary service account, let's move on to see what else is required for successful replication.
The three main components needed for replication are: the export server, import computer, and export and import directories. Figure 8-1 shows an example of a export/import scenario with the default directories used.
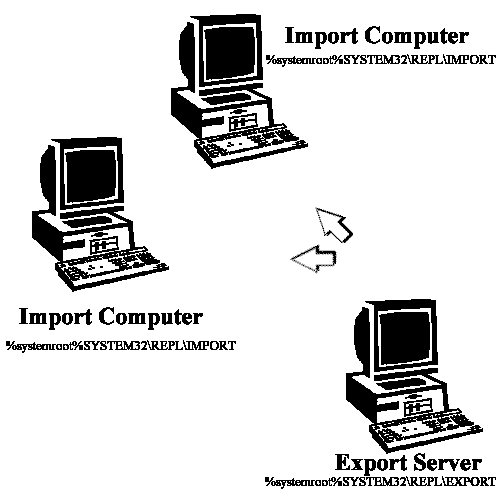
Figure 8-4: Export server and import computers
The export server is the computer that provides the directories to be replicated. The selected directories can be replicated from the export computer to any number of specified computers or to other domains.
Systems that receive the replicated files and directories from the export server are called import computers. Import computers can be Windows NT domain controllers and servers or Windows NT Workstations. If the import computer is not part of the export server’s domain or trusting domain, it will need to create a replication user account as illustrated in Exercise 8-1. The account must have permission to access the export server’s REPL$ share, as discussed in the following paragraph.
By default, the export server keeps the directories that will be replicated in an export directory located at %systemroot%SYSTEM32\REPL\EXPORT. You can create as many subdirectories as necessary beneath this directory structure for all the files that you want to replicate to the import computers. A file is replicated when it is first added to an export directory, then replicated again every time the file on the export server is saved (such as when changes are made). Replication occurs automatically once the Directory Replicator service is enabled and fully functional. The %systemroot%SYSTEM32\REPL\EXPORT directory is shared as REPL$ after the Directory Replicator service is started. REPL$ is the single directory tree that contains the main directory "export" and up to 32 subdirectories.
Each system that has been configured to be an import computer contains an import directory. By default, the import directory is located at %systemroot%SYSTEM32\REPL\IMPORT. Imported files and subdirectories are automatically placed under this directory. Subdirectories are created during replication, so there is no need for you to worry about creating them prior to replication.
Now that we have discussed the main components needed for replication, let's get the Directory Replicator service functioning.
The Directory Replicator service has to be configured and started in order for replication to occur. You can have your export server and import computers set up, but replication will not occur unless the Directory Replicator service is configured and running on each system. Figure 8-5 shows the Services dialog box for a system. You can see that the Directory Replicator is set for manual startup and has not been started.
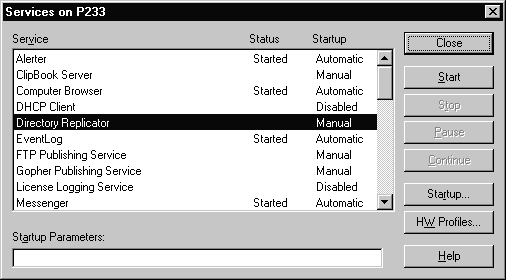
Figure 8-5: Services on P233 dialog box
Figure 8-6 displays the Directory Replicator service startup parameters. This is where you modify the Directory Replicator service so it will start up automatically and use the service account you created in Exercise 8-1.
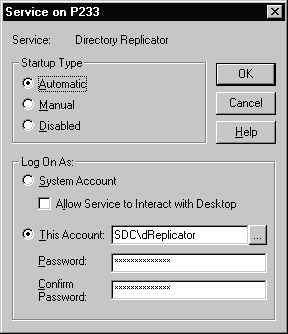
Figure 8-6: Directory Replicator service startup parameters
Exercise 8-2 leads you through the steps needed to configure your system for the Directory Replicator service. The exercise assumes you have a machine named Computer1 on your network. You'll need to change the name Computer1 to the actual name of a system (one for which you have administrator privileges) on your local network. Exercise 8-2 must be performed for each system you intend to use as either an export server or an import computer.
The Directory Replicator service has now been configured to automatically start at system initialization using the dReplicator service account. But you haven't actually started the service, you have only configured it.
Now you need to start the service so replication can begin. In Exercise 8-3 you'll designate a system to be the export server, configure the export directories, and then start the Directory Replication service. The exercise assumes you have a machine named Computer1 on your network. Again, change the name Computer1 to the actual name of a system (for which you have administrator privileges) on your local network.
Figure 8-7 shows how the export server looks on our system. SDC is the domain name where this export server is located. If you do not specify computer names or a domain in the To List, directories will be exported to all import computers in the local domain.
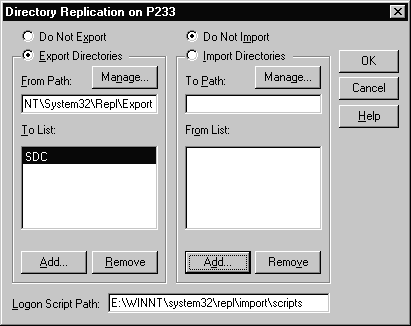
Figure 8-7: Directory Replication export directories
In Exercise 8-4 you'll designate a different system to act as an import computer, configure the import directories, and then start the Directory Replication service. The exercise assumes you have a machine named Computer2 on your network. Change the name Computer2 to the actual name of a system (one for which you have administrator privileges) on your local network
Figure 8-8 shows how the import computer looks on our system. SDC is the domain name where this particular import computer is located. If you do not specify computer names or a domain in the From List, the computer will import from all export servers in the local domain.
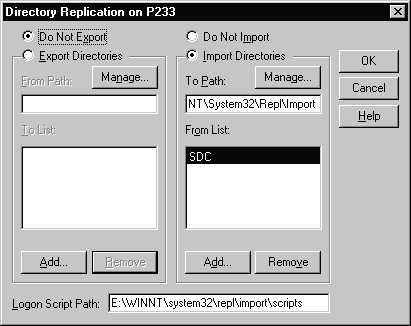
Figure 8-8: Directory Replication import directories
You may want to consider setting up your export server as an import computer as well, depending on what files and directories you may be exporting. As you'll see later in the chapter, this is necessary if your export server is the PDC or a BDC. Once completed, the Directory Replication dialog box for your export server should look like the one in Figure 8-9.
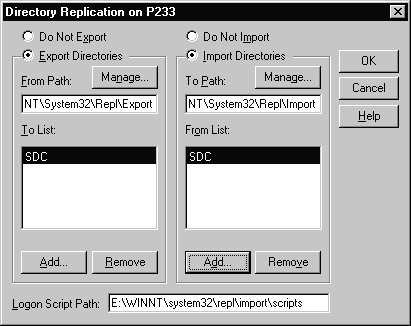
Figure 8-9: Directory Replication showing export and import directories
Now you have created export directories on the export server. As mentioned earlier, import directories are automatically created on the import computers. But how do you really know if data is being replicated? Exercise 8-5 gives you the opportunity to verify that replication has really occurred. The exercise assumes you have machines named Computer 1 and Computer2 on your network. Change the names Computer1 and Computer2 to the names you used in Exercises 8-3 and 8-4.
Now that the Directory Replicator service is working, you've done everything necessary—right?Let's hope you answered No to that question, because you still need to manage the replication process.
Let's look at what you do to manage the replication process. First, you can use Server Manager to control what directories are replicated from the export tree and what directories are copied into the import tree. You can also control a variety of export server functions from the Server Manager, as described in the following list.
| Locks Prevents a directory from being exported. You may want to use a lock when you are working on files in a directory and do not want the directory replicated until you have completed all the work. You activate this function by clicking the Add Lock button. | |
| Stabilize Shows whether the files in the export directory will wait two minutes or more after changes before being exported. You would use this function to help prevent the premature replication of a directory that is currently being changed (and thus might not contain complete data). To activate this function, place a check mark in the box next to Wait Until Stabilized. | |
| Subtree Shows whether the entire subtree will be exported. To activate this function, place a check mark in the box next to Entire Subtree. | |
| Locked Since Shows the date and time a lock was placed on a directory. |
Figure 8-10 shows the Manage Exported Directories dialog box you use to control these functions.
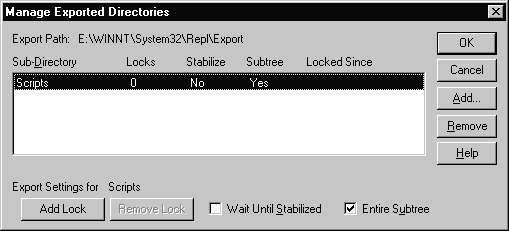
Figure 8-10: Manage Exported Directories dialog box
Exercise 8-6 gives you some practice in managing directories on the export server. The exercise assumes you have a machine named Computer1 on your network. Change the name Computer1 to the name of the system you set up as the export server in Exercise 8-3.
Figure 8-11 shows the Manage Imported Directories dialog box. You can control a variety of functions for the import computer by using the Server Manager.
| Locks Prevents a directory from being imported. You activate it by clicking the Add Lock button. | |
| Status Shows the status on receiving updates from the export server. There are four possible items you may see here: | |
| OK Regular updates are being received from the export server and the data being imported is identical to the data exported. | |
| No Master Updates are not being received from the export server. This could be caused by the export server not running or it might have stopped exporting updates. | |
| No Sync This shows that updates have been received, but the data is not up-to-date: it can happen if there are open files on the import computer or export server, if access permissions to the export server are not available to the import computer, or if the export server has malfunctioned. | |
| [empty] The status block is empty if replication has never occurred for the directory. This can be caused if replication has not be properly configured for the export server, this import computer, or both. | |
| Last Update Date and time the last update was made to a file in the import directory. |
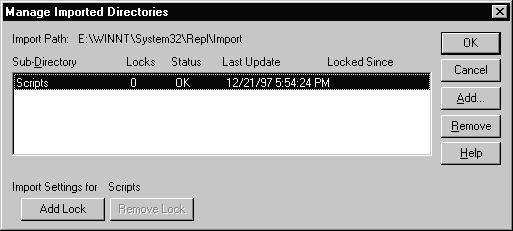
Figure 8-11: Manage Imported Directories dialog box
Now that you've seen how to use the Directory Replicator service to replicate directories, let's look at some other replications that occur on a Windows NT domain. One of the most important items that needs to be replicated when you have one or more BDC's in your network is the user accounts database. This section also describes the use of replication in the management of logon scripts, system policy files, and widely used files.
The user accounts database is synchronized automatically by Windows NT Server. This communication is managed by the netlogon service. Based upon the PulseConcurrency value in the Registry, the PDC sends out notices that signal the BDC's to request database changes from the PDC. (Table 8-1 explains the PulseConcurrency value.) To keep bandwidth usage down, the notices are staggered so all BDC's do not request changes at the same time. A BDC does not request changes if it is up-to-date. When the BDC requests a change, it informs the PDC of the last change it received.
Changes requested by BDC's may consist of any new or changed passwords, new or changed user and group accounts, or any changes in their group memberships or user rights. The changes are stored in the change log. The number of changes that can be held in the log depends upon its size.The default log size is 64KB and each change is approximately 32 bytes in size. This allows about 2000 changes to fit into the log. When the log is full, the oldest change is overwritten as a new change is added. Changes that occurred since the last synchronization are copied to the BDC when the BDC requests changes. If a BDC does not request changes in a timely manner, the entire user accounts database must be synchronized to that BDC. For example, if a BDC on a busy domain is offline for a day for scheduled maintenance, more changes will occur during that time than can be stored in the change log.
As discussed in the preceding paragraphs, a partial synchronization is the automatic, timed replication to all domain BDC's of only those directory database changes that have occurred since the last synchronization. You can use the Server Manager to force a partial synchronization to all BDC's in the domain. For example, if you add a new user (who happens to be your boss) to the domain and you want to get the new account added to all the BDC's quickly, you can perform a partial synchronization to get the account added to all BDC's as soon as possible.
It is also possible to use Server Manager to force a partial synchronization of a particular BDC with the PDC. This can be useful if the BDC has been offline for a few minutes and you don’t want to wait for automatic partial synchronization to occur.
As seen in Table 8-1, it is possible to control synchronization information by modifying the following Registry key:
\HKEY_LOCAL_MACHINE\SYSTEM\CurrentControlSet\Services\NetLogon\Parameters
Name of Value |
Description |
| Pulse | The pulse frequency in seconds. All changes made to the user accounts database since the last pulse are compiled; when the pulse time expires, a pulse is sent to each BDC that needs the changes. A pulse is not sent to a BDC that does not need the changes. Default value: 300 (5 minutes); value range: 60 (1 minute) - 3600 (1 hour) |
| PulseConcurrency | The maximum number of simultaneous pulses the PDC will send out to BDC's. The netlogon service sends pulses to individual BDC's, which in turn causes the BDC's to respond by asking for any database changes. The PDC will have only the number of pulses specified in PulseConcurrency out at any one time. This feature is designed to control the maximum load placed back on the PDC. If you increase PulseConcurrency, the PDC has an increased load. However, when you decrease PulseConcurrency, it takes longer for a domain with a large number of BDC's to send a change to all the BDC's. Default value: 20; value range: 1-500 |
| PulseMaximum | The maximum pulse frequency in seconds. Regardless of whether a BDC's user accounts database is up-to-date it is sent at least one pulse at the frequency reflected by this parameter. Default value: 7200 (2 hours); value range 60 (1 minute) - 86400 (1 day) |
| PulseTimeout1 | This is how long, in seconds, the PDC will wait for a BDC that is not responding. If the BDC does not respond within this time period, it is not counted against the PulseConcurrency limit. This allows the PDC to send a pulse to another BDC in the domain. A partial synchronization can take a long time to complete if this number is too large and the domain has a large number of BDC's that do not respond. The load can be increased on the PDC if this number is too small and a slow BDC is not responding fast enough. This is because after the BDC finally does respond, it still has to receive a partial synchronization from the PDC. Default value: 5 (5 seconds); value range 1 (1 second) - 120 (2 minutes) |
| PulseTimeout2 | This is how long, in seconds, a PDC willwait for a BDC to complete partial synchronization. Synchronization progress has to continue even though a BDC has initially responded to a pulse. A slow BDC will consume one of the PulseConcurrency slots if this number is too large. On the other hand, if this value is set too small the load on the PDC could be increased because of the number of BDC's that are doing a partial synchronization. Default value: 300 (5 minutes); value range: 60 (1 minute - 3600 (1 hour) |
| Randomize | Specifies the BDC backoff period, in seconds. After receiving a pulse the BDC will back off some number of seconds between zero and the Randomize value before calling the PDC. The Randomize value should always be smaller than the PulseTimeout1 value. Default value: 1 (1 second); value range: 0 - 120 (2 minutes) |
Table 8-1: Synchronization Control Parameters
It is important to note that if a value is not present in the registry, the default value is in effect.
In a full synchronization, the PDC sends a copy of the entire user accounts database to a BDC. However, a full synchronization can be a bandwidth hog because user accounts databases can be as big as 40 megabytes! If changes have been overwritten from the change log before replication occurs, full synchronization is performed automatically. Full synchronization also occurs when a new BDC is added to the domain.
Normally, a full synchronization will not be required because the netlogon service, by default, sends out updates every five minutes and, as mentioned earlier, the change log holds about 2000 changes.
When using Server Manager to synchronize domain controllers, the Computer menu command chosen for synchronizing changes depends on whether you select the PDC or BDC.
When the PDC is selected, the Synchronize Entire Domain command is available on the Computer menu. When this command is issued, the latest changes to the user accounts database are immediately copied from the PDC to all the BDC's in the domain. The command does not wait for any synchronization currently in progress to complete.
When a BDC is selected, the Synchronize With Primary Domain Controller command is available on the Computer menu. This command copies the latest user accounts database changes only to the selected BDC.
A parameter exists in the Windows NT Server Registry to help increase the performance of replication over a slow WAN link. That parameter is called the ReplicationGovernor. A BDC uses the ReplicationGovernor to increase the performance of domain synchronization by defining both the size of the data transferred on each call to the PDC and the frequency of the calls.
A BDC can take advantage of the ReplicationGovernor parameter by adding it to the following key in its Registry:
\HKEY_LOCAL_MACHINE\SYSTEM\CurrentControlSet\Services\NetLogon\Parameters
Assign a type of REG_DWORD and a value from 0 to 100 (the default is 100). As mentioned earlier, the value defines both a percentage for the amount of data transferred on each call to the PDC and the frequency of the calls to the PDC. For example, if the value of the ReplicationGovernor were set to 75 percent, it would use a 96KB buffer instead of the default 128KB buffer. Also the BDC would have an outstanding synchronization call on the network for only a maximum of 75 percent of the time. If you want to decrease the value of ReplicationGovernor, you need to increase the size of the change log. The new value does not take effect until you stop and restart the netlogon service.
The ReplicationGovernor value should be used only when necessary, because synchronization may never complete if it is set too low. If synchronization is set below 25 percent, the user account database may become completely out of sync.
Now that you are familiar with different automatic synchronization parameters you can adjust how your domain will replicate. Exercise 8-8 shows you how to modify your registry in order to change the synchronization interval within your domain.
User accounts can be assigned logon scripts. Every time a user logs on, the logon script assigned to that user is run. An administrator can use the logon script to affect the user’s environment without trying to manage all aspects of it. When the PDC or a BDC processes a logon request, it locates the logon script by combining a filename specified in User Manager for Domains with a path specified in Server Manager.
If you plan to use logon scripts in a domain that has a PDC and at least one BDC, you should replicate the logon scripts to all the domain controllers. The master copy of each logon script should be stored in the export tree of the export server. The export server might be the PDC, but it is not required to be. Copies of the master logon scripts should be replicated to each import computer that participates in authenticating logons for the domain. If this is done, only one copy of each logon script needs to be maintained, but every system that participates in authenticating domain logons will have an identical copy of all the user logon scripts.
As mentioned earlier, replication is configured so that Windows NT Server computers export subdirectories and logon scripts from the directory %systemroot%SYSTEM32\REPL\EXPORT\SCRIPTS, and import subdirectories and logon scripts to the directory %systemroot%SYSTEM32\REPL\IMPORT\SCRIPTS. We have added the SCRIPTS subdirectory to specifically be used for logon scripts. For the PDC and every BDC, the path to imported logon scripts must be entered in the Logon Script Path dialog box of the Directory Replication dialog box shown in Figure 8-12.

Figure 8-12: Logon script path location
You can define a specific user’s settings or the settings for a group of users by using a system policy file. A single policy file can contain the registry settings for all users, groups, and computers. There is no need to use separate policy files for each user, group, or computer.
If you create a system policy file that will be automatically downloaded from validating domain controllers, you should name the file Ntconfig.pol for Windows NT users and config.pol for Windows 95 users.
When a user of a Windows NT 4.0 system logs onto the network, the system conducts a check of the netlogon share on the validating domain controller for the NTconfig.pol file. By default, the netlogon share is %systemroot%SYSTEM32\REPL\IMPORT. If the system finds the file, it downloads it, scans it for the user, group, and computer policy data, and applies it if appropriate.
When you implement a system policy file for Windows NT or Windows 95 users and computers, make sure that directory replication is working properly among all domain controllers that share in user authentication. By default, the course of action is for the system that is logging on to check for a policy file in the netlogon share of the validating domain controller. If directory replication to a domain controller fails and the system logging on does not find a system policy file on that domain controller, then no policy will be applied and the existing settings will remain. In that case, users may have more capabilities than you intended for them to have.
While replication can be a very handy feature to use on your Windows NT network, you must use it with caution so that it doesn’t backfire on you. The following guidelines should help you determine when a file should be replicated and when it should not be. If a file is one that is commonly read by several users on your network, but not updated, then you should replicate it out. If a file is changed by only one person and widely read, then you should probably replicate it. If a file is updated by many people, many times per day, you may not want to replicate it out because the most current version may not be the one replicated—especially across a slow link. Speed of the link is a valid point to consider when considering replication of files. If the file is only accessed once per day across a slow link, but updated three times a day, then it's best not to replicate it. However, if the files are accessed several times per day over a slow link and only changed once, you should replicate the file over the slow link so users can access it faster via their local network.
There are some limitations to the directory replication service that can lead to problems if you are not familiar with them. Directory replication is a holdover from the old LAN Manager days. Today, it is almost exclusively used to replicate policy files and logon scripts among domain controllers. You may find other uses of it to be unsatisfactory.
The number one problem in setting up directory replication is a logon failure of the service account. Directory replication must be set up in be tediously exact fashion. We make a point of this to the students, yet we can still rely on several of them to make mistakes. This allows us to demonstrate to the class the error and its fix—without having to script the failure in advance. Two things are important. First the service account must be a member of both the Replicators and Backup Operators Local group. Second, the password specified when you created the account must match the password you supplied when you configured the Directory Replication service in the Services applet.
One of the limitations to the service is that it can not be scheduled. Directory replication happens on its own schedule. This not the kind of service where you can make massive changes and expect them to replicate during off hours, or come in a few minutes early one morning to make some policy changes and expect them to replicate across your domain controllers by the time users start logging on.
Another limitation, in terms of file distribution, is that directory structure on the import computers will be made to be identical to the directory structure of the export server. This is the job of the import computer. When the export server announces changes, the import computer looks at the directory structure of the export server and then creates an identical directory structure. This enables files on the export server to be brought to the import computer. Unfortunately, it also means that files that are on the import computer but are not on the export server will be deleted from the import computer! What happens if you modify a file on the import computer? Remember, the import computer will create a directory structure (including all files) that is identical to that of the export server.
You probably need to keep the most up-to-date files on the computer you are currently using, regardless of whether you are connected to a network or if you use multiple computers such as a notebook system and a desktop system. Transferring these files can be a very tedious process, in which you have to compare file dates and copy files from one machine to another. This is a job for My Briefcase, which tracks relationships between file versions on different computers—either on the network or stand-alone. It helps to eliminate problems that are caused by manually trying to keep files synchronized. My Briefcase provides file-level synchronization. It has no clue about the format the file is in and it doesn’t care. Figure 8-13 shows what My Briefcase looks like when it is first initialized. Exercise 8-9 leads you through the steps of creating your own My Briefcase.
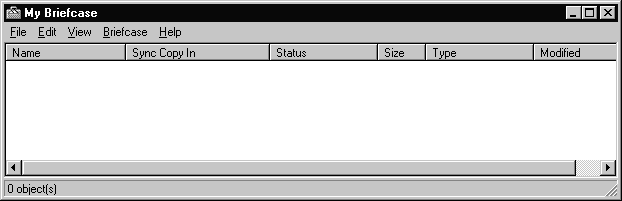
Figure 8-13:My Briefcase when first initialized
To use My Briefcase, make sure it is on your notebook system, then simply drag and drop the files and directories that you want to track onto the briefcase icon. It doesn’t matter whether you make changes to the files inside My Briefcase or to the original files in other directories of the computer. Exercise 8-10 shows you how to add some of your own documents to My Briefcase.
When you put your notebook back on the network, you can instruct My Briefcase to update the unmodified files, whether they are on another system on the network or on your notebook system. There are a couple of ways My Briefcase can do this.
Here's the quickest and easiest way: if either the original file or the one in My Briefcase has changed, then My Briefcase suggests that the newer version of the file be copied to the original location and to My Briefcase.
However, if both the original file and the one in the Briefcase have changed, then My Briefcase has two options to consider. First it checks to see if a reconciliation handler for the file is available. If there is, My Briefcase passes synchronization control to the application. If there is no reconciliation handler, My Briefcase doesn't change either copy of the file, but instead notifies you so that you can choose to keep both files or else select one the latest version. Exercise 8-11 shows you how to keep your files synchronized using My Briefcase.
When you look at the contents of My Briefcase, you’ll notice information such as the location of the sync copy and the status for each document as seen in Figure 8-14.
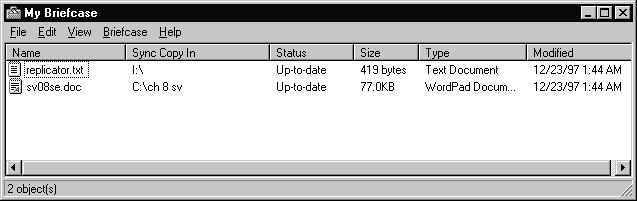
Figure 14:My Briefcase, with additional file information
The Directory Replicator service enables you to set up and automatically maintain identical directory trees on multiple computer systems. With directory replication, you can maintain a single master copy of a file but have it available for use on other systems. Updates made to the files in directories on the export server that have been set up for replication are periodically copied to import computers. Directory replication is useful for load balancing. To successfully implement the Directory Replicator service, you must create a special service account for it to use. The Server Manager is used to configure most of the Directory Replicator.
The user account database is an example of a replication that does not use the Directory Replicator service. If you have a PDC and one or more BDC's in the same domain, then at predetermined intervals the user account database is synchronized amongst them. The synchronization can be either a partial synchronization or a full synchronization. Several parameters can be changed in the Registry to control how synchronization will occur within a domain.
My Briefcase enables you to keep the most up-to-date files on the computer you are currently using—regardless of whether you are connected to a network or if you use multiple computers such as a notebook system and a desktop system. My Briefcase tracks relationships between file versions on different computers. My Briefcase provides file-level synchronization and does not recognize the format any file is in.
| Directory replication is a service of Windows NT that allows you to set up and automatically maintain identical directory trees on many computer systems. | |
| Before you can use the Directory Replicator service, you must create a special user account required by the Directory Replicator service. | |
| You can name the replicator service account by any name that you want, with the exception that it cannot have the same name as a group. That is the reason it is named dReplicator— not just Replicator—because a group by that name already exists. | |
| The three main components needed for replication are: the export server, import computer, and export and import directories. | |
| Only computers that are running Windows NT Server can be configured as export servers. The Windows NT Server does not have to be a domain controller to be used in this configuration. | |
| The Directory Replicator service has to be configured and started in order for replication to occur. | |
| Use Server Manager to control what directories are replicated from the export tree and what directories are copied into the import tree. | |
| One of the most important items that needs to be replicated when you have one or more BDC's in your network is the user accounts database. | |
| Based upon the PulseConcurrency value in the Registry, the PDC sends out notices that signal the BDC's to request database changes from the PDC. | |
| A partial synchronization is the automatic, timed replication to all domain BDC's of only those directory database changes that have occurred since the last synchronization. | |
| In a full synchronization, the PDC sends a copy of the entire user accounts database to a BDC. | |
| User accounts can be assigned logon scripts. Every time a user logs on, the logon script assigned to that user is run. | |
| The logon script path cannot be changed for member servers. You need to store logon scripts in %systemroot%SYSTEM32\REPL\IMPORT\SCRIPTS or in subdirectories of that path. | |
| You can define a specific user’s settings or the settings for a group of users by using a system policy file. | |
| My Briefcase, which tracks relationships between file versions on different computers—either on the network or stand-alone. |
The following questions will help you measure your understanding of the material presented in this chapter. Read all the choices carefully, as there may be more than one correct answer. Choose all correct answers for each question.