| Chapter 7 * |
| Windows NT 4.0 Domains * |
| Certification Objectives * |
| The Workgroup Model and The Domain Model * |
| Workgroups: Peer-to Peer Networking * |
| Domain Computing * |
| Workgroup Model versus Domain Concept * |
| Managing Domain Trusts * |
| Trusted Domain Concept * |
| Trust Relationships between Domains * |
| Exercise 7-1: Creating a one-way trust relationship * |
| Exercise 7-2: Using the trust relationship * |
| Exercise 7-3: Identifying the trust relationships on domain B * |
| Exercise 7-4: Terminating a trust relationship * |
| Number of Trusts * |
| Domain Strategies * |
| Single Domain Model * |
| Master Domain Model * |
| Multiple Master Domain Model * |
| Complete Trust Model * |
| From the Classroom * |
| Trust Relationships Between Domains: Who Do You Trust? * |
| Using NT Server Manager * |
| Exercise 7-5: Launching Server Manager * |
| Server Properties * |
| Monitoring Users * |
| Exercise 7-6: Disconnecting a user session * |
| Managing Share Resources * |
| Exercise 7-7: Disconnecting a user on a shared directory * |
| Monitoring Resources in Use * |
| Monitoring Server Alerts * |
| Exercise 7-8: Managing Server Alerts * |
| Adding/Removing Computers * |
| Exercise 7-9: Adding a Computer to a Domain * |
| Exercise 7-10: Deleting a computer from a domain * |
| Promote a BDC to a PDC * |
| Exercise 7-11: Promoting a BDC to a PDC * |
| Exercise 7-12: Demoting a recovered PDC to a BDC * |
| Synchronize BDC's with PDC's * |
| Exercise 7-13: Manually synchronizing a BDC with the PDC * |
| Exercise 7-14: Manually synchronizing all BDC's with the PDC * |
| Local and Global Groups * |
| Setting Up a Global Group * |
| Exercise 7-15: Creating a new global group * |
| Setting Up a Local Group * |
| Exercise 7-16: Creating a new local group * |
| NT’s NetLogon Service * |
| Pass-Through Authentication * |
| Configuring NetLogon Service * |
| Pulse * |
| PulseConcurrency * |
| PulseMaximum * |
| PulseTimeOut1 * |
| PulseTimeOut2 * |
| Randomize * |
| ReplicationGovernor * |
| Certification Summary * |
| Two-Minute Drill * |
| Self Test * |
| The Workgroup Model and The Domain Model | |
| Managing Domain Trusts | |
| Using NT Server Manager | |
| Local and Global Groups | |
| NT’s NetLogon Service |
This chapter discusses the NT workgroup and domains models. We’ll discuss which domain model is appropriate for given situations. In order to completely understand all the domain models, we’ll explain what a trust is and how it relates to the domain models. Once a domain model is decided upon you’ll need to manage user accounts by combining them into groups. You’ll learn about local and global groups and when it’s appropriate to use each type. Then we’ll discuss Server Manager and how to use it to manage your NT domains and servers. Finally, we’ll tell you how to configure the netlogon service so you can optimize it for your network needs.
All NT computer systems participate in either a workgroup or a domain. The biggest difference between the two is where the user accounts are located. If the user accounts are located locally (except for domain controllers), the computer is part of a workgroup. If the user accounts are located on a remote server, the computer is part of a domain.
A workgroup is an organizational unit that groups computers together if they don’t already belong to a domain. A computer that participates in a workgroup is responsible for keeping track of its users and groups. This information is maintained by the local computer and not shared with other computers in the workgroup. Because of this feature, users in a workgroup must have a user ID and password for every NT computer they need to access. This is good for small networks, but can become impossible to manage if many computers are involved. Since there is no central user accounts database in a workgroup, all computers are considered to be peers. This is known as peer-to-peer networking. No one computer has authority over any other computer; all computers are equal.
A domain is a group of computers that share a common user accounts database and security policy. A Windows NT server can act either as a domain controller or a member server to a domain. Domain controllers (either primary or backup) maintain a copy of the directory service database. Servers that don’t maintain a copy of the directory service database are called member servers. NT Workstation can also be part of a domain, but it can’t maintain a copy of the directory service database. By being part of the domain, a computer allows the domain to provide security validation for its users. Logon requests are processed by domain controllers for all computers participating in a domain.
A domain doesn’t refer to a single geographic location. A domain can consist of computers on a LAN or WAN. The computers can be connected by many types of physical connections that allows them to communicate, including ISDN, Ethernet, token ring, satellite, leased lines, ATM, dial-up adapters, etc.
As mentioned earlier, a server can either be a domain controller or a member server. A member server is much like a workstation on the domain. It relies on the domain controllers for user authentication. There are two types of domain controllers: primary domain controllers (PDC) and backup domain controllers (BDC). There must be one and only one PDC per domain. The PDC is responsible for tracking changes made to the directory service database, then distributing these changes to the BDC's. The PDC is the only server that can accept changes to the directory service database. If you try to change a user’s password when the PDC is unavailable you’ll get an error message stating that the PDC for the domain can’t be found.
A BDC contains a copy of the directory service database. The BDC’s directory service database is automatically synchronized with the PDC. The BDC is used to authenticate user logons and it can be promoted to be the PDC in case the PDC fails. You can usemultiple BDC's to load balance your network by placing BDC's near many users. The number of BDC's that are required depends on your network. You have to consider the number of workstations on your network, the physical location of the workstations, and the connection speed to all areas of your network. Table 7-1 shows the Microsoft recommended number of BDC's per number of workstations. BDC'sSince you’ll still need a PDC for each domain, the total number of domain controllers is the number of BDC's plus one. These numbers were calculated using a 486/66 computer with 32 MB of RAM. As the hardware performance increases, you can decrease the number of recommended BDC's.
| Number of Workstations | Number of BDC's |
| <5,000 | 1 |
| 5,000 | 2 |
| 10,000 | 5 |
| 20,000 | 10 |
| 30,000 | 15 |
Table 7-1: Number of BDC's per Number of Workstations
The workgroup model has one advantage in that it doesn’t require central administration. Since all computers are peers, every computer can have its own administrator. In small LAN's that don’t require central security/administration that’s an advantage; however, in larger LAN's it's a disadvantage. The more computers you manage, the more you need to use a domain.
Domains offer several advantages over workgroups. First, domain controllers create a single administrative unit, which allows administrators to manage only one account for each user. This centralized network administration gives a view of the entire network from any workstation in the domain. It gives administrators the ability to manage users, groups, and resources in distributed network. Second, since there is only one account per user, each user only needs to remember one password and user ID. Single user logon allows users to access any server in the domain for which he has proper permissions with only one logon. The third advantage ties in with the second, universal access to resources. One logon allows users to access multiple servers within the domain. The account validation is extended to allow seamless user access to multiple servers throughout the domain or other trusted domains.
At this point you’re probably asking, "What is a trust?" A trust is a link that combines two separate domains into one administrative unit that can authorize access to resources on both domains. To put it another way, validated users in domain X can access resources in domain Y if a trust relationship is established. To manage trusts you use User Manager for Domains.
A trust allows administrators to manage multiple domains as a single administrative unit. Each trust has a trusting domain and a trusted domain. The trusted domain is the domain that can perform administrative tasks in the other domain. User accounts created in the trusted domain can access resources in the trusting domain (if proper permissions are assigned). The trusting domain trusts another domain to manage its user, group, and resources. To put the two concepts together, the trusting domain allows the trusted domain to manage its users, groups, and resources. Although a trust exists, administrators in the trusting domain can still manage their own local resources and users; however, they can’t manage users in the trusted domain.
You can create a one-way or a two-way trust relationship. In a one-way trust relationship, one domain trusts the users in the other domain to use its resources. In other words, validated users of domain X can access resources in domain Y, but domain Y users cannot access resources in domain X. If users in domain Y need access to domain X, you’ll need to create a two-way trust. Two-way trusts are actually two separate one-way trusts. It allows users from either domain to access resources in the other domain. Figure 7-1 shows a one-way trust in which the Sales domain trusts the Marketing domain. Figure 7-2 shows a two-way trust where Sales trusts Marketing and Marketing trusts Sales. Notice the direction of the arrows. They may appear backwards, but they're not. The arrow should point from the trusting domain to the trusted domain. In Figure 7-1, Sales trusts Marketing, so it points at Marketing for its security provider. You may think the arrow should point the opposite direction because the users from Marketing can get into Sales. Well, that’s not correct, although it makes sense. Microsoft has defined arrows as pointing from the trusting domain to the trusted domain.
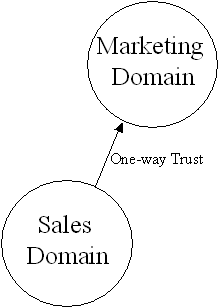
Figure 7-1: One-way trust
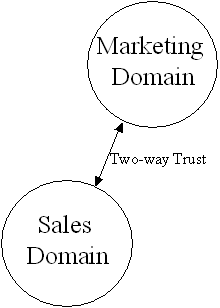
Figure 7-2: Two-way trust
The following exercises teach you how to use trusts and manage them in various situations. First let’s create a one-way trust. Follow Exercise 7-1 to create a one-way trust between two domains. We’ll establish a one-way trust between the domain Sales and the domain Production where Sales is the trusted domain. For this exercise you’ll need to have administrator rights to two NT domains.
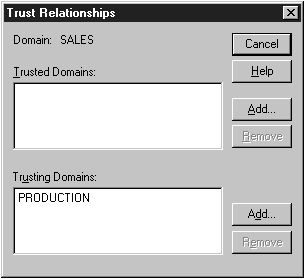
Figure 7-3: Adding Production as a trusting domain
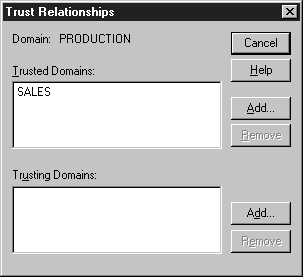
Figure 7-4: Adding Sales as a Trusted Domain
Exercise 7-2 shows you how to give users permissions to a shared directory in a resource domain.
Exercise 7-3 shows you how to identify the trust relationships on a domain.
Before version 4.0, NT had a recommended limit of 128 trusts per domain. NT 4.0 has increased the number of possible trusts to unlimited. It also increased the number of LSA secrets significantly higher than the previous limit of 256. (You use one LSA secret for each trust you establish.) Another limiting factor was the nonpaged pool size of the domain controllers on which the resource domains are stored. Whenever a domain controller starts, it sends a message to each domain in an attempt to discover domain controllers in all trusted domains. Each domain controller in every trusted domain responds with a message to the starting domain controller. The response is temporarily stored in the nonpaged pool until NetLogon can read it.
NT 4.0 provides a large default nonpaged pool size, which provides for a substantially higher number of trusted domains than earlier versions did. The default nonpaged pool size depends on the amount of physical RAM on your server. Table 7-2 Lists the default nonpaged pool size that is configured when NT Server is installed on computers with different amounts of physical memory. If necessary, you can use the registry editing tool REGEDIT to increase the size of your nonpaged pooled memory size. Edit the following key to increase the nonpaged pooled memory size:
HKEY_LOCAL_MACHINE\SYSTEM\CurrentControlSet\Control\Session Manager\Memory Management
| Nonpaged Pool Size | # of Trusted Domains | Total Physical Memory |
| 1.2 MB | 140 | 32 MB |
| 2.125 MB | 250 | 64 MB |
| 4.125 MB | 500 | 128 MB |
Table 7-2: Default Nonpaged pool size Vs. Physical Memory
Now that you understand trust relationship, we can discuss Microsoft's recommended domain models. There are four recommended domain models: single, master, multiple master, and complete trust.
Let’s start by discussing the simplest domain model—the single domain model. The single domain consists of one domain; therefore, no trusts are set up. All user and group accounts are located in this domain. Figure 7-5 depicts the single domain model. Notice how all user accounts and resources are located in one domain. A single domain can handle up to 26,000 users, but that really depends upon the type of hardware and number of servers in the domain. The single domain is good for central administration and small networks.
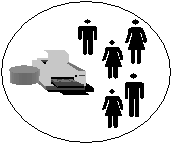
Figure 7-5: Single Domain Model
The master domain model is also good for central administration. As in the single domain, all user accounts are located in a single domain, which is called the master domain. Resources, like printers and files, are shared in other domains called resource domains. This provides for organizational grouping of your network resources, but still allows central administration. The master domain model can handle about 30,000 users depending on the number of servers and type of hardware. This model is a very common model to be used in the real world. It gives departments the ability to manage their own resources. As an administrator you’ll quickly find that inter-department politics will definitely play a role in choosing a domain model. This model is used to allow departments to control their own resources while allowing a central administrator to manage user accounts. This is a good compromise between the single domain model and the full trust model (which we’ll discuss a little later).
Figure 7-6 depicts the master domain model. Users log on to the Master Domain called MyCompany. Resources are then shared to those users in other domains. The resource domains Sales, Marketing, and Production can each have their own administrators to manage their resources.
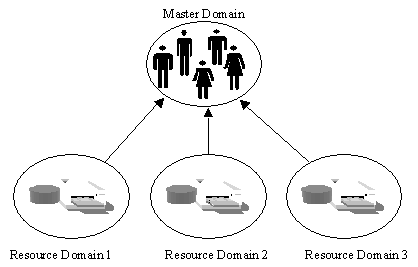
Figure 7-6: Master Domain Model
The master domain model is good for:
| Centralized account management. User accounts can be centrally managed; add/delete/change user accounts from a single point. | |
| Decentralized resource management or local system administration capability. Department domains can have their own administrators who manage the resources in the department. | |
| Resources can be grouped logically, corresponding to local domains. |
The multiple master domain model is managed much like the master domain model, except it can handle more users. The multiple master domain is actually two or more master domain models joined by a two-way trust. Figure 7-7 shows the trusts that are needed to create a multiple master domain.
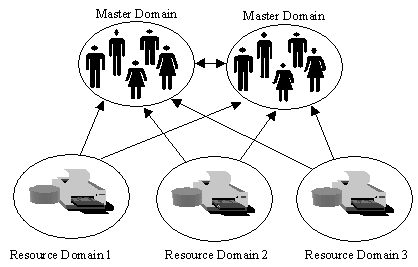
Figure 7-7: Multiple Master Domain Model
The multiple master domain has the same benefits of the master domain model plus the following:
| Organizations of more than 40,000 users. The multiple master domain model is scalable to networks with any number of users. | |
| Mobile users. Users can log on from anywhere in the network, anywhere in the world. | |
| Centralized or decentralized administration. | |
| Organizational needs. Domains can be configured to mirror specific departments or internal company organizations. | |
| BDC's can be distributed between sites to facilitate LAN-WAN interactions. |
This model doesn’t fit in with the other models. This model is generally used when a company cannot decide on a central place for administration. Since there is no central administrator each domain is a complete entity onto itself. In order to facilitate communication between domains, a two-way trust is established between every domain participating in this model.
This model can scale to more than 30,000 users. In fact, like the multiple master domain model, it can scale to an unlimited number of users. You’ll just need to create a new domain and establish the proper trusts for that domain for every 30,000 users. This model is 100% decentralized management. Each domain has its own administrator. Resources can be shared to users in other domains because of the two-way trust arrangement.
This model requires many trusts to be established. The formula for determining the number of trusts is n(n-1) = total number of trusts; where n is the number of domains. If you have 7 domains you’ll need 42 trusts. Add one more domain and you need 56 trusts. This can get out of hand very quickly.
Figure 7-8 shows the complete trust model for four domains. Notice that each domain has to have a two-way trust established with every domain.
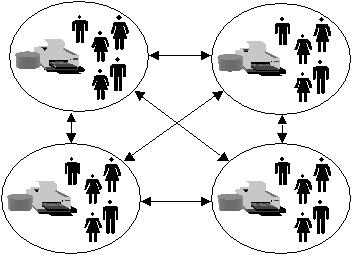
Figure 7-8: Complete Trust Domain Model
Trust relationships may be tough to understand at first. In simplest terms, a trust relationship allows administrators to preserve the "one user, one account" design goal. That is, any user should be able to go anywhere in the enterprise, log on with the same account, and still have access to the same resources—without the need for multiple accounts in different domains.
One of the most confusing things for students to understand is the "trusted/trusting" terminology. This may simply have to be memorized.
| The "trusted" domain has the user accounts. | |
| The "trusting" domain has the resources that the users want to access. |
In other words, the domain with the resources is going to "trust" the security system of the domain with the user accounts. Stated another way, the resource domain (the one with the stuff the user wants to get at) will be "trusting" the authentication of the user's account done by the accounts domain—the "trusted" domain.
Microsoft documentation says that you may set up either side of the trust first, and then complete the other side. Experience in both the classroom and at client sites suggests that if you set up the "trusted" side first and the "trusting" side next, it will be easier for you to determine that the trust relationship was established. This is because only the "trusting" side receives a message indicating success or failure. If you try to set up this side first, you will always get an error message stating that the trust could not be verified at this time. That is simply because the trusted side has not been set up.
If you start with the trusted side first and then do the trusting side, the message will report that the trust has been successfully established. While you can do it either way, one way could lead to confusing messages.
The Server Manager utility allows you to manage servers and computers in your domain. You can use Server Manager to:
| Select a domain, workgroup, or computer for administration | |
| Manage a computer by viewing a list of connected users, viewing shared and open resources, managing services, managing shared directories, and sending messages to connected users | |
| Manage a domain by promoting a BDC to the PDC, synchronizing BDC's with its PDC, and adding or removing computers from the domain |
Server Manager has many of the same functions as the Server and Services applets in Control Panel, but Server Manager allows you to manage both the local computer and remote computers. Exercise 7-5 shows how to launch Server Manager.
By double-clicking on the computer you want to manage, you will cause the Properties dialog box for that computer to display (see Figure 7-9). You can use Server Manager to monitor:
| Sessions: Total number of users remotely connected to the computer | |
| Open Files: Total number of open files currently accessed via the network | |
| File Locks: Total number of file locks placed by remote users against the open files | |
| Open Named Pipes: Total number of open named pipes between the computer and remote clients |
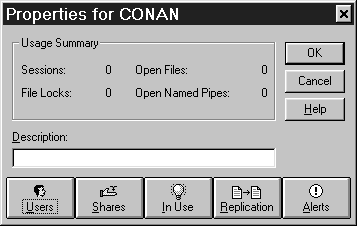
Figure 7-9: Server Manager Properties for server CONAN
Server Manager allows you to enter a description of your computer, which will appear whenever users view your computer using Server Manager. You can do more than just look at the open connections; you can also manage the connections using the control buttons located at the bottom of the Properties windows.
There are five buttons on the on the Properties windows, but in this chapter we'll only discuss four of them: Users, Shares, In Use, and Alerts.
The Users button opens the User Sessions dialog box. The User Sessions dialog box allows you to view a list of all the network users connected to the computer, and list all the resources opened by a selected user. Optionally, you can disconnect one or all of the users connected to the computer. Exercise 7-6 teaches you how to disconnect one user from your computer. Although you can disconnect the user while accessing a shared folder, the client connections are persistent. In other words, the client will keep attaching to the shared resource even after you disconnect the user. To prevent the user from connecting again you’ll have to stop sharing the resource with that user.
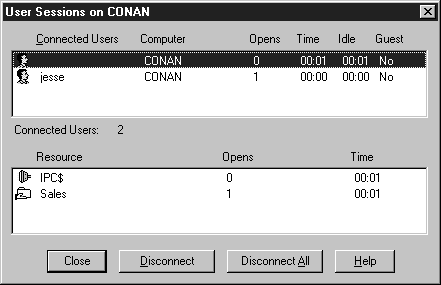
Figure 7-10: User Sessions on server CONAN
The Shares button opens the Shared Resources dialog box. Use this dialog box to view a list of the shared resources available on the computer and for a selected resource a list of connected users. Optionally, you can disconnect one or all of the users connected to the share. Use Exercise 7-7 to disconnect a user accessing a shared directory.
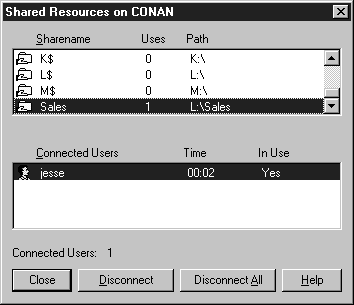
Figure 7-11: Shared Resources on server CONAN
The In Use button opens Open Resources dialog box. Use this dialog box to view a list of the computer's open shared resources, as shown in Figure 7-12. You can also close one open resource or all open resources by selecting the resource that is open and clicking Close Resource.
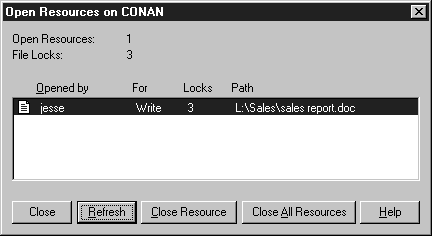
Figure 7-12: Open Resources on server Conan
Server Alerts are used to send notification messages to users or computers. Server alerts are generated by the system, and relate to server and resource use. They warn about security and access problems, user session problems, printer problems, and server shutdown because of power loss when the UPS service is available. It’s a good idea to have a message sent to both the administrator and the administrator’s workstation. See exercise 7-8 to manage Server Alerts.
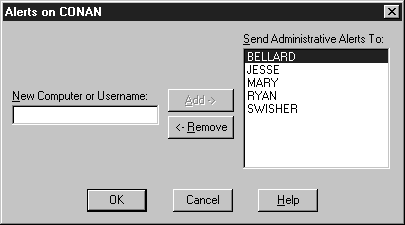
Figure 7-13: Alerts on server CONAN
There are two ways to add NT Servers and Workstations to a domain. You can use the Network Control Panel on the computer that you want to add to the domain. This method requires and administrator’s password to create the computer account. A server operator can also user Server Manager to add computers to the domain.Exercise 7-9 shows you how to add a computer to your domain.
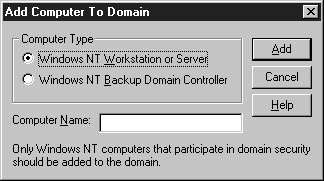
Figure 7-14: Adding a computer to a domain
Exercise 7-10 shows you how to delete a computer from a domain.
When a PDC fails, a BDC must be promoted to fulfill the role of the PDC. After the failed PDC is fixed and before it comes back online, it must be demoted from the role of PDC. (After it is demoted it can later be promoted to the PDC role.) Exercise 7-11 shows how to promote a BDC to a PDC.
Exercise 7-12 shows how to demote a recovered PDC to a BDC.
Synchronization is usually done automatically by the system, but if the domain directory database on a computer running Windows NT Server becomes unsynchronized or if a BDC is unable to establish network connections due to password failure you’ll need to manually synchronize the BDC. You can either manually synchronize one BDC or all the BDC's. Exercise 7-13 teaches you how to manually synchronize domain controllers.
Exercise 7-14 teaches you how to synchronize all BDC's with the PDC.
This can get confusing. Global groups can only be created on domain controllers, whereas local groups can be created on domain controllers, member servers, and workstations. Since global groups are exclusive to domain controllers, you should add users to global groups. Then on the resource servers you should add global groups to local groups and give local groups permissions to the shared resource.
You treat a local group as a single security object that can be granted access to many objects in a single location (domain, workstation, or member server) rather than having to edit the permissions on all those objects separately. Using global groups, you can group user accounts that might be granted permissions to use objects on multiple domains and workstations.
With more than one domain, you can use global groups to allow other trusting domains to add them to their local groups. Global groups can pass through trusts, whereas local groups can not. To allow groups to be granted permissions in resource domains, create a global group to hold the user accounts and then add the global group to a local group in a trusting domain.
When using a single domain you should still follow this model. In the future you may create a trust in which you can then add the global groups from the trusted domain to your domain's local groups. The same is true for the other domain. Your global groups can be given permissions in the trusting domain via that domain's local groups.
Domain global groups can also be used for administrative purpose on computers running Windows NT Workstation or on member servers running Windows NT Servers. For example, the Domain Admins global group is added by default to the Administrators built-in local group on each workstation or member server that joins the existing domain. Membership in the workstation or member server local Administrators group enables the network administrator to manage the computer remotely by creating program groups, installing software, and troubleshooting computer problems.
Table 7-3 provides guidelines for using global and local groups.
| Purpose | Type | Remarks |
| Group users of this domain into one common entity for use in a trusting domain or user workstations. | Global | Other domains or workstations can place global groups into their local groups. |
| Need permissions and rights only in one domain. | Local | The local group can contain users and global groups from this and other domains. |
| Need permissions on computers running NT Workstation or on member servers. | Global | A domain’s global groups can be given permissions on these computers, but a domain’s local groups cannot. |
| Contain other groups. | Local | The local group can contain only global groups and users; however, no group can contain other local groups. |
| Include users from multiple domains. | Local | The local group can be used in only the domain in which it is created. If you need to be able to grant this local group permissions in multiple domains, you will have to manually create the local group in every domain in which you need it. |
Table 7-3: Global and Local Group Guidelines
Creating a new global group is easy. However, once you create a global group you can’t rename it. In order to rename the group you’ll need to create a new group with the name you want to use and assign permissions and users as appropriate. To create a new global group follow exercise 7-15.
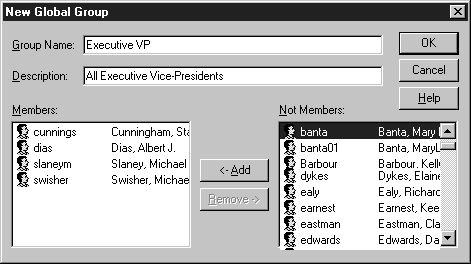
Figure 7-15: New global group
Unlike global groups, local groups can be created on a domain controller, member server, or a workstation. Therefore, you can use User Manager for Domains or User Manager to create the group. Like global groups, local groups can’t be renamed. Follow Exercise 7-16 to create a local group.
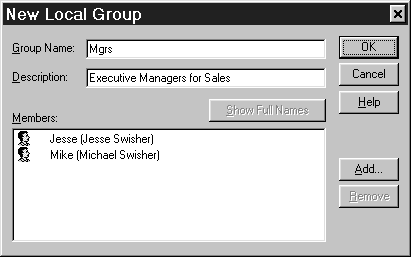
Figure 7-16: New local group
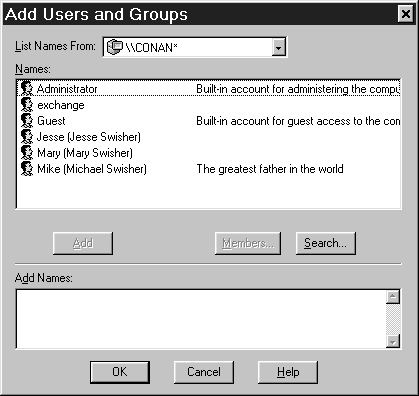
Figure 7-17: Adding users and groups to a local group
The netlogon service used in Windows NT 4.0 Server domain computing is described in the first section of Chapter 6. When you log on to the network from a remote location, the netlogon service establishes a secure communications channel with the first available domain controller that recognizes the computer as a member of its domain. The netlogon service on the domain controller passes the request to the domain controller’s security subsystem, where the username and password are verified against the domain’s directory service database. If the username and password are correct, the domain controller creates an access token and informs you of a successful match.
Pass-through authentication occurs when you choose a domain to log on to from your NT computer, but your computer doesn’t have an account in that domain. When your computer starts it creates a secure communications channel with the domain controller for which it is a member. The connection provides the winlogon process in your local computer with the list of domains available to the workstation. Only the member domain and all trusting domains are displayed in the initial logon list box. This is the same domain controller that responds to the logon request to the domain in which your computer is a member. However, it serves a different role when you choose to log on to a trusted domain.
When logging on to a trusted domain, your request is passed from the domain controller where your secure communications channel exists to the trusting domain’s domain controller. That domain controller then processes the logon and returns a token to your domain controller. Logon then occurs just as it does in domain logon between the trusted and trusting domains, except that another step occurs, in which your member domain controller notifies your computer of a successful logon.
netlogon serviceThe netlogon service not only helps authenticate users, it also manages changes to the directory service database. Use the following key to configure the netlogon service:
HKEY_LOCAL_MACHINE\SYSTEM\CurrentControlSet\Services\NetLogon\Parameters
Configurable options are discussed in the following paragraphs.
The interval after which the netlogon service looks for new changes to the database and sends a pulse (change notice) to the BDC's (default: 5 minutes).
The number of backup domain controllers that pulses are sent concurrently. A higher number increases the amount of network bandwidth required at each synchronization (default: 10).
The interval after which the netlogon service will send a pulse to the BDC's to verify the synchronization level, whether or not there are new changes to the database (default: 2 hours)
Defines how long (in seconds) the PDC waits for a non-responsive BDC. When a BDC receives a pulse, it must respond within this time period. If not, the BDC is considered to be non-responsive. A non-responsive BDC is not counted against the PulseConcurrency limit, allowing the PDC to send a pulse to another BDC in the domain. If this number is too large, a domain with a large number of non-responsive BDC's will take a long time to complete a partial replication. If this number is too small, a slow BDC may be falsely accused of being non-responsive. When the BDC finally does respond, it will partially replicate from the PDC—unduly increasing the load on the PDC (default: 5 seconds)
Defines how long (in seconds) a PDC waits for a BDC to complete partial replication. Even though a BDC initially responds to a pulse (as described for PulseTimeout1), it must continue making replication progress or the BDC will be considered non-responsive. Each time the BDC calls the PDC, the BDC is given another PulseTimeout2 seconds to be considered responsive. If this number is too large, a slow BDC (or one that has its replication rate artificially governed) will consume one of the PulseConcurrency slots. If this number is too small, the load on the PDC will be unduly increased because of the large number of BDC's doing a partial sync.
This parameter only affects the cases where a BDC cannot retrieve all the changes to the directory service database in a single RPC call. This will only happen if a large number of changes are made to the database (default: 300 seconds).
Specifies the BDC backoff period (in seconds). When the BDC receives a pulse, it will back off between zero and Randomize seconds before calling the PDC. The pulse is sent to individual BDC's, so this parameter should be small. Randomize should be smaller than PulseTimeout1. Consider that the time to replicate a directory service database change to all the BDC's in a domain will be greater than:
[(Randomize/2) * NumberOfBDC'sInDomain] / PulseConcurrency
When this value is not specified in the Registry, NetLogon determines optimal values depending on the domain controller’s load (default: 1 second).
Limits the amount of bandwidth the domain synchronization process can consume. Forces the netlogon service to sleep between calls and use smaller buffers to allow other network traffic to pass. This is usually configured for slow WAN links, so that directory service database replication won’t consume all your bandwidth. Setting ReplicationGovernor to 50% will use a 64K buffer rather than a 128K buffer and will only have a replication call outstanding on the net a maximum of 50% of the time. Do not set the ReplicationGovernor too low, or replication may never complete. A value of 0 will cause Netlogon to never replicate. The directory service database will be allowed to get completely out of sync. (default: 100% of available bandwidth).
The ReplicationGovernor is set on BDCs only, not on the PDC.
In order to pass the NT Server 4.0 Core Technologies exam, you need to fully understand the four different NT domain models: single domain, master domain, multiple master domain, and complete trust domain. Be sure to understand the trust relationships involved with each model and which users and groups can be granted access to different domains. Another item to remember is how to configure the netlogon service, especially the ReplicationGovernor. The ReplicationGovernor is used to limit the amount of bandwidth used for synchronizing domains, usually over a slow WAN link.
| All NT computer systems participate in either a workgroup or a domain. | |
| If the user accounts are located locally (except for domain controllers), the computer is part of a workgroup. If the user accounts are located on a remote server, the computer is part of a domain. | |
| Peer-to-peer networking means no one computer has authority over any other computer; all computers are equal. | |
| A domain is a group of computers that share a common user accounts database and security policy. | |
| There are two types of domain controllers: primary domain controllers (PDC) and backup domain controllers (BDC). | |
| A trust is a link that combines two separate domains into one administrative unit that can authorize access to resources on both domains. | |
| NT 4.0 has increased the number of possible trusts to unlimited. | |
| There are four recommended domain models: single, master, multiple master, and complete trust. | |
| The single domain consists of one domain; therefore, no trusts are set up. All user and group accounts are located in this domain. | |
| All user accounts are located in a single domain, which is called the master domain. | |
| Resources, like printers and files, are shared in other domains called resource domains. | |
| The multiple master domain is actually two or more master domain models joined by a two-way trust. | |
| The Server Manager utility allows you to manage servers and computers in your domain. | |
| Server Manager has many of the same functions as the Server and Services applets in Control Panel, but Server Manager allows you to manage both the local computer and remote computers. | |
| Server Alerts are used to send notification messages to users or computers. Server alerts are generated by the system, and relate to server and resource use. | |
| Global groups can only be created on domain controllers, whereas local groups can be created on domain controllers, member servers, and workstations. | |
| Pass-through authentication occurs when you choose a domain to log on to from your NT computer, but your computer doesn’t have an account in that domain. |