![]()
![]()
![]()
![]()
Chapter 10
*Remote Access Service and dial-up networking
*Supported Connections
*Supported Protocols
*Telephony Advanced Programming Interface (TAPI)
*Native 32-bit and Application Portability *
Device Sharing *
Installing RAS
*Configuring Network Settings
*Dial-Up Networking (DUN)
*RAS Security
*Certification Summary
*Two-Minute Drill
*Self Test
*
![]()
Chapter 10
Remote Access Service and Dial-up Networking
![]()
| Overview of RAS | |
| Supported Connections | |
| Supported Protocols | |
| Telephone API | |
| Installing RAS | |
| Configuring Network Settings | |
| Dial-Up Networking | |
| RAS Security |
As we discuss the Windows NT Remote Access Service (RAS), we’ll focus on several key objectives that are important to remember. For the purposes of passing the test, it is very important to remember that RAS is a particularly strong part of the Microsoft Windows NT platform, so you need to know more than just how to set up a dial-out client. Microsoft wants you to know the infrequently used capabilities of RAS, such as point-to-point tunneling protocol, as well as the more common features, such as dial-up networking. The following section headings will guide you through the rest of the chapter. Again, review the more obtuse topics such as TAPI and RAS Security carefully, because they will be on the exam.
The prospect of accessing network resources remotely has spawned a huge demand for remote dial-up solutions. Windows NT 4.0 Workstation ships with all the software necessary to configure the workstation as either a dial-up Internet client, or a one-connection RAS. The fundamentals of RAS all revolve around Internet connectivity standards. So as we go along, you’ll not only learn about NT, but you’ll also become more familiar with many of the underlying principles that govern the Internet. Our tour will include some hands-on installation work, and in-depth looks at the protocols that manage RAS connections. Please remember to draw on all you know about Network Interface Cards and local area network (LAN) protocols for a conceptual understanding of how RAS works. When we’re through, you’ll regard the wide area network (WAN) interfaces that RAS uses, such as modems, ISDN terminal adapters, and X.25 Packet Assembled Dissemblers, much as you would a Token-Ring or Ethernet adapters.
RAS has a rich set of features that we’ll review here. The important issues associated with RAS connections are link stability, bandwidth, authentication security, data security, and network fault recovery. The RAS features of Windows NT deal with all of these problems nicely by incorporating the features directly into the operating system, rather than making them add-on products.
Point-To-Point Protocol Multi-link Protocol (PPP-MP)
If you’ve ever been bottlenecked by a slow WAN link, you’re going to appreciate the functionality included in Windows NT 4.0 Workstation. PPP multi-link protocol is an Internet standard whereby multiple WAN media, such as modems, ISDN, or X.25, can be bundled into one logical pipe that has the aggregate bandwidth of the WAN interfaces. For example, if you took two 28.8Kbps modems and bundled them, the resulting logical pipe would have a bandwidth of 56Kbps.You can bundle as many modems as you want, or you can bundle different WAN interfaces. The RAS server must have just as many WAN interfaces available as the dial-up client does, and they must be bound together as well.
Point-to-Point Tunneling Protocol (PPTP)
The costs associated with maintaining a WAN backbone through leased lines can be very high. Depending on the type of line, the cost could range from $350 a month to get across town, to $10,000 a month for a coast-to-coast circuit. PPTP securely transfers encapsulated TCP/IP, NetBEUI, or IPX traffic across public networks, such as the Internet, allowing users to avoid expensive dial-up or leased line tariffs. By using the Internet you can remove many of the carrier costs, as well as the hassles that go with maintaining an extensive WAN.
Transient problems with phone circuits can cause a line drop on modem dial-up connections. Too often, this happens right in the middle of an important file download. Rather than starting over, the Windows NT 4.0 RFC feature automatically picks up where it left off before the line was cut off.
In order to log on to the domain, NT workstations must validate on a domain controller. On a LAN, the NIC provides access to the domain controller, but there’s no way to authenticate for a stand-alone workstation. Windows NT Workstation 4.0 includes an option to log on to a domain using dial-up networking. Domain security is validated through the domain controller by dialing up a RAS server and pushing the logon information over the dial-up networking link. RAS also has an auto dial feature that keeps track of network resources and automatically connects to the remote resource. Auto dial maintains a list of all the RAS phonebook entries, and which network resources are accessed by the corresponding entry in the RAS phonebook.
Client/Server API Enhancements
NT 4.0 includes additional APIs that allow developers to further control RAS connections from the application. Operations such as managing connections, dialing phonebook entries, and checking the status of current connections are managed through the RAS API.
After a connection has been idle for a period of time that the administrator specifies, the RAS server automatically terminates the link. The RAS server monitors packets traversing the WAN link, and if there is none for a specified amount of time, the line is dropped.
Dial-up networking and RAS maintain configuration and control parameters consistent with the Windows 95 interface. Hardware and software settings are very similar to that of Windows 95. If you know how to set up dial-up networking (DUN) in Windows 95, you only have to make a few adjustments for NT. We’ll talk about the specifics of configuring DUN later in the chapter.
Pay attention to the features Microsoft mentions in their marketing pushes and white papers. In this section, we’ll discuss the details of each type of connection, how it works, and what its limitations are. WAN media is particularly interesting because the development of each transmission type usually spans decades. We’ll pay particular attention to the advantages and disadvantages of each respective transmission type, and the public network infrastructure behind it.
Phone lines are by far the most common way of connecting into a RAS server, owing to the overwhelming availability of phone lines compared to other media. Unfortunately, voice lines are analog, which means the signal a computer sends has to be converted from digital to analog. The modulator/demodulator, also known as the modem, modulates a computer’s digital signal to analog, for transmission over the phone lines. Once the signal arrives at the downstream modem, it’s demodulated back to a digital signal that the receiving computer can understand. This process is controlled by a modem protocol, commonly V.34 28.8Kbps, which regulates the speed at which the modem operates. Windows NT 4.0 Workstation comes with a hardware compatibility list of the modems that have been tested to work with RAS.
Figure 10-1 is an outline of an NT 4.0 RAS session with modems. Through normal dial-up lines, the client is linked to the server—in this case, a NT 4.0 RAS server that has two interfaces. On the right is the modem interface; on the left is the LAN interface.
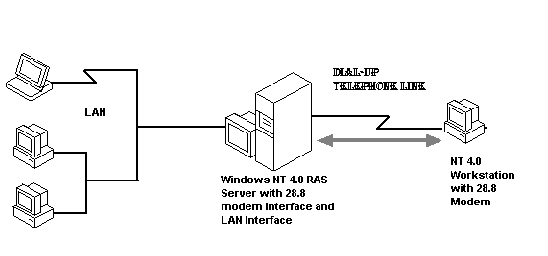
Figure 1: A RAS session with modems. The server has two interfaces.
Modems have a couple of disadvantages. First, they are very slow compared to LAN or leased line transmission speeds. An Ethernet LAN moves at 10,000,000 bits per second, whereas a typical V.34 modem moves at 28,800 bits per second. Although RAS makes a modem act like a network card from a functionality standpoint, it’s painfully slow when compared to a LAN.
Integrated Services Digital Network (ISDN) has become a popular way of accessing remote resources as prices for ISDN lines and terminal adapters have come down. Local telephone companies install ISDN on local premises, and usually tariff structures are similar to regular phone lines, but more expensive. ISDN is a digital medium, but that doesn’t mean you can hook your PC directly to it. You must install an ISDN terminal adapter, more often called an ISDN modem (although this is misnomer), which converts a computer’s signal to the signal that ISDN uses over its lines. ISDN is available worldwide, although some places are still waiting for it. Traveling users find it less than convenient, because the configuration is a bit tricky compared to modems, and the lines aren’t as readily available.
ISDN is delivered in two forms: primary rate interface (PRI), and basic rate interface (BRI). BRI comes with two digitized channels: a B (for bearer) channel, with a throughput of 64Kbps; and a D (for data) channel, with a throughput of 16Kbps, that’s used for channel signaling. BRI is sometimes called 2B+D. Typically, it’s used as a small office link to the Internet or in a residential setting.
PRI is 23 B channels operating at 64Kbps, and one D channel operating at 64Kbps. This is more widely used by service providers that have multiple dial-up ISDN lines going into the RAS server.
ISDN lines are fast, and disaffected modem users, tired of slow response times, have been quick to utilize the newfound speed. The B channels are typically bound together as one logical pipe through PPP-MP, which we’ll discuss later. This generates in 128,00 bits per second throughput, which, from an end-user perspective, means significantly increased response times.
X.25 is a protocol that runs on a worldwide network of packet-forwarding nodes that deliver X.25 packets to their designated X.121 addresses. X.25 connections are 56Kbps (64Kbps in Europe) and work either X.25 SMART cards or packet-assembled dissemblers (PADs). X.25 connections are just like normal dial-up connections, except the phonebook entry is the X.25 PAD type and the X.121 server address. X.25 is a parent protocol to frame relay implementations, and it carries the packet-switched network architecture (PSN) that X.25 implemented. X.25 bandwidth is purchased through companies like Sprintnet. X.25 connections come in either dial-up or permanent access connections. Dial-up connections work off of per-minute tariffs, and permanent access is billed like a leased line connection. X.25 is typically used in areas where ISDN is not available.
Null modem cables, or LapLink cables, can be used to connect the RAS server serial port directly to the serial port of the client machine. There are no modems involved in this configuration and the cable goes point-to-point. This is typically used in the absence of any network attachment.
Point-to-point tunneling protocol is covered in the following section, Supported Protocols.
If we’re going to hook up a machine in Denver with a server in San Francisco, we need a set of rules that define how the data packets are going to work on our RAS links. This is the job of connection protocols—to manage and negotiate RAS links to support our upper layer protocols, such as IPX/SPX, TCP/IP, and NetBEUI.
At first glance connection protocols are mind-boggling, but we’re going to simplify things by working off of what you already know. LAN and RAS connections have two common components, interfaces and media, that are easily understood and that can help us understand the big picture. Figure 10-2 is an illustration of the role of these components in a RAS connection.
An interface is a device that has one connection to a machine, such as a computer, and another connection to a transmission medium, such as an Ethernet. The interface could be Token-Ring, Arcnet, T1, or any number of media interfaces. The important thing is that an interface has one foot in the device it’s attached to and one foot in the medium. The second common component of LAN and RAS is the media. The transmission medium could be ISDN, a telephone line, or any one of the many different types of media available. The important thing is that there is common set of rules, or a language, which defines how data flows over the medium.
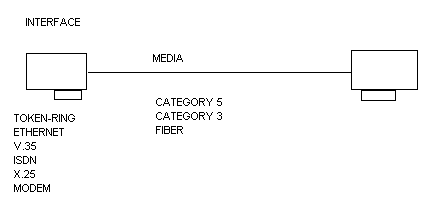
Figure 2: A RAS Dial-Up connection.
Don’t allow the different types of interfaces and media that we discuss in this section confuse you. Instead, focus on the rules that govern how they are controlled.
NT 4.0 supports several different link protocols, which we’ll go over here. Please keep the conceptual model in mind, as it will prove useful in understanding all of these protocols. We’ll compare the advantages and disadvantages of each protocol and explain why PPP is the best-of-breed industry protocol.
PPP is a language that allows two interfaces, with no intermediary devices, to define the rules for transmitting higher-level protocols, such as TCP/IP and IPX, over different media. See Figure 10-3 for an illustration of how PPP works. PPP was developed in the early 1990s by the Internet Engineering Task Force (IETF) to provide a standardized way to encapsulate IP datagrams across the broad spectrum of hardware vendors. PPP plays an important part of network infrastructure development, as it’s the de facto standard for point-to-point communications. PPP is derivative of the High Level Data Link Control (HDLC) protocol, as are numerous other link control protocols such as SDLC, ISDN, and X.25.
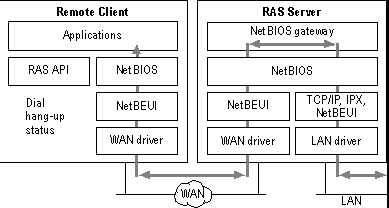
Figure 3: A schematic diagram of PPP.
That’s enough background. Let’s talk about what’s in the name point-to-point protocol. The protocol is called point-to-point because it enables links between two points with no devices in between. It provides a number of different services to aid the upper-layer protocols, such as TCP/IP, in datagram transmission. Link Control Protocol (LCP) manages the link and negotiates the frame size of the PPP packets. PPP also provides facilities for authenticating remote links with anything from clear text passwords to encrypted passwords. Finally, the network control protocol (NCP) negotiates which upper-layer protocols, such IPX, are carried across the link.
In Figure 10-3 we can see PPP architecture of RAS. PPP owes much of its popularity to its capability to operate multiple protocols over links. NT 4.0 supports all 3 major network protocols over PPP links: NetBEUI, TCP/IP, and IPX/SPX. Looking at the remote client on the left side of the figure, we can see how the NetBIOS sockets, TCP/IP and IPX/SPX all are directed into the WAN driver. Applications written to these protocol specifications work over PPP. Error checking is also included within the PPP packets, as is the ability to dynamically allocate TCP/IP addresses through Dynamic Host Control Protocol (DHCP).
NT 4.0 Workstation can operate as a single-connection RAS server or, through DUN, it can access other NT RAS servers, as well as third-party PPP compliant servers.
Point-to-Point Tunneling Protocol
PPTP is an exciting extension to PPP. If you recall, PPP provides facilities for remote link validation within the packet structure. PPTP extends this by allowing multiple protocols, such as NetBEUI and IPX, to be encapsulated within IP datagrams and transmitted over public backbones such as the Internet. (See Figure 10-4.) Additionally, the packets are encrypted with RSA public key technology such that the datagrams are encrypted, but none of the validation information, such as username and password, is transmitted across the public network.
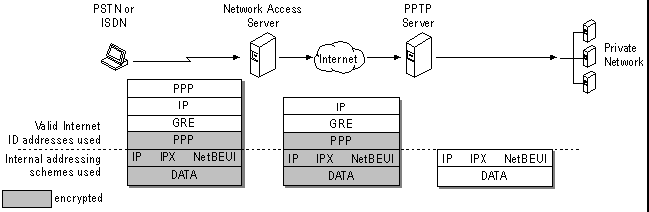
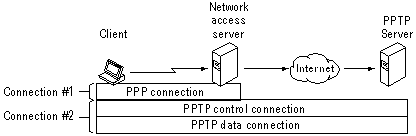
Figure 4: A Layout of PPTP layers.
Let’s go over an example of why I said PPTP was exciting. Imagine a telecommuter in Toledo needs to access a network resource, a UNIX host, in San Francisco. With PPP, his only option would be to use dial-up long distance lines to access the RAS server. Long distance is expensive, so if the user needed to work on the UNIX host all day, the long distance tariffs would be very high. Another option would be to put the UNIX host on the Internet, but then anyone with a packet sniffer could find his username and password and hack the system. PPTP is a variation on the solutions we just mentioned. First the client system dials up a local PPP server, such as is typically provided by an Internet Service Provider (ISP). (Note connection 1 on our Figure 10-4.) After the client validates with the ISP, he uses DUN to connect through the Internet to a RAS PPTP server, also located on the Internet. Connection 2 (PPTP) works on top of connection 1 (PPP) to securely transmit packets over the Internet. PPTP uses Microsoft Challenge Authentication Handshake Protocol (MS-CHAP), RSA RC4, and DES technologies to encrypt the IP datagrams. The result is that the RAS server with PPTP authentication allows clients to use the Internet as a secure IP, IPX, or NetBEUI backbone. This embodies the concept of a virtual private network (VPN) that’s becoming increasingly popular to lower the cost of WAN connections.
There are huge economic benefits to avoiding the long distance costs associated PPP dial-up links that are left up for extended periods of time. In the preceding example, even if our user wanted to remain online eight hours a day, every day of the week, our only cost would be that of the account with the ISP.
PPP Multi-link Protocol (PPP-MP)
RAS connections can be very slow, especially over slower links such as 33.6 modems. PPP-MP provides a way of bundling multiple PPP links into one logical link with the aggregate bandwidth of the individual PPP links. For example, a PPP-MP NT workstation with two modems can be programmed to dial-up a PPP-MP-enabled NT RAS server with two modem lines bound together with PPP-MP. If each modem were 28.8Kbps, the aggregate bandwidth of the logical channel would be 56Kbps. The same can be accomplished with different WAN interfaces. For example, a modem could be bound in with an ISDN or an X.25 interface.
PPP-MP can significantly increase throughput, especially for applications such as file sharing, which can grind to halt with a single WAN interface.
Previous versions of the Windows NT and LAN Manager operating systems used NetBEUI loaded on the client to communicate with the RAS Server. This enabled NetBIOS resources on the network and provided a gateway by which NetBIOS calls from the remote client could be translated over to IPX and TCP/IP. The RAS server could then go out through the LAN interface to access the IPX or TCP/IP resource, and reverse the process when the resource is responding to the client. This provides multi-protocol support to some extent. The only difficulty is that the remote client is unable to run any applications that need IPX or TCP/IP loaded to function.
Serial Line Internet Protocol (SLIP)
SLIP is an older protocol used to carry TCP/IP over low-speed serial lines. SLIP dates back to 1984 and has been eclipsed by PPP in recent years, but it’s still used frequently by many older dial-up clients. NT 4.0 supports SLIP both for DUN and RAS. PPP enjoys a number of advantages over SLIP: SLIP doesn’t support multiple protocols; it can use only one protocol at a time. SLIP doesn’t work with DHCP or bootp servers, so IP numbers have to be statically assigned to the client. SLIP requires operator intervention while it’s negotiating the correct IP address, and doesn’t support any kind of packet error checks as PPP does. For the most part SLIP is used only to connect to some older UNIX systems, so it’s included in the dial-up networking (DUN) package.
Now that you’ve seen all of the connection protocols, let’s look at some sample scenarios where they would be appropriate.
| I’m working from home and the office is a long-distance call for me… | Use PPTP for connectivity. By utilizing the Internet as your WAN backbone, you can avoid long distance charges. |
| I work off of a legacy UNIX server which doesn’t support PPP… | SLIP is the right one for you. SLIP predates PPP and has a lot of support in UNIX environments. |
| I work from home but I need more bandwidth… | Use PPP-MP. Creating a logical pipe with multiple RAS ports increases your speed. |
| I use NetBIOS applications that access non-NetBIOS hosts… | Use the NetBIOS gateway. Clients can access TCP/IP or IPX hosts through the RAS server, which does a protocol conversion to allow access to NetBIOS clients. |
| I’m a traveling user and I need access back to the office… | Use PPP because it’s simple. PPP does all the necessary negotiation and allows multiple protocols. |
Exercise 10-1 Enabling Remote Access Service Compression
You can approach link compression from two levels. The first is at the modem/hardware level. Modem link control standards incorporate modem hardware compression that is done by the modems themselves. The second level is the software compression that’s available in the DUN client, which compresses the data at the software level. Ultimately the compression ratio is dependent on the compressibility of the data being transferred. Text files, for example, typically can get a 4:1 ratio, while bitmaps and other graphics files can’t be compressed at all. Because compression at the modem hardware level involves the frequent use of interrupts, and most hardware can not handle the higher port speeds, it’s recommended that software compression be used. Additionally, we’ll also make sure that modem error control is enabled to further optimize our connection profile.
- Open the Dial-Up Networking icon and select the phonebook entry you’re interested in modifying.
- Select the More button and specify Edit Entry and Modem Properties.
- At the Edit Phonebook Entry screen pictured in Figure 10-5, select the Configure button.
- At the Modem Configuration screen, shown in Figure 10-6, deselect the Enable Modem Compression option and make sure Enable Hardware Flow Control and Enable Modem Error Control are selected, then select OK.
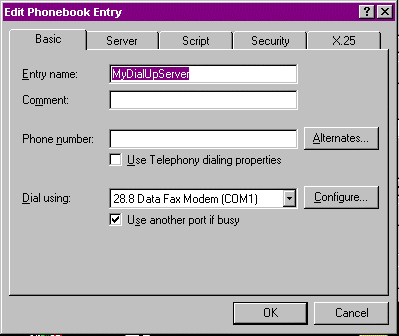
Figure 5: The Dial-Up Networking phonebook editor.


Figure 7: Editing DUN Phonebook entries.
Telephony Advanced Programming Interface (TAPI)
Increasingly, the worlds of voice and data networks are beginning to converge. Computers and telephones exist on most corporate desktops, but there are no standardized ways of pushing and pulling information from applications to the phone system. TAPI was first introduced in 1993 and is the result of work among 40 different companies. The role of TAPI is to provide an abstraction between the application and hardware layers, which provides developers with device and network independence. TAPI enables applications to use Windows NT 4.0 on PSTN, ISDN, PBX, or IP based networks, shielding the programmer from any need to code custom interfaces. Computer-telephony integration (CTI) has typically suffered from proprietary solutions that necessitated redundant and expensive development. A good example of a telephony-enabled application would be a personal information manager (PIM) that allows automatic dial-out by clicking a name in the user’s address book. This example relates specifically to the PC acting as an edge device and routing calls outbound. Windows NT 4.0 Workstation TAPI 2.0, which ships with NT, also deals with calls coming inbound from the PBX. For example, in the case of automatic call distribution (ACD), inbound calls can be routed to groups or individuals based on an identification number that the caller supplies. The key here is that any information existing on the machine—fax screens, area codes, location information, or any other kind of application data—can be passed up to the PBX for processing. In this way, rules can be developed to automate how calls are managed from the call switching level. The TAPI interface speeds application development by simplifying what programmers have to know about individual phone switches, and reducing everything to a common set of APIs that work across a broad spectrum of manufacturers.
TAPI 2.0 has a large set of features that allow developers to control telephony functionality without undue involvement in the details. It comes built in with all the APIs needed for most general-purpose applications, and it’s very extensible with support for writing additional capabilities for telephone-centric applications. TAPI 2.0 supports Unicode for global support, and many application development environments provide ActiveX controls to make development even faster. TAPI 2.0 provides four levels of service for telephony-enabled applications:
| Assisted Telephony | |
| Basic Telephony Services | |
| Supplementary Telephony Services | |
| Extended Telephony Services |
Assisted telephony is designed for non-telephonic applications. It allows programs that don’t typically get involved with placing phone calls, such as a word processor, to nest phone numbers within them and initiate phone calls. Assisted telephony very simply allows your application to make a telephone call and doesn’t go beyond that.
For anything beyond the very simple, basic telephony is the next step in functionality. Basic telephony provides all the services of plain old telephone services (POTS). Any service provider, such as a Telco or PBX vendor, is required to offer this kind of capability, which includes: Address translation, making calls, call states and events, answering calls, dropping calls, call handle manipulation, and assisted telephony server.
Supplementary Telephony Services
Anything beyond basic usually means the application will be backed up against a PBX, so there are some additional capabilities that TAPI 2.0 can provide. The supplementary telephony services constitute the bulk of what the TAPI specification offers. This is a rich set of functions that allow easy access to telephony applications with a large spread of needs. Most of these are capabilities you have at work, but not in your home. The functions include: hold, transfer, conference, forward, park, pickup, completion, accept, redirect, reject, secure from interruptions, generating digits and tones, digit and tone monitoring, media mode monitoring, media stream routing and control, user-user info, change call parameters, and phone terminal control.
Provides a well-defined device extension mechanism so vendors can write device-specific functions into TAPI. It’s completely up to the vendor to write these additions to TAPI, as they are basically a standardized way of writing custom applications.
Native 32-bit and Application Portability
Windows NT 4.0 is a fully 32-bit operating system, as is TAPI 2.0. TAPI 2.0 runs under Windows NT 4.0 Workstation in a preemptive multitasking and multithreading threading environment that is capable of running under several processors and system configurations. Since Windows is a portable operating system it can be migrated to whichever CPU offers the best price/performance ratio, and can run in an SMP configuration, should additional processors be needed. All this can be done without the application being re-written, which means development investment protection. Any applications that currently run under Windows 95 and TAPI 1.4 will run on Windows NT 4.0 Workstation.
Device sharing is particularly useful in the small home office where there is usually only one phone line, but there are multiple phone-enabled devices such as phones, fax machines, or modems. Device sharing prevents inbound calls from going to anything but the specified device. For example, with distinctive rings you can enable three phone numbers over one phone line. The first number produces one ring, the second two rings, and the third three rings. If a call comes in with two rings, device sharing allows you to program the TAPI 2.0 drivers to direct the call to a port that has been designated as the second number. This allows you to have voice, fax, and modem on one phone line. Inbound calls would be directed to the correct port seamlessly.
Under Windows NT 4.0 Workstation, RAS is installed as a service, and the installation varies a great deal depending on which protocols, WAN interfaces, and software options are selected. We’re going to install all three step by step in the following exercises. For the purposes of this discussion, I’ll use a modem because it’s the most common interface, but these examples could apply to ISDN and X.25 as well.
The RAS service for NT 4.0 Server and Workstation are basically identical except that the server version can support 256 connections while the workstation version can handle only one.
Our first step will be to install the WAN interface.
Exercise 10-2 Modem installation
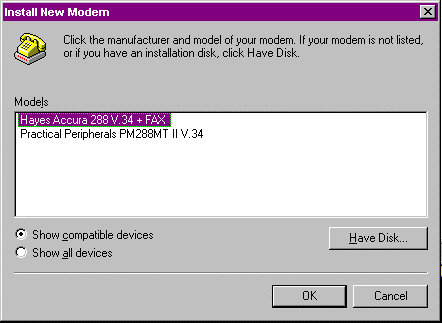
Most modem installs only differ from the one in this exercise in cases where you have to select from the modem manually. As newer hardware is released after NT Workstation 4.0, you’ll have to specify the correct modem. Most of the time the default installs work well, but as you experience problems reinstalling with the same specification, it’s a good idea to start troubleshooting.
Once the modem is installed you can modify the settings from the Modem Properties screen at any time. By selecting the modem and clicking the Properties button, you can gain access to all the modem-specific connection information such as port speed, modem initialization strings, hardware control, and other advanced features.
Under the Dialing Properties option on the Modem Properties screen, you’ll find a number of TAPI 2.0 settings referring to the location being dialed from. If you ever need to change your default area code, calling card, or dial sequence to get an outside line, this is the place to go.
Note that you must have a RAS interface installed and recognized by NT before we can set up RAS. During the RAS install, if you haven’t installed a RAS interface you will be prompted to do so. It’s advisable to finish it before hand.
Exercise 10-3 Installing the Remote Access Client on NT 4.0 Workstation
The initial NT RAS install is pretty straightforward, but there are a lot of subtle differences to the software configuration that I’ll point out here. Keep in mind that RAS doesn’t care what connection medium it’s working off of; only that’s it’s configured properly. As we bind the WAN wrapper to the LAN protocols, take a look at the Bindings tab on the Network icon. This can give you a good conceptual understanding of how the NDIS wrapper treats LAN and WAN interfaces similarly.
- Log on to the NT workstation and go to the Settings option under the Start menu and select the Control Panel option.
- Select and double-click the Network icon to access the Network Configuration screen.
- Select the Services tab, shown in Figure 10-11, to begin installing the new RAS service.
- Select the Add button to access the NT RAS software from the installation CD-ROM. Note that you’ll need access to the Windows NT 4.0 Workstation CD-ROM to complete the installation, or access to the files from another source such as a network or local drive. After you select Add you’ll see Figure 10-12, showing a number of different services that NT offers. Select the RAS service.
- Click the Have Disk button and NT prompts for the appropriate processor-specific installation directory. In this case it specifies the d:\i386\ directory from which Windows NT 4.0 was installed. After inserting the NT 4.0 CD-ROM, the setup begins copying files off of the CD-ROM.
- During the installation it needs to confirm the RAS ports so you’ll see the Add RAS device screen, shown in Figure 10-13, appear with the modem you’ve already specified listed. Select OK to confirm the RAS port. If at this point you haven’t set up any RAS interfaces, you can do so.
- To install a modem and run through the Modem installation that we performed in Exercise 10-2, select the Install Modem button. This is the option for either ISDN or analog modems. If you need to install a PAD or Smart card select Install X.25 Pad. The PAD installation requires some specific information from your X.25 network provider, so be sure to have that ready.
- After you select OK the Remote Access Setup screen, shown in Figure 10-14, appears. This screen has a number of important options that we’ll take a careful look at. The first is the Add button on the bottom right. If you want to add more ports this button allows you to do so. If you have a device that isn’t configured for RAS, but it could be, this button adds it into the configuration. If you don’t have any additional RAS ports, this button you to the Add RAS device screen. The remove button does the obvious; it removes RAS devices from the list of RAS-enabled devices. Please note that it doesn’t remove the device from the modem configuration in NT.
- Pressing the Configure button brings up the dialog box in Figure 10-15, where you can specify whether the port will be used for the purpose of dial-in, dial-out, or both. This is an important security feature. For our purposes I’ll select to enable both.
- We’ll deal with the Network button in a later section, so we’re only left with Continue which does precisely that.
- When you press Continue you might receive some screens requesting LAN protocol information. Just cancel through those for now.
- The Remote Access Service is now configured and you should find yourself back at the first Network Configuration box. This time under the Services menu you’ll see the Remote Access Service loaded. Click Close and NT prompts you to reboot. Select Yes and allow Windows NT to reboot.
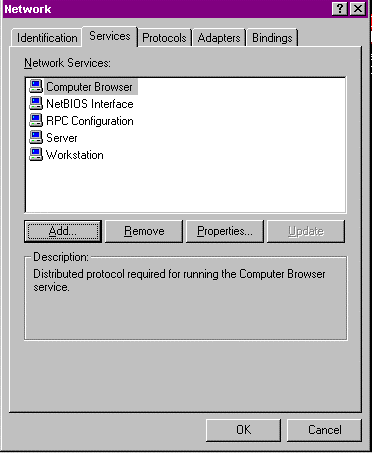
Figure 11: At the Services tab, begin installing a new RAS service.
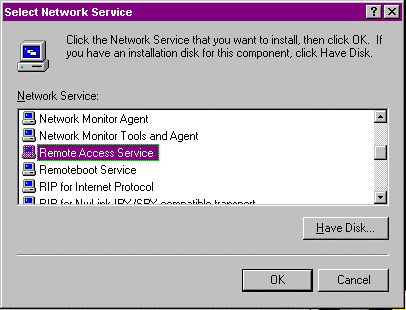
Figure 12: Select a service at the Network Service screen.
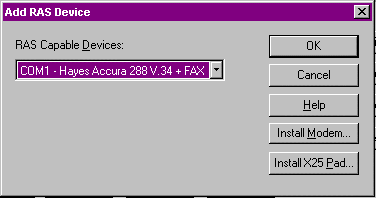
Figure 13: Add a RAS device at this screen.
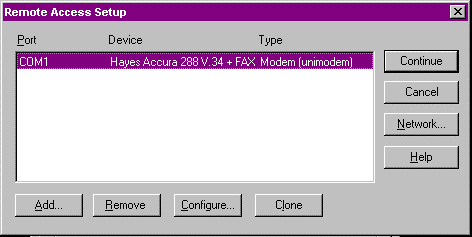
Figure 14: Add more ports at the Remote Access Setup window.
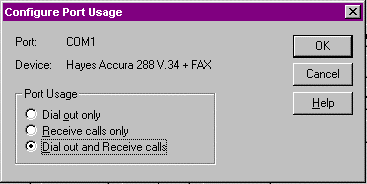
Figure 15: Specify dial-out or dial-in at the Configure Port Usage window.
This completes the RAS installation. We’ll configure the network settings in the next section.
Now that RAS is installed let’s configure the network settings for our RAS port. RAS interfaces, just like LAN interfaces, must have at least one protocol bound to them to speak to anyone on the network. Any protocol that you intend to bind to a RAS port must already be attached to the LAN port on the computer before network configuration can take place. For the next exercise I’ve already loaded NetBEUI, TCP/IP, and IPX/SPX on the NT workstation so that we can configure all the protocols. As you’ll notice in Figure 10-16, there are two sides to the configuration: the dial-out protocols, and the dial-in RAS server protocols. We’ll talk about the dial-out protocols and how they affect the dial-up networking client, as well as briefly look at the RAS dial-in protocol configuration settings. Suffice it to say that the server settings control which protocols are available for clients dialing up the NT 4.0 Workstation.
Exercise 10-4 Configuring Network Protocols for dial-out.
Since we have NetBEUI, IPX/SPX, and TCP/IP bound to the LAN interface, we can configure all of these protocols for dial-out. If you tried to select a protocol that hadn’t been loaded, NT would give you an error message instructing you to load the protocol.
- Go to the Network Neighborhood icon and right-click it. From the list select Properties to modify the network settings.
- At the Network Settings screen select the Services tab to modify the Remote Access Service. Double-click the Remote Access Service to modify its properties.
- Select the Network button and the screen in Figure 10-16 comes up. There are three places where the dial-out protocols have to be configured. The first is the one I already mentioned—configuring the protocols to work on the LAN adapter. The second is here underneath the dial-out protocol settings. To enable the protocols, select the box next to it. Underneath the Server Settings options are the Protocol options for clients dialing in to the RAS server. Selecting the Configure button next to each protocol allows you to configure the protocol settings for dial-in clients. The setting they all have in common is the option to allow RAS clients access to just the RAS server or the network behind the RAS server. TCP/IP and IPX/SPX have some specific information relating to the protocol configuration. On the bottom of the dialog box are the choices for dial-in user authentication, and the option to enable PPP-MP support for dial-in clients. If your RAS server has multiple RAS interfaces they can be bound together into one logical unit. Note that this doesn’t cover dial-out PPP-MP connections.
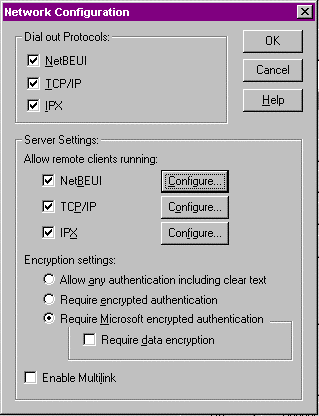
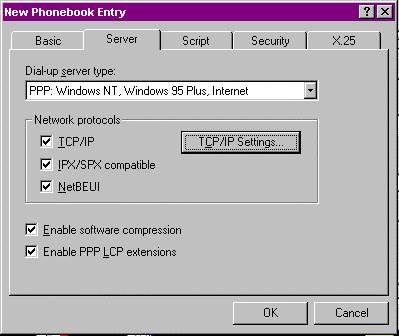
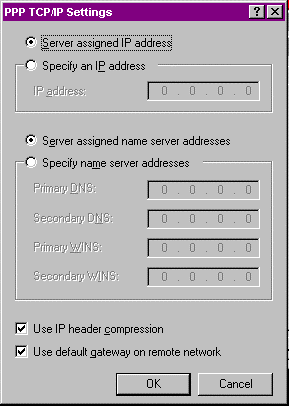
Figure 18: Configure TCP/IP PPP settings.
TAPI 2.0 location and modem specifications
The previously mentioned TAPI 2.0 specification contains all the modem and location properties related to using dial-up networking. Back when we were installing the modem the Modem Properties screen was actually a subset of the TAPI 2.0 drivers under the telephony driver settings. The telephony drivers also contain local dial-out information such as the current area code, number to get an outside line, calling card information, and other location-specific information. This is handy because the locations generated here can be accessed through the DUN phonebook entries. The phonebook gives you the ability not only to thumb through your dial-up servers, but also to change your location from where you’re calling. Dialing-out of PBXs and to foreign countries requires a dizzying array of access codes that creates a real challenge every time you need to make a call. The Locations features allow you to plug the codes in once and forget about it. In order to access the screen in Figure 10-19, go to Telephony Drivers in the Control Panel.
Under the Telephony options you’ll also find the Telephony Drivers tab. If you have a modem you have two default drivers installed: the Unimodem Service Provider drivers, and the TAPI Kernel-Mode Service Provider. The Unimodem driver is the Modem Properties we configured previously, and the TAPI Kernel-Mode Service provider is the TAPI 2.0 specification we’ve talked about.
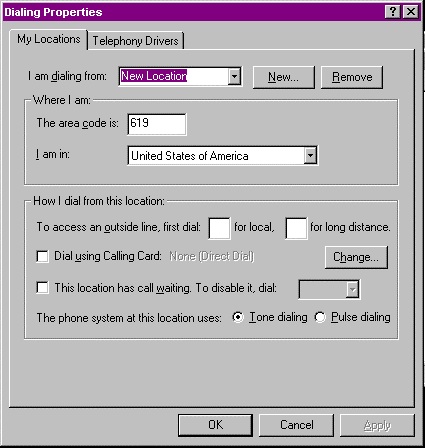
Figure 19: The Dialing Properties dialog box.
Now that you’ve installed RAS protocols, connections, WAN interfaces, and TAPI information, it’s time to put it all together with DUN. First, let’s draw a distinction between RAS and DUN. They’re very much related except that RAS concerns itself more with dial-in clients and DUN deals with dialing-out. Of course, as we’ve discussed, many of the settings in RAS have a bearing on how DUN works, but by and large they’re separate operations. For example, RAS enables PPP-MP, but it does so for only dial-in clients. To enable PPP-MP going outbound you have to insert the parameters within DUN. Everything we’ve done up to this point allows you to understand all of the DUN configuration settings. As we generate the DUN parameters, ask yourself what corresponding server settings would be appropriate to match the DUN configuration. For example, if we setup DUN to use a static IP number, what corresponding settings would be appropriate for the RAS server? These exercises draw on all the information you’ve learned up to now.
Exercise 10-5 Creating a Dial-Up Networking Connection
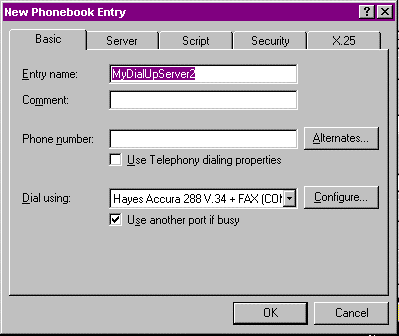
Figure 20: The Basic tab on New Phonebook Entry.
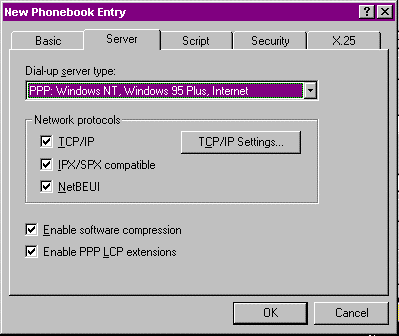
Figure 21: The Server tab on New Phonebook Entry.
- Now that your basic configuration is set up, you’re ready to dial. Press the OK button and you’ll be taken back to the main Dial-Up Networking screen. Notice that your configuration name appears on the top part of the screen, the phone number comes up on the preview, and that your location data is selected. Verify all the entries and press OK.
- At the DUN dialog box, shown in Figure 10-22, enter the logon data. If you’re logging on to an NT domain, the Domain field is required. If you’d like to save the password, select the Save Password option.
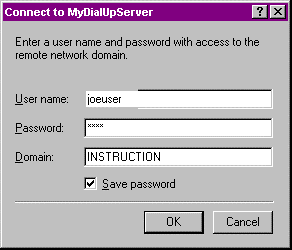
Figure 22: Connecting to a dial-up server.
- At this point DUN goes out and connects to the specified server.
Exercise 10-6 Testing a RAS Connection
The easiest way to test a RAS connection is to look at the upper layer protocols to see if they’re making it across the line. Here we’ll use the tools that TCP/IP gives us to see if we can see other servers across the connection.
- After you’ve connected to the dial-up server, check your TCP/IP number with the ipconfig command at a command prompt. Then find the IP number of the server you’re connecting to.
- At the command prompt ping localhost.
- At the command prompt ping the IP number of your PC.
- If both pings return, ping the host name of the RAS server. See Figure 10-23 if you have any questions about the ping utility.
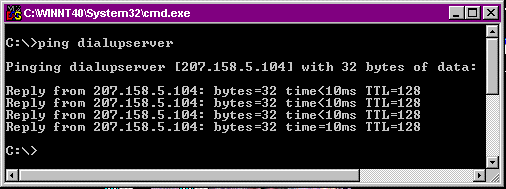
Figure 23: Using the PING utility to test a RAS connection.
- The first two pings confirmed that the IP stack locally was fine. If you can’t ping across the RAS link, or your RAS interface isn’t being assigned an IP number through DHCP, there is probably some fault with the connection.
Exercise 10-7 Checking the status of a RAS connection
NT comes equipped with a dial-up monitor. In this exercise we’ll check the status of our dial-up connection by viewing the information in the dial-up monitor.
- If you’re currently online you can view the DUN monitor by double-clicking the icon on the Windows 95 task bar directly to the left of the time. If not, the monitor can be accessed through the Control Panel.
- Go to the Control Panel and open the dial-up Monitor. Figure 10-24 opens up with a variety of connection statistics that we’ll discuss. The Device field provides a way of moving from one RAS device to the next. The Condition tells you whether or not the device is currently active. Line bps and Duration give you a summary of your session statistics. This is useful for troubleshooting applications that don’t seem to be sending data across the link. Starting at Device Staticstics, the columns are divided. On the left are the statistics for inbound traffic, and on the right the statistics are for outbound traffic. Device Statistics helps you determine whether data is going predominantly upstream or downstream. Connection Statistics treats everything from the standpoint of packets going across the network. It gives the number of frames sent and what the compression ratio was. Device Errors deals with the modem errors that are detected during transmission either due to line quality problems or modem issues. The Summary tab is useful for looking at information when there are multiple devices attached to the workstation. The Preferences tab deals with the Dial-up Networking Monitor program defaults for displaying information.
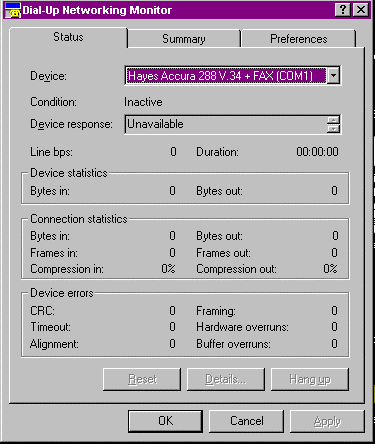
Figure 24: Use the DUN Monitor to check the status of a dial-up connection.
Exercise 10-8 Disconnecting RAS Sessions
The DUN Monitor provides a couple of facilities for dropping a RAS session. I’ll show you how to use them here.
- Open up DUN Monitor from the task bar while your session is connected.
- In the Device option box, make sure the connection you want to terminate is specified.
- Press the Hang Up button and your session will be terminated.
- You also can go to the Summary tab and under Active Lines select the modem you wish to terminate.
- At the bottom press the Hang Up button.
At this point we’ve talked about the two main DUN phonebook entries. Let’s look at the role of one of the most important remaining sections, the Script tab. There are still many SLIP servers, and SLIP needs either manual logons or a script to insert the validation request from the server.
Exercise 10-9 Creating a connection script
Here is example of how to create a connection script.
- On the DUN Edit Phonebook Entry screen, select the Script tab, shown in Figure 10-25. For PPP connections the default after dialing is None, meaning that no script runs.
- If the SLIP server needs a terminal window for validation, select the Pop Up terminal window option. There are some SLIP systems that use this method of validation rather than requiring a script on the PC.
- For our exercise, we’ll use a generic script already loaded on the machine. Select the Run This Script option and press the arrow-down key on the right of the drop-down menu box.
- We are now presented with a list of scripts that are already created for specific service providers. Select the C:\WINNT40\System32\ras\CIS.SCP to select the CompuServe CIS manager logon script.
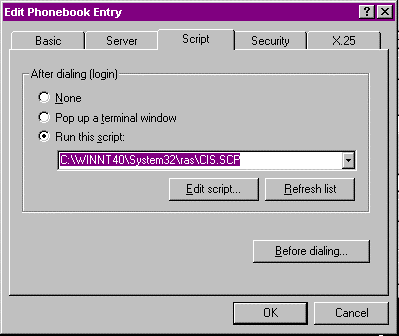
Figure 25: Use the Script tab with a SLIP server.
- From here we can edit the script by selecting the Edit Script button. Each script has some parameters laid out in the script text to customize it for the individual user.
Exercise 10-10 Enabling Command Logging
Since each SLIP server must have a custom script we need to look at the commands contained within the script to adjust our specifications. This exercise deals with a very generic SLIP server, but the principles can be applied to servers requiring more sophisticated logon procedures.
- Follow the steps from Exercise 10-10, but choose Generic Login under the script name.
- Read the instructions within the generic login text. What I’ll do here is provide a brief synopsis of what information needs to be looked at.
- SLIP is typically used in a UNIX host environment. The UNIX prompt for logon is:
login:
Respond with your logon name and password. The goal of the script is to detect your login and password, and push that data to the server automatically. The first command should be:
command=
This tells the server you have nothing to submit before it asks you to logon. The next line should contain:
OK=<match>"ogin:"
LOOP=<ignore>
This loops the system until it detects the login: prompt. The next line,
COMMAND=<username><cr>
pushes your login name on to the host.
OK=<match>"assword:"
LOOP=<ignore>
COMMAND=<password><cr>
Follow this same sequence with your password. Every server has a different logon process, so further customization might be necessary if, for example, the server asks for data other than your username and password.
The final tab we’re concerned with is the Security tab. If you recall the RAS server security options, there was a list of the types of validations that the NT RAS server would accept. This is essentially the same thing in the dial-up networking client. The first option for clear text passes the username and password unencrypted to the RAS server. This lacks security because a network sniffer could decode the packets and find your password. The second option uses password authentication protection (PAP) to encode your username and password before sending them to the server. This has a pretty broad support base so it’s useful for dialing up non-Windows NT RAS servers. The third option is useful only with Windows NT RAS servers, as it uses MS-CHAP. MS-CHAP utilizes RSA RC4 and DES encryption technologies for even more security. Selecting only the first option encrypts the logon data, but selecting the sub-option Require Data Encryption protects all your data with this robust form of encryption. The last option allows RAS to connect with the Ctrl-Alt-Del logon information after the password information has changed on the local machine.
Windows NT 4.0 Workstation also comes with an auto dial feature, whereby NT automatically dials the appropriate connection for a network resource once it’s been accessed from the PC. For example, if you dial-up a remote system and telnet onto a UNIX host, the next time you issue the command to telnet to that host the connection is automatically created. This is handy for users with multiple RAS hosts. It might be difficult to remember which one has the appropriate server. All the user has to do is access the host and the auto dial feature creates the connection.
When your modem initially connects to the RAS server there are a number of settings that are automatically negotiated from the server to the workstation. Having just seen the SLIP scripting scenario you’ll really appreciate how PPP automates all the configuration necessary to maintain the WAN link.
The first step is to negotiate the Link Control Protocols. LCP manages the frame size and link management between the two connecting points. PPP encapsulates data within PPP datagrams. This shields the different hardware manufacturers from incompatibilities over RAS links. The second step is to negotiate the authentication protocols. As we just discussed, NT Workstation and RAS server can both mandate that the other party uses a certain level of authentication on the link. This can range from clear text logon validation to using RSA encryption on the data. The last step is to negotiate the Network Control Protocols. NCP manages a dialogue between the client and server to find out which network protocols, IP, IPX or NetBEUI, will be supported over the link. PPP sessions remain active until one of the following happens.
| The client hangs up | |
| The server drops the line due to an idle time out. | |
| The administrator on the server end hangs up the line. | |
| There is a fatal link error. |
Experience has shown us that one of the most problematic areas of RAS setup is with the security settings and the point-to-point protocol. The symptoms of this kind of problem are manifested when the user attempts to dial in. The dial-in appears to be normal when the modem connects, but then the connection terminates, with no error code or other indication of a problem. There can be several causes for this. You can help isolate this problem by enabling the PPP.LOG file, through an entry in the Registry. This log details the activities of the link-level protocol bind. It might provide clues as to where the problem lies. One feature that can cause problems is something modern modems do, called fallback and fall ahead. After modems connect, they sample the line conditions and error rates. If they detect excessive error rates, they renegotiate the link speed, usually to a slower speed, in an effort to increase throughput by not spending so much time re-transmitting data. The modems might attempt to increase the speed, as well. This is normally a good feature. However, it can cause problems. If you are experiencing unexplained disconnects, try disabling the Auto Reliable mode of your modem.
A related problem occurs after the modems connect, and during the authentication process: The system attempts to verify your account, and then hangs up without any further indications of a problem. To help isolate this problem, set the security settings to authenticate any logon, including clear text. Dial in and see if you can establish a connection and have your account verified. Increase the encryption until authentication fails, and then use the PPP.LOG to help determine the source of the problem.
Different sets of problems occur when configuring RAS and modem options. Many modems today are set, by default, to enable compression and error checking between modems. RAS provides for error checking built into the software. It is more efficient if you disable error checking on the modem. Software compression is a different story. RAS also provides for data compression, as do most modems. It probably would be faster if you let the modems do the compression. One last setting you should check is the setting for flow control. Flow control tells the modem and/or the software when to stop sending data because of saturation. It’s in your best interest to set hardware flow control vice software flow control. Hardware flow control reacts to saturation conditions much faster than software flow control.
RAS incorporates a number of stalwart security features that make it pretty tough to crack. If the RAS server and client are set up properly to take advantage of NT’s encryption, they make it difficult to find out what data is being sent. In this next exercise we’ll configure Internet Explorer to run with RAS, taking full advantage of the security features.
Exercise 10-11 Running Internet Explorer with Remote Access Service
Microsoft Internet Explorer can be configured, using the auto dial feature, to establish a dial-up connection automatically when a URL is accessed on the browser. For example, if you have your start page on the Internet when you start Internet Explorer it automatically prompts you to dial your ISP. Before we begin, make sure that the following services are started: RAS, Remote Access Auto Dial Manger, and Remote Access Connection Manager. Also make sure the phonebook entry for your ISP is selected.
- Open DUN and connect to your ISP.
- Load up Internet Explorer and connect to the home page you had in mind.
- On View Menu select Options and click the Navigation tab.
- In the Page box click Start Page and select Use Current.
- Click OK.
The next time you start Internet Explorer, and you’re not connected to your ISP, the auto dial feature will make the call for you.
Windows NT 4.0 supports a number of different encryption algorithms to support logon validation and data transmission. At the DUN Security tab there were several methods available for logon validation and data transmission. Now we’re going to take an in-depth look into the protocols that NT uses to control security.
Login validation to a remote NT domain follows the same security model that logging onto the domain from a LAN entails. RAS clients submit their username and password to the domain controller (DC), which checks its user database, the SAM, for rights. The DC then returns a token that authenticates the user for that session. To maintain compatibility with other dial-up servers and clients, NT has the capability to do this same authentication over RAS links with clear text. This isn’t advisable, because anyone with a sniffer could look at the packets coming from the client to the server and decode your login information. For this reason NT Workstation includes several strong encryption options to secure your login information and data. The Security tab on the DUN phonebook entry screen has several encryption options available. The first option, Accept Any Authentication Option Including Clear Text, permits the password authentication protocol (PAP) which uses clear text to transfer logon information. This isn’t recommended. It also permits all of the other authentication protocols including MD5-CHAP, MS-CHAP, and SPAP. CHAP comes in two versions: MD5 and Microsoft’s implementation. CHAP uses a challenge response mechanism with one-way encryption to pass responses to the server. Microsoft’s CHAP protocol always uses DES, the government standard encryption, when communicating with other RAS servers. The MD5-CHAP standard, from RSA Inc., is available to access other third-party servers that use the Message Digest 5 algorithm, but Microsoft never uses MD5-CHAP when talking to other Windows machines. The Shiva Password Authentication Protocol (SPAP) is used when communicating with Shiva LAN Rover server or when a Shiva client accesses a Windows NT RAS server. The Accept Any Authentication Option Including Clear Text option uses MS-CHAP to negotiate down from the strongest form of encryption (CHAP) to the mid-grade solution (SPAP) and finally to PAP.
The second option, Accept Only Encrypted Authentication, uses any of the previously mentioned protocols accept PAP. This works well in situations where there are non-Windows-based remote clients, but you don’t want the security risk of using PAP.
The last option, Accept Only Microsoft Encrypted Authentication, forces the RAS server to use only MS-CHAP when validating logons. Please note that up to this point the only thing that we’ve encrypted is the logon information to the server. Any data sent after that goes unencrypted unless you specify Require Data Encryption. When encryption is mandated, Microsoft uses RSA, Inc.’s RC-4 algorithm to secure the packets. In North America 128-bit RC-4 encryption is permitted, but due to strong export laws that regard encryption algorithms as munitions, only the 40-bit implementation is permitted for export. This is particularly important in cases where your data may be going over public networks such as the Internet or a phone switch.
The Remote Access manager and DUN monitor are the best ways to view events in real time, but sometimes you may have to look at a problem over time to spot the trends you’re looking for. RAS by default enables auditing of any attempts to access to RAS. They are viewed in the Event Viewer. Events are generated by either success or failure conditions. An example of a successful condition is a normal logon by a user, disconnection by a user, or a normal callback procedure. A failure audit would be generated by activity such as a failed authentication, inactivity timeout, a duplicate NetBIOS name, or too many errors on the RAS link. All these are pushed into the Event Viewer, so it should be checked periodically to ensure there isn’t anything unusual occurring. Check to make sure the HKEY_LOCAL_MACHINE\SYSTEM\ControlSet001\Services\RemoteAccess\Parameters\EnableAudit key is set to 1 to insure the events are recorded.
RAS provides support for third-party security hosts that validate user logons before they are passed to the RAS server. Typically the host resides in between the dial-up client and the RAS server. Usually this additional security takes the form of some type of hardware key on the client side that must send a code to the host before the client is allowed access to the RAS server. One such implementation uses a pocket calculator-like device to receive access codes every minute using RF technology. When the user presses the security host, he must type in the current access code from the hand-held device to validate. At that point the host passes the user on to the RAS server for further authentication. The extra validation also could take the form of another username and password screen before you’re allowed onto the RAS server.
However it’s done, RAS provides an open architecture that’s capable of handling secondary security.
Taking a page from the low-cost long distance providers, the callback feature allows clients to dial-up and authenticate on the RAS server. RAS then drops the line and calls the user back at a specified phone number. This saves the client from the line tariff associated with the call, and it insures that authenticating users can only dial-up from a specific location. This discourages most hackers, because even if they obtain a user’s logon information, they would also have to answer the callback at the pre-assigned phone number. The callback feature is set under the Remote Access Administrator of the RAS server. There are three options available to administrators: Preset To, Set By Caller, and No Callback, which is the default. Preset To and Set By Caller force the RAS server to dial back once the user authenticates. Preset To offers the true callback security. In the RAS Administrator, you specify Preset To for the user and specify a callback number. This has to be a number that can be dialed directly, not one that’s accessed through a switchboard. Set By Caller really isn’t a security feature, but it does allow the user to avoid connect charges. After the client authenticates, the RAS server prompts for the callback number for this session and the user types it in. This is ideal for roving users who want to avoid excessive long distance tariffs charged by foreign telephone monopolies. Default RAS comes configured as No Callback, which doesn’t require a dial back after authentication.
Windows NT 4.0 Workstation ships with TAPI 2.0, which includes APIs that allow developers to telephony enable their applications without getting mired in the details of managing RAS links. The TAPI specification is fully 32-bit, and ensures that applications can be moved across multiple processor architectures. RAS offers a rich suite of Internet-based protocols, including PPP-MP, PPP, PPTP, and TCP/IP, and continues to support the legacy connection protocols SLIP and NetBIOS gateway. There are a number of new features, including Restartable File Copy, idle disconnect, auto dial, and logon dial, that make operating and administering low-speed WAN links much easier. Windows NT 4.0 Workstation also maintains the look and feel of Windows 95, which makes operation considerably easier.
RAS treats all the supported RAS connection types—telephone, ISDN, X.25, PPTP and RS-232C—as fully configurable WAN ports. RAS supports multi-protocols, including NetBEUI, IPX and TCP/IP, over PPP, and can take on the role of either a dial-up networking client or a one-connection RAS server. The RAS service provides facilities for easily maintaining RAS ports and their related protocols. The dial-up networking phonebook can easily be configured to handle a variety of situations, such as multiple servers, locations and network protocols. The phonebook entries also contain parameters for multiple connection protocols, multiple logon validation protocols, and scripted connection handling. Windows NT 4.0 Workstation security model has modular security options with logon validation ranging from PAP to fully encrypted authentication and data links, utilizing MS-CHAP and RSA RC-4 technologies. Third-party authentication devices, RAS auditing, and callback features are also included in the security model.
| The chief issues associated with RAS connections are link stability, bandwidth, authentication security, data security, and network fault recovery. | |
| Connection protocols manage and negotiate RAS links to support upper-layer protocols such as IPX/SPX, TCP/IP, and NetBEUI. | |
| PPP is a language that allows two interfaces, with no intermediary devices, to define the rules for transmitting higher-level protocols, such as TCP/IP and IPX, over different media. | |
| PPTP is an exciting extension to PPP. PPTP extends remote link validation within the packet structure by allowing multiple protocols, such as NetBEUI and IPX, to be encapsulated within IP datagrams and transmitted over public backbones such as the Internet. | |
| PPP-MP provides a way of bundling multiple PPP links into one logical link with the aggregate bandwidth of the individual PPP links. | |
| NT 4.0 supports SLIP both for DUN and RAS. | |
| The role of TAPI is to provide an abstraction between the application and hardware layer, which provides developers with device and network independence. | |
| TAPI 2.0 provides four levels of service for telephony-enabled applications: |
| Assisted Telephony | |
| Basic Telephony Services | |
| Supplemental Telephony Services | |
| Extended Telephony Services |
2. How many simultaneous dial-in clients can Windows NT 4.0 Workstation handle?
3. Your remote users are complaining that their applications run slowly over their RAS connections at home. What feature of Windows NT 4.0 RAS would allow you to increase the users’ throughput?
4. You want to make sure that the throughput for dial-up users is maximized, by enabling compression. What represents the fastest configuration for achieving this goal?
5. (True/False) Before network protocols can be loaded on RAS interfaces, they must first be bound to the LAN adapter, in order for the NT 4.0 Workstation to operate as a RAS server.
6. Which of these pairs of RAS interfaces could be used in a PPP-MP configuration to increase your bandwidth?
7. Dial-Out network protocols are configured from the:
8. TAPI 2.0 has programming facilities to:
9. (True/False) NetBEUI can be used to provide connectivity from TCP/IP and IPX- based hosts to NetBEUI-based clients that dial-up to a RAS server configured as a NetBIOS gateway.
10. The My Locations section of the dialing properties can keep track of which location-specific information?
11. Which of the following methods would you use to test a dial-up connection?
12. You need to dial-up a UNIX host, and accessing the host with PPP isn’t working. What other connection protocol might work?
13. You want to program your RAS connection to dial-up your ISP after you load your browser. Which NT RAS feature enables you to do this?
14. While downloading a file from your NT network, the modem line unexpectedly drops. You dial-up back to the server and file copy resumes once you connect. Which feature enabled this?
15. You want to make sure that your communications are secure over the RAS link you're using. What constitutes the most secure connection type available over RAS?