![]()
![]()
![]()
Chapter 15
Booting,Troubleshooting, and Service Packs
*Exercise 15-1 Viewing the Session Manager Registry Settings *
BOOT.INI *
Exercise 15-2 Edit the BOOT.INI File *
ARC Naming Convention *
BOOT.INI Switches *
Exercise 15-3 Editing BOOT.INI with Control Panel *
Configuring Multiboot Systems
*Troubleshooting Hardware/Software
*Exercise 15-5 Booting Windows NT with the LastKnownGood configuration *
Exercise 15-6 Creating an Emergency Repair Disk *
Exercise 15-7 Using the Emergency Repair Disk with the NT Setup Disks *
System Recovery *
Exercise 15-8 Configuring for Memory Dumps *
Task Manager *
Exercise 15-9 Shutting Down a Task with Task Manager *
Exercise 15-10 Taking Ownership of a Resource (Troubleshooting Security Problems) *
Event Viewer *
Log Files *
Log File Events *
Log Event Details *
Exercise 15-11 Using the Event Viewer *
From the Classroom *
Windows NT Diagnostics (WinMSD)
*Exercise 15-13 Installing a Service Pack *
Exercise 15-14 Removing Service Packs *
"Blue Screen of Death" *
Troubleshooting Resources *
Exercise 15-15 Opening Help Files *
Certification Summary
*Two-Minute Drill
*Self Test
*
![]()
Chapter 15
Booting, Troubleshooting, and Service Packs
![]()
| Boot Process for Intel-based and RISC-based Machines | |
| Configuring Multiboot Systems | |
| Troubleshooting Hardware/Software | |
| Installing Windows NT Service Packs | |
| The "Blue Screen of Death" | |
| Troubleshooting Resources |
Wouldn’t life be wonderful if we could install an operating system and never have to worry about it failing to work correctly? In all my years of dealing with a variety of operating systems, I have never encountered one that didn’t need coaxing at some point in time. Windows NT is no different, so it’s very important that you be intimately familiar with the boot process for different processor-based configurations. In this chapter, we discuss the boot process for Windows NT on Intel-based and RISC-based machines. We also discuss systems that have been set to multiboot between two or more operating systems.
Next, we look at troubleshooting your hardware and software to include having a Windows NT boot disk and emergency repair disk for your system. Not all problems you encounter are boot-specific, and you may need other utilities to help with your troubleshooting. We examine the Event Viewer, and we learn what Windows NT Diagnostics, also known as WinMSD, can offer you in determining faults within your system.
No operating system is bug free, but when Microsoft makes significant fixes to bugs in Windows NT, it issues a Service Pack. In one section of the chapter, we discuss installing Service Packs.
No chapter on troubleshooting Windows NT would be complete without a discussion on the "Blue Screen of Death".
In the last section of the chapter, we look at a variety of resources available to you, to help keep your Windows NT system operating smoothly.
Boot Process for Intel-based and RISC-based Machines
The boot process for Intel-based and RISC-based machines is essentially the same. You turn on your machine, the screen flickers a little, a bunch of words scroll across the screen, and eventually a menu appears, prompting you to select what flavor of Windows you want. But what is going on behind the scenes? What does all that chugging, churning and chattering really mean? The answers to these questions and more will be exposed over the next several pages. You are probably familiar with the way in which a normal PC boots. It does a Power On Self Test (POST), reads the Master Boot Record (MBR), loads the operating system, sets the environment, and then brings everything up. You can refer to Figure 15-1 for more information on this process.

Figure 1: As a PC boots, it checks the hardware configuration prior to initializing the operating system.
Windows NT boots up in a similar fashion; it does a POST, reads the MBR, and loads it into memory. However, when NT is installed, it changes the boot sector to load NTLDR, which takes over at that point. The changes take place after the MBR is read. See at Figure 15-2 to visualize this process.
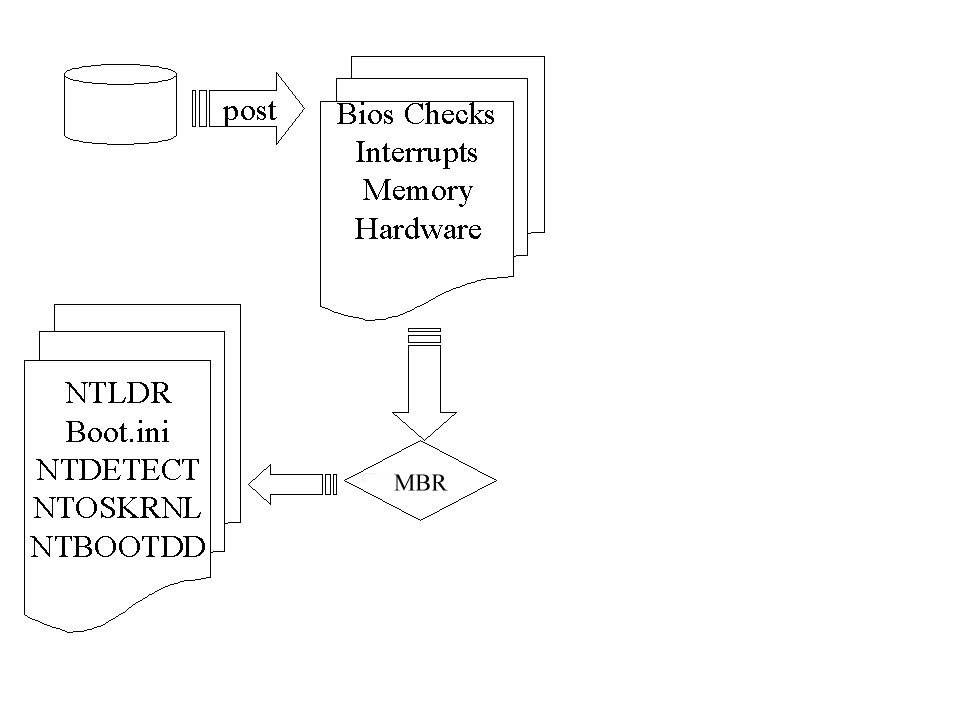
Figure 2: Windows NT boots in a similar fashion to other operating systems, until the MBR is read.
At this point you might be tempted to ask why are we having this involved discussion about boot sequences. Well, in addition to being on the MCSE test, this information is important for understanding the boot process from a troubleshooting standpoint. Users often are not sophisticated enough to give you an informed description of what is going on when they’re having a computer problem. Quite often, the problem is simply stated as, "the stupid thing is broken." Eliciting a better description of the event, from the user standpoint, can tell you where in the boot process to begin looking for what has caused the problem.
Table 15-1 lists the files that are required to boot up Windows NT 4 Workstation on an Intel-based machine.
| Windows NT files | Description |
| NTLDR | Loads the operating system for Windows NT. It can also load other operating systems (such as Windows 95) if the machine is configured to dual-boot. |
| BOOT.INI | Configures the start-up menu that launches NT. Points to the location of the boot partition for NT, and to the location of other operating systems on the machine. |
| BOOTSECT.DOS | Is only used if starting an operating system other than NT (such as DOS or Windows 95). |
| NTDETECT.COM | Examines the hardware on an Intel machine to build a list that is passed to the NTLDR. |
| NTOSKRNL.EXE | This is the NT kernel. |
| NTBOOTDD.SYS | Only used if the machine has SCSI hard disks (and the SCSI adapter has the bios disabled). |
Table 1: Files for Intel-based Machines
How do the files in Table 15-1 work together? First, NTLDR reads the BOOT.INI and builds a menu of operating system choices. If you choose to start Windows NT rather than another operating system, it starts NTDETECT.COM. NTDETECT.COM scans over the hardware in your system and tells NTLDR what it has found. Then NTLDR loads NTOSKRNL.EXE for further processing. We will see what additional processing occurs when we discuss Windows NT load phases.
The BOOT.INI file also points out an important concept: the boot partition and the system partition do not have to be the same thing. The boot partition is where the Windows NT system files are stored. The system partition is simply where you boot from. (The names might have lead you to think it would be the other way around.) On Intel-based computers, the system partition must be on the first physical hard disk. The boot partition can be the same as the system partition, or can be on a different partition on the same hard disk, or it can be on a different hard disk.
Table 15-2 lists the files needed to boot Windows NT 4 Workstation on a RISC-based machine. Notice the differences between the two different processor platforms.
| Windows NT files | Description |
| OSLOADER.EXE | Loads the operating system on a RISC machine. Basically the same as NTLDR on an Intel machine. |
| NTOSKRNL.EXE | The NT kernel. |
| NTBOOTDD.SYS | Only used if the machine has SCSI hard disks (and the SCSI adapter has the bios disabled). |
Table 2: Files for RISC-based Machines
Table 15-3 displays the differences between the two processor platforms pre-boot sequences.
| Intel-based Pre-boot Sequence | RISC-based Pre-boot Sequence |
| POST routines are run. | ROM firmware reads boot precedence table. |
| MBR is read into memory. | Firmware reads first physical sector of boot drive (MBR) into memory. |
| Active partition is located, and boot sector is read into memory. | Firmware examines BIOS Parameter Block (BPR) to determine support for file system. |
| NTLDR is loaded. | OSLOADER.EXE is loaded |
Table 3: Comparison of Boot Sequences
Now that we have discussed the files needed to boot Windows NT, let’s look at the process NT uses to load so it can run successfully.
As Windows NT begins to load the system files, it does so in a predetermined fashion. It moves from a character mode into a graphical mode—this transition is crucial—and as this takes place, it engages many different facilities.
As Windows NT loads, it goes through four distinct phases. These phases are the Kernel load phase, the Kernel initialization phase, the Services load phase, and finally the Windows subsystem start phase. The process is complete when a user successfully logs on. Let’s look at each of these phases.
The Kernel load phase begins when NTOSKRNL.EXE is loaded into memory. At this point you see the message, "NTDETECT is checking hardware". Then the hardware abstraction layer (HAL) is called into play. The function of HAL is to hide differences in hardware from the operating system. In this manner, HAL virtualizes the hardware specifics from Windows NT (which in turn enhances portability). This comes at a cost, however, both in performance and in the range of applications that NT can run. This is becoming much less of an issue. Basically, any program that relies upon direct hardware calls does not run under Windows NT. The programs affected by this are primarily games.
After HAL is constructed, the Registry is consulted to determine which drivers are to be loaded, and in what order. So where in this vast database is the information found? If you look at Figure 15-3, you see the Service Group order key.
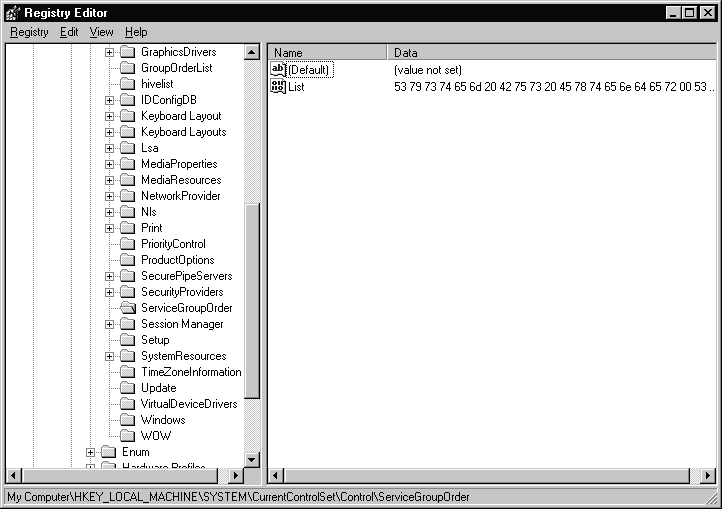
Figure 3: The Service Group Order subkey controls the order in which Windows NT loads the drivers.
The last step of the Kernel load phase occurs when the screen turns black and dots progress across the top of the screen. It is at this stage that the drivers in the Service Group Order subkey are loaded into memory. If you had selected the /SOS option in your BOOT.INI, you actually would see the names of the drivers being loaded. This is a valuable troubleshooting technique, and will be visited later.
It is now time to begin initialization of the Kernel. This occurs when the screen turns blue. Each driver loaded during the Kernel load phase is initialized. As this occurs, dots parade across the screen. If the progression appears to hang, a driver that either is taking a long time to load, or is having trouble loading. You can get a rough idea of what caused the hang by counting the dots which preceded it. How Windows NT treats a failed service is governed by the settings found in HKEY_LOCAL_MACHINE\SYSTEM\CurrentControlSet\Services\servicename\ErrorControl. There are four levels of settings:
| Ignore: 0x0. If a service has this error control code, and Windows NT has trouble loading or initializing the service, it is ignored and the boot sequence proceeds. You aren’t even given an error message. | |
| Normal: 0x1. When this level is set, the error is be ignored, and boot progresses in a normal fashion, but this time you are given an error message. | |
| Severe: 0x2. When a severe level is set, and you are not booting using the LastKnownGood configuration, the boot process fails and restarts using the LastKnownGood configuration. If you are already booting using the LastKnownGood, the error is ignored and the boot process continues. LastKnownGood configuration will be discussed in depth later in the chapter. | |
| Critical: 0x3. If a critical service fails and you are not booting using the LastKnownGood configuration, the boot process fails and restarts using the LastKnownGood configuration. However, if you already are using the LastKnownGood configuration, and you receive the critical error control code, then the boot fails and an error message is generated. Refer to Figure 15-4 to see how these error control codes are displayed in the Registry. |
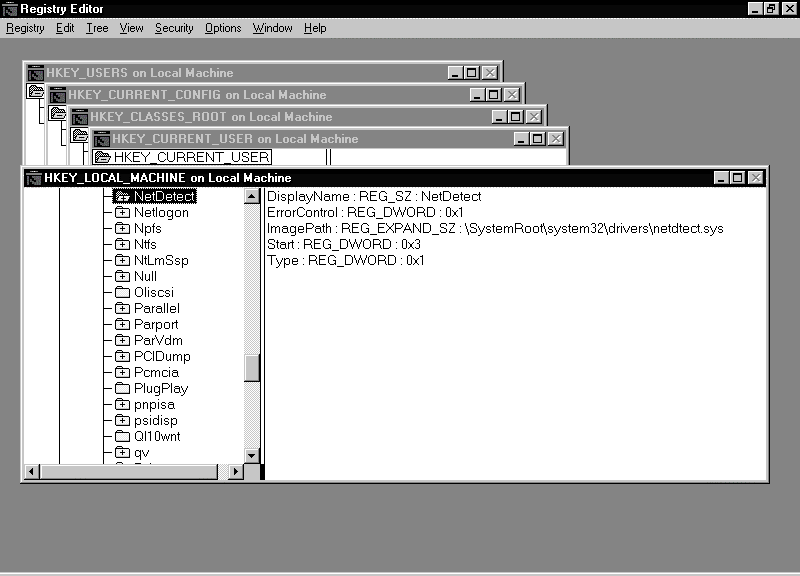
Figure 4: During Kernel initialization, the error control level assigned to each service determines how Windows NT handles exceptions.
We are now ready to begin the Services load phase. At this point, Windows NT reads the contents of the following key: HKEY_LOCAL_MACHINE\SYSTEM\CurrentControlSet\Control\Session Manager\BootExecute. The default entry for this particular key is shown in Figure 15-5. The autocheck autochk * is roughly equivalent to the old DOS utility CHKDSK. You can customize this key to tell NT to fix any problems found on the disk automatically, if you change the autochk * to autochk /p *. It then check each partition on your system for errors. If you change it to autochk /p \DosDevices\c:, it checks drive C: for errors.
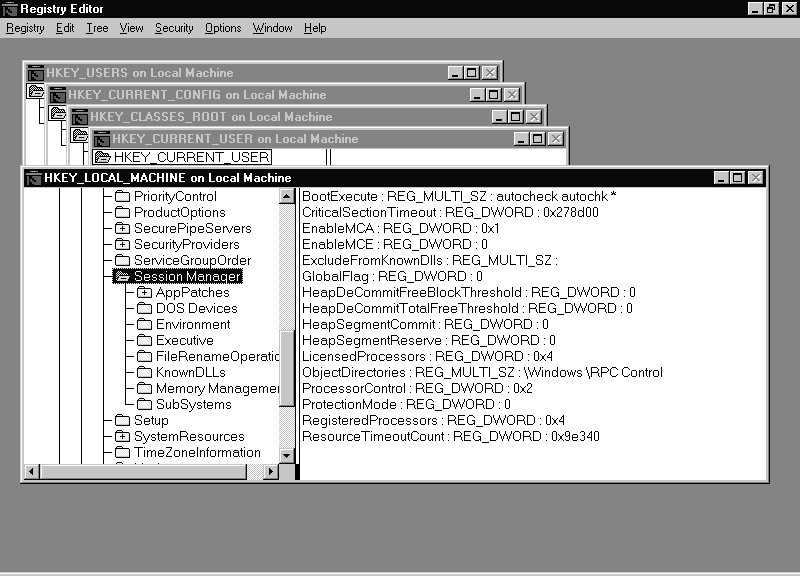
Figure 5: The Session Manager subkey details global variables that are loaded during the Services load phase.
The Session Manager subkey of the Registry contains global variables used by the Session Manager. These items are stored in the following Registry path: HKEY_LOCAL_MACHINE\SYSTEM\CurrentControlSet\Control\Session Manager. In order to explore these settings, we have to use the Registry editor to view them. The Registry contains critical configuration information, without which Windows NT is severely lobotomized. It is with the utmost respect and caution that we examine this database. Prior to working with the Registry, make sure that you have a good backup (just in case). Remember that some settings are changed dynamically, and therefore enacted without warning or prompting. It is for this reason that I prefer REGEDT32 set to Read Only mode. It can prevent transient fingers from inadvertently making real-time changes to your workstation. This is illustrated in Figure 15-6.
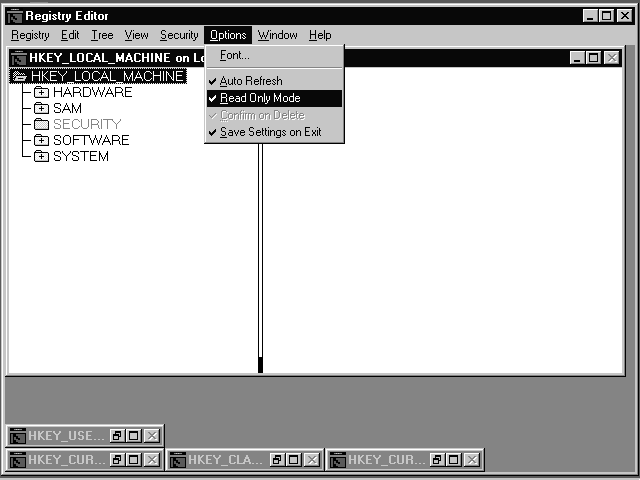
Figure 6: When exploring in the Registry, the Read Only mode of REGEDT32 is a handy feature.
Exercise 15-1 Viewing the Session Manager Registry Settings
When the Windows Subsystem starts, it starts winlogon.exe, which starts the Local Security Authority (LSA). The LSA is the main element of the Windows NT security system, and is responsible for showing the Ctrl-Alt-Del logon dialog box.
The next thing that happens is that the Service Controller executes and takes a final look through the Registry, checking for services that are marked to load automatically.
The process is complete after a successful logon has been accomplished. After a successful logon has occurred, the Windows NT Kernel copies the Clone Control Set to LastKnownGood. The system does not consider the boot to be successful unless the Clone Control Set has been copied to LastKnownGood. Later in the chapter we discuss how LastKnownGood can be utilized for your benefit.
Now that we have seen what happens while Windows NT is starting, let’s take a closer look at the BOOT.INI file it uses during startup.
The BOOT.INI file is a critical .INI file created by Windows NT when it is first installed. This file is where you can configure the many ways your system behaves when Windows NT is booted. If this file becomes damaged or corrupted, Windows NT simply doesn’t load.
There are two sections that make up the content of the BOOT.INI. As seen below, the first is the boot loader section and the second is the operating systems section. No matter how many operating systems are installed, you must still have a BOOT.INI file.
[boot loader]
timeout=30
default=multi(0)disk(0)rdisk(0)partition(7)\WINNTWS
[operating systems]
multi(0)disk(0)rdisk(0)partition(7)\WINNTWS="Windows NT Workstation Version 4.00"
multi(0)disk(0)rdisk(0)partition(7)\WINNTWS="Windows NT Workstation Version 4.00 [VGA mode]" /basevideo /sos
multi(0)disk(0)rdisk(0)partition(6)\WINNT="Windows NT Server Version 4.00"
multi(0)disk(0)rdisk(0)partition(6)\WINNT="Windows NT Server Version 4.00 [VGA mode]" /basevideo /sos
C:\="Windows 95"
Exam Watch: The importance of the BOOT.INI cannot be stressed enough. Know what will happen if the BOOT.INI file is damaged, missing or otherwise errant. You must also know how to edit it, and be very familiar with reading it.
Exercise 15-2 Edit the BOOT.INI File
The boot loader section contains two basic entries: timeout, and the default operating system. The timeout is simply a countdown timer to give you a chance to make a selection other than the default. When timeout reaches 0, the default operating system is loaded. If you want your system to start up more quickly, you either can make a selection or change the timeout setting. However, if the timeout setting is changed to 0, you won’t have a chance to make any selection.
If you are dual-booting your system, you can make changes here to select the default operating system by pointing the default setting to the one preferred. Rather than directly editing the BOOT.INI to make changes to the boot loader section, it is preferable to utilize the Startup/Shutdown tab under System Properties. As seen in Figure 15-7, the graphical tools provided are easy to use—much easier than trying to edit the Advanced RISC Computing (ARC) naming path to the default OS.

Figure 7: Use the System Properties tab under Startup/Shutdown to edit the boot loader section of the BOOT.INI file.
The operating systems section of the BOOT.INI file is perhaps the most ominous looking portion of this important file. Although it is poorly understood even by many professionals, you need to learn this section, as it might be on your exam. So what is the operating systems section of the BOOT.INI? Its function is to tell you what operating systems are installed on the machine, and to tell Windows NT where to find them. Even if you are not dual-booting your machine, the BOOT.INI file still has this section.
The ARC naming convention comes to us from the RISC world. It is useful in identifying partition information on multidisk/multipartition machines. For instance, look at Figure 15-8.
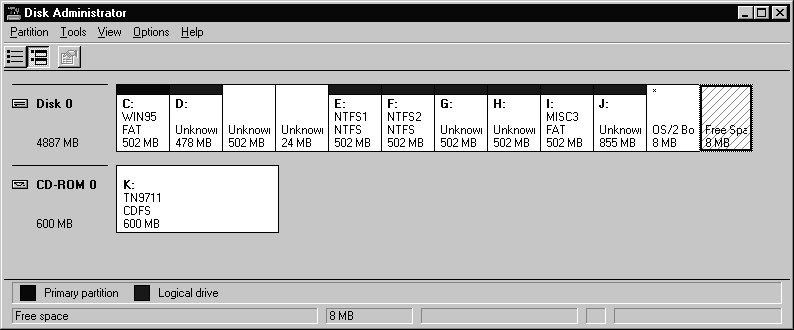
Figure 8: Disk Administrator shows a graphical representation of the disk layout of a particular machine.
If we look at the BOOT.INI for this machine, we see the following:
[boot loader]
timeout=30
default=multi(0)disk(0)rdisk(0)partition(7)\WINNTWS
[operating systems]
multi(0)disk(0)rdisk(0)partition(7)\WINNTWS="Windows NT Workstation Version 4.00"
multi(0)disk(0)rdisk(0)partition(7)\WINNTWS="Windows NT Workstation Version 4.00 [VGA mode]" /basevideo /sos
multi(0)disk(0)rdisk(0)partition(6)\WINNT="Windows NT Server Version 4.00"
multi(0)disk(0)rdisk(0)partition(6)\WINNT="Windows NT Server Version 4.00 [VGA mode]" /basevideo /sos
C:\="Windows 95"
From this we can see the boot partition is on partition number 7. But what is all this other stuff? Let’s look and see.
A SCSI controller that has its resident BIOS disabled uses the SCSI ARC name. All other controllers (IDE controllers, and SCSI controllers with BIOS enabled) are listed as multi. The numbers that follow SCSI or multi start counting with 0. In the preceding example, the multi (0) indicates that it is the first controller (either IDE or SCSI with the BIOS enabled).
Exam Watch: If your BOOT.INI does not list the SCSI ARC name then NTBOOTDD.SYS will not be used.
Disk is only used if SCSI is listed as the first word of the ARC path. If Disk is used, the SCSI bus number is used here. It starts counting with 0. If you have multi in the first space, then Disk will always be 0.
Rdisk indicates the SCSI Logical Unit Number (LUN), when SCSI is the first word in the ARC path. It indicates the ordinal number of the disk, if the first word is multi. Remember the counting here also starts with 0.
This is simply the partition number on the disk. The important thing to remember is that the counting starts with 1. In Figure 15-7, even though the OS/2 Boot Manager is at the physical end of the drive, it is counted as number 1 partition, since the system boots from it, then moves up in count from the C: drive.
To put this all together now, if we have the following:
multi(0)disk(0)rdisk(0)partition(7)\ WINNTWS="Windows NT Workstation Version 4.00"
we know it is either an IDE controller or a SCSI controller with the BIOS enabled. It is the first controller on the system. Disk (0) in this instance is ignored. Rdisk (0) means that it is the first drive on the system. Partition (7) means that Windows NT Workstation is located on the seventh partition.
Please note that if changes are made to the system, and this section of the BOOT.INI is not updated, Windows NT will not load on the next boot.
You may be wondering about the "unknown" partitions listed in Figure 15-8. The unknown partitions are valid, but unknown to Windows NT 4 Workstation, as it does not recognize OS/2, LINUX, or FAT32 partitions.
The path listed in the preceding BOOT.INI is simply the path to the location of each operating system.
There are several switches that can be used to customize the way Windows NT boots up. Some of these are used for troubleshooting purposes. These can be used in the BOOT.INI file.
/NOSERIALMICE=[COMx | COMx,y,z…]
This switch tells Windows NT that you do not have a serial mouse on a particular COM port, and as a result it does not poll the port for a mouse. You might want to use this if you have a serial device attached to a particular COM port. If NT detects the device, it might think it is a mouse, and as a result the device would not function properly under Windows NT. If you were to use /noserialmice without a particular COM port specified, this disables polling on all COM ports. If you say /noserialmice=COM1 then only polling on COM1 is disabled.
This switch causes Windows NT to load the standard VGA driver in 640 by 480 mode. This is useful if, for instance, you make a change to a video driver and then reboot, only to find you cannot read anything on the screen. In the /basevideo mode you can get the machine up, and change the settings back to something supported by your particular hardware configuration. By default Windows NT sets this option up for you. It appears on the screen as VGA mode of BOOT.INI.
This switch enables the automatic recovery and restart options, and is set up when you make changes to the Recovery section of Startup/Shutdown under System in Control Panel. While you can add it to the BOOT.INI manually, the safest way to change this is through Control Panel.
SOS mode does pretty much what it sounds like; it tells you what drivers Windows NT is loading during start up. Remember the dots that go across your screen as drivers are loaded? This switch causes NT to echo the names onto the screen. It is useful for determining which driver is hanging during startup. This entry is also added by default to the VGA mode entry in BOOT.INI.
The /nodebug switch tells NT that no debug information is being monitored. When this information is being used, there is a pretty significant performance hit as a result. This switch is useful to developers.
If you use the /maxmem switch, you can tell Windows NT how much memory it is allowed to use. Why would you want to limit how much memory NT uses? Normally you wouldn’t, but if you suspected that you had bad memory modules, you can play with these settings until you locate the bad module.
The /SCSIordinal switch is used if you have two identical SCSI controllers in the same system. You would use this switch to tell NT which one was which. The numbering on this begins with 0, so 1 would indicate the second controller.
We have edited the BOOT.INI with a text editor, so let’s take a look at how to modify it using a Control Panel applet.
Exercise 15-3 Editing BOOT.INI with Control Panel
Earlier in this section, we mentioned dual-booting different operating systems. In the next section, we discuss multiboot configurations.
Windows NT supports multibooting between Windows NT and additional operating systems, if your system partition contains the Windows NT boot sector.
When you install Windows NT, set up copies the first sector of the system partition (the boot sector) to a file named bootsect.dos. NT then replaces the original boot sector with its own boot sector.
When you start your computer, and the system partition contains the Windows NT boot sector, the code in the boot sector loads the Windows NT boot loader, NTLDR. The operating system menu, which is built from the BOOT.INI file, enables you to choose the operating system to be loaded.
If you select an operating system other than Windows NT from the operating system menu, NTLDR loads and starts the Bootsect.dos file. This functionality results in the other operating system starting, as if NTLDR had not intervened.
If you want to dual-boot between Windows 95 and Windows NT, you should install Windows 95 first and then install Windows NT. If the Windows 95 boot sector replaces the Windows NT boot sector, it causes a problem for Windows NT accessing any NTFS volume. Why would it cause this problem? Because the Windows 95 boot sector is for FAT partitions, and does not recognize NTFS partitions.
So, now we have a fully-functioning Windows NT Workstation, in which everything will work perfectly from here on out, correct? Not on your life! As I said in the beginning of the chapter, I have never seen an operating system that doesn’t need to be massaged from time to time. In the next section, we start looking at methods to help you in troubleshooting hardware and software.
Troubleshooting Hardware/Software
Any discussion about troubleshooting hardware and software could easily fill this entire book, so we will limit ourselves to only a few topics on the matter. Let’s start the section off with a look at boot failures and methods available to overcome them.
Boot failures can take many different paths to lead your system to failure. It can be anything from a boot file being corrupted to a bad video driver not allowing your system to complete the boot process.
The first item to ensure is that you have a Windows NT boot floppy, in case one of the boot files for your system ever gets deleted. With a boot floppy on hand, you might be able to get your system back up quickly, and might be able to copy the missing or corrupt file back to your hard disk. You must use a special boot disk that has been formatted on a Windows NT system and modified to mimic the boot configuration of the system that won’t boot. When you create the boot disk, you may need to modify the BOOT.INI file to show the ARC path to the boot partition on the bad system. Exercise 15-4 leads you through the steps of creating a Windows NT boot floppy for an Intel-based machine.
Exercise 15-4 Creating a Windows NT Boot Floppy for Intel-based Machines
While the Windows NT boot disk can save you from several boot problems, it doesn’t solve them all.
Using the LastKnownGood Configuration
What happens if you load a new device driver that doesn’t function correctly, and prohibits the system from booting correctly? Is all lost, and is your only option to reload Windows NT? I hope you answered with a big resounding NO! You can get around this problem by reverting to the LastKnownGood configuration. LastKnownGood is the configuration that was saved to a special control set in the Registry after the last successful logon to Windows NT. So instead of reloading the operating system, you can restart the computer without logging on, and select LastKnownGood during the boot sequence. This loads the previously known good control set, and bypasses the bad device driver. Exercise 15-5 leads you through the process of booting, using the LastKnownGood configuration.
Exercise 15-5 Booting Windows NT with the LastKnownGood configuration
While the LastKnownGood configuration can save your day, like the Windows NT boot floppy it doesn’t work in all situations. Another tool available for your use is the Emergency Repair Disk.
Using the Emergency Repair Disk
The Emergency Repair Disk (ERD) can be used to return a Windows NT system back to the configuration it was last in, based on the last time you updated your Emergency Repair Disk. This disk can repair missing Windows NT files, and restore the Registry to include disk configuration and security information. To create an ERD, use the Repair Disk Utility. Figure 15-9 shows the Repair Disk Utility after it has been started.
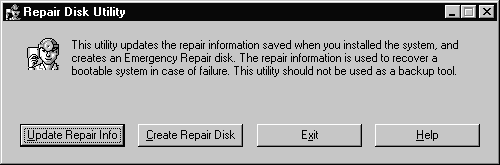
Figure 9: The Repair Disk Utility after it has first been started.
If you choose the Update Repair Info button, the Repair Disk Utility overwrites some of the files located in the %systemroot%\Repair directory. After the %systemroot%\Repair directory has been updated, the program prompts you to create an Emergency Repair Disk. The disk it creates is the same as if you had chosen the Create Repair Disk option.
If you choose the Create Repair Disk button, the Repair Disk Utility formats the disk prior to creating the ERD. This occurs whether you use a prior ERD or a new disk. Exercise 15-6 shows you how to create an ERD.
Exercise 15-6 Creating an Emergency Repair Disk
If you look at the files on the ERD you will notice some of them end with a ._. This indicates that those files have been compressed. You can decompress those files using the expand utility that comes with Windows NT.
Exam Watch: The Security Accounts Manager (SAM) and security files are not automatically updated by rdisk. To update those files, you need to use the /S switch in conjunction with rdisk.
Now that we have an up-to-date Emergency Repair Disk, it is time to use it in the Emergency Repair Process. The Emergency Repair Process is used when your system doesn’t function correctly, and using the LastKnownGood configuration doesn’t solve the problem. This process requires the original installation disks from when you first installed Windows NT Workstation. You also need the ERD that you created in the preceding exercise. Please note that ERDs are computer-specific, so don’t get them mixed up if you have several systems. Exercise 15-7 shows you how to complete the Emergency Repair Process.
Exercise 15-7 Using the Emergency Repair Disk with the NT Setup Disks
Windows NT features a Recovery utility that can perform selected tasks in the event of a STOP error. You configure the recovery options within the Startup/Shutdown tab of System Properties. You should remember this tab from earlier in the chapter when we discussed changing the boot loader options of the BOOT.INI file. Figure 15-10 shows the Startup/Shutdown tab.
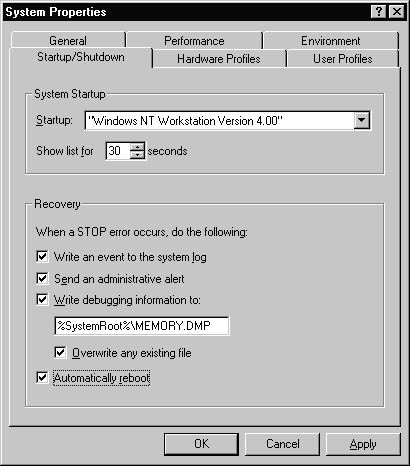
Figure 10: System Recovery options on the System Startup/Shutdown tab.
The Recovery options are, for the most, part self-explanatory. However, it is worth mentioning that the Automatically Reboot option allows your system to be returned to normal operation quickly after a system crash, instead of it having to be rebooted manually. The most important option in the Recovery utility, as far as troubleshooting goes, is the Write Debugging Information To utility. When this option is checked and a STOP error occurs, the entire contents of memory get dumped to the pagefile. When your system restarts, this information is copied automatically from the pagefile to the name you specified in the Recovery option block.
Since the entire contents of your system’s memory is dumped to the pagefile, the pagefile has to be as large as the amount of physical memory installed in your system. A system that has 64MB of physical memory needs to have a pagefile that is at least 64MB in size. One other caveat: The pagefile has to be located on the boot partition. Exercise 15-8 gives you a chance to configure your system for memory dumps.
Exercise 15-8 Configuring for Memory Dumps
The Task Manager should look familiar to you. We examined it in Chapter 14 while discussing Performance Tuning. Let’s look at one more function that it can perform with regard to troubleshooting your system. It has the capability to end a task that may be causing your system to hang. Under normal operating conditions you see the word "Running" underneath the status column, as illustrated in Figure 15-11. However, if a task is no longer responding, the words "Not responding" are in the status column. Exercise 15-9 leads you through the process of shutting down a task.
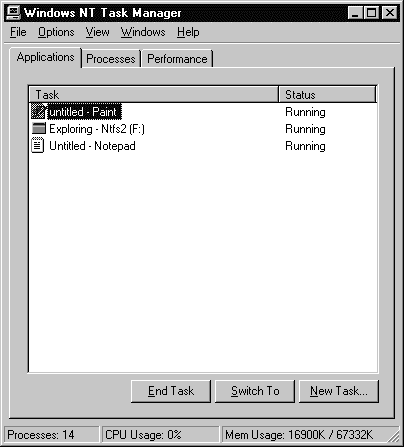
Figure 11: Applications tab of the Task Manager shows whether a task is responding.
Exercise 15-9 Shutting Down a Task with Task Manager
Taking Ownership of a Resource
If you share your Windows NT Workstation with other people, at some point the inevitable happens: someone loses access to a resource. Of course, this only happens if you are using the NTFS file system. Assuming you have Administrator privileges, you can easily solve the dilemma by taking ownership of the resource and sharing it to the person who needs access with full control, so he can gain ownership of the resource. In my experience, this action normally occurs when someone is fired or quits. Exercise 15-10 shows you how to gain ownership of a resource and allow someone else to take ownership of it. In the exercise, User1 is the person who quits the organization and User2 is the person who takes his place.
Exercise 15-10 Taking Ownership of a Resource (Troubleshooting Security Problems)
Not all of your problems will be boot-related, or easily identified with any of the methods described so far. You might need to use other tools to help you diagnose the problem your system is having. In the next section, we look at two tools available to you: the Event Viewer and Windows NT Diagnostics.
The Event Viewer, located in the Administration submenu, allows you to examine various events that have been generated by the Windows NT system, services, and applications, or through user actions that have been audited. Figure 15-12 shows an example from the Event Viewer.
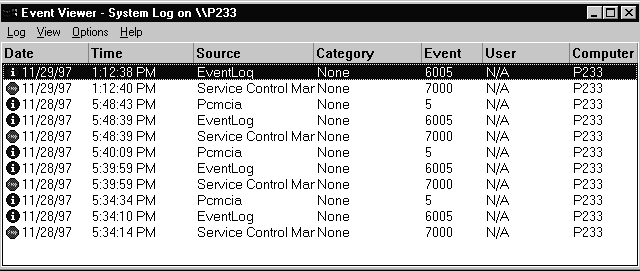
Figure 12: Event Viewer allows you to examine various events that have been generated by the Windows NT system.
The event viewer can display three separate logs. Depending on the type of item you need to view, it dictates which log you will open.
| The System Log contains events that are provided by the Windows NT internal services and drivers. | |
| The Security Log contains all security-related events when auditing has been enabled. | |
| The Application Log contains events that have been generated by applications. |
By default, each log file is a maximum of 512KB in size, and overwrites events older than seven days. These default settings are configurable by changing the Maximum Log Size and Event Log Wrapping options. The maximum size of the log can be changed in 64KB increments. The three event log wrapping options are: overwrite events as needed, overwrite events older than (n) days, and do not overwrite events (clear log manually).
Event log files can be saved in three different formats; event log file with the .EVT extension, text file with the .TXT extension, or a comma-delimited text file with the .TXT extension. The .EVT file is a binary file that can be read only by the event viewer utility. Any ASCII editor can read both types of text files.
There are five types of events you might encounter in the various logs. A unique icon identifies each event type, so that you can locate rapidly the type of event you may be interested in finding. Table 4 describes each of the events corresponding to an icon.
| Icon | Event | Description |
| Error | A significant problem has occurred, such as a service that may not have started properly. | |
| Warning | An event has occurred that is not currently detrimental to the system but may indicate a possible future problem. | |
| Information | A significant event that describes a successful operation. For example, a service starting successfully may trigger this type of event. | |
| Audit Success | Audited security access attempt that was successful. For example, access to an audited directory. | |
| Audit Failure | Audited security access attempt that was not successful. An example is a failed logon attempt. |
Table 4: Types of Events Displayed in the Event Viewer
Events can be seen in greater detail by using the mouse to double-click the event, or by choosing Detail from the View menu while the event is highlighted. The detail dialog box displays a text description that can help in analyzing the event. Hexadecimal information may also be provided, depending on the event. If you save the log file, the text description is saved no matter what format of log file, but the hexadecimal data is saved only if you use the .EVT format. Figure 15-13 shows the Event Details for an event from the System log.
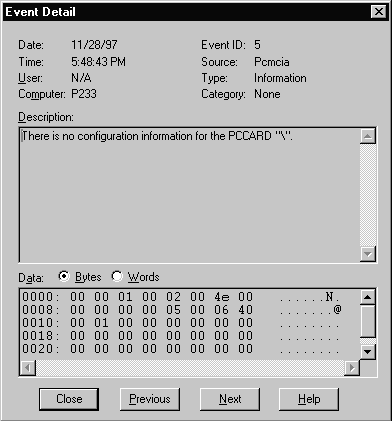
Figure 13: Event Detail from the System log.
Exercise 15-11 shows you how to use the Event Viewer to see the logs on your system.
Exercise 15-11 Using the Event Viewer
Troubleshooting NT – Where to Begin?
NT has some wonderful tools to help you find out what is happening in your computer. Of course, tools are only valuable if you use them. If you are accustomed to the DOS/Windows environment, which offers few tools bundled with the operating system, you probably don’t even look to the operating system for information about what is happening with your system. Habits can be tough to change, but you should try to change this one.
It’s interesting to observe student behavior during an NT class when computer problems pop up, especially when the problems are not part of the troubleshooting labs. When this happens, more than half the students revert to old troubleshooting patterns. After the students pursue these lines fruitlessly for a while, you actually can see them becoming aware of the tools in NT and beginning to use them.
The tool to start with, when a problem occurs, is the Event Viewer. From there you can look over the three log files to see what activities have been logged. Consider the following scenario: You are having trouble connecting to a remote host and are running the TCP/IP protocol.
When we introduce this problem in class, the students start flying through their troubleshooting techniques for IP. They begin pinging away, wondering about default gateways and routers, checking subnet masks, and changing IP addresses. None of these activities involves using the Event Viewer and checking the System Log file. When they finally get around to checking the logs, they discover that the network adapter has failed.
Even though I’ve been working with NT a long time, I find myself doing the same type of thing—launching into some process or another, trying to get information before I remember to check the Event Viewer. Old habits die hard.
Windows NT Diagnostics (WinMSD)
Windows NT Diagnostics (also called WinMSD) has several tabs that reflect a lot of information about your Windows NT Server system. Figure 15-14 shows Windows NT Diagnostics after it has first been started.
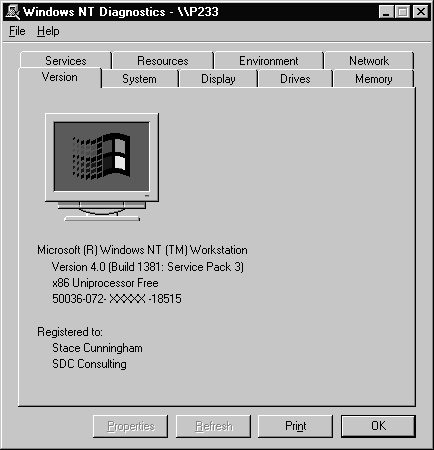
Figure 14: The Windows NT Diagnostics opening window.
The Version tab shows the NT version number, build, and type, the CPU architecture, and multiprocessor support. The serial number and the name of the person to whom the copy of Windows NT is registered are also displayed on this tab.
The System tab shows system-level information about the hardware, including the vendor ID, the Hardware Abstraction Layer (HAL) type, the BIOS date, and a description of the CPU.
The Display tab shows the video BIOS date, the display processor, the video resolution, the quantity of video RAM, the vendor, the digital to analog (DAC) type, and the driver type and revision.
The Drives tab provides a tree display that can be sorted by drive letter or drive type for each logical disk drive. Selecting any drive brings up a Properties window that shows information such as the drive letter, the serial number, the disk space available and how much disk space is in use. A File System tab on the Properties window gives information about the file system being used, including the maximum number of characters in a filename. The File System tab also shows whether the case will be preserved in filenames, the support of case-sensitive filenames, support for Unicode in a filename, file-based compression, and security preservation and enforcement.
The Memory tab shows in-depth details on memory utilization in your system, including the total number of processes, handles, and threads in use. This tab also displays the total amount of physical memory and the page file space available and currently in use.
The Services tab displays information on all services and devices on your Windows NT Server. Highlighting a selection and selecting the Properties button brings up a Service Properties dialog box for the service or device. Information is displayed that shows the executable file associated with the service or device, the start type, the user account with which it is associated, and any error associated with it. The service flags are also displayed, indicating whether the service runs in its own memory space, whether it is a kernel driver, and whether it can interact with the Windows NT desktop. A Dependencies tab shows you if the highlighted choice depends on another service or device. If it does depend on another service or device, it may help you in troubleshooting why a service or device failed to start.
The Resources tab displays information about hardware resources, including interrupt requests (IRQ), I/O ports, direct memory access (DMA), physical memory, and device drivers. If you select an item, it displays a dialog box indicating the associated device driver, bus, and bus type. A check box on this tab allows you to choose whether you want resources owned by the NT HAL to be displayed on the list.
The Environment tab displays all environment variables and values. It can display either values for the system or values for the local user for user-specific entries.
The Network tab provides you with a great deal of information: the number of logged on users, the transport protocols in use—along with the media access control (MAC) address of each transport, the internal network settings, and the system statistics regarding server bytes sent, hung sessions, and more.
Now that you are familiar with all the tabs offered by Windows NT Diagnostics, Exercise 15-12 gives you the chance to see how your system is functioning.
Exercise 15-12 Using the Windows NT Diagnostic Tools
There are times when, no matter how much troubleshooting you do to your system, nothing fixes it. The reason could be a bug within Windows NT. In the next section we discuss how Microsoft handles this type of situation.
Microsoft periodically issues a Service Pack to fix bugs that have been detected in the Windows NT operating system. At the time of this writing, the latest service pack issued is Service Pack 3.
The latest Service Pack can be ordered from Microsoft by phone or from their FTP site. The FTP address is ftp.microsoft.com/bussys/winnt/winnt-public/fixes/usa/nt40/ussp3/i386 for Intel-based machines.
The first thing you need to do prior to installing a Service Pack is to read the README.TXT file that comes in the archive to see what bugs have been fixed, and whether there are any peculiarities that might affect the installation on your system. Installing a Service Pack is not a complex task; there are only a couple of decisions that need to be made. It is wise to err on the side of caution, as a Service Pack can render your machine inoperable. Exercise 15-13 shows you the process of installing Service Pack 3.
Exercise 15-13 Installing a Service Pack
Do not delete the Service Pack archive from your system. Anytime you change hardware or software on the system you will have to reapply the Service Pack. If you reapply it, you must also choose to create a new uninstall directory.
You may find that the Service Pack does not function correctly on your system. If this happens, you have to remove it from your system. Keep in mind that you can only uninstall the Service Pack if you originally installed the Service Pack with the Uninstall Directory option selected. Exercise 15-14 shows you how to remove a Service Pack from your system.
Exercise 15-14 Removing Service Packs
"Blue Screen of Death" is just about the most frightening phrase you can say to clients when dealing with their Windows NT systems. Blue screens are actually text mode STOP messages identifying hardware and software problems that have occurred while Windows NT has been running. The reason for producing the blue screen is to alert you to the fact that an error message has been generated. The blue screen gives you information to help in troubleshooting the problem, rather than the system failing in an invisible manner. As shown in Figure 15-15, the blue screen consists of a STOP message, the text translation, the addresses of the violating call, and the drivers loaded at the time of the STOP screen.
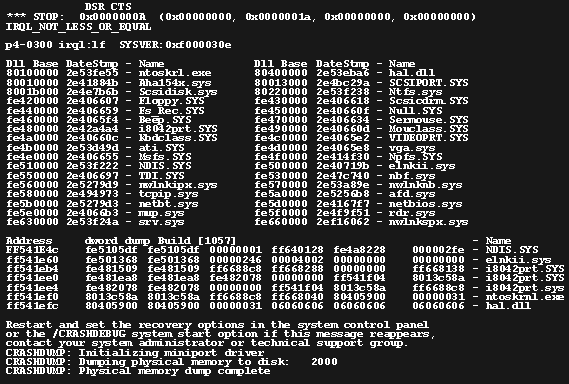
Figure 15: A typical "Blue Screen of Death".
Having access to a variety of troubleshooting resources can make your life much easier when dealing with Windows NT. In this section, we discuss some of the resources that are available to you.
Microsoft maintains World Wide Web (WWW) servers and FTP (File Transfer Protocol) servers that can provide you with updated drivers, current product information, and more. The web address is www.microsoft.com and the FTP address is ftp.microsoft.com. The FTP site allows anonymous logons, so feel free to explore the site.
The Knowledge Base, developed by Microsoft product support specialists, contains support information about problems that they have solved. I cannot stress enough the value of the Knowledge Base, the first place I look when I encounter an unusual problem. It’s always possible that someone else has encountered the problem, and solved it. The Knowledge Base is available in many different places. It can be accessed on Microsoft’s web site, the TechNet CDs, and Resource kit CDs.
The Resource Kits contains detailed information that is an in-depth, technical supplement to the documentation included with the product. Resource kits also come with a CD that is full of useful utilities. Resource kits can be obtained from your local dealer, and they also are included on the TechNet CDs.
The TechNet CDs are an invaluable tool for supporting any Microsoft product. We already have discussed a couple of the items included on the TechNet CDs, when we looked at other troubleshooting resources. There are over 1.5 million pages of technical documentation available on the TechNet CDs, along with drivers, updates, and Service Packs. TechNet is available by yearly subscription and delivers new CDs to you every month as they are updated.
Windows NT Help is no farther away than a few mouse clicks. Help is available in three different contexts. You can use the Contents tab in Help to find topics grouped by subject, or use the Index tab to find specific topics listed alphabetically, or use the Find tab to search for information by typing in a subject, title, specific word or phrase. Figure 15-16 displays the Help Index tab. Exercise 15-15 gives you an opportunity to use Help to find a specific phrase.
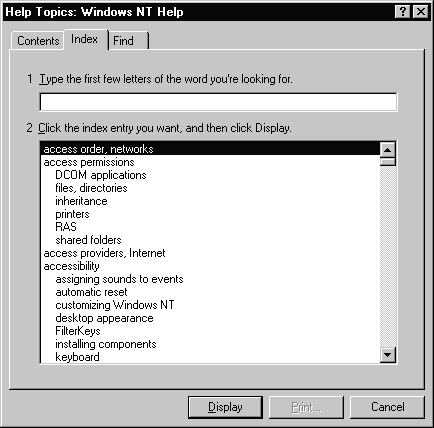
Figure 16: The Index tab of Help displays topics alphabetically.
Exercise 15-15 Opening Help Files
The boot processes for Intel- and RISC-based machines are quite similar. The main difference concerns the files used during the booting of each type of machine. Windows NT loads in four distinct phases. It is helpful during troubleshooting to realize what is supposed to happen during each phase. Windows NT depends on the BOOT.INI file to load the operating system properly. The BOOT.INI file is made up of two sections, boot loader and operating systems. The ARC naming convention is used throughout BOOT.INI. It is possible to modify the way Windows NT starts up by using a variety of switches in BOOT.INI.
Windows NT supports multibooting between multiple operating systems. This can be useful when you need to use more than one operating system on a single machine. If you are going to run Windows 95 and Windows NT on the same system, it is best to install Windows 95 first.
Troubleshooting hardware and software is never an easy process. Problems can include a variety of boot failures in which you may need to use the LastKnownGood configuration or the emergency repair disk. System recovery can assist in troubleshooting by providing a dump of your physical memory that can be further analyzed when appropriate. If an application stops responding, you can use the Task Manager to shut it down. In some situations you may need to take ownership of a resource to clear up a security problem that exists. Other tools available to help with troubleshooting Windows NT are the Event Viewer and Windows NT Diagnostics (WinMSD).
When Microsoft fixes a significant amount of bugs, it issues a Service Pack. Service Packs can be obtained from the Microsoft FTP site. Installing a Service Pack is not a complex task, but you should read the readme.txt file prior to installation.
The "Blue Screen of Death" can be intimidating, and it’s something that no one dealing with Windows NT looks forward to seeing. It reflects that a serious problem has occurred and gives information to help you find out what caused the STOP error.
There are many resources available to help you troubleshoot Windows NT. Some of the resources available include Microsoft’s web site, the TechNet CD subscription, and the online Help file that is included with Windows NT.
| Apart from the fact that it’s on the MCSE test, it is helpful to understand the boot process from a troubleshooting standpoint. | |
| It is important to note that on RISC-based machines the system partition has to be on a FAT partition. | |
| As Windows NT loads, it goes through four distinct phases: the Kernel load phase, the Kernel initialization phase, the Services load phase, and finally the Windows subsystem start phase. | |
| The BOOT.INI file is a critical .INI file created by Windows NT when it is first installed. If this file becomes damaged or corrupted, Windows NT simply doesn’t load. | |
| Know what happens if the BOOT.INI file is damaged, missing or otherwise errant. You must also know how to edit it, and be very familiar with reading it. | |
| The ARC naming convention is useful in identifying partition information on multidisk/multipartition machines. | |
| Windows NT supports multibooting between Windows NT and additional operating systems, if your system partition contains the Windows NT boot sector. | |
| Ensure that you have a Windows NT boot floppy in case one of the boot files for your system ever gets deleted. | |
| LastKnownGood is the configuration that was saved to a special control set in the Registry after the last successful logon to Windows NT. | |
| The Emergency Repair Disk (ERD) can repair missing Windows NT files and restore the Registry to include disk configuration and security information. | |
| To create an ERD, use the Repair Disk Utility. | |
| The Security Accounts Manager (SAM) and security files are not automatically updated by rdisk. To update those files, you need to use the /S switch in conjunction with rdisk. | |
| Windows NT features a Recovery utility that can perform selected tasks in the event of a STOP error. Configure the recovery options within the Startup/Shutdown tab of System Properties. | |
| Task Manager has the capability to end a task that may be causing your system to hang. | |
| The Event Viewer, located in the Administration submenu, allows you to examine various events that have been generated by the Windows NT system, services, and applications, or through user actions that have been audited. | |
| Windows NT Diagnostics (also called WinMSD) has several tabs that reflect a lot of information about your Windows NT Server system. | |
| Microsoft periodically issues a Service Pack to fix bugs that have been detected in the Windows NT operating system. | |
| The "Blue Screens of Death" are actually text mode STOP messages identifying hardware and software problems that have occurred while Windows NT was running. | |
| Troubleshooting resources include Microsoft’s WWW and FTP Sites, The Knowledge Base, Resource Kits, TechNet CD-ROM, and Windows NT Help. |
The following questions will help you measure your understanding of the material presented in this chapter. Read all the choices carefully, as there may be more than one correct answer. Choose all correct answers for each question.
2. (True/False) The /SOS switch is used in the BOOT.INI file to enable the capture of debugging information.
3. What files are required to be on a Windows NT boot disk for a non-SCSI Intel-based machine?
4. NTDETECT.COM is used to __________ .
5. You are sent out on a trouble call and told that the system hangs ever since the user added a new video driver. What would you do?
6. Your system has 32MB of physical memory and you have set the System Recovery to write debugging information to %systemroot%\memory.dmp. What else needs to be done to ensure that the debugging information will be saved?
7. What tool do you use to detect the group dependencies for a service?
8. (True/False) The only way to change the default timeout is to edit the BOOT.INI file manually.
9. Which load phase can be identified by the screen turning blue?
10. Paul has been fired and his replacement, Ann, needs to access the fourth-quarter report located in a folder that belonged to Paul. How can Ann access this folder?
11. (True/False) The Session Manager subkey of the Registry contains local variables that are used by the Session Manager.
12. If a service has been set in the Registry for an error control of 0x2, it reflects a level of ______ .
13. To update your Emergency Repair Disk, you would type _________from a Command Prompt.
14. (True/False) A Service Pack can easily be removed from your system, even if you do not have the uninstall folder.
15. What causes the "Blue Screen of Death"?
16. (True/False) Any ASCII editor can be used to read an Event Viewer .EVT log file.
17. The partition(n) portion of an ARC name starts counting with _____ .
18. Your system is set to dual-boot between Windows 95 and Windows NT. You receive the following message as you try to boot into Windows 95: I/O Error accessing boot sector file. What has caused this to occur?
19. A system you have been sent out to troubleshoot will not boot. You attempt to use the LastKnownGood configuration and it does not correct the problem. What would you do next?
20. (True/False) The SAM and security files are automatically updated when you use the Repair Disk Utility.