![]()
![]()
![]()
![]()
Chapter 5
*Windows NT File System Support
*Long Filenames
*New Technology File System (NTFS)
*Converting to NTFS
*Q & A *
Volume Sets
*Stripe Sets
*Disk Administrator
*Third-Party Disk Utilities
*Certification Summary
*Two-Minute Drill
*REVIEW ANSWERS
*
![]()
Chapter 5
Windows NT File System Support
![]()
| File Allocation Table (FAT) | |
| Long Filenames | |
| New Technology File System (NTFS) | |
| Additional File Systems | |
| Disk Administrator | |
| Fragmentation | |
| Volume and Stripe Sets |
One of the ways Windows NT Workstation maintains compatibility is with file system support. Windows NT provides support for the File Allocation Table (FAT) and introduces the New Technology File System (NTFS). The FAT file system is a widely used, well-supported file system utilized by most Microsoft operating systems. To overcome prior operating system limitations, NT now supports the NTFS file system for long filenames, compression, security, and increased efficiency. This chapter will cover the features of both file systems, as well as disk management features such as Volume and Stripe sets for improvements in performance and fault tolerance. These disk management features are implemented through the new Disk Administrator, a graphical-based utility for managing your disks and partitions.
The File Allocation Table is a widely supported file system introduced with the first version of MS-DOS over fifteen years ago, and continued through Microsoft’s most popular operating systems such as DOS, Windows 3.x, and Windows 95. Even OS/2 can read the FAT file system format. The file system gets its name from the method used to store data on the disk. Comparable to the index of a book, the FAT file system is used to point to the areas on the disk where data is stored. This file system was great for its time but is beginning to show its age, especially with today’s large capacity hard disks and extended file attributes (discussed later in the chapter). FAT is by no means dead, however. We can make a strong case for the use of FAT partitions in Windows NT Workstation. Another point to remember about the FAT file system is that it is required for system partitions of RISC processor architectures. The FAT file system can be as small as two megabytes to support the RISC boot files, and the rest can be NTFS. If you are faced with a question on the exam about Alpha or MIPS and file systems, you now know these require FAT. Regardless of the FAT file system’s limitations, in some circumstances it is appropriate to use the FAT file system in Windows NT workstation, and therefore you should understand it.
With the Windows 95 OEM Service Release 2 (OSR2), Microsoft updated the FAT file system. It’s now referred to as FAT32. There are some improvements with FAT32 that are worth mentioning, including support for larger hard disks and more efficient use of space. Cluster sizes are smaller with FAT32 than with the FAT16 file system. Unfortunately, FAT32 partitions are not visible from MS-DOS, or even from the original version of Windows 95. FAT32 is still not compatible with the NTFS file system, and therefore NTFS partitions are not visible from Windows 95 OSR2.
FAT Naming Conventions Under DOS
The FAT naming convention uses the 8.3 scheme: an eight-letter filename, with a three-letter file extension. This limitation is a nuisance that has lasted for many years. Filenames such as SETUP.EXE are clear enough, but combinations of acronyms and abbreviations, made to create unique and meaningful filenames, quickly become indecipherable. Of course, the eight-letter maximum filename made sense under DOS, which requires text-based user input (unless you are using a DOS shell). The eight-character maximum would facilitate minimal typing to execute programs and change directories. Can you imagine the labor involved in typing filenames and spotting errors if there were no maximum? But today the graphical user interface (GUI) rules the operating systems, so it’s only natural that restrictions inherited from DOS and FAT are being challenged. Since you will still be using DOS and FAT file systems, you must learn the concepts associated with the two, especially the naming conventions. There are a few rules regarding the FAT naming conventions:
| Filenames consist of one to eight characters with an optional extension of one to three characters. | |
| The period is used to separate the filename from the extension, and only one period can be used. | |
| The name cannot contain any spaces, nor can it contain any of these characters: / \ ^ ? * " [ ] | : = , ; | |
| System command names are reserved, such as COM1, LPT1, PRN, NUL, and CON. | |
| Filenames are not case sensitive. Lowercase letters are transformed into uppercase automatically. |
FAT Naming Conventions Under Windows NT
A new version of FAT, called Virtual File Allocation Table (VFAT), was created with Windows NT and maintains compatibility with FAT. VFAT enables the use of long filenames, while maintaining the 8.3 naming convention for older applications viewing the same file. It does this by writing two files on the disk: one for the FAT compatible 8.3 convention, and one that is the actual long filename. The only time this dual naming becomes a concern is when you have many long filenames for directories in your root directory. You are limited to 512 directory entries. So, if for some strange reason you have 200 or more directories in your root directory, you may be concerned. For most of us, this is not a problem.
The VFAT can be thought of as "middle ground" between the FAT file system and the NT file system (NTFS). It gives users with FAT partitions the enhancements in long filename support without the complete transition to NTFS. That’s about the only NTFS related enhancement that you get, though—no security attributes, nor the capability to compress files. What is nice about VFAT is that you can change to directories with a wildcard character. For example, if I was in my root directory of C and I wanted to change to the Norton Utilities NT directory, I would enter this at the command prompt:
C:\cd nort
*This command would take me to the directory without having to type the whole directory path.
VFAT introduced a few modifications to the restrictions of the FAT naming conventions that you must be aware of:
| The name can now be up to 255 characters. | |
| The names now preserve case. | |
| The names can also contain spaces and more than one period. The last period still separates the filename from the extension. |
Exercise 5.1 Creating a VFAT Filename and Viewing Its FAT Alias
Long filenames created in NT will be read by older operating systems as the 8.3 counterpart on the FAT partition. Truncated 8.3 filenames are cryptic at best. You need to know how NT creates an 8.3 version of a filename.
For example, an 8.3 version of the filename "April Report from Human Resources" would be APRILR~1. Notice that the filename consists of the first six characters (ignoring spaces between words) followed by a tilde and a number. The number after the tilde is used to distinguish among files that have the same first six characters. So a second file, "April Report from Finance," would be APRILR~2. If you had an "April Report" from every department in a large company, imagine the time wasted on a FAT file system trying to distinguish APRILR~5 from APRILR~9.
If "April Report from Human Resources" had an extension of .TXT, the 8.3 FAT alias would be APRILR~1.TXT.
Let’s clarify a difference between Windows 95 and Windows NT VFAT concerning filenames. Windows 95 increments the number after the tilde for each file it finds with the identical first six characters. NT increments only through the fourth repetition and then starts using a hexadecimal number after the first two letters. In the next example you will see what NT did to my name:
CAMERO~1 cameron brandon1
CAMERO~2 cameron brandon2
CAMERO~3 cameron brandon3
CAMERO~4 cameron brandon4
CAEC68~1 cameron brandon5
CAFC68~1 cameron brandon6
Long filenames are difficult to work with if you dual-boot to an operating system such as DOS, which will not recognize the long name. Keep in mind that you can’t view the NTFS partition from other operating systems that don’t recognize NTFS. This makes for very taxing deciphering of long filenames from another operating system. Windows 95 will show the long filename, but DOS will not. Fortunately, if you are using NT you probably won’t use DOS applications much, so you won’t spend much time at the command prompt.
Remember these rules concerning the creation of FAT aliases for long filenames:
| NTFS removes all spaces from the long filename when it is creating the FAT alias. | |
| NT replaces all illegal characters with the underscore character (_) when it creates the FAT alias. | |
| Illegal characters include: ? " / \ < > * | : | |
| NT truncates the file extension to three characters or less. |
New Technology File System (NTFS)
NTFS is Microsoft’s robust file system exclusive to the Windows NT operating system. This file system is much improved over its predecessor, FAT. NTFS was introduced in 1992 with the Windows NT Advanced Server, and developed to address the need for long filename support, larger capacity drive support, and extended security attributes. Keep in mind that the FAT file system is more compatible with other operating systems such as Windows 3.1, DOS, Windows 95, and OS/2 (in particular, Windows 95 cannot see NTFS partitions). If you format with FAT, you will not be able to use the features that NTFS supports. Although NT supports both FAT and NTFS, the file system of choice for the Windows NT operating system is NTFS.
It would be helpful to leave one of the partitions on your computer formatted with the FAT file system so you can observe the features and limitations provided by this file system. This is a great learning tool, and you can always convert the partition to NTFS later.
Be sure you are aware of all the ramifications of choosing a file system before you start installing. For the home user this is not a major concern, but in large companies it is very common to have a standards guideline in place that you follow whenever new systems are being built and configured. If you are responsible for developing these standards guidelines, it is very important that you be aware of the differences, and make the appropriate decision as to which file system to implement. Like it or not, corporate standards are not very flexible.
As noted earlier in the VFAT file system section, NT makes use of the VFAT file system to maintain compatibility with FAT filename conventions while allowing the use of long filenames. VFAT and NTFS naming conventions are one and the same. But be aware that NTFS is the file system that uses VFAT to maintain compatibility. In other words, you won’t ever format your drive with the VFAT file system.
Although you can have both FAT and NTFS formatted partitions on the same computer, there are many features of the NTFS file system that would make it the preferred choice for your NT workstation. NTFS is most suitable in companies needing to take advantage of NTFS attribute security, or using powerful modern computers with high-capacity hard disks installed. The maximum for the FAT file system is 4GB. Exceeding this 4GB limit was unheard of just a few years ago. The NTFS architecture is designed to use numbers up to 264 bytes (that is, 16 exabytes, or 18,446,744,073,709,551,616 bytes). The NTFS file system’s practical limit is 2 terabytes (TB). NTFS is the culmination of several enhancements to the FAT file system and the High-Performance File System (HPFS), but can introduce a few disadvantages. Regardless of these disadvantages, as the following sections demonstrate, NTFS is an exceptional choice for your primary file system.
One of the fault tolerant features of NTFS is the hot-fix feature, often called sector sparing. Hot-fix moves information found in a bad sector to a different sector, and marks the original sector as unusable. The fix is completely transparent to the user. This feature cannot guarantee your data will not be damaged in the process, but at least subsequent attempts to write data to the bad sector will be avoided.
One feature of the NTFS file system that makes it very secure is the invisibility of NTFS partitions from non-NTFS operating systems. This may be a nuisance to some home users who dual-boot, only to find the files they need are on the NTFS partition when they are using Windows 95. That is another reason to choose carefully regarding your file system. If you must be compatible with other operating systems, NTFS may not be for you.
With NTFS it’s difficult (you need a third-party utility) to boot from a floppy disk and access the NTFS partition. This makes for a very secure environment where physical tampering of the machine is not tolerated. A would-be hacker could not reboot the computer and boot to a floppy disk to view your partition, as was the case with FAT partitions. Unfortunately, neither can you if something should go wrong. I faced this dilemma when our Exchange server went down on my first day of work at a new job. The hard disk appeared to have crashed, but it would still boot up to a certain point before the blue screen of death would appear. We needed to recover the Exchange private and public stores located on the drive. Had it been a FAT partition, we could have booted up with a floppy and then accessed the partition and retrieved our information. Since it was an NTFS partition, we couldn’t circumvent the security so easily. Microsoft even recommends a 500MB FAT partition for this very reason.
In some organizations security is too important to include a FAT partition on your system. If you are ever in a situation where you need to access a failed partition, you can use a minimal install of NT in another directory to boot the system. This alleviates the need to use the less secure FAT file system as the primary partition. Please note that RISC-based systems require at least a 2MB FAT primary partition.
Advanced NTFS security allows an administrator to restrict access to folder level and even down to the file level by assigning permissions to users or groups. FAT partitions allow an administrator to grant permissions only to the folder level—not down to the file level. This is a major reason why the NTFS file system should be chosen in a business setting, or any setting where extra security is needed. This subject should be fully understood and will be discussed in later chapters. Learning NTFS security is important not only for the NT Workstation exam, but also for other exams such as those for NT Server, Exchange, Internet Information Server, and SQL Server. If you learn the concepts now, you will be in good shape for any other exams that you take.
When you delete a file from NT it is gone (unless it is still in the recycle bin). This unfortunate NTFS feature pretty much guarantees a tech support phone call whenever a user accidentally deletes a file. I’ve even heard of a user who bought three NT utilities software packages in a valiant attempt to recover a multimedia file he had been working on for weeks. Of course, an irrevocable delete feature has its value. For example, a top-secret file can be deleted after it is read and under the current inability to recover lost files it can never be resurrected and viewed by unauthorized users. (With a FAT file system, you could drop to the DOS prompt and issue the UNDELETE command.)
NTFS also uses the lazy-write feature—a transaction log that keeps track of whether writes to the disk have been completed. In the event the system crashes during a disk write and the write becomes incomplete, NT rolls back the transaction that was taking place during the crash. After a successful transaction, NT updates the log, confirming the transaction’s completion. In the FAT file system, a power outage or an improper shutting down of the system could result in corrupt or damaged files. I once was running a disk utility on Windows 95 and I accidentally pulled the power cord. The system did not even boot completely the next time I started it. If this happens in Windows NT, CHKDSK /F will automatically be invoked upon boot up. This utility reads the transaction logs and checks to see if any writes are outstanding, or if any incomplete write needs to be rolled back.
NTFS is referred to as the "recoverable file system," because of the feature known as the Master File Table (MFT). The MFT contains information about the files and folders, comparable to FAT. MFT is critical, so it is mirrored. Pointers to both the original and the mirror of the MFT are stored in the boot sector of the disk. This provides recovery if the original MFT becomes corrupt or lost.
In order to understand the improvements that NTFS offers, it is important to understand the differences between FAT and NTFS when it comes to file and partition sizes. This aspect of NTFS excited users like me when we upgraded to Windows NT, and it’s probably the biggest improvement the NTFS file system has made, next to the addition of extended security attributes.
The FAT file system was designed for small hard disks and for simple file and directory structures. This is because a drive formatted with the FAT file system uses clusters to store information. The larger the partition size, the larger the cluster size.
Partition size Cluster size
0MB – 32MB 512 bytes
33MB – 64MB 1K
65MB – 128MB 2K
129MB – 255MB 4K
256MB – 511MB 8K
512MB – 1023MB 16K
You can see how the cluster size increases exponentially as the partition size gets larger. For users with large hard disks, it was necessary to format drives into smaller partitions to avoid the excessive overhead due to large cluster sizes. This is why the FAT file system is not recommended for today’s high capacity hard disks. I can still remember formatting drives into 510MB partitions to retain the 8k cluster size.
In the next example, you can see how NTFS cluster size alleviates the problem of excessive file system overhead.
Partition size Cluster size
512MB or less 512 bytes
513MB – 1024MB (1GB) 1K
1025MB – 2048MB (2GB) 2K
2049MB – 4096MB (4GB) 4K
4097MB – 8192MB (8GB) 8K
Compare the FAT cluster size to the NTFS cluster size on the 512 – 1023MB partition. You can see that NTFS saves a substantial amount of space.
One of the most popular features of the NTFS file system is its capability to compress single files or directories, without the need to compress the whole drive. In older DOS-based programs like DoubleSpace, Stacker, and DriveSpace, you had to format the whole drive. A device driver for the compression program would make one large file consisting of everything on the drive you had compressed. I once saw an 800MB file! Not to mention how much conventional memory the driver took up, giving you fits if you needed to load several device drivers. You did get a better compression ratio this way, but it was a hassle. The new NT compression is a welcome alternative to these compression programs. This individual basis of compression comes in handy when you need extra space or when certain files will not be accessed over a period of time. You probably will not even notice as the files are uncompressed when you open them, and then compressed again when you close them. The Properties window (see Figure 5-1) shows your file attribute options. Compressed files and directories also can be displayed in different colors. This is handy when you are viewing directories through Explorer, and can immediately tell if the file or folder is compressed or not.
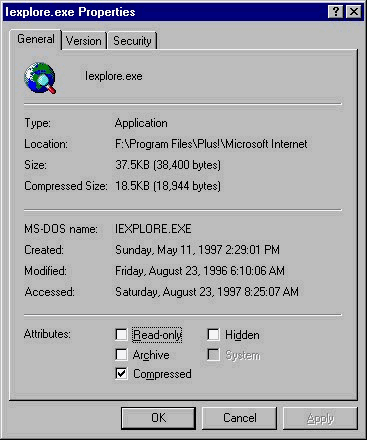
Figure 1: The Properties dialog box showing the Compressed attribute set and the compressed file size.
You have the option to compress the folder, and also to compress the subfolders of a folder. When you select the Compressed check box, if there are folders underneath this selected folder, a prompt appears, asking if you would like to compress the subfolders. To compress the entire contents of a drive, just right-click an NTFS drive and select the Compress button. If you enjoy working at the command line, you can also compress files and directories with the command line compression utility called COMPACT.EXE. The syntax is:
COMPACT name_of_file_or_directory /C
The /C switch is to compress, and the /U switch is to uncompress. As with any command line utility or command, there are many switches that can alter the performance of the command. Incidentally, the COMPACT command with no switches displays compression statistics on the files and folders.
One of the aspects of file compression dealt with thoroughly on the exam is the matter of what results from moving and copying files on NTFS compressed partitions. The following rules appear simple enough, but in a testing environment Microsoft can fool you with complex scenarios and extraneous information.
| On an NTFS partition, when you move a file or folder that is compressed to another area on the same partition, it retains its state. The file or folder does not inherit the compression attribute of the target folder into which it was moved. | |
| When a file or folder is copied to another area on the same partition, it inherits the compression attributes of the target folder. | |
| When you are moving or copying a file or folder to another NTFS partition, the file or folder always inherits the compression attribute of the target folder. This rule also applies when you move or copy to another NTFS formatted drive, either local or network. Similarly, when you move or copy a file or folder from a FAT partition to NTFS, it always inherits the compression attribute of the target folder. Remember that, since FAT does not support compression, any file or folder that is moved or copied to a FAT volume is uncompressed automatically. |
I don’t want to complicate these rules by belaboring them. The key to answering questions that involve these rules is to ignore all the extra information that is given to fool you. Disregard Judy’s directory name, or the read-only attribute that Mike set, or the no access permission that Garth has. Where is the file or folder going? Are you moving it or copying it? The bottom line is: The file or folder will either retain or inherit its compression attribute. Know when each rule applies.
Portable Operating System Interface (POSIX) is an open system standard for application portability among different computer platforms, most of them UNIX based. In order to be POSIX compliant, an application must fulfill certain requirements, such as having case-sensitive filenames. For example, with POSIX applications, filenames such as Microsoft, microsoft, and MICROSOFT are all treated as separate files. POSIX applications also use hard links, which can be compared to Windows NT shortcuts, in which many entries can point to the same file. There are a few characters that cannot be included in an NTFS filename under POSIX compliance: / \ < > ? " * | :
Another POSIX feature is additional time stamps, which show when the file was last accessed or modified. POSIX applications are run in what is known as an "environment subsystem." The subsystem is loaded automatically when a POSIX- compliant application is started. The POSIX subsystem interacts with the NT Executive Services, because applications are not allowed to access the hardware directly. The NT Executive Services intercept the request and make calls to the NT Win32 services for processing.
There is no clear winner between FAT and NTFS when it comes to performance. However, NTFS provides a file allocation feature that will allow it potentially to increase read/write times. When NT needs to write a file to the disk, it first searches for a contiguous area of free space in which to write the entire file. If there is no area of contiguous space large enough, then it has to fragment the file. This increases read/write times. A badly fragmented disk slows over time. The FAT file system, on the other hand, writes to the first cluster it can find—a recipe for disaster as far as fragmentation is concerned.
Usually I’m not too concerned with fragmentation on the NTFS file systems because of the file allocation feature mentioned previously. Drives that are fairly large should not have a problem for quite some time. When drives become full, fragmentation occurs. Recently I was working on a PC whose owner reported that it had been slow lately. Granted, it was a Pentium 75, but there were only a few megs of hard disk space left. When I viewed the fragmentation report from Norton Utilities Speed Disk, I saw there were over 9000 file fragments. It took over an hour to defrag the 540MB hard disk.
Another difference in performance between FAT and NTFS is in file and folder access. The two file systems have different ways of looking up information. As we noted earlier, FAT is comparable to the index in a book, in that it points to the physical areas on the disk where data is stored. When you use a book index, of course, you can go directly from the index to the page you wish to view. Unfortunately, the FAT system has to "walk the tree" to access the file. In book terms, the FAT index would be the equivalent of finding the right chapter, going there, and only then finding the right section. This might not sound like much of an issue, but if you have a folder nested deep within other folders, it could mean a drop in performance while the FAT index searches for the starting cluster for each directory.
Windows NT uses the Master File Table (MFT) which is similar to the File Allocation Table. Small files and folders can be contained entirely within the MFT so the computer does not have to search as much as it does with FAT. If we continue our book analogy, the MFT would contain some if not all of the information within the index, and any other information that could not be contained in the MFT would have a single pointer to the remaining content.
Conversion to NTFS is easy. Just make sure this is what you want to do, because the conversion is one-way. You cannot return to your original file system. There are three ways to convert your partitions to NTFS.
The first way is the easiest: Make the conversion when installing NT Workstation, at the screen shown in Figure 5-2. This is also a quick way to format a partition when reinstalling NT, or when installing over another operating system.
Figure 2: The simplest way to convert to NTFS is when installing Windows NT.
The second way to convert your FAT and HPFS file systems to NTFS is through the use of the command line utility CONVERT.EXE. Here are the appropriate options for the CONVERT.EXE command:
CONVERT e: /fs:ntfs
The e: in the example is the partition you wish to format. The /fs: is short for file system, and ntfs is the file system that you are going to convert the partition to, in this case NTFS.
The third way to make the conversion is to go through Disk Administrator. Select a partition that is FAT, choose Tools, and then Format. Change the file system to NTFS in the drop down box and then choose Start to convert the partition.
Exercise 5.2 Converting a FAT Volume to NTFS
Converting time is in proportion to the size of the drive you are converting.
(3)Compact Disk File System (CDFS)
The Compact Disk File System is, obviously, the file system for compact disks. It provides file and directory management just as FAT and NTFS do, but for the read-only compact disk medium. Since CD-ROM is read-only, the file system supports only reads, copies, and opens of files and directories.
High-Performance File System (HPFS)
HPFS support was removed with Windows NT 4. It was supported under Windows NT 3.51, and is available only if you are upgrading from NT 3.51. I once was working on a computer where FDISK reported an HPFS partition. I asked the owners if they used OS/2 and they said no. I was puzzled until I found out that DOS FDISK reports any partitions that it does not recognize, including NTFS, as HPFS.
We have learned so far that NT uses local file systems such as FAT, NTFS, and CDFS for managing data. When you are connecting to another computer on the network, you are using a remote file system, but the file system is local to that computer. When you are servicing a request from another computer, you are using your local file system to service their remote request. In order for this to work, the local computer (the one that is doing the requesting) must redirect requests to the remote computer. This is done through the redirector, which is also a file system driver in NT. In NetWare terminology, the redirector is known as the "requester." Do not be confused if you see a reference to the requester, just know that it is Novell’s equivalent to the redirector. You will read more about the redirector in the networking chapters later in the book.
Here is a quick Q & A scenario to help you review the suitability of FAT vs. NTFS in different circumstances:
Q: "I am installing NT and I have HPFS…"
A: Convert it before you upgrade. NT 4 does not like HPFS.
Q: "I do not require the capability to assign permissions or use compression…"
A: Use FAT. Dead giveaway.
Q: "My hard disk is 120MB…"
A: Use FAT. NTFS is not as efficient for a drive that size.
Q: "My hard disk is 1.2GB…"
A: Use NTFS. FAT is not very effective on a large drive.
Q: "I have a RISC processor…"
A: Then use FAT on your system partition. The remainder can be NTFS. FAT is required for the bootup files on the system partition.
Volume sets let you maximize the available space on up to 32 drives by combining leftover space on each drive into one large volume with one single drive letter. Volume sets are transparent to the user, which is a good thing. NT just continues on to the next volume member when more space is required. You can have 20 partitions, each with 5MB of data, for a total of 100MB of space. What else could you do with 5MB partitions if it weren’t for volume sets? What is important to remember about volume sets is that they are not fault tolerant. That is a bad thing. Imagine if the disk drive with one of your 5MB partitions were to crash. You would lose the entire volume set. If you lose one small area of the volume set, then you lose the whole volume set. Also note that other operating systems will not be able to view the data on the volume set, and volume sets do not increase performance. To summarize, here are the advantages and disadvantages of volume sets:
The advantages of volume sets:
| Free space on the drives can be combined into a single drive letter. This includes multiple spaces on one drive, as well as multiple spaces on multiple drives. | |
| Free space from different types of hard disks can be included (SCSI, IDE). |
The disadvantages of volume sets:
| If one member of the volume set fails, the entire set is inaccessible. | |
| The system and boot partitions cannot be included in the volume set. | |
| Non-NT operating systems will not be able to see the volume set. |
For the next exercise, you must have two small partitions that you would like to combine into one volume set. You may want to reserve some free space in order to complete the exercise after this one (on extending the volume set).
Exercise 5.3 Creating a Volume Set
The volume set is now complete. You can assign the volume set a different drive letter at this time if you wish. If you reserved some free space, we can begin to extend the volume set. One of the advantages of the volume set is that any amount of free space on any of your drives can be consolidated into the volume set for the most efficient use of space, and the set can easily be extended.
Exercise 5.4 Extending a Volume Set
The volume set is now extended. You can commit changes at this time.
A stripe set divides data into blocks (64k) and spreads them across an array of hard disks. Just like the volume set, the stripe set takes on one drive letter, and is transparent to the user.
The stripe set does not have to be created from partitions that are the same size. Nor do the physical disks in a stripe set have to be the same size, but there must be unpartitioned areas available on each disk that you want to include in the volume.
The stripe set uses the smallest partition size included in the set as the common partition sizing. For example, if three disks with 200MB of space on each were dedicated to the stripe set, those three disks would equal a 600MB stripe set. If you added a 150MB region, the stripe set would remain 600MB. Here is how it works:
You are creating a stripe set with four members: three at 200MB, and one at 150MB.
Because you can only create a stripe as wide as the smallest member, the stripe size in this case would be 150MB. Therefore the total size of the stripe set would be: 150MB + 150MB + 150MB + 150MB = 600MB.
Stripe sets improve read times because the data is being read off separate drives simultaneously. This makes them a good choice when you feel that the biggest bottleneck in your system may be the throughput from your hard disk. When you create a stripe set (RAID level 0), you are not fault tolerant. If one disk fails, you lose all the data in the stripe set. You can create a stripe set on a minimum of two hard disks, and a maximum of 32 drives.
Before we go any further, let’s review the advantages and disadvantages of disk striping.
The advantages of disk striping:
| Improved performance for read/write access on your hard disks. | |
| Requires only a minimum of two hard disks. | |
| Striping provides the best performance of all disk management options. |
The disadvantages of disk striping:
| If one disk fails, you lose the whole set. | |
| You cannot use the system and boot partitions in the stripe set. | |
| In order to expand a stripe set, you have to back up the data, delete the stripe set and create the new, larger stripe set from Disk Administrator, and then restore from tape. |
You need equal regions of free space on each disk to make the stripe. This may be difficult to muster if you already have been using your drives. For this reason, a stripe set is something that you should plan ahead, and not a feature to implement on a whim.
Exercise 5.5 Creating a Stripe Set
In this exercise we will be creating a stripe set. You must have free space on two separate drives in order to complete this exercise.
- Highlight one of the areas of free space you would like to combine into the stripe set.
- While holding down the Control key, click the other areas of free space you wish to add.
- Choose Create Stripe Set from the Partition menu.
- Enter the amount of space you would like to allocate to the stripe set, or just accept the default maximum amount. If you retained the default coloring scheme, your stripe members should now be green.
- From the Partition menu, select Commit Changes Now. This step is necessary in order to format the stripe set in the next step.
- You can now select Format from the Tools menu to format the stripe set with the file system of your choice. You can also change the drive letter assignment if you wish.
I have heard conflicting reports of performance gains by implementing the stripe set from various users. One colleague of mine performed an experiment in a lab in which he used two older PIO MODE 2 hard disks, and created a stripe set with them. (If you are unfamiliar with PIO MODE 2 drives, they are very slow.) When he benchmarked the stripe set against a modern hard disk, the stripe set barely beat the new drive. I also have heard people say that striping produced results that hardly were noticeable. Perform your own tests to see which you prefer. Next time I format my hard disks I am going to implement a stripe set.
With Windows NT Server you have the choice of creating a stripe set with or without parity. The biggest difference between the two is fault tolerance. A stripe set with parity is able to endure a crash of a single disk within the stripe. The failed drive can be replaced and then recreated by the information that is already contained in the stripe. However, NT Workstation only allows disk striping without parity. Another feature that NT Workstation does not support is the disk mirroring feature. You will encounter this in NT Server also.
There are a few tips regarding the use of volume and stripe sets that should be addressed for the exam. Just like the rules for moving and copying compressed files, the volume and stripe set rules are fairly simple, but Microsoft will go out of its way to confuse you with too many details. If you keep the simple rules in your head, you should do fine. Here is a quick reference for possible scenario questions, and the appropriate answers:
Q: "I want greater disk performance…"
A: Do not use a volume set. Use a stripe set.
Q: "I want to increase my capacity later…"
A: Do not use a stripe set. Use a volume set. It can be extended, whereas a stripe set cannot.
Q: "I want to use free space from several areas…"
A: Do not use a stripe set. Use a volume set. It can combine multiple areas of free space, including space within partitions on the same drives.
Q: "I have the same amount of space on two separate disks…"
A: Use a stripe set.
Q: "I want to include the system and boot partitions…"
A: You cannot include the system or boot partitions in stripe or volume sets.
Disk Administrator is the graphical tool for managing disk drives. With Disk Administrator you can create partitions, volume sets, and stripe sets, format drives with both FAT and NTFS file systems, and even assign drive letters manually. It’s a much better alternative to DOS’s FDISK. Disk Administrator uses a graphical representation of the drives (see Figure 5-3) and color coding to make it easy to see volume and stripe sets, as well as the separate partitions for each physical and logical disk in the system. The Disk Configuration view is what you see most often, but the other option is the Volumes view. The Volumes view gives you important information such as percent and amount of free space on each drive, and total capacity. Disk Administrator’s ability to create and access a partition without having to reboot the machine is a great improvement over FDISK. Incidentally, you should be an administrator to use Disk Administrator. An inexperienced end user could get into trouble with this utility!
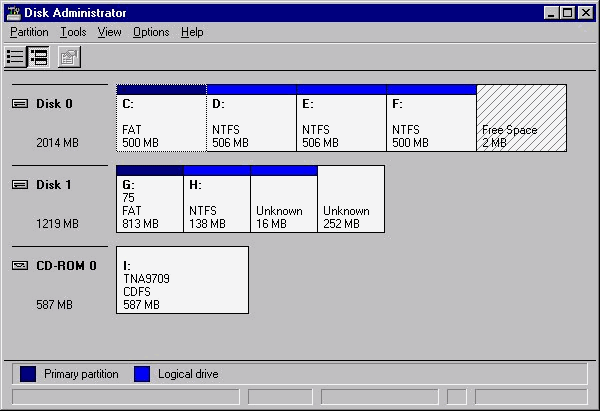
Figure 3: The Disk Administrator window shows partitions for each physical and logical disk in a system.
When you start Disk Administrator for the first time, or if you have changed your configuration, you are prompted to write a signature to the disk. This is a non-destructive signature for NT to determine whether a change has occurred since the last time Disk Administrator was started.
You will spend most of your time in Disk Administrator creating and formatting partitions. If you are not familiar with primary and extended partitions, and logical drives, let’s go over them now.
When you start Disk Administrator, you probably will see a few partitions already. If you notice in Figure 5-4, there are two primary partitions, indicated by a dark color. Usually, a primary partition is used by the operating system. There can be a maximum of four primary partitions, but if you create an extended partition (which we will discuss next), you can use only three primary partitions. This may seem like a limitation, and in some instances it is, but the use of extended partitions overcomes it. An active partition is important because that is the partition the operating system uses to boot up on. It also allows you to boot to different operating systems. Most likely it is the first primary partition on the drive (C). In RISC-based computers, this primary partition must be FAT. You can partition your entire disk as a primary, but if you would like more partitions later, you will have to destroy all the data on the drive in order to do it. I recommend that you always create an extended partition.
Extended partitions were a bit confusing for me at first. I remember needing to call a friend and have him walk me through FDISK whenever I created one. Extended partitions contain logical drives. An extended partition is not a partition that you can format like a primary partition, nor does the extended partition get a drive letter assigned. It just holds the logical drives.
Logical drives are contained within the extended partition. If you have lots of partitions, you probably are using an extended partition with many logical drives. In Disk Administrator, the logical drives are indicated by a lighter color than the primary partitions.
When you want to create a partition in Disk Administrator, you create it from free space on a drive. When you install a second hard disk in your computer, for example, you need to create a partition before the space can be used. (With stripe and volume sets, as we discussed earlier, you do not need to do this—they require that free space, not partitions, be added to the sets.) In the Figure 5-4, there are nearly 4GB of free space in which you can make a partition, or several partitions.
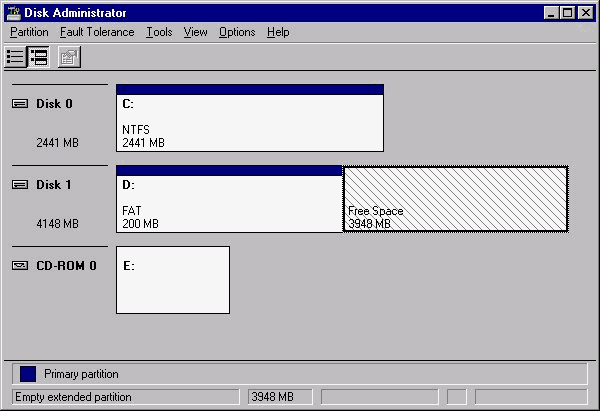
Figure 4: Disk Administrator shows how much free space is available for creating partitions.
When you partition this free space, you might create two logical drives that encompass the entire 4GB extended partition. Or you might just create another primary that spans the whole 4GB. In the next exercise we will create a partition in Disk Administrator. In order to create a partition, you must have free space on your hard disk that is not currently allocated.
Exercise 5.6 Creating a Partition
These changes do not take effect until the changes are committed, which gives you one last chance to back out if you are unsure. To commit the changes, you either can right-click the partition and select Commit Changes Now, or select the Partition menu and choose Commit Changes Now.
Let’s now go through the steps of deleting a partition. You can use the partition you just created in the next exercise.
Exercise 5.7 Deleting a Partition
It’s that simple. The partition now contains free space. Remember that you cannot format system and boot partitions.
While I was working through the preceding exercises, a couple of things occurred with regard to drive letter assignments that you should be aware of. Let me begin by sharing what happened on my machine during the exercise, as illustrated in Figure 5-5. I have one drive in my computer that is divided into two partitions with the drive designators C and D. I added a another drive—the 4GB drive for which I was creating the partition. When I finished creating the partition, I expected to see it take the drive designator E. I was surprised when it took drive letter N.
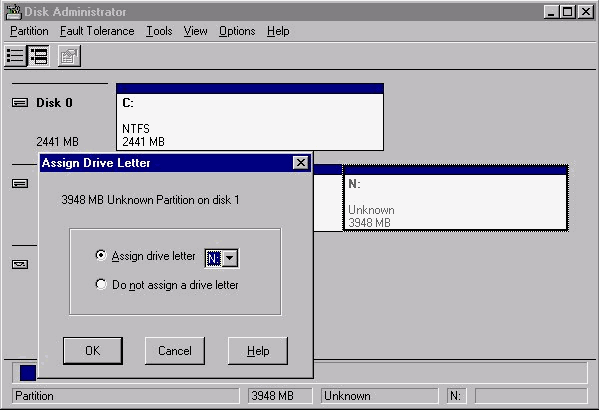
Figure 5: When a partition is created, a dialog box offers options for assigning a drive letter to that partition.
I realized I had about 15 network drives mapped, so I took the next available drive, which in this case was N. Needless to say, I disconnected the network drive mappings, and assigned a new drive letter. It’s important to know how to assign drive letters manually.
Exercise 5.8 Assigning a Drive Letter
Notice that you also can choose not to assign a drive letter to the partition. This option comes in handy when you need to partition the drive, but are not sure which drive letter you would like the partition to take. It also allows you to hide the drive from any network users. Unfortunately, you can’t use the drive yourself until you un-hide it by giving it a drive letter.
After my run-through of the exercise, when I restarted Disk Administrator, my CD-ROM was taking drive letter E, which is the drive designator I had wanted for the new hard disk partition. I had to select the CD-ROM (E:), and choose Do Not Assign A Drive Letter in order to free up drive letter E. After I had assigned E to the new partition, I went back to the CD-ROM and assigned it letter F. Applications that expect to see the CD-ROM at its original drive letter of E will not be able to find it, and will return an error message.
I experienced another example of what can go wrong, if you are careless, during adjustments to partitions in Disk Administrator: Once when I created a partition, a dialog box prompted me to change the reference to the drive in my BOOT.INI file. I disregarded it. When I restarted the computer the next day, I selected "Windows NT Workstation 4.0" from the menu. I noticed later that CHKDSK was busy fixing numerous problems. Had I lost my drive? When the computer finished booting, it was at the NT Server login screen. I rebooted, thinking I had selected the wrong menu item the first time, but the same thing happened again. Finally, I remembered the dialog box about the BOOT.INI modification. The references to the partitions had changed and they were pointing to the wrong partitions. While the problem was easy to fix, it was a scary situation. Take care and become familiar with the assignment procedures.
After you have created your partition, you must format it. You can format the new partition with the FAT file system or the NTFS file system. See the preceding sections if you still have questions regarding which file system to use. Once again, be careful which partitions you are selecting to format, because all data on the partition will be erased, even if you choose to cancel while the formatting is taking place. Remember that drives formatted with NTFS will not be visible to other operating systems.
Format partitions by right-clicking them from Explorer or the My Computer icon. This brings up the dialog box in Figure 5-6. You have the choice of the normal format, or the quick format. The quick format bypasses the physical check on the disk’s surface for errors. I do not recommend using the quick format the first time you format the drive.
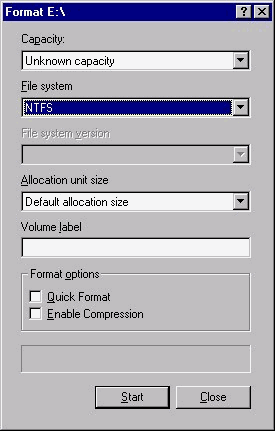
Figure 6: At the formatting partition dialog box, you can select the Quick Format option.
The next exercise covers formatting the partition that we created in the earlier exercises. If you deleted the partition in the last step, now is a good time to practice creating partitions and create it again. In order to start formatting, we need to verify that you performed the steps correctly. You should see the partition with a drive letter now, and it should say Unformatted. Right-click the partition. The option to format should not be grayed out. If it is, you didn’t commit the changes when you created the partition, so select Commit Changes Now.
Exercise 5.9 Formatting a Volume
Just so you know, I have Novell NetWare on one of my partitions, which Disk Administrator reports as unknown. I can’t really do anything with it other than delete it from Disk Administrator, which is what I am tempted to do. (I hope that does not offend any NetWare lovers out there.)
Recovering Disk Configuration Information
Even if you are extra careful while configuring partitions in Disk Administrator, you can easily make a quick decision that you will regret. Fortunately, Disk Administrator can save and restore disk configurations. When you are satisfied with a certain configuration, you can save it to floppy disk where it can be used in the event of an emergency. An emergency that would require you to restore the disk configuration would be a hard disk drive failure, where you would need to reinstall NT. After NT has been installed on the new drive, you can restore your disk configuration to the state it was in before the disk failure. This can save time while you get your computer back into its original state. Please note that this does not save data that was on the disk before the failure. Back up your data. Failure to do so is unprofessional and potentially costly.
To save the configuration information, select the Partition menu, choose Configuration, and select Save. This prompts you to insert a floppy disk on which to save the configuration. Remember that any changes you make should be updated using RDISK.EXE. You should have a recovery disk for every computer, and you cannot use the same recovery disk for every computer in your company.
To restore the information from a saved configuration, select the Partition menu, then choose Configuration, and select Restore.
Later chapters cover recovery techniques that use the emergency repair disk you just created. Microsoft always has extensive troubleshooting questions and scenarios in its exams.
There are a number of third-party disk utilities that augment the performance of Windows NT Workstation. A thorough analysis of the available products is beyond the scope of this book. One important fact relating to the use of third-party products is that they must be compatible with NT, and more specifically, the NTFS file system. The rule is not to use third-party products that are unaware of long filenames. For example, a 16-bit program, such as an older version of Norton Utilities, will destroy them. Security attributes that you assigned to the file or folder will be lost as well. Use only 32-bit utilities that are designed to run on Windows NT. I know NT looks like Windows 95, and some products are compatible with both operating systems, but generally the file system utilities, such as DEFRAG, will not work with NTFS.
NT did not ship with a disk defragmenting utility. Fortunately, there are a few great third-party products for NT that provide a graphical way to defragment your hard disks. The most notable are Norton Utilities Speed Disk, and DiskKeeper by Executive Software. Both products support FAT and NTFS file systems, scheduling, and consolidation of free space. It would be wise to invest in one of the following disk defragmenting tools before your file system gets out of control. It is easier to control fragmentation before it begins. We all can attest to the fact that a system slows down over time. This is due mostly to fragmentation.
Norton Utilities have been around for a long time and have a loyal following. It was no surprise that Norton Utilities for NT included the highest-quality tools for optimizing and monitoring NT, including Speed Disk, the graphical disk defragmenting utility. Although NT tries its best to keep an NTFS volume from becoming fragmented, over time the fragmentation will increase. Speed Disk analyzes your drive and returns a percentage of fragmentation. It then recommends the necessary actions to eliminate fragmentation. Since the defragmentation process takes several minutes to complete, or even longer if you are performing the thorough option, it is nice to be able to schedule Speed Disk to execute at times you specify. I prefer Speed Disk to do a standard defragmentation a few times a week, and a thorough defragmentation every couple of weeks, depending on the environment and usage of the computer.
Executive Software's DiskKeeper
DiskKeeper from Executive Software is another of the leading disk defragmentation utilities. DiskKeeper has most of the features Speed Disk has, and can accomplish the same tasks as well. One of the features I like about DiskKeeper is the quick and easy way I can view the fragmention report on my drives with the Analyze button. This enables me to view file fragments on a percentage basis, and DiskKeeper suggests appropriate actions to take to correct problems. The detailed fragmentation report has everything you need to know about the status of fragments in your file system, including pagefile fragments, number of fragmented files, percent of disk fragmented, and even a list of the most fragmented files. The fact that DiskKeeper can run in the background using idle resources enables you to work on the system while the defragmentation is taking place. This is a welcome feature for those of us who don’t have the time to just stare at the screen for 20 minutes. Another feature that is helpful is the capability to exclude files and directories from the exclusion lists. Unfortunately, DiskKeeper does not tell you what it is doing at each phase of the defragmentation process. Still, I recommend you download the DiskKeeper Lite demo and try it for yourself.
Windows NT supports two files systems: FAT and NTFS. The FAT file system is provided to maintain compatibility with older operating systems, such as MS-DOS, Windows 3.x, and Windows 95. FAT partitions use the 8.3 naming scheme, and does not support long filenames, whereas NT provides long filename support with a new version of FAT called the VFAT. These long filenames are truncated when copied to a FAT partition.
While the FAT file system can be used in some situations, the NTFS file system is the system of choice for Windows NT. Some of the new features provided with NT cannot be implemented without use of the NTFS file system. This new file system, introduced with NT, supports larger hard disks, compression, extended security attributes, file-level security, fault tolerance, and long filenames.
With Windows NT you have several disk management options for increasing performance and usability. You can create stripe sets, which spread data across several hard disks so that the data can be read from multiple drives at once for greater disk throughput. You also can create volume sets that consolidate free space from any partition or disk and create one large logical drive. None of these options is fault tolerant.
Disk management is performed through the use of the Windows NT Disk Administrator. This graphical utility allows you to create and manage partitions, stripe sets, and volume sets. You also can format partitions with FAT or NTFS—even convert a FAT partition to NTFS. Disk Administrator is useful for viewing disk configuration information, such as disk capacity, free space, percent of disk free, and format.
| File Allocation Table (FAT) is the file system used in older operating systems such as DOS, Windows 3.x, and Windows 95. | |
| FAT naming conventions use the 8.3 syntax—eight letters for the filename, and three letters for the extension. | |
| The VFAT system enables you to use long filenames, and is completely compatible with FAT. | |
| NTFS creates FAT-compatible 8.3 names by using the first six letters of the long filename followed by a tilde and a number. | |
| NTFS supports long filenames, compression, security attributes. | |
| NTFS partitions cannot be accessed from non-NT operating systems. | |
| You can create primary or extended partitions. Primary partitions can be active. Extended partitions contain logical drives. | |
| The lazy-write feature is a transaction log that keeps track of whether writes to the disk have been completed or not. | |
| FAT is best for volumes of less than 400MB, and NTFS for anything over 400MB. | |
| On an NTFS partition, when you move a file or folder that is compressed to another area on the same partition, it retains its state. | |
| When a file or folder is copied to another area on the same partition, it inherits the permissions of the target folder. | |
| When you are moving or copying a file or folder to another NTFS partition, it always inherits the compression attribute of the target folder. | |
| POSIX is an open system standard for application portability among different computer platforms. | |
| You can convert a drive from FAT to NTFS during installation of NT, or with the CONVERT.EXE program, or through Disk Administrator. | |
| An HPFS partition must be converted prior to NT installation. | |
| Volume sets let you combine free space on several partitions into one large volume with one single drive letter. | |
| Stripe sets spread data across an array of disks to improve read/write performance. | |
| Stripe sets and volume sets are not fault tolerant, and cannot encompass system and boot partitions. | |
| Disk Administrator is the graphical tool for creating partitions, volume sets, and stripe sets, and formatting drives. | |
| An emergency repair disk can be made through Disk Administrator, or the RDISK utility that allows you to recover disk configuration information in the event of an emergency. |
2. What will be the FAT alias for this long filename:
Notes from March meeting concerning X.400.txt
3. What will be the FAT alias for this long directory name:
Current.proposal.34
4. What will be the outcome if I move a file called FINANCE.TXT, which is not compressed, to a compressed folder on a different partition on my only hard disk?
5. What will be the outcome if I move the file C:\job duties\Friday.txt, which is compressed, to the C:\monthly duties\ directory, on the same computer, which is not compressed?
6. I have a Pentium 133 with 64MB of RAM and a 2GB hard disk that is partitioned into several 200MB partitions. I need to choose a file system that supports long filenames and has the capability to track file updates by viewing their timestamps. Which file system should I use?
7. I am using a 486/33 with 16MB of RAM and a 540MB hard disk. The hard disk is divided into two equal partitions. I need to restrict access to a certain directory on the computer from other users who may log on. Which file system should I use?
8. I am upgrading an NT 3.51 computer that has the HPFS file system installed. What is the best way to convert the file system to FAT?
9. What is the only way to convert a partition from NTFS to FAT?
10. Fill in the blank.
NT uses the _______________ feature that uses a transaction log to keep track of whether
writes to the disk have been completed or not.
11. What is the most effective usage of space?
12. (True/False) If you lose one of the members of a volume set, you only lose the data that was contained on that drive.
13. What is the total size of a stripe set created from the following free regions of space: 200MB, 450MB, 150MB, 235MB, and 180MB?
14. I want the fastest performance from my configuration, but I do not require fault tolerance. What should I use?
15. (True/False) When you try to format a section of free space, you are prompted to create a partition before you format.
16. (True/False). A drive can have as many as four extended partitions.
17. Fill in the blank.
The utility used to compress files and directories from the command line is _________.
18. What menu option would you choose in Disk Administrator to format a volume?
19. What would be the result if I issued this command to convert my FAT J: drive to
NTFS?
J:\>CONVERT J: /fs:ntfs
- (True/False) MFT stands for Master Format Table.
17. COMPACT.EXE
- D. Tools. You can also assign a drive letter and view the properties of the volume you have selected.
19. C. It would ask if I would like to schedule conversion next time the system restarts. The system cannot gain exclusive access to the drive because I issued the command from the drive is was wanting to convert.
20. False. MFT stands for Master File Table.