![]()
Chapter 4
*Managing Users and Groups
*Guest *
Local Groups *
Default Local Groups *
Special Access Types *
Global Groups *
Naming Conventions *
Group-Based Security *
Creating User Accounts *
Exercise 4-1 Creating a New User Account *
Group Memberships *
Exercise 4-2 Assigning User Accounts to Groups *
Adding and Removing Users from Groups *
User Environment Profile *
Granting Dial-in Permission *
Editing User Accounts *
Copying an Existing User Account *
Exercise 4-3 Copying a User Account *
Deleting an Existing User Account *
Exercise 4-4 Disabling a User Account *
Exercise 4-5 Enabling a Disabled User Account *
Exercise 4-6 Deleting a User Account *
Renaming User Accounts *
Exercise 4-7 Renaming a User Account *
Changing Account Properties *
Exercise 4-8 Changing a User’s Environment *
Creating Local Groups *
Exercise 4-9 Creating a New Local Group *
Exercise 4-10 Change Default Account Policy *
Exercise 4-11 Grant a User Right to a Group *
Exercise 4-12 Remove a User Right from a Group *
Advanced User Rights *
Exercise 4-13 View Advanced User Rights *
Audit Policy *
Exercise 4-14 Enabling Auditing *
Security Log *
Exercise 4-15 Viewing and Clearing the Security Log *
Certification Summary
*Two-Minute Drill
*Self Test
*
Chapter 4
![]()
| Default User Accounts | |
| Default Group Accounts | |
| User Manager | |
| Account Policies | |
| User Rights |
Windows NT was designed from the start to be used in a business network environment. In such an environment, more that one person may use the same computer. Therefore, a method of logging onto network services needs to be provided, by which users are given an "account" to access the network. Windows NT provides this capability by implementing user accounts and passwords. As an administrator, one of your primary duties will be to manage these user accounts.
A Windows NT-based computer requires all users to have a user account. A user account is required in order to gain local or network access. User accounts are defined by the combination of a unique username and password. In order to gain access, the user must enter the username and then the password after pressing Ctrl-Alt-Del.
In addition to a username and password, Windows NT user accounts typically include other account information, and are subject to system-wide account policies.
Each user account can have personal settings according to the security level or personal preferences of the user. Users can be assigned security permissions to give them access that is appropriate to them. Also, individual users can determine their desktop settings according to their own preferences.
Assigning privileges to each individual user account can be too time-consuming, especially in an environment where there are many user accounts. For this reason, user accounts can be assigned to groups. Groups have network privileges assigned to them as a unit, rather than assigning privileges individually. Since some users have higher levels of privileges on the computer, Windows NT provides a set of default user groups with pre-defined security settings.
Default User Accounts
When Windows NT is installed, two default accounts are created: Administrator and Guest. These two accounts are very useful to you if used correctly. Initially, the account you will use the most is, of course, the Administrator account. The Administrator account allows you to set up the workstation. The Guest account, if used correctly, only allows temporary users to gain access to the workstation.
The Administrator account is the account used to manage the workstation. This account has very powerful privileges that give it access to the entire computer. The administrator can: manage security policies; create, modify, or delete user accounts and groups; modify operating system software; create and connect to shared directories; install and connect to printers; format or partition a hard disk; backup and restore files; debug the system; take ownership of files and other objects; and install or update device drivers.
The Administrator account should be used only for administrative tasks. This follows the principle of making sure that users use the lowest level of privileges necessary to do their job. The person with access to the Administrator account should have a secondary account for everyday use. The Administrator account cannot be deleted, but it can be renamed. The Administrator account created when installing Windows NT Workstation is used only to administer the local machine. You cannot use the Administrator account on a workstation to access or administer a domain.
Password-guessing programs written by hackers attempt to gain access to this account, since it is the only account that cannot be locked out due to failed logon attempts. For this reason, you should rename this account after you install Windows NT.
Passwords: You can’t be too careful
To gain access to an NT machine, you must have a user ID and password. There are no tricks or "back doors" that you can use to gain access to an NT machine. Pay attention! NT is not like some other operating systems (Win95, for example) that let you in without a valid account.
What’s more, passwords in NT are case sensitive. This can take some getting used to.
In the classroom, we stress this to the students and we ask them to use a standard password so that they do not get themselves into trouble by "locking" themselves out of the computer. Of course, telling a techie type not to do something because it can cause real trouble is interpreted by some to mean, "Let’s find out just how much trouble it can be."
This password issue comes up early because, during installation, you must supply a password for the account administrator. If you get it wrong at that point, after the installation you will have no way to gain access to the computer to fix the problem. In the classroom, we often tell the students to use a blank password as the initial password for the administrator’s account. (Of course, using a blank password is not recommended in real-world circumstances.) You probably know where this story is going. We can always count on a couple of students exploring for themselves how much trouble it can be if they use complex passwords. Sure enough, they forget the password and lock themselves out. The only fix is to re-install NT, which we generally have the students do on the Saturday morning make-up session—the one where the instructor sleeps late.
The Guest account is used for limited access for remote users or users from other domains. This account is best used for temporary users to whom you do not wish to give a regular user account. Changes made to the desktop settings by a user logged on as Guest are not saved when that users logs off. When Windows NT is installed, this account is disabled by default. The Guest account is a member of the Guests built-in local group.
The Guest account is set up with a blank password. If you decide to enable it, be sure to change the password.
Six local groups come built in to Windows NT, and are common to all NT Workstation machines and to NT Server machines not installed as domain controllers. On an NT Domain Controller, there are three additional built-in groups.
Local groups affect resources only on the workstation. They can have user accounts as members, or, if the computer is a part of a domain, they may also contain global groups. Local groups can be assigned rights and permissions only for resources on the computer containing the directory database in which they are defined. Local groups can be created on any Windows NT computer. Figure 4-1 shows a local group with one user account as a member.
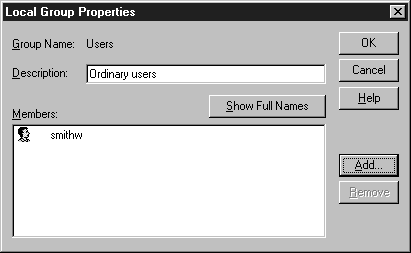
Figure 1: Local groups can be created on any Windows NT computer.
Windows NT Workstation comes with several built-in local groups for convenience in adding new users to the workstation. Each group has a default set of rights and capabilities, which makes it easy to categorize user accounts. The administrator may modify these rights and capabilities, or create custom groups after NT has been installed.
These groups are:
| Administrators | |
| Power Users | |
| Users | |
| Guests | |
| Backup Operators | |
| Replicator |
Administrators hold full rights and privileges over all files and other resources on
the workstation. The default Administrator account created when you install NT is a
member of this group. Also, if the workstation is part of a domain, then any domain administrator is part of this group. The Domain Admins global group is a part of this group in a domain environment, but it can be removed.
Operations that can be performed by members of the Administrators group include:
| Partition or format a hard disk | |
| Display, initialize, and control the security data | |
| Perform volume backups and restores | |
| Access system memory locations for debugging | |
| Take ownership of files | |
| Unlock a locked workstation | |
| Assign user rights |
Power Users are given the ability to share directories or printers. In addition, they can add Program Manager groups, change the system clock, and create or delete users and groups.
The Power Users group is useful if users are managing their own workstations in a Workgroup environment. This level of access allows them to manage their own workstations, while preventing them from accidentally changing system-critical information.
This is the general classification given to most users on the workstation who are not administrators. Members of the Users group can run applications, print documents on local or shared printers, and manage their own user profiles.
All newly created accounts are automatically added to the Users group. In a domain environment, the Domain Users global group is a member of the Users local group, but it can be removed.
The Guests group provides low-level access to the workstation. The Guest account is a member of this group. In a network environment, any user may log on to the workstation as a member of the Guests group. Remember that by default, the Guest account is disabled¾ access to system resources through the Guests group must be assigned specifically by the administrator. In a domain environment, the Domain Guests global group is a member of the Guests local group, but it can be removed.
Backup Operators can use the Backup and Restore commands to backup and restore all the files on NT Workstation. Any user can backup and restore files to which he has rights, but members of Backup Operators are given full rights to any file on the workstation, as long as they are using the Backup and Restore commands. This also means that they can bypass read and write protection of files.
Replicator is a special group used by the Replicator service. The Replicator service can automatically update files from servers to workstations in a network.
There is a second set of five groups used by the Windows NT system, which are automatically assigned based on how the user is accessing the system. The administrator cannot assign anyone to these groups, and they do not show up in the User Manager.
The five special groups are:
| Interactive Users that are directly logged onto a workstation. | |
| Network Users that are connected to the computer from another computer in the network. | |
| Everyone All users, including Interactive and Network. | |
| Creator Owner A user who created or became the owner of a file, folder, or print job. | |
| System Used internally by the operating system. |
If you are logged into your workstation, you are in the Interactive group. If you are connected to another workstation, you are a member of the Network group on that computer. Anyone connected to, or logged onto, any workstation is a member of the Everyone group. If you create or take ownership of a resource, you are a member of the Creator Owner group for that resource.
Global Groups are created on domain controllers and are used to assign local permissions to domain users. To do this, Global Groups can become members of Local Groups on other Windows NT computers in the domain. In this way, domain users can be given access to local computers in a domain without assigning each domain user separately.
An important part of an administrator's job is to come up with a naming convention for naming users, groups, and resources, such as printers. The naming convention should be consistent, and easy to learn and understand. If the naming convention is hard to understand, the users won't use it!
A good naming convention for user accounts is to use the last name of the individual, followed by the first initial of the first name. For instance, the username for Joe Schmoe would be schmoej. If another person has the same first initial—Jane Schmoe—we use her middle initial or the second letter of the first name—in this case schmoeja. This naming convention is commonly used on the Internet for email account names.
Keep naming conventions simple, and make them easy to understand. For instance, if we were mapping to a printer with the network name HP4SI-422, we could quickly determine that this is a Hewlett Packard Laserjet 4SI located in room 422. If you make the convention simple enough that anyone can figure out what the name of a new user, group, or resource should be without having to ask, it should work quite well.
By placing users into groups, the system administrator can escape the tedious job of assigning permissions to individual users. Groups can be assigned rights as a unit, rather than assigning rights to each individual account. You may create your own groups or use the built-in groups that come with Windows. It is not recommended that you modify the default rights of the built-in groups, although you could do so.
To manage users effectively, don't bother trying to assign each one permissions individually. Instead, use the built-in groups to put your users in the appropriate categories. If the built-in groups don't work, you can create your own groups with their own individual permissions. If you decide to do this, it's best to group by department. For instance, sales personnel would be part of the Sales local group, while technicians would be part of the Techies local group. Above all, keep it simple enough that someone else can figure out your system by just looking at it.
In a domain environment, global groups are used to assign local permissions to domain user accounts. User accounts from the domain master account database are added to a global group that is also defined on that database. The local administrator of the workstation can then add the global group to a local group that has access to resources on that workstation. The important rule to remember here is that permissions are assigned to local groups; global groups go into local groups; and domain users go into global groups.
User Manager, shown in Figure 4-2, is the administrative tool used for the management of all users and groups on the workstation. This is also the tool used to manage user profiles.
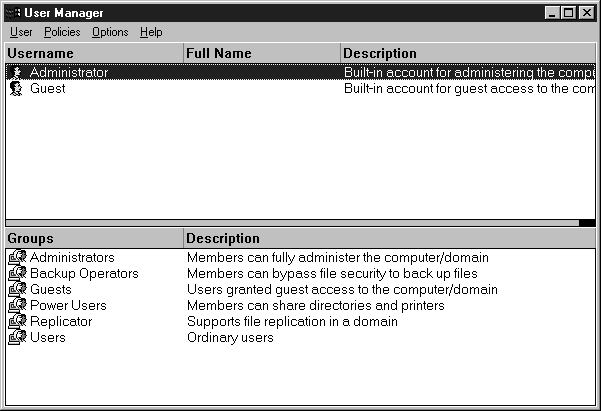
Figure 2: User Manager is the administrative tool used for the management of all users and groups on the workstation.
Creating user accounts in Windows NT Workstation is easy. You can use User Manager to create user accounts in one of two ways: creating new accounts, or copying existing accounts.
When you create a user account, you can enter information specific to that account, assign the account to multiple groups, and set the profile information for that user. See Figure 4-3 for an illustration of the New User window. See Table 4-1 and Table 4-2 for an explanation of the fields and check boxes in this window. Remember that each user account name must be unique.
Each user account or group account created is assigned a security ID (SID) by Windows NT. Each SID is unique to that account. The SID allows certain permissions to be given to each user, since the SID is part of an access token that is given to the account whenever the user logs on. This access token is compared to the access control list of an object to determine if the user can access that object. If the user account or group is deleted, its SID is lost, as are its permissions.
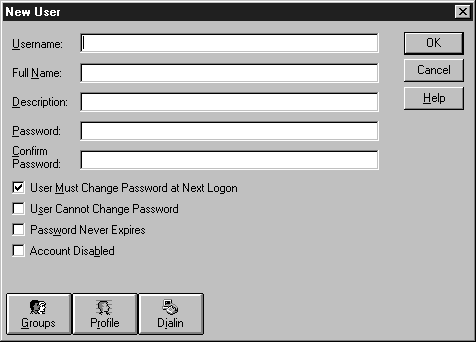
Figure 3: Creating user accounts at the New User window.
| Box Name | Description |
| Username | A unique name of up to 20 characters. Not case sensitive. A username cannot include any of the following characters: " \ / [ ] | = ; : , + * ? < > |
| Full Name | The real name of the user. |
| Description | A brief description of the account or the user. |
| Password | Passwords are case sensitive and cannot be longer than 14 characters. In this window passwords always appear as asterisks (*). |
| Confirm Password | Re-enter the password in this field to confirm it. |
Table 1: New User Field Descriptions
| Box | Description |
| User Must Change Password At Next Logon | This forces the user to change their password the next time they try to log on. This option is disabled once the user changes his password. |
| User Cannot Change Password | Keeps the user from changing the password. Useful for accounts shared by several people. |
| Password Never Expires | Keeps the password from ever needing to be changed. If this box is checked, any password expirations are ignored. |
| Account Disabled | Disables the account so that nobody can log on with it. |
Table 2: New User Check Boxes
Exercise 4-1 Creating a New User Account
There! You have created a new user account called jeffersont.
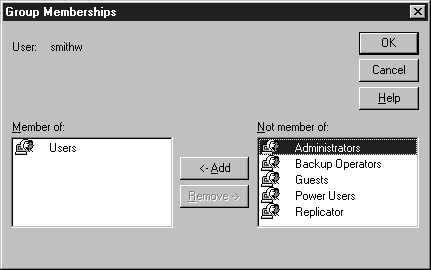
Figure 4: Assigning Group memberships.
You can add a new user account to any group. Once a user is assigned to a group, that user is given the rights and permissions inherent to membership in that group. Refer to Figure 4-4 as you do the exercise for assigning user accounts to groups.
Exercise 4-2 Assigning User Accounts to Groups
Adding and Removing Users from Groups
Users can be added to groups in two ways. One way involves selecting the specific user, and adding the user to groups by selecting the Groups button in the New User dialog box, and then adding groups to the Member Of field.
With the other method, you select an individual group and add users to it, using the Add Users and Groups dialog box.
The User Environment Profile (the window shown in Figure 4-5) allows you to control the system environment according to which user is logged on. As an administrator, you can control the location of the user profile, run a logon script individual to that user, or specify the location of a home directory for the user.
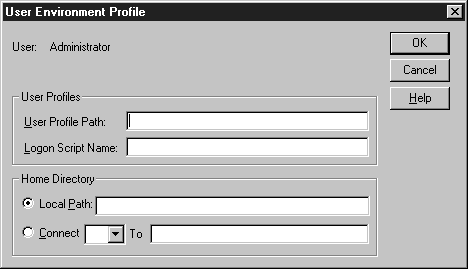
Figure 5: The User Environment Profile window allows the administrator to control the system environment.
The user profile is the set of stored characteristics that set the default desktop configuration for each individual user account. The system looks for the user's profile in the path specified in the User Profile Path box. User profiles can be stored on the local computer or they can be located on a server. There are five basic types of user profiles:
| System Default Sets the configuration of the display when no users are logged on. This information is kept in the file DEFAULT at the path \WINNT\SYSTEM32\CONFIG. | |
| User Default Sets the default configuration for newly created users logging in for the first time. This information is kept in the file USERDEF at the location \WINNT\SYSTEM32\CONFIG. | |
| Local User Stores the desktop configuration for a user when logged on to a particular computer. Each logged-on user has his own local profile on the computer (except for Guests). This information is kept in a file named after the user. | |
| Roaming Used in a domain environment, roaming user profiles are created by a domain administrator and stored on a server. This profile can be assigned to one or more users and applies to them at whatever Windows NT-based computer they log on, if they log on using a domain account as opposed to a local account. | |
| Mandatory Also used in a domain environment, mandatory user profiles are identical to Roaming user profiles except that they cannot be changed by the user. Any changes made to a mandatory user profile by a user are lost when that user logs off. Instead of having the extension .DAT like other profiles, mandatory profiles use the extension .MAN. |
Logon scripts are files that run every time the user logs on to the network. They allow you to assign a set of network connections to a user account each time that user logs on. Logon scripts are useful for logging on from a non-Windows NT operating system (such as DOS), that uses logon scripts to define network connections. Most of the time, logon scripts are not used on individual workstations not connected to a network.
A logon script is usually implemented as a DOS batch file with the extension .BAT. However, executable files with the extension .EXE or .CMD can be used as well.
When a logon script is run, the authenticating computer looks for the script in the NETLOGON directory of the authenticating computer. Usually this directory is found in the \WINNT\SYSTEM32\REPL\IMPORT\SCRIPTS directory. Windows NT domain controllers use directory replication to copy logon scripts from one domain controller to another.
Home directories provide a way for users to store their individual data in a special directory. The home directory can be a directory on the local computer in a workgroup environment, or it can be located on a server computer in a domain environment. You should make sure that a user's home directory has permissions set so that only the appropriate user has access to the files in that directory. Windows NT makes the home directory the default save location for programs that do not specify one in their Save dialog box. When an MS-DOS command prompt is launched, NT defaults to the home directory.
When you create a home directory for a user, use the variable %USERNAME% in the directory path. By doing this, Windows NT substitutes the user's name for the %USERNAME% variable, so you only have to enter the variable once, rather than type the name for each user.
Granting dial-in permission to a user account allows that user to access the workstation using the Remote Access Service (RAS). If you do not grant dial-in permission to the user, he won't be able to connect to the computer using RAS, even if he already has an account on the computer.
One way to implement security for remote connections is to implement the Call Back feature. When Call Back is enabled, if a user attempts to log on remotely, the computer hangs up and calls the appropriate number before that user is logged on.
The number called depends on which option has been selected in Call Back. In Set By Caller, the user calling in to the computer enters a number to be called back when he first connects. The computer calls the user at that number. This can be useful in situations where a long-distance phone call is being made, and you don't want the call to be billed to a remote user's home. Or, you can preset the number called back from the Dial-in Information dialog box (shown in Figure 4-6). This is the most secure way of implementing this feature, since the computer only calls the preset number before the user can log on.
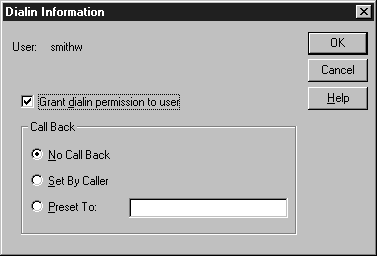
Figure 6: At the Dial-in Information window, set the number the computer should call back when a user logs on.
Once a user account has been created, you can come back and change it anytime by using User Manager. User accounts can be copied, deleted or renamed in User Manager.
Copying an Existing User Account
Copying a user account can be useful if you need to create a large number of user accounts with the same rights. For instance, let's say that your company hires 50 new people in the Sales department. Instead of creating each account and assigning the rights to it one by one, you can create one generic Sales account and copy it whenever you want to add a new user with the same rights as Sales. This generic account is called a template. When you copy a user account, it is given a new security ID (SID) by Windows NT. The permissions for the old account are copied to the new one.
Exercise 4-3 Copying a User Account
Deleting an Existing User Account
If a user account is no longer needed, you can delete it easily. Be careful; once you delete a user account, it’s gone. There's no way to bring it back once you have deleted it. This is because once the account is deleted, the security ID (SID) is lost. SIDs are unique and, once erased, are not recreated. Because the SID identifies the permissions given to an account, when you erase an account you lose any individual permissions it may have. The permissions cannot be recreated by creating another account with the same name.
If you wish to prevent a user from logging on, but don't want to delete the user’s account, you can disable the account. This prevents a logon, but all information and rights in the account are saved. Once it is enabled, the user can log back on as if nothing happened. This can be useful if a user takes a leave of absence or a vacation.
Exercise 4-4 Disabling a User Account
Exercise 4-5 Enabling a Disabled User Account
Exercise 4-6 Deleting a User Account
Renaming a user account allows changing the name on the account without losing any of the rights or information assigned to it. This can be used in a situation where a person leaves a company, and someone else is hired to fill the job. Renaming an account retains its SID, so no individual permissions are lost.
For instance, let's say that Fred quits your company, but he has a special set of user rights that give him access to several special directories on the computer. Your company hires Mary to fill Fred's old position. The best way to implement the change would be to disable Fred's account when he leaves, and when Mary starts, enable the account and rename it for Mary. Enter a new password for Mary, and select the User Must Change Password at Next Logon option.
Exercise 4-7 Renaming a User Account
Once a user account is created, anytime that you wish to go back and edit the properties of the account, you can do so in User Manager.
Exercise 4-8 Changing a User’s Environment
In most cases, you should try to use the built-in groups for managing your users, but if these groups are not convenient, you can create your own, using the widow shown in Figure 4-7.
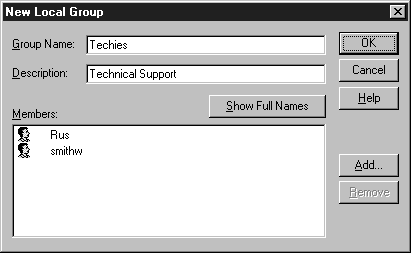
Figure 7: Creating a new Local group.
Exercise 4-9 Creating a New Local Group
The administrator of a Windows NT computer can control the security policies for accounts on that computer. These policies affect every account that logs onto your computer in areas such as password usage, user rights, and event auditing. These policies can be enacted through the User Manager's Policies menu and affect accounts only on that computer. In a domain environment, account policies are managed through User Manager for Domains (found in Windows NT Server), and affect all the accounts in the domain.
The account policy for a workstation controls general password usage for each account. As Figure 4-8 illustrates, administrators can determine when a password expires, or lock out a user for not being able to provide the correct password after a set number of tries, among other policies. See Table 4-3 for a description of the policies, and their default settings. Remember that you can never lock out the Administrator account. Only administrators can change account policies.
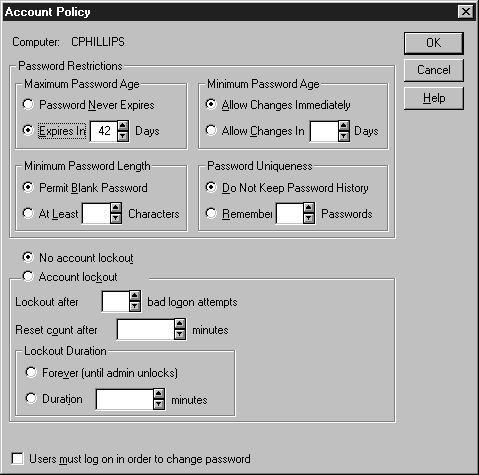
Figure 8: Account Policies that the administrator can determine.
| Policy | Action | Settings | Default |
| Maximum Password Age | Sets the duration of a password's life. | Up to 999 days | Expires in 42 days |
| Minimum Password Age | Sets the minimum amount of time a user must keep a password. | From 1 to 999 days | Allow Changes Immediately |
| Minimum Password Length | Sets the minimum number of characters required for the password | Not greater than 14 characters | Permit Blank Password |
| Password Uniqueness | Sets the number of unique passwords that must be used before a user can reuse an old one. | Up to 24 | Do Not Keep Password History |
| Account Lockout | Sets the policy on unsuccessful logon attempts due to bad passwords. Reset Count After sets the number of minutes during which the system tallies bad logon attempts; if the specified number of bad logons occurs in this time frame, the account is locked out. Duration sets the condition for unlocking the account. | Reset Count After - up to 99,999 minutes. Duration - up to 99,999 minutes. |
No Account Lockout |
| Users must log on in order to change password | Prevents users from changing the password if it has already expired, since they cannot logon to change if it has expired. An administrator would have to change the password at that point | On or Off | Off |
Table 3: Settings on the Account Policy Dialog Box
Exercise 4-10 Change Default Account Policy
Administrators can assign rights that control which activities a user or group can perform on the workstation. Rights are assigned at the User Rights Policy window, shown in Figure 4-9. Rights apply to the entire computer, unlike permissions, which are assigned to specific objects like printers or directories. Table 4-4 describes the various user rights. You should not change user rights unless you know exactly what the results of your changes will be.
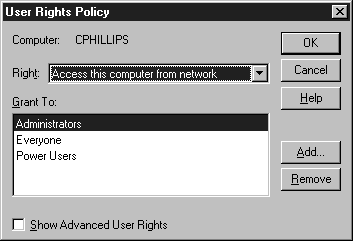
Figure 9: User Rights apply to the entire computer, unlike permissions, which are assigned to specific objects.
| User Right | Description | Default Groups |
| Access this computer from network | Allows a user to connect to the computer over a network | Administrators, Everyone, Power Users |
| Backup files and directories | Allows a user to make backups of files or directories. This right supercedes any permissions set for files or directories. | Administrators, Backup Operators |
| Change system time | Allows a user to set the time on the computer’s internal clock. | Administrators, Power Users |
| Force shutdown from a remote system | Allows a user to shut the system down remotely over the network. | Administrators, Power Users |
| Load and unload device drivers | Allows a user to change device drivers | Administrators |
| Log on locally | Allows users to log on at the workstation | Administrators, Backup Operators, Server Operators, Print Operators, Account Operators |
| Manage and audit security log | Allows a user to manage the security policy. | Administrators |
| Restore files and directories | Allows a user to restore files or directories from a backup | Administrators, Backup Operators |
| Shut down the system | Allows users to shut down the workstation at the computer. | Administrators, Backup Operators, Everyone, Power Users, Users |
| Take ownership of files or other objects | Allows a user to take authority of files, directories, or other objects. | Administrators |
Table 4: User Rights
Exercise 4-11 Grant a User Right to a Group
Exercise 4-12 Remove a User Right from a Group
Advanced User Rights are some sophisticated rights that can be assigned. You can view these rights in User Manager easily, as shown in Figure 4-10. Generally these rights are associated with software development, so you won't need to use this much in administration.
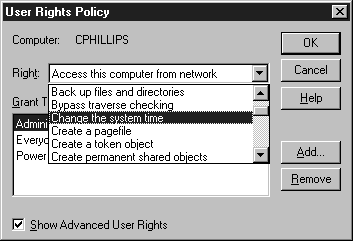
Figure 10: Advanced User Rights
Exercise 4-13 View Advanced User Rights
Auditing allows you to keep track of system events relating to user activity on a system. These audited events can capture the following information:
| The name of the event or action. | |
| The name of the user who performed the action. | |
| The date and time of the action. |
Auditing is useful for many purposes, such as tracking the occurrence of invalid logon attempts. Multiple invalid logon attempts could indicate an attempt to hack into the system. You can also use auditing to generate a report whenever a user attempts to access a resource for which that user does not have access permission. Even changes to users and groups can be audited providing an "audit trail" of all such activity.
The success or failure of an attempted action can be audited and recorded. This information can be written to the Windows NT Event Log and saved to disk. You can save audit information on the successful use of printers or other shared resources, and plan for future capacity using the information you saved. Table 4-5 describes the kinds of activities that can be audited, and explains what failure and success mean.
The ability to set up auditing is a user right called Manage Auditing and Security Log, which by default is granted only to the Administrators group. Members of the Administrators group can view the Security Log information. On Windows NT Server, the Administrators and Server Operators groups can view this information.
Be careful when you implement an audit policy. Auditing common events like file access and object access can slow your computer down. This is especially true on a server, where multiple users may be accessing the same files or objects. Audit only those events that you consider important.
| Activity Audited | Event Logged if Success | Event Logged if Failure |
| Logon and Logoff | User logged on or off the workstation, either locally or remotely. | User attempted to log on but failed, either locally or remotely. |
| File and Object Access | User accessed a directory, file, printer, or other object that is set for auditing. | User attempted but failed to access a directory, file, printer, or other object set for auditing. |
| Use of User Rights | User succeeded in use of a user right other than logon or logoff. | User failed in use of a user right other than logon or logoff. |
| User and Group Management | User created, modified, or deleted a user or group account, or modified a password. | User attempted, but failed to create, modify, or delete a user or group account or modify a password. |
| Security Policy Changes | User made changes in User Rights or Audit Policies. | User failed in an attempt to change User Rights or Audit Policies. |
| Restart, Shutdown, and System | User restarted or shut down the system, or a system security event occurred. | User failed to restart or shut down the system, or a system security event occurred. |
| Process Tracking | User started or stopped a program or other system process. | User failed to start or stop a program or other system process. |
Table 5: Auditing Activities with NT
Exercise 4-14 Enabling Auditing
You can use the Event Viewer to display and manage the security log. The Security log shows events that are related to security, as specified in the Audit Policy. The Security log does not record any information until you tell it to through the Audit Policy in User Manager.
Exercise 4-15 Viewing and Clearing the Security Log
To log on to Windows NT, each user must have a user account. All usernames must be unique. Passwords do not have to be unique, but cannot be longer than 14 characters and are case sensitive. User accounts can be added into groups, which simplifies their management. Policies applied to groups apply to all the user accounts in that group as a unit.
Windows NT comes with two accounts already created: Administrator and Guest. The Administrator account is used to manage user accounts, policies, and resources. The Administrator account cannot be locked out or disabled. The Guest account provides low-level access to the computer for users that do not have a user account of their own. The Guest account is disabled by default.
User Manager is the administrative tool used to manage user accounts, groups, and policies. You can copy, rename, or delete user accounts with User Manager.
Account Policies are set from User Manager and allow you to change how passwords are used. You can also set the account lockout policy there. Enabling account lockouts can help prevent your system from being hacked into.
User Rights allow you to control which operations a user or group performs. Each right enables the user to perform specific operations on the computer.
| When Windows NT is installed, two default accounts are created: Administrator and Guest. | |
| The administrator can: manage security policies; create, modify, or delete user accounts and groups; modify operating system software; create and connect to shared directories; install and connect to printers; format or partition a hard disk; backup and restore files; debug the system; take ownership of files and other objects; and install or update device drivers. | |
| The Guest account is used for limited access for remote users or users from other domains. | |
| Local groups affect resources only on the workstation. | |
| Windows NT Workstation comes with several built-in local groups for convenience in adding new users to the workstation. | |
| There is a second set of five groups used by the Windows NT system, which are automatically assigned based on how the user is accessing the system. | |
| Global Groups are created on domain controllers and are used to assign local permissions to domain users. | |
| An important part of an administrator's job is to come up with a naming convention for naming users, groups, and resources, such as printers. | |
| Groups can be assigned rights as a unit, rather than assigning rights to each individual account. | |
| User Manager is the administrative tool used for the management of all users and groups on the workstation. | |
| Once a user is assigned to a group, that user is given the rights and permissions inherent to membership in that group. | |
| As an administrator, you can control the location of the user profile, run a logon script individual to that user, or specify the location of a home directory for the user. | |
| Granting dial-in permission to a user account allows that user to access the workstation using the Remote Access Service (RAS). | |
| Once a user account has been created, you can come back and change it anytime by using User Manager. | |
| Nearly every student who has taken the Windows NT Workstation test has reported that they were given a question about renaming user accounts. You will receive at least two questions concerning when it's appropriate to copy, delete, disable, or rename an account. | |
| Account policies affect every account that logs onto your computer in areas such as password usage, user rights, and event auditing. | |
| Administrators can assign rights that control which activities a user or group can perform on the workstation. | |
| Auditing allows you to keep track of system events relating to user activity on a system. |
5. Which user accounts are created by default when Windows NT is installed?
6. The _________________ administrative tool is used to manage all user and group accounts.
7. You want your users to be able to share their own printers, but you don't want to grant them full access to the computer. Which built-in group should you make your users members of?
8. Bob is retiring from your company. Linda, a new employee, is taking over Bob's position. You want Linda's user account to have the same rights and permissions as Bob's user account. How do you do this with the least amount of administrative effort, while maintaining security?
9. If a user creates a file on the computer, then that user is a member of the ____________ special group for that file.
10. (True/False) Users that access the computer over the network are members of the Interactive special group.
11. Members of which built-in group can take ownership of a file or folder?
12. When you copy a user account, what information is not transferred to the new account?
13. (True/False) If an account is accidentally deleted, it can be restored by creating a new account with the same name and description.
14. Which Administrative Tool can be used to view the security log?
15. You believe that someone may be trying to get unauthorized access to your computer. How can you verify this?