![]()
![]()
![]()
![]()
Chapter 8
*Installing and Configuring TCP/IP
*Installing and Configuring TCP/IP
*From the Classroom *
Configuring for DNS *
Configuring Windows Internet Name Service (WINS) *
Routing *
Configuring for DHCP *
Q & A *
Peer Web Services *
Exercise 8-2 Installing Peer Web Services *
Exercise 8-3 Publishing an HTML Document Using Peer Web Services *
Configuring WWW *
Exercise 8-4 Access the World Wide Web Using Internet Explorer and Search for Windows NT Information *
Configuring FTP *
Certification Summary
*Two-Minute Drill
*Self Test
*
![]()
Chapter 8
Installing and Configuring TCP/IP
![]()
| Features of Microsoft TCP/IP | |
| TCP/IP Architecture | |
| Installing TCP/IP | |
| Configuration for DHCP, WINS, DNS | |
| Peer Web Services |
With the tremendous growth of the Internet and networking, we have become dependent on communication among computers around the world. Communicating with many different types of computers and architectures is quite a difficult task. We need a language that everyone can agree on in order to communicate effectively. This language is the transmission control protocol/Internet protocol (TCP/IP). This protocol has become a standard because of its proven reliability and durability. After nearly two decades in existence, this protocol has become the most used protocol for communication today. A number of components combine to make this protocol so powerful. In this chapter, you gain an understanding of what is involved in the architecture of this protocol. You become familiar with the installation and configuration of the Microsoft implementation of TCP/IP. This chapter includes an overview of its features, such as dynamically configuring client workstations and resolving names in a Windows-based computer network. We close the chapter with a discussion of the new web and file transfer servers that take advantage of the TCP/IP protocol. The web server included with Windows NT Workstation is the Microsoft Peer Web Service, which enables you to publish your own web site.
Although we have devoted a whole chapter to the TCP/IP protocol and the web server, we still don’t cover these topics in exhaustive detail. There are entire books devoted to these subjects. We give you enough information to understand any TCP/IP or Peer Web Server concept that you might see on a Windows NT Workstation exam. What’s more, this knowledge provides a basis for study towards future Microsoft exams, such as Internetworking TCP/IP on Windows NT 4, and Implementing and supporting Microsoft Internet Information Server.
Transmission control protocol/Internet protocol is the protocol of choice for connecting diverse workstations such as Windows NT, UNIX, Macintosh, and even mainframe computers. It is the protocol of the Internet, which is a testament to the popularity of this protocol. TCP/IP was developed in 1969 by the Department of Defense for the ARPANET project. This project was to design a fault-tolerant network that could withstand partial destruction in the event of war. In such a fast-moving industry as computers, it’s amazing that something developed so long ago is still useful today. Internet TCP/IP applications such as e-mail and file transfer played a large part in the growth of the protocol’s popularity. The Internet will continue to evolve, but TCP/IP remains the glue that holds it together. TCP/IP is not just for the Internet. It is a very capable protocol for any organization. Although it is not the fastest or easiest protocol to configure, it has many advantages that would make it a wise choice for your company’s primary network protocol.
Microsoft has its own implementation of TCP/IP that is supported with nearly every Microsoft operating system, including DOS, Windows 3.x, Windows 95 and Windows NT. In most cases, support is built directly into the operating system. The Microsoft implementation still includes standard TCP/IP components such as FTP, SNMP, Telnet, and a wide range of TCP/IP commands. On top of these, the Microsoft TCP/IP is enhanced for Windows networks with additional features such as DHCP and WINS. These subjects are discussed later in the chapter.
The TCP/IP protocol maps to a popular networking model called the open systems interconnect (OSI) model. The OSI model is used to standardize protocols so that systems of different types can still communicate. As you can see from Figure 8-1, TCP/IP does not map to the OSI model exactly. Perhaps this is because the OSI Model was introduced in the late seventies, nearly a decade after TCP/IP.
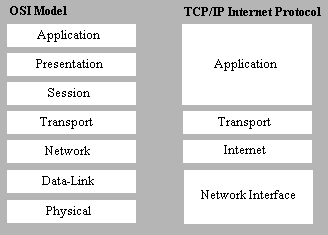
Figure 1: TCP/IP maps the OSI model.
Each layer of both models has a distinct function that it provides to the layer directly above or below it.
The network interface layer is the lowest layer of the TCP/IP architecture. It is responsible for putting frames onto the network medium. There is another layer that separates the network interface layer from the network device, and that is called the network device interface specification (NDIS) interface. This is not a portion of the TCP/IP protocol suite, but a standard for communicating between the device and the protocol. NDIS allows an NDIS-compliant protocol, such as TCP/IP, to communicate with any NDIS-compliant device.
The Internet layer of the TCP/IP architecture is concerned with the source and destination addresses of the computers. The Internet layer must use the components listed below to acquire the correct address—either the physical hardware address or a logical address such as an IP address or host name.
| Component | Function |
| Internet Protocol (IP) | This protocol is the core of the TCP/IP suite. IP packets are delivered on a connectionless delivery system. This means that packets are not guaranteed to arrive in the correct order, if they arrive at all. |
| Internet Control Message Protocol (ICMP) | A maintenance protocol used between two systems to share status and error information. The PING command uses this protocol. |
| Address Resolution Protocol (ARP) | Used to distinguish the hardware address of the destination computer from the Internet address. |
| Reverse Address Resolution Protocol (RARP) | Used when a computer must determine an Internet address while it already has a physical hardware address. Microsoft uses Dynamic Host Configuration Protocol (DHCP) instead of RARP for this purpose. |
| Dynamic Host Configuration Protocol (DHCP) | Allows a computer to obtain an IP address and other information from the DHCP server upon booting. Much easier than manually configuring workstations TCP/IP information. |
Table 1: Internet layer
The transport layer provides communication between the hosts, and data delivery for the layer above it. This sounds like the Internet layer, but the transport layer provides frame sequencing, error detection, and acknowledgments. Which of the two available components of the transport layer is used depends on the nature of the application being used. If an application requires speed rather than guaranteed delivery, the user datagram protocol is used. If data must arrive intact, the transmission control protocol is used.
| Component | Function |
| User Datagram Protocol (UDP) | Protocol that does not guarantee the data will arrive in order, if it arrives at all. Just like IP, it is faster because it does not have to wait to receive acknowledgements from the destination computer. |
| Transmission Control Protocol (TCP) | A connection-oriented protocol that ensures the data will arrive in the correct order. A connection is set between the two communicating devices to send and receive data. If this data is out of order, TCP reorders the information. If the expected information was not received, it is requested again. |
Table 2: Transport layer
The application layer contains the connection utilities and applications. This is the layer that the user and applications interact with. As we indicated before, applications in this layer determines how the lower layers should perform their jobs. Does this application require connection-oriented (TCP), or connectionless (IP) services? The applications that are run in this layer require the services of the lower layers to function. For example, the PING command makes use of the Internet layer’s ICMP protocol.
| Component | Function |
| Ping | A utility for verifying connectivity between two TCP/IP machines. Sends Internet control message protocol (ICMP) echo request and echo reply packets to the destination. The destination responds, proving there is connectivity. If it doesn't respond (times out) you can start your troubleshooting process. This is a very helpful utility. |
| Telnet | Used for terminal emulation for character-based communicating. |
| File Transfer Protocol (FTP) | Used to transfer files between two computers. The computer you are receiving from must have an FTP server. An FTP client and server is provided with NT Workstation, which can also allow you to upload information as well. |
| Trivial File Transfer Protocol (TFTP) | Similar to the file transfer protocol, but does not require user authentication. |
| Simple Mail Transfer Protocol (SMTP) | Used to send and receive mail over the Internet. |
| Domain Name Service (DNS) | Translates host names into IP addresses. (An example of a host name would be microsoft.com.) DNS Servers are used to store the host names/IP address information and are queried by the clients. |
| Simple Network Management Protocol (SNMP) | Used for managing SNMP-compliant network devices such as hubs and routers. A managing computer is used to get data from other computers on the network such as configuration data, error messages, protocol information, and usage statistics. |
Table 3: Application layer
Installing and Configuring TCP/IP
Although the TCP/IP protocol is the by far the most popular protocol available, it is one of the most difficult to configure. There are a number of configuration settings that must be correct before you can begin communicating. From the server end you can implement some of the newer technologies associated with Microsoft’s TCP/IP to ease the burden of configuring workstations. These require plenty of time and expertise to configure, though.
Most of the installation and configuration of the TCP/IP protocol is done through the Network applet in the Control Panel. Figure 8-2 shows the Protocol tab. (It’s interesting to note that, in Network Properties, Microsoft defines the T in TCP/IP as transport, rather than transmission. I checked many different sources to verify the correct definition for the acronym. The vast majority use transmission. The transmission control protocol is a component of the transport layer, so they are not too far off.)
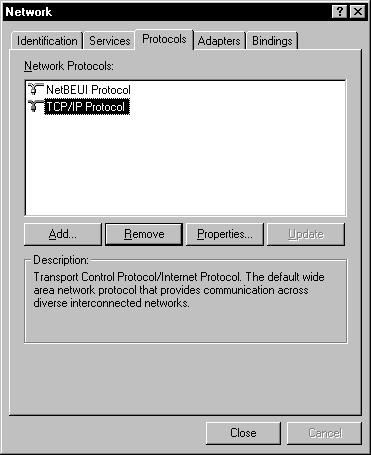
Figure 2: Installing and Configuring TCP/IP from the Protocols tab.
As you can see, we have already installed TCP/IP, because it is in our list of network protocols. If you do not see it in your list of network protocols, you have to install it. The next exercise covers installing the TCP/IP protocol.
Exercise 8-1 Installing and Configuring TCP/IP
Once you have installed the TCP/IP protocol you still might have to revisit the Network applet frequently for adjustments. Even if you do not make any adjustments, you will visit this area to view the settings for the protocol. You reach the Microsoft TCP/IP Properties dialog box, shown in Figure 8-3, by selecting the TCP/IP protocol from the list of installed protocols and selecting Properties.
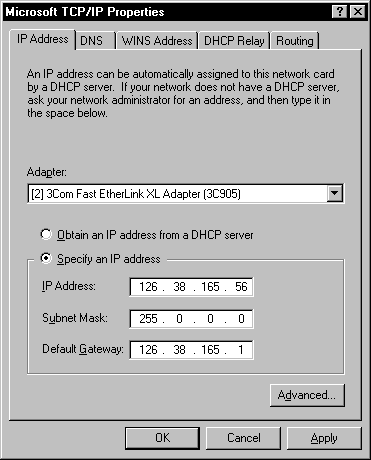
Figure 3: Find the settings of a protocol at the Properties dialog box.
In addition to the Network Control Panel applet for viewing TCP/IP information, there are many console-based utilities. You can use these utilities to get current statistics on the state of connections, the route table, addresses, name resolution, and much more. An important console command that you should be familiar with is IPCONFIG. Issuing this command without any parameters gives you the big three TCP/IP settings: IP address, subnet mask, and default gateway. This is a convenient way to determine your current IP address when you are being assigned one through DHCP. For more detailed information, you can type IPCONFIG /ALL. Here is a sample of the output provided by the IPCONFIG /ALL command:
Windows NT IP Configuration
Host Name . . . . . . . . . : hal-wcbrandon.mydomain.com
DNS Servers . . . . . . . . :
Node Type . . . . . . . . . : Hybrid
NetBIOS Scope ID. . . . . . :
IP Routing Enabled. . . . . : No
WINS Proxy Enabled. . . . . : No
NetBIOS Resolution Uses DNS : No
Ethernet adapter El90x2:
Description . . . . . . . . : 3Com 3C90x Ethernet Adapter
Physical Address. . . . . . : 00-60-97-42-50-63
DHCP Enabled. . . . . . . . : Yes
IP Address. . . . . . . . . : 198.114.201.109
Subnet Mask . . . . . . . . : 255.255.255.0
Default Gateway . . . . . . : 198.114.201.1
DHCP Server . . . . . . . . : 198.114.201.23
Primary WINS Server . . . . : 198.114.201.23
Secondary WINS Server . . . : 198.114.201.38
Lease Obtained. . . . . . . : Wednesday, December 03, 1997 10:23:00 AM
Lease Expires . . . . . . . : Saturday, December 06, 1997 10:23:00 AM
Get to know this powerful command. It is a great one to have in your tool belt as a TCP/IP administrator. It is very helpful when you need to troubleshoot a system that you are not familiar with. Rather than ask the end user, you can just type the command and see for yourself. Everything you need to know about the current TCP/IP configuration can be found here. Before we get too far, let us lay the foundation of configuring the TCP/IP protocol.
The IP address uniquely identifies a computer on the network. It is 32 bits long, with four octets separated by periods, such as 198.24.147.48. Each octet has eight bits, which equals one byte. What is so special about the IP address is the fact that it not only uniquely represents the host, but also represents the network that the host is on. You will see in the next section how this is done.
It is very important to ensure that no two hosts are using the same IP address on your network. If there is a host on the network with the same IP address, the second machine may not even initialize on the network, or may just receive intermittent errors while communicating. The latter of the two is a little more difficult to detect. Duplicate addresses on the network can be avoided by creating a list of IP addresses and updating it every time you manually assign an address. This list is also convenient if you need to look up the address for a specific machine.
The subnet mask is used to hide part of the IP address in order to distinguish the network from the host on the network. You may already have seen a few subnet masks, such as 255.255.255.0. With the subnet mask of 255.255.255.0, you can see how network can be distinguished from host.
255 = 11111111 in binary digits. Therefore the subnet mask of 255.255.255.0 would equal:
11111111.11111111.11111111.00000000
When you apply the subnet mask to the IP address, you are separating the network from the host based on the subnet mask you are using. The one binary digit is used to distinguish the network from the host. Here is an example of how the one binary digit covers, or masks, a portion of an IP address:
First, let’s pick an IP address of 165.29.45.114. We will convert this IP address to binary to show you more clearly how the mask works. This IP address expressed in binary representation is shown below:
10100101.00011101.00101101.01110010 = IP address
11111111.11111111.11111111.000000000 = subnet mask
Wherever there are ones in the subnet mask, they are used to designate the network, so from this example we can draw the following conclusion: The IP address is on the 165.29.45 network, and the unique host is 114.
This means that we can use the same first three octets of the IP address for everyone on the network. The last octet, based on this subnet mask, is the unique address that we must change for each host on the network. We have a total of 254 unique host addresses on this network: 1 – 254. If we need more than that, we have to use another range for the IP address, or change the subnet mask. Custom subnet masking is a little beyond the scope of this book, but will be covered in great deal as you study for the Internetworking TCP/IP on Windows NT exam.
The default gateway is used when you have an address that is not on a network you belong to. You need to send this information to another network, because it is not destined for your network. This default gateway is extremely important for this reason. One important detail concerning the default gateway is that it must be on your network. For example, if you are on the network of 214.84.153, the default gateway must have this same network address of 214.84.153. This address also can be thought of as the router address of the machine that connects you or your LAN to the outside world, or just connects you to another subnet.
I recently had to track down a problem when my boss changed the IP address of a printer to another subnet and could not communicate with the printer anymore. The printer would not reply to the PING command (a TCP/IP command to verify connectivity by pinging the IP address to see if you receive a response). He showed me how he had changed the IP address, and sure enough, he had not changed the default gateway to the new subnet. We changed the default gateway and the printer responded to the PING command.
The Advanced Options tab for the TCP/IP protocol enables you to configure separate TCP/IP settings for multiple network adapters in your system. These multiple network adapters let your computer join separate TCP/IP networks, and possibly route packets between them. Since each network adapter takes part on a different network, you need to configure the TCP/IP settings for each network. As we said before, the IP address must reflect the network you are on. This involves configuring the subnet mask and default gateway, specific to each network.
You can also specify that you want to enable point-to-point tunneling protocol (PPTP) filtering. This is a new technology that allows remote users to access the network over the Internet. It provides a secure channel, even though you are transmitting information over the very populated Internet. It is called the tunneling protocol because it can be thought of as a tunnel that your data goes through to remain safe from prying eyes. Your data enters the tunnel at your workstation and surfaces at the server with PPTP enabled.
The button to enable security on the Advanced tab of TCP/IP settings allows you to specify which port or protocol you would like to allow for each network card. Disallowing access based on specific ports or protocols makes your network more secure against intruders gaining access.
Now would be a good time to use the PING command. This command is most commonly used to test for connectivity with remote systems, but also can be used to see if you have installed and configured TCP/IP correctly on your system. Here is the syntax to verify TCP/IP has been installed correctly:
PING 127.0.0.1
This IP address is reserved for internal loopback testing. You know you have set up TCP/IP correctly when you see the following screen:
C:\PING 127.0.0.1
Pinging 127.0.0.1 with 32 bytes of data:
Reply from 127.0.0.1: bytes=32 time<10ms TTL=128
Reply from 127.0.0.1: bytes=32 time<10ms TTL=128
Reply from 127.0.0.1: bytes=32 time<10ms TTL=128
Reply from 127.0.0.1: bytes=32 time<10ms TTL=128
If you did not receive this response, verify your installation. After you have installed and configured TCP/IP correctly, you can use this command to verify that the WINS, DNS, and default gateway settings are correct. Let me show you how, as we continue the troubleshooting steps using the PING utility.
After we have verified that we have TCP/IP set up correctly on our machine, we continue testing in this order:
- Ping the near side of the router. Since a router has two addresses to connect networks, you should ping the side of the router that is closest to you. If you receive a response, then you can communicate on your network.
- Ping the far side of the router. This is the address of the other side of the router from your network. This means that your packets are passing through the router.
- Ping a computer on the far side of the router. This not only means that you can pass packets through the router and on to the other network, but that you can communicate with a specific host on the other network.
This is an effective troubleshooting technique to use to identify where the problem is on a TCP/IP based network. I have spent many hours reconfiguring Internet settings because of connection problems, only to figure out that they were not my fault. I now have a list of certain computers to ping in order to find which link in the chain is broken.
TCP/IP, or Life can be one ping after another.
TCP/IP protocol can be a lot of fun. There are, however, a number of parameters that must be configured correctly in order for your computer to be able to communicate on the network. The mistake most frequently made, when manually configuring the IP address, is inputting the wrong IP address or the wrong subnet mask. In a class of ten students, we can count on three of the students getting the entries wrong.
The most common problem is keyboarding in the wrong IP address. This is especially true when you have subnetting in place. For example, consider the following IP address and subnet mask:
171.131.19.20 IP
255.255.255.0 Subnet Mask
If you make a transposition error and enter 171.131.20.19, and the correct subnet mask, you can’t communicate with other computers on your segment, because you have the wrong net ID. This is an easy mistake to make and a hard one to find. I have observed students staring at the IP address for many minutes without seeing the transposition error. Even seasoned instructors may struggle to find the error.
The second most common error is a typographical error made when entering the subnet mask. Look closely at the following subnet masks:
255.255.255.0
255.255.225.0
Do you see the mistake? Look closely at the third octet in both addresses. I have stood behind students while they entered the addresses, and watched them make the typo. It is especially likely to happen if they are using the numeric pad and typing quickly. Like the transposition error, this error can be hard to find, because the numbers look so similar.
Of course, you can eliminate this entire hassle if you use DHCP servers to hand out IP addresses.
It’s a safe bet that all of you have been on the Internet, or have seen ads on television for company web sites. When you type in the uniform resource locator (URL), such as www.pepsi.com, you are transported to the site. You don’t have to know the 32-bit IP address. This is made possible by the use of the domain name service (DNS). DNS performs name resolution of host names to IP addresses. If there were no way around the Internet other than the IP address, there would be about a hundred people on the Internet right now, rather than millions. There are many servers out on the Internet dedicated to the sole purpose of resolving these host names. As you probably have noticed, there are different URL classifications, such as org, mil, and edu. These classifications are an attempt to organize the Internet. The com designation of commercial sites has greatly outnumbered the other designations. When DNS finds the designation of com, it searches through the lower branches of its hierarchy first—the reverse of the order in which URLs with other designations are resolved. Configure DNS at the tab shown in Figure 8-4.
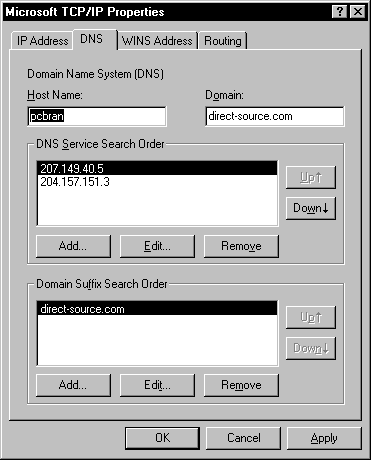
Figure 4: Configure for DNS at the DNS tab in Properties.
The host name is the name you are using for your computer, and must adhere to a few rules. It can contain the letters A – Z, 0 – 9, and a hyphen. The host name is case-sensitive due to the fact the Internet is populated with many UNIX machines, which are case-sensitive. No other characters are permitted in the host name. If the name of your computer is used as the host name, which it is by default, and contains illegal characters, they are mapped to a hyphen.
The domain name can be a bit confusing. Earlier in the book you learned about the NT domain structure, which is a logical grouping of computers. The domain name that is used here is a bit different, and should not be confused with the NT domain name. A DNS domain is a collection of TCP/IP hosts, either physical or logical. An organization usually has one domain name, such as Microsoft.com. Under the Microsoft.com domain, you can have subdivisions, such as sales.microsoft.com, or training.microsoft.com.
The DNS service search order is where you specify a DNS server to resolve host names. If you are like most people who access the Internet, you are given this DNS server address from your Internet provider. You can have three DNS servers queried until one is found to be available.
The domain suffix search order is used to append the domain name to the end of your host name. You would enter the name of your organization here. If your computer was named engineering1, and the suffix search order (your organization’s domain name) is computerking.com, then the combination of host name and domain name would be engineering1.computerking.com.
Configuring Windows Internet Name Service (WINS)
On a Windows TCP/IP network there are many names that correspond to the various machines on the network, such as the workstations, servers, and printers. These types of name are called NetBIOS names. These names also make it easier to communicate with other computers on the Windows network. I say Windows network because these NetBIOS names are not used by non-Microsoft computers such as UNIX machines. Like DNS, these NetBIOS names require translation in order to be used. Then Windows Internet Name Service (WINS) is responsible for mapping these NetBIOS names to IP addresses. There is a WINS server on the network responsible for translating these NetBIOS names. This is where WINS clients have their names registered. If they were not registered in the WINS database, they would have to broadcast their name registration across the network, which could cause unnecessary traffic. When a client would like to communicate with another NetBIOS computer, it just queries the WINS server with the NetBIOS name, and the WINS server sends back the IP address that is associated with that NetBIOS name. Here is an example of the result I got when I typed the command to view NetBIOS statistics:
C:\nbtstat -r
NetBIOS Names Resolution and Registration Statistics
Resolved By Broadcast = 2
Resolved By Name Server = 196
Registered By Broadcast = 0
Registered By Name Server = 31
If you were to type the command on your home computer you would probably not see anything. If you get a chance, type the command at work just to see how many names were resolved and registered by the name server and by broadcasting.
WINS is a dynamic replacement for the LMHOSTS file. This file was a static text file that computers would use to map NetBIOS names to IP addresses. If a computer was added to the network, this file would have to be manually adjusted on the workstations to reflect the name and IP address of the computer. Manually adjusting several LMHOSTS files on the network was a very daunting task. Now with WINS, a workstation can query the server with a name that it would like resolved to an address. The workstation no longer has to manually update the LMHOSTS file, even though it may provide fault tolerance to maintain the LMHOSTS files in a smaller network in case the WINS server fails. See Figure 8-5 to configure WINS.
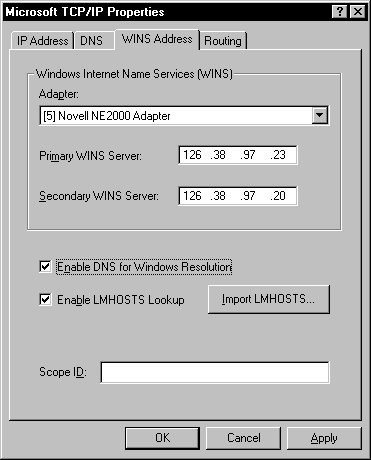
Figure 5: Configure WINS at the WINS Address tab in Properties.
Choose the adapter you would like to configure the WINS information for. You can have different WINS configurations for each adapter located in the system. This is required if you are connected to two different Windows networks that have separate WINS servers. You can directly query the WINS server for each network.
The primary WINS server is the server you designate to be first on your list of WINS servers to query. Most networks have, at most, two WINS servers to service client translation requests. It is a very good idea to add a second WINS server for fault tolerance.
The secondary WINS server can be used if the primary WINS server becomes unavailable. The secondary WINS server is used only as a backup to the primary, but contains the same information as the primary. If there were not a secondary WINS server on the network and the primary WINS server became unavailable, the clients would have to resort to broadcasting translation and registration requests over the network. This can quickly lead to traffic congestion. They can also use the static LMHOSTS file if it has been maintained.
Enable DNS for WINS Resolution
You can use the DNS Server that you configured in the DNS Configuration dialog box to resolve NetBIOS names. If WINS was not successful at resolving the name, the system then tries the DNS server to see if it can resolve the name.
As we said earlier, the LMHOSTS file is a static text file that was used to map NetBIOS names to IP addresses. You can still use LMHOSTS if you have implemented WINS. If you have selected Enable LMHOSTS Lookup, when a name is not resolved dynamically the LMHOSTS file is parsed for the computer name. You should keep this enabled as a backup name service to the WINS server should it go down.
The Import LMHOSTS file is where you specify the LMHOSTS file that you want to use. This can be helpful if you need to import an LMHOSTS file from another computer that has already been configured.
You can use the NetBIOS scope ID to isolate NetBIOS traffic to a specific set of computers. Only computers that have the matching scope ID can communicate. This can be effective if you want a group of computers to communicate separately from the rest of the network. You also can have several computers on the network with the name SERVER as long as they are using different scope IDs. An example of this would be SERVER.ENG, SERVER.SALES, and SERVER.SUPPORT. ENG, SALES, and SUPPORT would be the scope IDs. I once changed the Scope ID on one of the computers here at work, and something interesting happened. After I made the change, I was prompted to restart the computer. When the computer rebooted and I tried to log in, a domain controller could not be found. The domain controllers on the network were not configured with the same Scope ID, so they were not available to validate me. Oh well. It seemed like a good idea—isolate my computer from other users. Unfortunately, it isolated me from everything else, including the resources I needed to access!
With the beta release of the upcoming Windows NT Server 5, the documentation says that WINS will no longer be needed. It appears as if DNS is going to replace WINS for name resolution purposes. This was shocking news, because there are so many NetBIOS names out there on Windows networks that use WINS for resolution.
Your Windows NT computer can participate as a router between two networks. For this to be possible, you need to have more than one network card installed on your system. This makes your computer multi-homed. Your computer can now route information by using route tables that you create with the ROUTE command. This is known as static routing. Dynamic routing relieves the burden of manually configuring the route information, but can increase traffic in large networks while it dynamically builds route information. Unfortunately, only Windows NT Server can take part in dynamic routing.
Each network adapter card in the computer has a different address. This will be a valid address on the network that the network card is connecting to. When routing is enabled, the computer determines whether the address is on the same network, or must be routed to another network. If the address is destined for a remote network, the packet is sent to the default gateway, which is the address of the card that is on the remote network.
The Enable IP Forwarding check box on the Routing tab of TCP/IP Properties, shown in Figure 8-6, is where you set up your workstation to route packets to different networks. This is a lower-cost alternative to an expensive dedicated router. This is effective if you have two smaller networks that communicate occasionally, but do not require a dedicated router. Keep in mind if you are routing using Windows NT Workstation, that you have to manually configure the routing tables for the network as we discussed earlier. Routing in this way should not be a replacement for routers in your organization, especially large networks. Hardware routers are very efficient, and especially designed for this purpose.
Another reason why routing is adequate for smaller networks is that Windows NT does not support the more robust routing protocols like Open Shortest Path First (OSPF), and External Gateway protocol (EGP). Routers use these protocols to share route table information, in which Windows NT cannot take part.
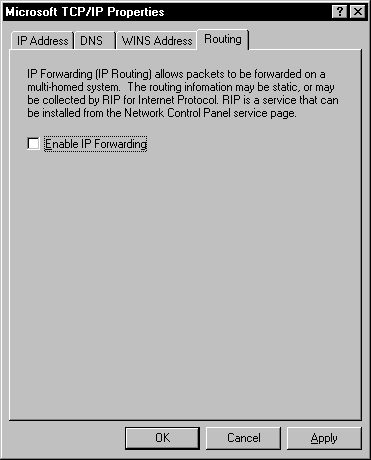
Figure 6: The Routing tab is a lower-cost alternative to an expensive dedicated router.
As we have witnessed so far, the TCP/IP protocol is a very complicated protocol to install and configure. There are many settings, such as the IP address, subnet mask, and default gateway that must be exactly correct. A strong knowledge of these settings is imperative to supporting a TCP/IP-based network. However, to relieve some of the burden, Microsoft has created the Dynamic Host Configuration protocol (DHCP). This will help you automatically configure a workstation’s many settings. Configuring the DHCP server is not in the realm of this discussion, but an understanding of how this can affect your workstation configuration is.
If you look back to Figure 8-3 you see the option to Obtain an IP address from a DHCP server. By clicking this radio button, you gray out the options for IP address, subnet mask, and default gateway. This is all you need to do on the workstation end to enable DHCP. Of course there is a little more to it, such as having a properly configured network card and TCP/IP installed.
As you know, you can manually assign an IP address to a computer, or you can have one assigned at random from a pool of IP addresses on the DHCP server. Deciding whether to manually assign an IP address is very important. There is a reason why you should manually assign an address to the important machines on your network. If you have a server such as a WINS or DNS server that clients need to have access to, this would make it a great candidate for a static address. If the server were to receive its IP address through the DHCP server at random, the clients could not have a reliable way to contact the server. The workstations should have the server’s IP address hard-coded in their configurations.
Here is a quick Q & A scenario to help you review the configuration of the TCP/IP protocol:
| You need to configure TCP/IP in a routed environment… | You will need to configure the default gateway. |
| You need to configure TCP/IP in a non-routed environment… | You do not need the default gateway. The default gateway is for sending information that is not on your network. |
| You would like to automatically configure… | Use Dynamic Host Configuration Protocol (DHCP). |
| You require dynamic resolution… | Use either WINS or DNS depending on scenario. These are dynamic alternatives to static files like HOSTS and LMHOSTS. DNS is to HOSTS as WINS is to LMHOSTS. |
The Peer Web Services included with Windows NT Workstation is a scaled-down version of the Internet Information Server (IIS) that allows you to publish web pages on your company’s intranet. With Peer Web Services you also can create the content for your Internet Information Server without the need to run Windows NT Server on your desktop. It may be a little limited compared to the IIS counterpart, but it should be sufficient when used as your internal company web server, and not as an Internet web server.
You can see in Figure 8-7 the WWW and FTP Services installed on the hal-wh2fctl6 computer. You have the option of selecting Properties, and connecting to a different server. You also can see the buttons to start, stop and pause the services for the computer. This screen will become familiar to you as you work with Peer Web Services, because you have to stop and start the service in order for changes that you make to take effect.

Figure 7: Two Internet services are installed on this computer.
Installing the Microsoft Peer Web Services is done a little differently than most application installations. Rather than accessing a directory on the Windows NT CD-ROM for a setup program, you use the Network applet in the Control Panel. This makes sense because you are installing a service. This exercise covers the installation of the Peer Web Server.
Exercise 8-2 Installing Peer Web Services
Exercise 8-3 Publishing an HTML Document Using Peer Web Services
By far the most complicated step in the preceding exercise is step 4. Just to make sure we are comfortable with the process, here is another example of a URL address. I have a computer called Pandora, and the HTML document I want to publish is called support.html. This is the correct URL address:
http://pandora/support.html
It’s not that this step is so difficult; it’s just the fact that most of us are unfamiliar with web servers, and how to access the files that we just published. It gets more difficult when you have several virtual directories to confuse you. We will discuss virtual directories later in the chapter. However, if you create links from your web pages, you don’t have to remember these paths, and life will be much easier for you and your users.
Once you have installed the WWW Service, you need to configure it to your situation. You have many options concerning security, access rights, publishing directories and logging. It takes time to find the right blend for your organization. Once you have made these settings they do not have to be adjusted very often, with the exception of your published directories. This probably takes the longest to configure because you usually have to make many directories, and place the correct information in them. For example, you could make directories for different areas of your web site, such as Sales, Support, and Training. You place the corresponding web pages in each directory to be published. Just hope that you aren’t the one who has to create all those web pages and link them to other pages.
Before we get too deep into the web server, let’s continue with an exercise involving the web, your browser, and—most important—your MCSE and Windows NT! For this exercise you need access to the Internet and a web browser.
Exercise 8-4 Access the World Wide Web Using Internet Explorer and Search for Windows NT Information
There is also an HTML-based Internet Service Manager, as shown in Figure 8-8. It is not possible to stop and start services with the web-based administration tool. If it is more convenient for you to configure the services remotely from a web browser, you will enjoy the web-based Internet Service Manager. You may have been around computers for years, but the concept of publishing web pages on your workstation is still quite new.
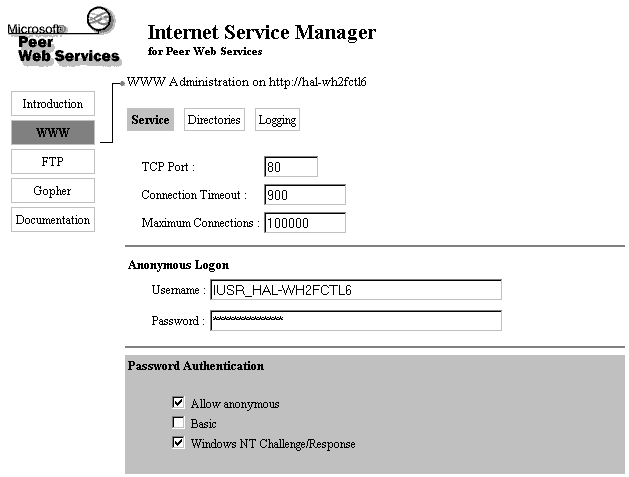
Figure 8: The HTML-based Internet Service Manager
There is a whole exam devoted to the Internet Information Server, which covers topics, such as virtual directories, anonymous logons, and publishing of documents, that are involved in Peer Web Services. However, you must understand the components in the Workstation Peer Web Services, which is essentially a limited version of the Internet Information Server. If you continue on your MCSE track and decide to take the Internet Information Server exam, you will already have a good understanding of these concepts. At the rate that the Internet and intranets are taking off, it would be a great idea to study for that exam. Web servers are going to be here for a long time.
Here are some differences between the Peer Web Services and the Internet Information Server:
| PWS | IIS |
| Web publishing for the corporate intranet | Web publishing for the Internet, or high-traffic corporate intranets |
| No virtual servers | Virtual servers |
| No IP address access control | Can limit access based on IP addresses |
| No ODBC connectivity | ODBC connectivity |
| Cannot limit network bandwidth | Can limit network bandwidth |
| 40-bit SSL support | 40-bit and 128-bit SSL support |
As I have described, there are two ways to configure the WWW service. For the remainder of the chapter I will be discussing the Internet Service Manager that is not web-based.
To access the WWW Service Properties, double-click the server that you would like to administer. Notice that your server is listed more than once if you have multiple services installed, such as WWW, FTP, and Gopher. There are a few things that are important on the Service tab. The first three settings should be sufficient when they are left at the default. Click the Help button if you are curious about these settings. The port setting is set by default at port 80.
The anonymous logon setting is created upon installation of Peer Web Services. It is created by appending the IUSR_ to the beginning of the computer name that the Peer Web Services are being installed on. An important point to remember about this logon account is that it must be the same in the Windows NT User Manager as in the Service Properties. This is a difficult problem to troubleshoot if only one of the account’s password changes. To remedy this, you may want to configure this user account so that the password never expires, and the user cannot change the password. If these passwords do not match, no one can access the server, not even the Administrator.
The password authentication settings are used when anonymous access is not allowed from the clients. The two authentication methods are Basic (Clear Text) and Windows NT Challenge/Response. Windows NT Challenge/Response is the more secure of the two, because it encrypts user names and passwords. If you are not concerned with security or encryption, you can choose Basic (Clear Text). If you enable Allow Anonymous, you do not need to worry about user names and passwords being transmitted over the network. This is actually much safer. It sounds funny when you think that anonymous logons can be safer than encrypted usernames and passwords but it is true. If you do not require usernames and passwords, which is what anonymous logon is for, there is no chance that a hacker can capture your username and password as they travel across the network. Keep that in mind because it can be a tricky exam question! With these three options, at least one must be selected.
The WWW Directories tab is where you configure the directories to be used for the WWW Service. In an earlier exercise you placed an HTML file in the wwwroot directory to be published. This wwwroot directory is called the home directory. There is only one home directory, but there can be many virtual directories. These virtual directories appear as if they are in the directory structure of the home directory, but they do not have to be. For example, the iisadmin virtual directory is actually C:\WINNT\System32\inetsrv\iisadmin. It appears to the web browser as if it is under the inetpub directory like the wwwroot was. These virtual directories can also be located on remote computers. Just specify the path that is going to be used to access the remote system. The alias is how the directory appears to the browser. We saw how the iisadmin alias is used for the physical directory path of C:\WINNT\System32\inetsrv\iisadmin. A common usage for these directories is to not only separate site content, but to have some directories as secured. These directories can be password protected. The site can have content that is viewable by the public, but access to certain private areas can be limited to those users with a valid password.
You have the option of specifying whether the users have read or execute access. Read access is just as it sounds. If you do not check the box for read access, users cannot view or download any of the files in that specific directory. Execute access is for applications that are run on the server. The client must have execute access to the directory-run applications that are located in this directory. It is common to have the execute box checked and the read box unchecked. This allows users to run the applications or scripts, but doesn’t allow them to view the information or script content.
You also have the option for Default Document. This is a handy feature that’s used if a user does not specify a file name. For example, if you type www.pepsi.com without specifying a file, the default document appears. This is most likely the main site. Because of this feature, users don’t have to remember long URLs to access a site.
You have several options when it comes to logging information on your web browser. Logging enables you to see who is using your server, and how they are using it. The first option is to decide whether you would like to enable logging or not. The easier choice is not to enable logging, but you still need to know about the different logging options. If you do enable logging, you have to choose whether to log to a file or to a database. It is easier to log to a file on your hard disk than to log to a SQL/ODBC database. If you do choose to log to a file, you have to decide where to store the log file, whether to automatically open a new log, and when to open that new log. If you choose the database you first need to have access to a database. Then you have to specify the Data Source Name (DSN), the table you would like to log to, and the username and password to access the database.
In addition to the WWW Services, you can have a File Transfer Protocol (FTP) Service for your users to download and upload information. Of course it’s not as pretty as the web, but it is simple and efficient. It can be much easier for you to set up a site without the hassle of creating dozens of fancy HTML documents.
You can see from Figure 8-9 that configuring the FTP Service looks very similar to configuring the WWW Service. The Service tab is very close to the WWW Service tab except for the Anonymous Username and Password. Of course the TCP Port is different too. If you enable Allow Anonymous Connections, you have to provide a username and password for the anonymous connection. This is provided by default by the installation program. The installation program also creates the user of the same name in the Windows NT User Manager. How nice of them! If you do not choose Allow Anonymous Connections, the option for username and password are grayed out, because the users will provide their own username and password. You also have the option of allowing only anonymous connections to your server. We discussed the advantages of this earlier. We don’t want hackers to capture our usernames and passwords, especially if we possess the magic orb: administrative access. Another nice feature of the FTP Service tab that was not available on the WWW Service tab is the Current Sessions button. Just click here to see the users that are currently connected to your server.
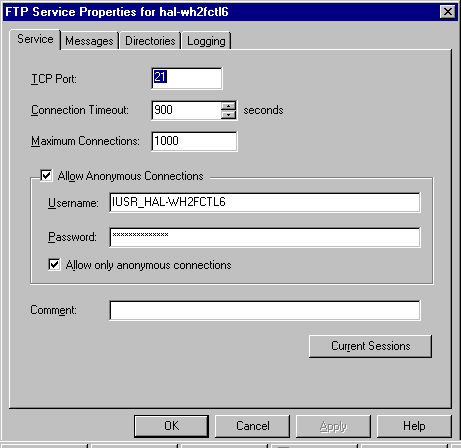
Figure 9: Configuring FTP from the Properties window.
The FTP Messages tab is unique to the FTP Service, and is not available for the WWW Service. This is where you set a custom greeting for users when they access your FTP Server. It can sometimes be difficult when you log on to someone’s FTP Server and there is no message there to greet you. This message can give them a quick introduction to your FTP site. You can inform them of new developments, or where to access certain information. You also can specify an exit message for when they log off your server. If too many connections are reached on your FTP server, you can specify a message to the users who are unable to access your server. This can be the usual message: "Sorry, we have reached our maximum limit of users. Please try again later."
The FTP Directories tab is similar to the tab for the WWW Service properties. Here is where you specify the directories that you will make accessible to your users. These can be virtual directories, either local or remote. The ftproot is provided by default as your home directory. The other option is the Directory Listing style. This can be UNIX or MS-DOS. If you specify MS-DOS, UNIX users may not be able to see the files on your FTP server. If you are publishing on the Internet, you should choose the UNIX directory listing because of the popularity of UNIX machines on the Internet. If you are just providing the FTP Service for your company intranet, then go ahead and select the MS-DOS directory listing format.
The Directories tab is where you can create a drop box for users to upload their information. You have to be using an NTFS partition for this to work. For the folder you would like to be the drop box, give users only the write-only permission. This is done by using Windows NT Explorer and clicking the Security tab and selecting Permissions. This creates an area that everyone has access to, but cannot be viewed—quite convenient for suggestions and comments on your intranet.
The FTP Logging tab is identical to the Logging tab for the WWW Service. Review the WWW Logging tab section for specific settings. Once again, it is important to enable FTP logging if you would like to know who is accessing your resources and how they are accessing them. If you do not have logging enabled you may not be able to detect intruders until it is too late. You can spot failed attempts to access resources.
TCP/IP is a reliable and robust set of protocols for communicating with diverse systems such as UNIX, Windows NT, and Macintosh. With a standard protocol, these different systems can effectively communicate and share information regardless of architecture. The TCP/IP is designed as a suite of protocols that can be used in varying situations, depending on the needs of the application. The layers of the TCP/IP architecture use these protocols to provide a distinct function for the layers above and below. From top to bottom these layers are the Application, Transport, Internet, and Network Interface.
To use TCP/IP on your machine, you must configure a subnet mask, a unique IP address, and possibly a default gateway. These can be assigned to the user automatically by the Dynamic Host Configuration Protocol (DHCP). You also may need to configure your workstation to use a WINS server, which resolves NetBIOS names to IP addresses, or a DNS server, which maps host names to IP addresses. These services replaced text-based files like HOSTS and LMHOSTS for name resolution.
With TCP/IP and Windows NT 4 you also can install your own Peer Web Server for publishing web pages on your intranet. This allows you to run a World Wide Web server, a Gopher server, or a File Transfer Protocol server. These services are managed with the Internet Service Manager, which can be the web-based version or just the standard Internet Service Manager. You can administer these services on local or remote computers. You have the ability to restrict access to directories, create private directories, allow anonymous users, require passwords, and log events.
| Transmission Control Protocol/Internet Protocol is the protocol of choice for connecting diverse workstations such as Windows NT, UNIX, Macintosh, and even mainframe computers. It is the protocol of the Internet | |
| The open systems interconnect (OSI) model is used to standardize protocols so that systems of different types can still communicate if they share the same protocol. | |
| Most of the installation and configuration of the TCP/IP protocol is done through the Network applet in the Control Panel. | |
| DNS performs name resolution of host names to IP addresses. | |
| The Windows Internet Name Service (WINS) is responsible for mapping the NetBIOS names to IP addresses. | |
| Your Windows NT computer can participate as a router between two networks. | |
| The Dynamic Host Configuration protocol (DHCP) helps you automatically configure the workstation’s IP address, subnet mask, and default gateway, in addition to many other settings. | |
| On the exam you may be asked what is required to automatically configure client workstations. | |
| The Peer Web Services included with Windows NT Workstation is a scaled-down version of the Internet Information Server (IIS) that allows you to publish web pages on your company’s intranet. | |
| You have many options concerning security, access rights, publishing directories and logging when configuring your WWW Service. | |
| You can also have a File Transfer Protocol (FTP) Service for your users to download and upload information. |
2. The ___________ layer of the TCP/IP model provides frame sequencing and error detection.
3. Which is the connection-oriented protocol that ensures data will arrive in the correct order?
4. Which is a valid IP address?
5. What would be a correct default gateway for your computer if your IP address is 106.23.86.211?
6. Which is not an option under the Advanced TCP/IP Properties tab?
7. What do you need access to if you are to resolve a name of mcsehopeful.com?
8. You are network administrator of a small network. Even though you have a WINS server on the network for name resolution, you still maintain the HOSTS files for each workstation. What would happen if you could not communicate with the WINS server?
9. What does DHCP stand for?
10. (True/False) A default gateway must always be present before you can communicate.
11. Which is not a tab on the WWW Service Properties dialog box?
12. Which tab in the Internet Service Manager do you use to specify what access a user has?
13. (True/False) Windows NT Challenge/Response is the most effective way to eliminate stolen passwords.
14. Which tab of the FTP Service would you specify UNIX or MS-DOS listing?
15. You are administrator of a branch office for the Guitars Galore corporation. You’ve been having communication problems with headquarters, and now there’s a support representative from the corporate headquarters on the phone. He tells you to issue the IPCONFIG /ALL command. You do so, and tell him the current settings. He tells you he knows what the problem is. Based on this TCP/IP configuration, which line is incorrect?
Ethernet adapter El90x2:
16. (True/False) The LMHOSTS file is used to map host names to IP addresses.
17. (True/False) Windows NT Workstation supports Routing Information Protocol (RIP) for dynamic routing updates.