| Chapter 3 * |
| Installing Windows NT Server 4.0 * |
| Certification Objectives * |
| Planning the Hard Disk Configuration * |
| File System Considerations * |
| Per Server versus Per Seat Licensing * |
| Naming Conventions * |
| Preparing for Installation * |
| Exercise 3-:1 Preparing the hard disk before the installation process * |
| Exercise 3-2: Preparing the hard disk during the installation process * |
| Installation Methods * |
| Network Installation * |
| Exercise 3-3: Configuring Microsoft Network Client Administrator * |
| Exercise 3-4: Creating a network boot disk using the Windows NT Client Administrator * |
| Exercise 3-5: Creating a network share on a central Windows NT 4.0 file server * |
| Exercise 3-6: Connect to the network drive share that contains the distribution files * |
| Exercise 3-7: Starting a network share installation process * |
| Exercise 3-8: Network installation of the Windows NT 4.0 Server * |
| Exercise 3-9: Recreating Windows NT boot floppy disks * |
| Network Installation Switches * |
| Exercise 3-10: Using the text part of the Windows NT setup program * |
| Information Gathering * |
| Exercise 3-11: Using the NT Setup wizard—Information Gathering * |
| Installing Windows NT Networking * |
| Exercise 3-12: Using the NT Setup wizard—Installing Windows NT Networking * |
| Finishing Setup * |
| Exercise 3-13: Using the NT Setup wizard— Finishing Setup * |
| CD-ROM Installation * |
| Exercise 3-14: Starting a CD-ROM installation without floppy disks * |
| Installing NT on RISC-based Computers * |
| Upgrade Installation * |
| Unattended Installation * |
| General Setup Options * |
| Networking Options * |
| Advanced Options * |
| Exercise 3-15: Creating an unattended installation answer file * |
| Unattended Setup and the Uniqueness Database File * |
| Server Roles * |
| Primary Domain Controller (PDC) * |
| Backup Domain Controller (BDC) * |
| From the Classroom * |
| The Number One Problem in Installing BDC's * |
| Member Server * |
| Server Promotion Rules * |
| Removing Windows NT * |
| Deleting FAT Partitions * |
| Exercise 3-16: Deleting a FAT Partition * |
| Deleting NTFS Partitions * |
| Removing Windows NT from a FAT Partition * |
| Exercise 3-17: Deleting the system files to remove Windows NT from a FAT Partition * |
| Changing the Boot Loader in an Existing FAT Partition to MS-DOS * |
| Exercise 3-18: Changing the boot loader in an existing FAT partition to MS-DOS * |
| Exercise 3-19: Setting MS-DOS as your default operating system * |
| Troubleshooting the Installation Process * |
| Certification Summary * |
| Two-Minute Drill * |
| Self Test * |
| Planning the Hard Disk Configuration | |
| Installation Methods | |
| Server Roles | |
| Removing Windows NT | |
| Troubleshooting the Installation Process |
As discussed in the previous chapter, planning and preparation are an important part of the Windows NT Server installation process. In this chapter you will learn more about hardware requirements that need to be considered, the type of file system to be used, and type of licensing to choose. The bulk of the chapter describes two methods you can use to install Windows NT Server 4.0: across the network using a network share, or from a local CD-ROM. After a step-by-step description of the installation process, the chapter considers some special situations such as installation on a RISC computer, procedures for upgrading from a Windows NT 3.51 installation, and unattended installations.
As you complete the installation, you'll need to know what protocol the network will use for communication. Windows NT Server supports three protocol standards: TCP/IP, NWLink, and NetBEUI.
Another major section of this chapter deals with server roles, particularly the use of primary domain controllers (PDC's) and backup domain controllers (BDC'sfor domain management. The final sections describe methods for removing Windows NT from a server and troubleshooting an installation.
Before you begin to install Windows NT 4.0, you must plan your hard disk partitioning scheme. Make sure to have a minimum amount of space available on the partition where you are installing Windows NT Server. You can set up a partition scheme prior to installation if you want to, or you can configure the partition scheme during installation. After the operating system is installed, system administrators can make changes to partitions using Disk Administrator—except that the system partition must be configured during the installation process, and cannot be changed without reinstalling.
Windows NT 4.0 Server requires a minimum amount of free space on the system partition (the partition where you install Windows NT Server). The absolute minimum recommended by Microsoft for Intel x86-type computers is 124 MB, but for satisfactory performance most networks require more space.
Two types of partitions are involved in Windows NT 4.0 installations: Thesystem partition and the boot partition. It is interesting (and sometimes confusing) that the "system" partition is where the operating system boots from, and the "boot" partition is where the system files are stored. These aren’t the only partitions available with Windows NT Server. Many other partitions can be set up for storing data and applications.
You also need to decide how you want your file system configured. You can install Windows NT Server either with the traditional FAT (file allocation table) file system used for DOS, Windows 95, Windows 3.1 and Windows for Workgroups 3.11, or you can use NTFS, thenew technology file systemdeveloped specifically for Windows NT. Certain hardware dictates the choice of file type. For instance, you can install Windows NT on a RISC-based system, but you must use a FAT partition for the system files.
NTFS allows the administrator to set up up permissions that specify who can and cannot access files or directories (folders) on the drive. In other words, selecting NTFS allows the administrator to take full advantage of Windows NT's security features, and the FAT file system does not. If security is important in your corporate environment, NTFS is the preferred file system for Windows NT Server installations.
If you decide to use NTFS for your system partition, remember that the FAT file system is kept intact until the installation is completed. The setup program does not format a new partition to NTFS. The system partition is converted to NTFS on the first boot of the server after a successful installation. If you install Windows NT Server on a the FAT file partition, you have the option of converting the partition later on, using a CONVERT utility included with NT 4.0 Server that runs from a DOS session prompt.
You also need to considerwhether the computer you are installing will be a "multiboot" system. Generally a Windows NT Workstation is more likely to have a multiboot configuration than an NT Server is. Operating systems such as Windows 95 and DOS cannot access NTFS drives. If you need to share information between operating systems on a multiboot computer, FAT would be the appropriate file system choice. If you do install Windows NT as an NTFS partition, be sure that the system partition is set up as FAT so the other operating systems can boot properly. You can make a separate NTFS partition for your data by using Disk Administrator within Windows NT.
As mentioned earlier, if information security is essential in your company, then it's smart to take advantage of the NTFS security features. This also prevents someone from getting at the files on your server by using a DOS boot disk.
As you are studying for the Windows NT Server exam, it's a good idea to create a dual-boot installation, with Windows 95 in one partition and NT Server 4.0 in another partition. This will give you a hands-on experience with the installation process. Remember, Windows NT can be installed on an existing partition. For example, let’s say that you have a computer with Windows 95 already installed and want to install Windows NT Server. You can install to the same partition, but you cannot install Windows NT into the same directory as Windows 95! In addition, if you have multiple instances of NT Server or NT Workstation on one computer you must install them in separate subdirectories. The installation program will automatically update the boot loader menu.
If you have MS-DOS and Windows 3.1 or Windows for Workgroups, you can install NT Server in the same Windows subdirectory. This has the advantage that the automatic setup of icons and programs that already exist under Windows 3.1 or Windows for Workgroups. However, if you install Windows NT Server in the same subdirectory as Windows 3.1 or Windows for Workgroups the original operating system will no longer be available. With Windows 95 and other NT operating systems (4.0 or greater) you must reinstall all your applications so they are accessible from each operating system on your hard disk. if you don’t have access to a "live" network.
Most of the options mentioned above can be decided during the installation process. However, it is best to prepare and plan ahead of time. Planning your installation will save time and reduce the possibility of mistakes.
Another factor to consider is how your licensing will be configured. Licensing is important because it affects the cost of your network installation. Part of the planning process presented in Chapter 2 is network layout and design. The license arrangement is part of this design.
Windows NT comes with two licensing options. Per Server or Per Seat licensing.These options provide different types of client access.
With Per Server licensing, your license depends upon the number of concurrent connections. If you have 100 workstations accessing your server, you would need 100 client access licenses and a server set up with Per Server licensing. This is ideal for networks that only have one server because each workstation needs a separate client access license for each server it accesses. The server itself controls the number of connections. If you have Per Server licensing set up and a 100-client access license for Windows NT Server, workstation 101 will not be able to log on when all the licenses are in use.
With Per Seat licensing you can set up your server so that each client has an access license for as many servers as it can access. In this case, the server doesn’t control logons. Instead, you are licensed for the number of computers on the network, but the clients are not limited to one server. Each workstation can concurrently use multiple servers even though it only has one license.
During the installation process you must specify whether you want Per Server or Per Seat licensing. You can take advantage of the Licensing option in your Control Panel (see Figure 3-1) to tell Windows NT Server how many licenses you have. If you are unsure about which type of licensing is best for your organization, select Per Server. If Per Seat turns out to be what you need, you can make a one-time switch from Per Server licensing to Per Seat licensing.
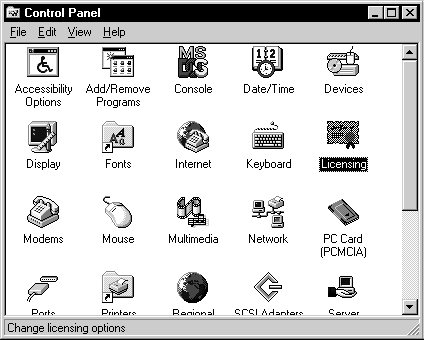
Figure 1: Control Panel Licensing option
When planning partitions—especially your system or boot partition—you should also consider fault tolerance and what methods you plan to use. Remember that mirroring, in which the data on one disk is exactly duplicated on a separate disk, is the only fault-tolerant scheme that can be used on the system or boot partitions. If you need more information about RAID (Redundant Array of Inexpensive Disk) techniques for fault tolerance, refer to Chapter 4 of this book.
To set up effective fault tolerance you need to keep data and fault tolerant information on a separation partition and/or disk.. A good rule of thumb is to set up one partition for the system files and then keep the remaining data on a separate partition. This enables you to set up the appropriate fault tolerant scheme that you choose.
When installing Windows NT 4.0 Server, it is important to understand the naming conventions. Microsoft uses a NetBIOS form of a UNC, or a Universal Naming Convention. Everything in Windows Networking relates to naming conventions. Each computer in the domain or workgroup is given a "friendly name." Windows NT converts the friendly name into the TCP/IP address, MAC address or other identifiable means of routing the information. The syntax for the UNC name is \\copmutername\sharename. Because the server name is determined during the installation process, make sure to give the server a name that makes sense. Often administrators will name the server something in relation to its responsibilities. The NetBIOS name of a computer can be 15 characters in length. For example, a Backup Domain Controller in the New York office for a company named Acme might be ‘AcmeNewYorkBDC’. Share names, on the other hand, can be up to 255 characters in length. An example of a share name might be NT40CDROM. In this case the UNC name would be \\AcmeNewYorkBDC\NT40CDROM. The slashes are important. Be sure to use the ‘\’ (backslash) and not the ‘/’ (forward slash). The server (or computer) name in Windows Networking should be preceded by two backslashes, with one backslash separating the server (computer) name and share name.
In the following exercises, you will prepare your hard disk for Windows NT 4.0 Server installation. PLEASE BE WARNED that these exercises will delete the entire contents of your hard disk. Be sure to use a computer where you can clear the hard disk!
During the pre-installation process you can use FDISK and FORMAT from a DOS boot disk to partition and format the hard disk. For this exercise you will need both a DOS boot disk with FDISK and FORMAT as well as the installation CD and boot disks.
| Microsoft Windows 95 |
| Fixed Disk Setup Program |
| (C)Copyright Microsoft Corp. 1983 - 1995 |
| FDISK Options |
| Current fixed disk drive: 1 |
| Choose one of the following: |
| 1. Create DOS partition or Logical DOS Drive |
| 2. Set active partition |
| 3. Delete partition or Logical DOS Drive |
| 4. Display partition information |
| 5. Change current fixed disk drive |
| Enter choice: [1]
Press Esc to exit FDISK |
Figure 2: FDISK main menu
Alternatively you can partition the hard disk during the Windows NT 4.0 Server installation process. Exercise 3-2 shows you how to do that.
When installing Windows NT Server 4.0 there are various methods one can use to configure the server. Windows NT Server comes with three boot disks and one CD. The installation files are no longer available on a floppy disks. The CD contains just over 600 MB of information, which would require more than 420 high density disks! Most new computers now come with a CD-ROM drive. If not, you can add one for less than $100.
You can install over the network or from the CD. The CD install can be done one of two ways.
| The Windows NT Server 4.0 CD is a bootable CD-ROM. If your server’s BIOS supports it, you can boot directly from the CD and start the installation process that way. | |
| If not, the three floppy disks that come with Windows NT Server are boot disks designed to allow users to start the installation process without a bootable CD-ROM drive. |
The reason the "boot" process is so important is that the installation program runs on a low-level version of Windows NT. The installation can start in DOS, but certain related files load to allow the system to reboot and start the NT operating system.
The following sections first describe the network installation option, then examine the CD installation process.
In a network installation, files are made available (shared) from another network computer, such as another server or workstation. With a network boot disk, you access the shared directory to run the setup utility. Files are then transferred across the network to the local hard disk during the installation process. Figure 3-3 illustrates this process.
Figure 3: Network installation
This isn’t necessarily the best way to install across the network. Most network administrators would recommend copying the installation subdirectory (\i386) to the local computer and then executing the setup file to start installation.
You can use Windows NT Client Administrator to create a network boot disk for a target computer. Exercise 3-3 shows you how to configure Windows NT Client Administrator so it will install the client files and set up the share. You need to have the Windows NT Server CD in the CD-ROM drive to perform this exercise.
Figure 4: Network Client Administrator
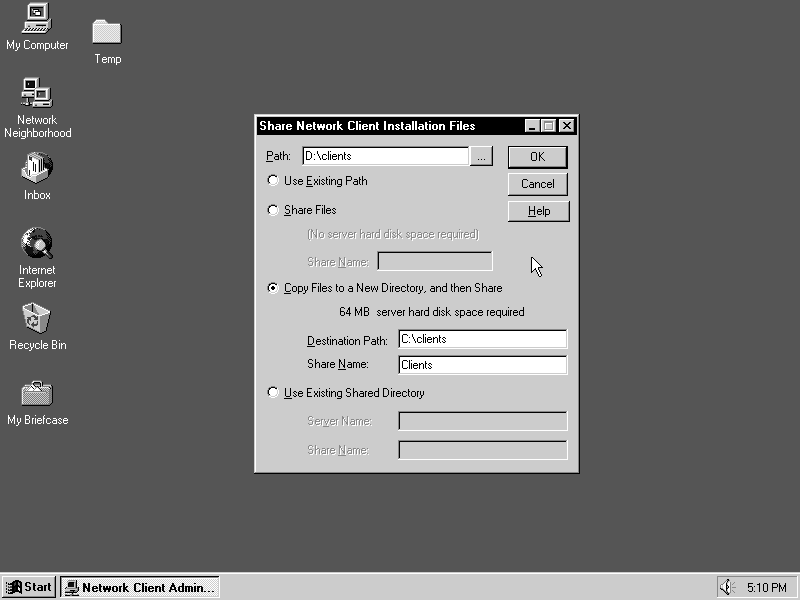
Figure 5: Setting up Network Client Installation Files for client installs
Now, in Exercise 3-4, you will create an Installation Startup Disk. This is sometimes confused with an Installation Disk Set, which is a complete set of disks used to install the network client software on a PC. The Installation Startup Disk is a single bootable disk that contains the network client software and allows you to access the network share and proceed with the installation.
To complete this exercise you will need at least one blank floppy disk. You should have also completed Exercise 3-3, which installs the client files and sets up the share on the central server.
Figure 6: Target workstation configuration
Figure 7: Network Startup Disk Configuration
Once the boot disk is created, you'll go to the computer where you are installing the network operating system, and connect to the network. However, you must first set up a share on a central Windows NT 4.0 file server, as shown in Exercise 3-5, so the new computer can access the appropriate files.
For this exercise, you will need the Windows NT Server CD. At the file server, the administrator needs to share the CD-ROM so the installation files can be accessed from a remote computer. The administrator also needs a boot disk that loads network drivers on the new computer so it can connect to the shared resource.
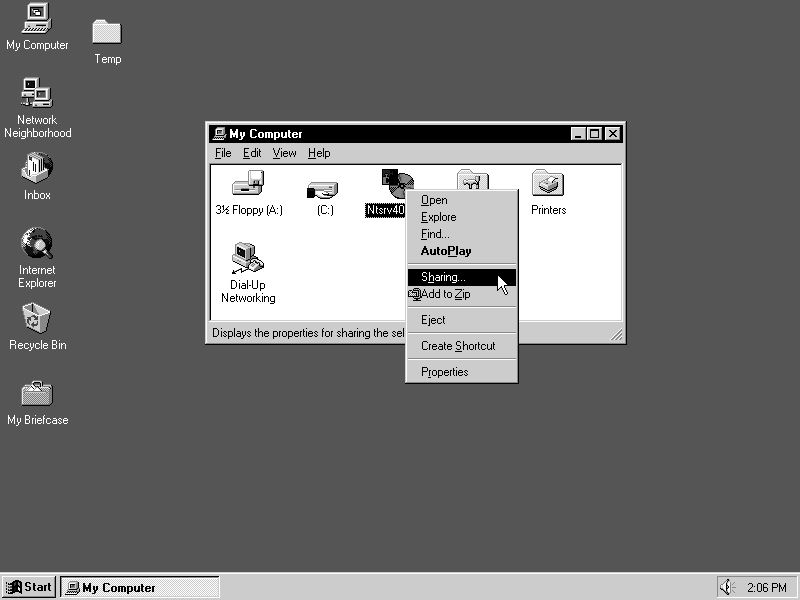
Figure 8: Sharing your CD-ROM drive in Windows NT server
When setting up the share on the server, some people suggest copying the entire contents of the CD to a directory on the hard disk and then sharing that, rather than using the CD. This can provide a faster response, due to the fact that hard disks have faster seek times than CD-ROM drives.
Once your network boot disk is created and you have a share set up on a central file server, you can use the floppy disk to access the share and then install Windows NT 4.0, as shown in the remaining exercises in this section.
Exercise 3-6 shows how to connect to the network drive share that contains the distribution files. For this exercise, you will need the network boot disk created in Exercise 3-4. You also need to have a share set up on a central server, as discussed in Exercise 3-5.
Once you have made your share on a central server and connected to that share via the network boot disk, you are ready to start the installation process on the target computer, as shown in Exercise 3-7. For this exercise, you should have completed Exercise 3-6, where you connect to a network drive to obtain the installation files.
You can run the setup program across the network, but the recommended procedure is to copy the files locally, then run the install. The reason for this is to prevent excess activity on the network that will affect other users. Copying the files to your local directory is faster and it does not put as much strain on the file server.
To run setup from the file server, you would complete Exercise 3-6 first. Then, instead of copying files as in Exercise 3-7, you would change to the i386 directory on the network drive and then type winnt /b there.
Exercise 3-8 takes you through network installation, step by step. To perform this exercise you need to make sure, at the dedicated server, that the CD or directory containing the files is a shared resource. If necessary, refer to Exercises 3-5 to do this. Also make sure that you have a network boot disk that contains the MS-DOS Network Client 3.0; the disk should be set up with the appropriate network drivers for your new computer. If necessary, refer to Exercises 3-3 and 3-4 to complete this task.
There will be instances where as an administrator you may have to recreate the three installation boot disks. This can be done by using the Windows NT 4.0 CD. You can use a various switches in conjunction with the setup file, as shown in Table 3-1 later in this chapter. You can create the boot floppy disks from a working computer (either DOS, Windows 95, or Windows NT) with the Windows NT Server CD in the CD ROM drive. From the command prompt you would type Winnt /ox. (The /OX switch tells the winnt.exe file to only create the boot floppy disks and not to continue with the remaining part of the installation.)
Exercise 3-9 shows how to recreate the Windows NT boot floppy disks. For this exercise, you will need three blank, formatted high-density floppy disks.
Notice that the setup program creates the disks in reverse order. The third disk is created first and the first disk is created last. The setup program tells you this, but many people overlook it. Be sure to label the disks accordingly.
When you install Windows NT in a network installation setting, there are various switches that can be used (see Table 3-1). These switches can make a network installation go more smoothly and quickly. In most cases the ‘/b’ switch is used in a network installation. This switch controls whether or not floppy disks are needed during the installation. In most cases, an administrator would not want to use the floppy disks if they were installing over the network.
| Switch | Result |
| /B | Floppyless install |
| /C | Tells setup not to check for free disk space on setup boot floppy disks |
| /E | Specifies command to execute when setup is finished |
| /I | Specifies the name of the setup information file |
| /F | Tells setup to not verify files as they are copied to setup boot floppy disks |
| /OX | Creates the boot floppy disks only. Doesn’t actually install Windows NT Server |
| /R or /RX | Specifies optional directory to be installed; the /RX denotes optional directory to be copied |
| /S | Lets the administrator specify the location of the source files. (for example, winnt /s:location or \\server\share\[path:] |
| /T | Tells setup where to put the temporary installation files. (for example, winnt /t:location). This must be a local drive |
| /U | This is used for Unattended Installations; requires /s |
| /UDF | Specify the Uniqueness Database File to use for unattended installation |
| /X | Do not created boot floppy disks |
Table 3-1: Switches available for Winnt.exe or Winnt32.exe
The setup program contains two parts. The installation process starts in text mode, and the second part uses the Windows NT GUI. The text part of the progam:
| Identifies correct hardware | |
| Confirms selection of partitions | |
| Confirms file system to be used for Windows NT | |
| Confirms the directory where Windows NT Server will be installed | |
| Copies essentials files to hard disk so setup can start NT upon reboot |
Exercise 3-10 shows you how to use the text portion of the setup process.
| F1 | Get help on installation (good for first-time installers) |
| Enter | Set up Windows NT Server |
| R | Repair a damaged Windows NT Server install |
| F3 | Quit without installing |
Once all the temporary files have been copied to the appropriate subdirectories, the system reboots and the setup program continues to the graphical portion of the installation, where all the important configuration items are chosen. The graphical portion uses the Windows NT Setup wizard, which divides the installation into three sections. The first is called the Information Gathering, the second is Installing Windows NT Networking, and the final phase is Finishing Setup. Although the Windows Setup wizard proceeds directly through the three sections, we describe each section in a separate exercise for convenience.
Exercise 3-11 guides you through the first section of the GUI setup, Information Gathering.
| Accessories: 13 components—calculator, screen savers | |
| Communications: 3 components—chat, Hyperterminal | |
| Games: 4 components—FreeCell, Solitaire | |
| Multimedia: 9 components—CD Player, sound schemes | |
| Windows Messaging: 3 components—Internet Mail |
Exercise 3-12 guides you through the second section, Installing Windows NT Networking.
| If you selected NWLink (IPX/SPX-compatible transport), you will be prompted for the frame type you want to use | |
| If you selected TCP/IP, you will see a question about DHCP as well as a |
Answer the questions, then click Next to proceed.
Exercise 3-13 guides you through the final section of the wizard, Finishing Setup
If the computer you are configuring has the option, you can boot directly from the Windows NT Server CD-ROM. The option to boot from the CD-ROM drive is configured from within the computer’s BIOS. If you are installing directly from the CD you should make sure that the CD-ROM drive is compatible with Windows NT. If the CD-ROM drive is not supported, you could run into problems later on if you try to configure Windows NT and the operating system prompts you for the CD. If your CD is unsupported under Windows NT Server 4.0, you should copy the contents of the appropriate subdirectory to your hard disk prior to installation and run the setup program from there.
Exercise 2-14 shows how to start a CD-ROM installation without floppy disks. For this exercise, you will need the Windows NT 4.0 Server CD.
Begin Q&A
| I want to install Windows NT Server. I do not have a bootable CD-ROM drive and one of my boot disks is giving me a read error consistently. | On a working computer with a CD-ROM drive, use the winnt.exe setup utility to recreate the floppy disks by using the /OX switch. |
| I am getting ready to install Windows NT Server 4.0 on a computer with Windows 95 already on it. I want to keep Windows 95 available as a boot option and allow the Windows 95 operating system to view the contents on my NT 4.0 Server drives created with Disk Administrator What do I have to do? | In this scenario you need to use FAT for two reasons. The first reason is to enable Windows 95 to boot. If you install NT into an existing FAT partition, you want to retain the FAT partition so the original OS can still boot. Windows 95 can only read FAT partitions. If you were to create a new drive letter from within Windows NT Disk Administrator using NTFS, Windows 95 would not be able to read the contents of that drive. |
| I am installing across the network and do not want the setup program to even mention using the boot floppy disks. What command or switch do I need to use in this instance? | In this instance you would use the /b switch. |
| I want to create a network boot disk with Network Client Administrator (NCA). I’ve never run NCA before. In which subdirectory of the Windows NT Server 4.0 CD are the files kept? What is the default share name specified upon first-time setup? | \Clients and Clients |
| I am setting up a new computer and I want to name it NEWSALESCOMPUTER12A. I consistently get errors when I try to name the computer. Why? | NetBIOS names are limited to 15 characters. |
| I have only 80 MB of free space left on my main hard disk in my Intel computer and I want to install Windows NT Server 4.0. Can I install it? | You need at least 124 MB of free space to install Windows NT
Server 4.0. It is recommended that you have more, but 124 MB is the bare minimum. |
One of the nice things about Windows NT Server is the fact that up can install it on multiple platforms. You can install Windows NT on a RISC-based system, but you must use a FAT partition for the system files. With RISC-based systems, the partitions must be set up ahead of time. Windows NT cannot set up and configure RISC partitions.
If you currently have a server running Windows NT 3.51, you can install NT 4.0 Server as an upgrade. You can also upgrade from DOS, Windows 3.1, Windows for Workgroups 3.11, and Windows 95. One important note: Later releases of Windows 95 use the FAT32 file format, so make sure you are not trying to upgrade in a FAT32 environment. Windows NT 4.0 cannot access the FAT32 file system.
To upgrade from a previous version of Windows NT, you run the Winnt32.exe file. The first part of the upgrade process is the same as the normal installation. The setup program copies files from the CD into temporary directories on the hard disk (see Figure 3-9).
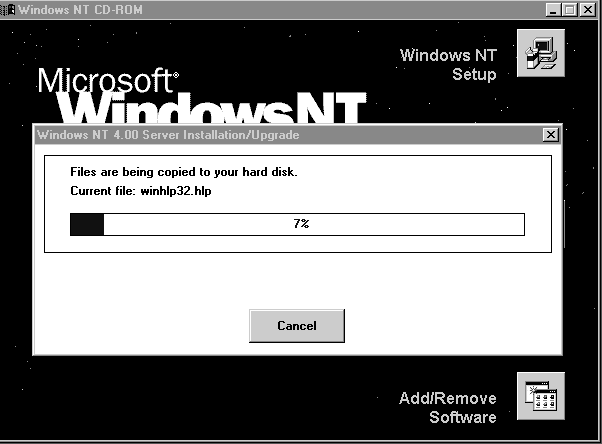
Figure 9: Windows NT Upgrade copies file to temporary directory on hard disk
Once the files are copied to the temporary directory, you will be prompted to reboot or stay in the current version of Windows NT (see Figure 3-10).
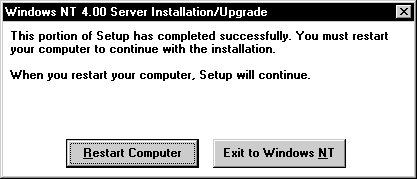
Figure 10: Rebooting during the upgrade
You will have the option to overwrite the existing operating system or install a dual-boot computer. If you choose to have a dual-boot machine, the boot loader menu will have a selection that allows you to choose the original operating system.
Of course, when upgrading you want to be sure and have a complete server backup available—in case the setup fails to complete and you have to revert to the original version. The following case study recounts an instance where a known good backup saved a company thousands!
A medical center had a Microsoft Windows NT 3.51 Server with various NT Workstations and Windows for Workgroups clients. This particular server was a Compaq ProLiant with a built-in CD-ROM drive and a Plextor 8 CD attached to it. An upgrade was scheduled for Saturday. Halfway through the installation, the server rebooted and the drive letters changed—which caused the entire upgrade to come to a screeching halt. Trying to reboot the server into Windows NT 3.51 did not work.
The only option was to reinstall Windows NT Server 3.51, then restore from backup. Then we started over on the upgrade. However, this time we disconnected the Plextor so that no drive letters would be changed in the middle of the installation process!
When upgrading from Windows NT 3.51 to Windows NT 4.0 you should be aware that the two products do not use the same default directory. By default, Windows NT 3.51 is installed in the \NT351 directory and Windows NT 4.0 uses the \WINNT directory. However, to maintain desktop, applications, and user information it is a good idea to put the upgrade files into the directory where the original version of NT had been located on that computer (in other words, in directory \NT351, not \WINNT). If you do not specify this directory when upgrading, you will end up with a dual-boot computer.
Of course the other big change with the transition from Windows NT 3.51 to Windows 4.0 is the GUI. The desktop and the product "look and feel" of Windows NT 4.0 is more like Windows 95. The change is similar to going from Windows 3.1 or Windows for Workgroups 3.11 to Windows 95. If your organization is used to the Windows 3.1 look of NT 3.51 it is essential to plan some training before the upgrade, to make end users comfortable with the new interface.
If you are deploying a large network with many servers and workstations, an unattended installation can make the operation much more efficient. Windows NT Server gives you the option to create an unattended answer file. Windows NT Server 4.0 CD contains a utility in the support\deptools\<computer type> subdirectory called SETUPMGR (see Figure 3-11). This is a GUI program that will help you set up answer files for unattended installation.
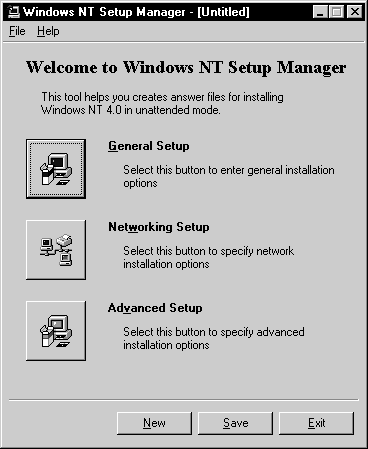
Figure 11: Setup Manager
There are three groups of options: General Setup, Network Setup, and Advanced Setup. The following sections describe how to set the options in each category.
The General Setup Options screen covers basic information about the installation. The first tab is the User Information tab, shown in Figure 3-12, which includes User Name, Organization, Computer Name, and Product ID.
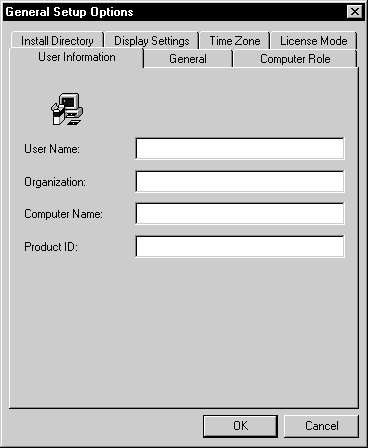
Figure 12: General Setup Options window in SETUPMGR
The General tab includes basic information about how setup will run in unattended mode. For example, you can specify that you want setup to confirm hardware during setup and you can list upgrade options. You can even specify that you want to run a program during setup.
On the Computer Role tab you choose one of the following as a role for the computer:
| Primary Domain Controller | |
| Backup Domain Controller | |
| Stand Alone Server in Domain | |
| Stand Alone Server in Workgroup | |
| Workstation in Domain | |
| Workstation in Workgroup |
Along with the computer role you can specify the Workgroup name, if applicable, or the Account Name, if appropriate.
The License Mode lets you specify the license mode if the Computer Role tab indicates the computer is being set up as a Server or Domain Controller. If you have Workstation in a Workgroup or Domain you do not need to complete the License Mode tab.
The Time Zone tab is self-explanatory: it lets you select the time zone where the computer is located.
The Display Settings tab enables you to configure Display Properties during installation. You can set up refresh rate, horizontal and vertical resolution, bits per pixel, and various flags.
The Install Directory tab lets you specify where the installation files will be located. Choices here include: Use default directory, Prompt user for installation directory, and Specify installation directory now.
The Networking Options area includes information on network adapter card configuration, bindings, protocols, Internet, and modem. The General Tab, shown in Figure 3-13, allows you to specify whether you want a manual network installation or an unattended network installation. As part of the Unattended option, you can ask setup to detect and install the first network adapter it finds or you can ask it to detect specific adapters. Alternatively, you can bypass the detection stage and specify what adapters to install.
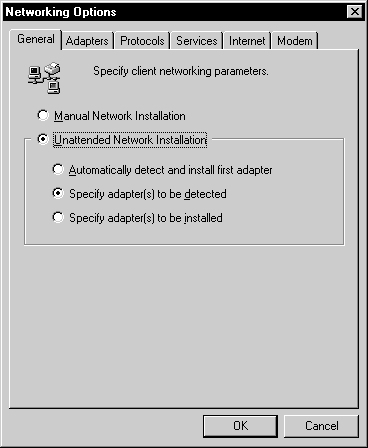
Figure 13: General tab of Networking Options window in SETUPMGR
On the Adapters tab, you can specify the network adapters to install.
On the Protocols tab, you can specify what protocols to load and install. Only the three basic Windows NT networking protocols are listed in this section: TCP/IP, NETBeui, and NWLink (IPX/SPX-Compatible Transport).
The Services tab allows you to specify which network services to install. The available options by default include, SNMP (Simple Network Management Protocol), Client Services for NetWare, and RAS (Remote Access Service).
The Internet tab is accessible only if the computer role in the General Setup section is set up as a server. If it is, this tab tells the setup program to install Internet Information Server (IIS) and gives configuration information for it. For example, you can tell setup where to install IIS and what subdirectories to set up for FTP, WWW, and Gopher. You can choose which options you want installed: Internet Service Manager (ISM) , HTMLA (an HTML version of ISM), and sample Web pages. You can also specify the guest account username and password to set up.
The Modem tab must be completed only if the Remote Access Service is selected in the Services tab. You can specify the COM port, modem type, manufacturer, provider, as well as the driver to install.
The Advanced Options window allows advanced users to specify additional information for the unattended installation process. The General Tab in the Advanced Options, shown in Figure 3-14, lets you specify information on the Hardware Abstraction Layer (HAL), the keyboard layout, whether or not to reboot after text and graphic setup sections, and whether to skip the Welcome Wizard page and Administrator Password wizard.
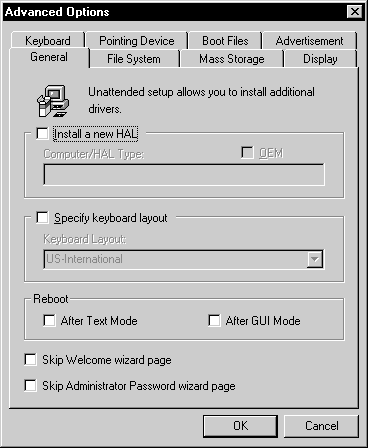
Figure 14: General tab of Advanced Options window in SETUPMG
The File System tab allows you to select whether you want to leave the current file system intact or convert the file system to NTFS. You also have the option here to extend the partition beyond two gigabytes (a FAT limitation), if you convert to NTFS.
The Mass Storage tab allows you specify additional mass storage devices to install drivers for during installation.
The Display tab, Pointing Device tab, and the Keyboard tab all let you specify display drivers for the installation process.
The Advertisement tab lets you customize the banner text, logo, and background information for your installation. This is a spot where network administrators can gratify their egos by personalizing an unattended installation.
The Boot Files tab allows you to specify a list of boot files.
Once you’ve supplied the appropriate information, click the Save button in the main SETUPMGR window. You can give the file any name you want; it will have a .txt extension. There is also a New button on the main window, which clears all the information in the highlighted section so you can start over.
Exercise 3-15 describes how to create an unattended answer file.
| Username: Bill Byttes | |
| Organization: Acme Inc. | |
| Computer Name: Bill’s Machine | |
| Be sure to confirm the hardware during setup | |
| Use the default install directory | |
| Configure the graphics device at logon | |
| Have setup choose the Bogota, Lima time zone | |
| Convert the existing file system to NTFS | |
| Add a 3COM Etherlink III Adapter | |
| You need to have TCP/IP and NWLink IPX/SPX loaded | |
| Be sure to skip the Welcome Wizard page | |
| Set up Per Server licensing with 100 licenses | |
| You have Novell workstations on your network, so be sure to add Client Services for Netware |
Once you’ve created the answer file, you have to tell setup where to get the file when the installation process begins. As mentioned earlier, the switch to use for an unattended answer file is: /u. For example you would type:
winnt /u:unattend.txt /s:{source}
When deploying large networks, the unattended answer file is a great tool for speeding up the installation process. When you have ten or more machines to set up and install on your network, creating an answer file for each can be tedious. Windows NT allows the creation of what is called a Uniqueness Database File (UDF).
A UDF allows an administrator to specify information for each individual workstation or server that is being installed. Items such as computer name, IP address (in a static IP environment), time zone, and other information can be specified on a per-machine basis. To use a UDF, a valid answer file must already exist.
The UDF is created as a text file that contains information to be merged into the default answer file. This is done through the use of specific switches with winnt.exe or winnt32.exe.
An example of a command line use:
winnt /u:unattend.txt /s:d:\ /t:c: /udf:useridl,z:\udf.txt
One of the most common concepts you will hear throughout your studies will be that of the domain. A domain, as shown in Figure 3-15, is a group of computers containing domain controllers that share account information and have one centralized accounts database. An administrator needs to determine what role the server or servers will play in the domain model. This is an important step in the installation process. A server can belong to only one domain.
Figure 15: Simple Domain Model showing various server roles
The Windows NT operating system has various roles a server can play. Remember, each server can only fulfill one role. The three possibilities are: Primary Domain Controller (PDC), a Backup Domain Controller (BDC), or Member Server (MS). Choosing whether the server will be a domain controller is a very important decision in the installation process. At the beginning of an installation, you must choose a role for the server you are setting up. If you make a mistake, you will have to restart the installation process.
Security is an important consideration when designing your network. An important role of domain controllers is to maintain security information—accounts information and the accounts database— for the domain. Domain controllers share a common security policy. The domain can also contain stand-alone (member) servers that do not maintain account and security information.
A PDC is the central server in the network. There must be one—and only one—PDC per domain. If the server you are installing is the first computer in the domain, it will be installed as a PDC. If you are not installing a PDC, another PDC must already be connected to the network.
When installing the PDC you have the opportunity to name the domain. This is an important step, because it affects how the remaining servers and workstations will be named. When other servers and workstations are added to the domain, the domain name—the name you assigned when you set up the PDC—will become part of each server or workstation name.
The master accounts database resides on the PDC. Synchronization is the process of copying the security information (accounts and permissions) to the BDC's and performing periodic updates to keep the information up-to-date. This database is synchronized on the BDC's only. The domain administrator sets up synchronization and specifies how often it will occur.
A BDC serves multiple purposes in a Windows NT Domain. The rule of thumb is to have at least one BDC per domain. As mentioned in the preceding paragraph, the BDC is responsible for helping maintain user account database information. When installing the BDC you must know the name of the domain to which you are assigning it. Whoever installs the BDC must have administrative privileges in the domain. Since BDC’s cannot be added to the network prior to installation, administrative privileges are needed to add machines to the network.
When a non-domain controller computer starts up, it goes through a process called discovery. That means the workstation looks across the network for a domain controller in its domain (and in all "trusted" domains; refer to the section "Trust Relationships" in Chapter 7). Once the workstation locates a domain controller, it uses that BDC or PDC for subsequent authentication.
BDC's can authenticate users when they log on to the domain. If the BDC fails to authenticate the user, then the logon request is passed to the PDC for authentication.
Another function of the BDC is to back up the PDC in the event of a PDC crash. Promotion of a BDC to a PDC by the domain administrator allows the BDC to take over the primary roll in the domain. This is the only type of server within Windows NT that can be changed without reinstalling.
Once you have your planning done, and have made sure that your hardware is compatible (or that you have all of the OEM diskettes you might need to install any hardware that isn't on the distribution CD-ROM), NT installation is pretty straightforward.
Then you come to the dialog box that asks you to set the role for the server. You have three choices: PDC, BDC and member server. In the classroom, we frequently pretend that the students are servers, and set them up in domains. One student is the PDC, others are BDC's or member servers. We make a point of emphasizing that anyone who is a BDC must wait until the PCD is completely installed before they can perform their installation. In every class, there are several students who ask for help because they get hung up when they try to select a role. This is because the installation cannot find the PDC. Of course not—their domain partner has not yet completed the installation of the PDC!
The same problem arises at our clients' sites, where the environment is not so tightly controlled. There are two situations when it can occur. The first is when IP subnetting is place. The administrator is attempting to install a BDC on one subnet and the primary is on another subnet with no gateway (router) between them. Of course the BDC cannot find the PDC, and installation cannot continue. A more mysterious variation of this same theme occurs when the PDC is on one subnet and the BDC is on another and a router does exist between the subnets. The problem is solved, right? So why does the setup program return an error saying that the BCD cannot locate the PDC? If you find the answer to this question, please let us know!
The second situation occurs when the client is installing the BDC at a remote site and the PDC is on the net connected by a WAN link. Can you anticipate the problem? You guessed it! In our scenario, the administrator has planned a one-day trip to the remote site, many miles away, and arrives to find that the WAN link is down. Of course, the administrator discovers this during the installation. And the WAN provider promises the link should be up shortly—a story that's right up there with "the check is in the mail." For the next two days, the WAN link "bounces" up and down. If only you could predict the "up" times, you might be able to finish the installation! Too often, in this case, we get a request for support from the administrator who explains the symptoms to us, but hasn't ever checked to see whether the remote site can actually be reached from another system.
Remember the rule, no matter where you are: to successfully install a BDC, you must be able to contact the PDC. Period.
A member server (sometimes referred to as a stand-alone server) is not a domain controller. Member servers have no responsibility in the accounts database and security information. They are used for application servers, print servers, or SQL servers. They are dedicated to process high-end searches, and non-security type functions. They help take the load off your domain controllers, which can concentrate on security and account information processing.
When something happens to the PDC, such as a crash or being taken offline for an upgrade, then the administrator must decide how the domain will function. If the PDC will be offline for an extended period, a BDC can be promoted to a PDC to take over the domain. When you try to bring a PDC back online, it will check the domain. If another BDC has been promoted to PDC, the original PDC will not be able to log on to the network. The administrator will have to use the Server Manager to demote the original PDC. (The Promote option on the Computer menu in Server Manager changes to a Demote option if the original PDC is highlighted on the list of computers in the domain.)
Stand-alone servers cannot be promoted or demoted. The only way to change the role of a member server is to reinstall Windows NT Server on the machine. The same applies to PDC’s and BDC’s. If an administrator wants to change an existing domain controller to a member server, the operating system must be reinstalled on that particular machine.
When promoting a BDC to a PDC there are two distinct possible scenarios. The BDC can be promoted while the existing PDC is still online or it can done after that the PDC has been taken offline.
If administrators know the current PDC will be offline, they can promote a BDC to a PDC to keep the domain alive. This is only recommended if the PDC will be down for an extended period. The master accounts database is synchronized on the BDC being promoted. When the BDC is promoted, the operating system automatically "demotes" the PDC, since there can’t be multiple PDC’s in the domain.
If a PDC is in danger of crashing, the domain administrator must decide how to maintain the domain. If the BDC is promoted while the PDC is already offline, the BDC uses the most recent update it has for the account database. If a domain synchronization hasn’t been done for a while and users have been added at the PDC, those users will be lost. When the original PDC returns to service, it will have to be demoted before it can return to the domain. This is done with the Demote option on the Computer menu of the Server Manager utility, shown in Figure 3-16. Remember, the user who performs this activity must have domain administrator permissions.
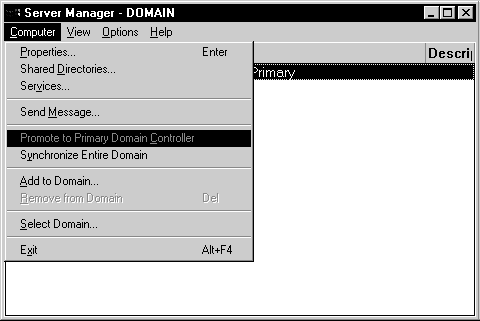
Figure 16: Server Manager with Promote to PDC highlighted
If you replace your server, you may want to remove Windows NT Server from the hard disk of the old server. There are a couple of ways to do this. You can delete the partition or you can simply delete the system files. The second method is better since it keeps other data intact
You can use FDISK from DOS or Windows 95 to delete a FAT partition. Some administrators think they can use Windows NT Disk Administrator to remove the system partition. This is incorrect. Disk Administrator lets you delete partitions, but not the system partition. Excercise 3-16 shows you how to delete a FAT partition.
| Microsoft Windows 95 |
| Fixed Disk Setup Program |
| (C)Copyright Microsoft Corp. 1983 - 1995 |
| FDISK Options |
| Current fixed disk drive: 1 |
| Choose one of the following: |
| 1. Create DOS partition or Logical DOS Drive |
| 2. Set active partition |
| 3. Delete partition or Logical DOS Drive |
| 4. Display partition information |
| 5. Change current fixed disk drive |
| Enter choice: [1]
Press Esc to exit FDISK |
Figure 3-17: FDISK Menu (Windows 95 version)
You cannot use the FDISK utility from the DOS and Windows 95 operating systems to delete NTFS partitions because DOS and Window 95 do not recognize NTFS partitions. A utility such as DELPART, found in the Windows NT Resource Kit CD, can be used. DELPART is also available for download from the Internet. Use one of the major search engines, such as Yahoo or Excite, to locate it.
One other option for deleting an NTFS partition is to use the OS/2 version of FDISK. You can use the /D option to delete a partition.
If installing MS DOS 6 or later, you can go through the installation process to remove Windows NT and set up a new master boot record. Boot with the first disk of the installation set. When prompted, choose the Remove files option.
One final way to delete an NTFS partition is to initiate a new Windows NT Server installation and choose Delete partition in the text portion of the setup process.
If you don’t want to destroy the data on your drive but want to remove Windows NT Server 4.0, you can delete certain system files. There are hidden, read-only system files on the drive root that you need to remove. You also need to remove some files in the Windows NT root (the subdirectory where you installed Windows NT Server—the default location is c:\WINNT). This procedure, described in Exercise 3-17, will work only if the partition is FAT, not NTFS.
| NTLDR | |
| BOOT.INI | |
| BOOTSECT.DOS | |
| NTBOOTDD.SYS | |
| NTDETECT.COM |
When Windows NT Server installs the master boot record on the drive is changed. In the event that a server needs to be setup with a different operating system, you need to make sure that the master boot record is rewritten for the operating system you have chosen. There a couple of ways to do this. The first is shown in Exercise 3-18, which shows you how to change the boot loader in an existing FAT partition to MS-DOS.
If you do not want to remove Windows NT Server and simply want to make MS-DOS your default operating system, you can change the startup process within Control Panel. The procedure for doing this is described in Exercise 3-19.
| I want to set up a server that will not be bothered with maintaining account information. What do I want to install? | You should set up a member server, which has no responsibility with the user account database. |
| My PDC just crashed and I need to keep the domain running. What do I do? | Use Server Manager to promote a BDC to PDC. |
| As a new member of Technical Support, I got a call from an Administrator who said that she was having a problem setting up a second PDC in her Domain Ajax. What should I tell her? | Only one PDC is allowed per domain. |
| I am the administrator of a domain that has one PDC and one BDC designated for each satellite office, but they are located in our local office. 15,000 client workstations are spread across the country in various satellite offices. (On the exam you will see questions that have network scenarios as big or bigger than this). Users complain that it takes a very long time to log on. The satellite offices are connected via T1 connections. What can I do to remedy this situation? | This question leans toward the Windows NT Server in the Enterprise exam, but it is still relevant here. An efficient way to speed logons in a WAN environment is locate a BDC in the remote office. Logging on across the WAN link can slow the process considerably. |
| I am the administrator of a Windows NT network that has one PDC and no BDC’s. The PDC has crashed and will not boot. The last known good backup is from yesterday. What can I do to bring the server back online? | Without a BDC to promote to PDC, your only choice is to reinstall Windows NT Server 4.0 and then restore from backup. Any changes between the backup and the server crash will be lost. |
| I am about to start the installation process with the boot disks. As I boot the machine, what do I have to type to get the installation process started? | Nothing. When you use the boot disks or CD-ROM drive for installations, the setup process starts automatically as the machine boots. |
| I have a machine whose CD-ROM drive is not compatible with Windows NT. What can I do to install Windows NT Server? | Copy the installation file to your hard disk and run the installation from there. Until you obtain an NT-compatible CD-ROM drive, you cannot install Windows NT Server from a CD-ROM. |
| I want to create an answer file for unattended installation. What utility is available to help me do this? | SETUPMGR on the Windows NT Server CD-ROM. You'll find it in the Support/Deptools/i386 subdirectory. |
During installation you may have to do some troubleshooting if your installation doesn’t go smoothly. Here are some of the most common troubleshooting problems.
Faulty media is a common problem. The boot disks may have one bad disk or the CD itself may not be functioning correctly. There have also been many documented cases of insufficient disk space problems. These simple problems can cause financial headaches for companies, because it can take hours to track them down and resolve them.
Another item that can cause problems with configuration is an incompatible SCSI device, or a third-party drive like a Zip or Jaz drive. SCSI adapters devices (which is what most hard drives in servers are) can be one of the more challenging devices to get to work with Windows NT. The recommended method, of course, is to consult the latest edition of the Hardware Compatibility List (HCL). Microsoft Technical Support will not support you if you are having a problem with a device that is not on the HCL.
Another simple mistake—such as a wrong username, domain name or protocol—can make it seem that the machine you are configuring is not connecting. Oversights such as usernames and domain names, if not checked, can be mistaken for hardware problems. It’s much more economical to spend 15 minutes troubleshooting the basic network configuration than it is to buy a new NIC and toss the old one out.
Here's a real-life example:
A network engineer, when setting up a new PDC and various workstations, named the domain MainOffice1. In the course of setting up the network, one of the workstations was also named MainOffice1. This network is part of a WAN environment, with other domain controllers set up in trusted relationships. When finalizing all the machines and rebooting the PDC and workstations, the engineer encountered an error message. What do you think it was?
Right: duplicate names. This is a classic case of mere oversight. You always have to make sure that any and all names are unique. Whether it is a domain name or a computer name, it must be unique in the network.
As part of the certification process you will need to be proficient in hands-on exercises; you'll also have to apply your knowledge to complex scenarios. The installation process for Windows NT Server accounts for about 10% of what you need to know on the exam and 40% of what you need to know in real life.
Be sure to know the hardware requirements for installing Windows NT Server 4.0. A good understanding of hard disk partitioning and planning is also important. Knowledge of basic NT administrative tasks, such as recreating the installation disks and the switches available for winnt.exe and winnt32.exe are also important. Be sure you have a good handle on the different security roles a server can have. You need to know how to maintain the domain environment, especially in the event of a PDC failure. When a Windows NT 4.0 Server installation fails, a good administrator can work through problems to get the server back online and restore proper functioning. Being able to troubleshoot the installation process is essential to the administration of your domain.
These items may be a small percentage of the entire exam, but they are invaluable for real-world situations. A good installation, with proper planning and preparation, can make domain administration a much easier process.
| Windows NT Server supports three protocol standards: TCP/IP, NWLink, and NetBEUI. | |
| The absolute minimum recommended by Microsoft for Intel x86-type computers is 124 MB. | |
| The syntax for the UNC name is \\copmutername\sharename. | |
| You can install Windows NT on a RISC-based system, but you must use a FAT partition for the system files. | |
| With RISC-based systems, the partitions must be set up ahead of time. Windows NT cannot set up and configure RISC partitions. | |
| Windows NT 4.0 cannot access the FAT32 file system. | |
| By default, Windows NT 3.51 is installed in the \NT351 directory and Windows NT 4.0 uses the \WINNT directory. | |
| The SETUPMGR utility in the support\deptools\<computer type> is a GUI program that will help you set up answer files for unattended installation. | |
| The Uniqueness Database File (UDF) allows an administrator to specify information for each individual workstation or server that is being installed. | |
| A PDC is the central server in the network. There must be one—and only one—PDC per domain. | |
| Member servers are used for application servers, print servers, or SQL servers. They are dedicated to process high-end searches, and non-security type functions. | |
| Stand-alone servers cannot be promoted or demoted. The only way to change the role of a member server is to reinstall Windows NT Server on the machine. |
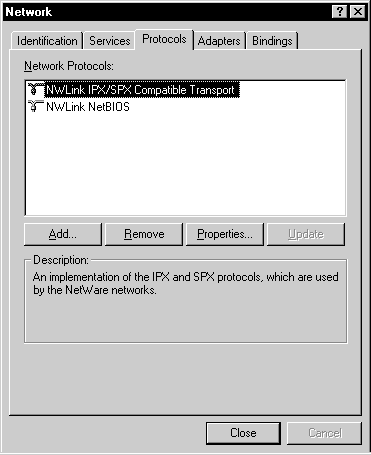
Figure 18: Protocol setup on new server
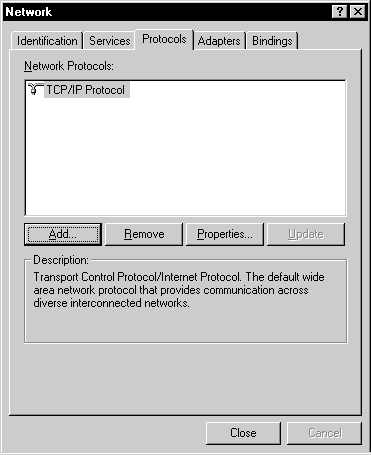
Figure 19: Protocol setup on PDC
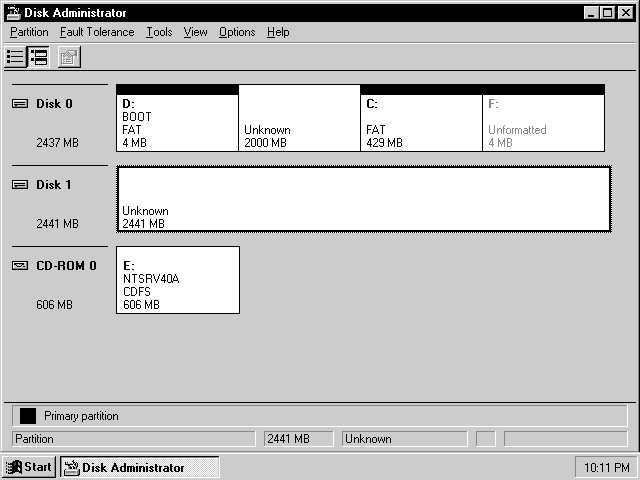
Figure 20: Disk Administrator on a dual boot machine
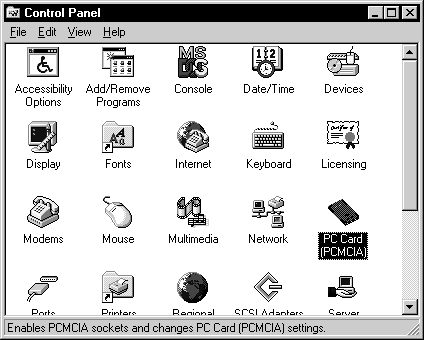
Figure 21: Control Panel
ANSWERS TO SELF TEST QUESTIONS