| Chapter 4 * |
Configuring Windows NT 4.0 * |
| Certification Objectives * |
| Configuring Network Protocols * |
| NWLink IPX/SPX-Compatible * |
| TCP/IP * |
| NT TCP/IP Services * |
| Dynamic Host Configuration Protocol (DHCP) * |
| Exercise 4-1: Creating a DHCP scope * |
| Exercise 4-2: Configure DHCP Options * |
| From The Classroom * |
| Configuring NT to Avoid Problems * |
| Windows Internet Naming Service (WINS) * |
| Internet Information Server (IIS) * |
| Exercise 4-3: Configuring the WWW Service on IIS * |
| Configuring Peripheral Devices * |
| Control Panel * |
| Changing Display Adapter Settings * |
| Exercise 4-4: Changing the Display Adapter * |
| Removing NT Components * |
| Exercise 4-5: Removing a Windows NT application * |
| Splitting the Paging File * |
| Exercise 4-6: Splitting the Paging File across Multiple Physical Disks * |
| Adding Tape Backup Drives * |
| Exercise 4-7: Adding a Tape Device * |
| Adding SCSI Adapters and CD-ROM Drives * |
| Exercise 4-8: Adding a SCSI Adapter * |
| Adding Modems * |
| Exercise 4-9: Adding a Modem to Windows NT * |
| Adding Uninterruptible Power Supplies (UPS's) * |
| NT 4.0 Disk Administrator * |
| Exercise 4-10: Launching Disk Administrator * |
| System and Boot Partitions * |
| Exercise 4-11: Changing the active partition * |
| Primary and Extended Partitions * |
| Exercise 4-12: Deleting a partition * |
| Exercise 4-13: Creating an extended partition with logical drives * |
| Exercise 4-14: Formatting a partition * |
| Volume Sets * |
| Exercise 4-15: Creating a Volume Set * |
| Exercise 4-16: Extending a volume set * |
| Stripe Sets Without Parity * |
| Exercise 4-17: Creating a stripe set * |
| Drive Letter Assignment * |
| Exercise 4-18 Assigning drive letters * |
| Fault Tolerance (RAID) * |
| Mirroring * |
| Exercise 4-19: Creating a mirror set * |
| Exercise 4-20: Repairing a damaged mirror set * |
| Duplexing * |
| Striping with Parity * |
| Exercise 4-21: Creating a stripe set with parity * |
| Exercise 4-22: Repairing a damaged stripe set with parity * |
| NT Clients * |
| Using the Network Client Administrator * |
| Make Network Installation Startup Disk * |
| Make Network Client Installation Disk Set * |
| Copy Client-based Network Administration Tools * |
| View Remoteboot Client Information * |
| NT Browser Types * |
| Domain Master Browser * |
| Master Browser * |
| Backup Browser * |
| Potential Browser * |
| Non-browser * |
| Browser Elections * |
| NT System Registry * |
| Exercise 4-23: Editing the Registry * |
| Exercise 4-24: Finding occurrences of a word in the registry * |
| Hardware Profiles * |
| User Profiles * |
| Devices * |
| Registry Hierarchy * |
| Data Types * |
| Answers to Chapter 4 Self Test * |
| Configuring Network Protocols | |
| Configuring Peripheral Devices | |
| NT 4.0 Disk Administrator | |
| NT Browser Types | |
| NT System Registry |
In order to pass the exam you’ll need to know how to configure various components within NT. This chapter will discuss configuring network protocols and various peripheral devices to include tape backup devices, SCSI adapters, and display adapters. It will teach you how to use Disk Administrator to manage your hard disk partitions—including how to set up software RAID levels 0, 1, and 5. You’ll also need to know the various clients that are available for NT. Finally, you'll learn about the NT system registry and how it is organized.
For the exam you’ll need to know which protocols can be configured. TCP/IP must be configured and NWLink can be configured if needed. NetBEUI doesn’t need configuration.
NWLink does not require any configuration. By default it uses Auto Detect to detect the frame type. However, if a Novell network uses more than one frame type, you may need to specify which frame type to use. To specify the frame type, open Network Properties and choose the Protocols tab. Double-click the NWLink IPX/SPX Compatible Transport. In the next dialog box, open the drop-down menu for frame type. There will be four frame types to choose from: 802.2, 802.3, II, and SNAP. NetWare version 2.2 and 3.1 use Ethernet type 802.3 as the standard frame type. NetWare version 4.0 and above uses 802.2.
TCP/IP requires configuration, unless you have a DHCP server assigning TCP/IP information. (Dynamic Host Configuration Protocol—DHCP—is explained later in this chapter.) First you’ll need to open the network properties and choose the Protocols tab. Then double-click the TCP/IP protocol. If your server is multihomed (in other words, if it has more than one network connection), you’ll need to select the adapter where you want to configure on the IP Address tab; otherwise, the appropriate adapter is already selected. You’ll need to specify an IP address, subnet mask, and default gateway. A default gateway may not be necessary if your computer doesn’t need to communicate outside its local subnet. However, since TCP/IP is usually used in a routed environment, a default gateway is usually necessary. Figure 4-1 shows the IP Address tab filled out properly. If your network has more than one gateway, you can use the Advanced button to configure the additional gateway.
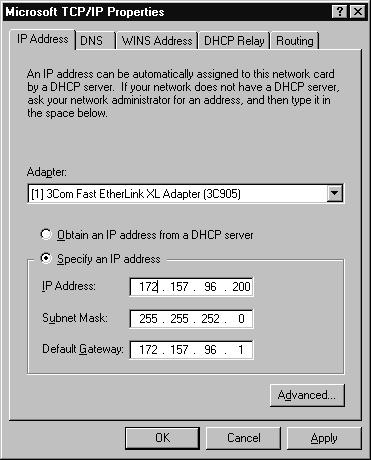
Figure 1: IP Address tab
If you plan to connect your server to the Internet, you’ll need to configure the DNS (Domain Name System) tab. Under Host Name fill in your computer’s host name (be sure to follow proper Internet naming conventions). In the Domain field you’ll enter your Internet domain name. This is not the same thing as an NT domain. The Internet domain name should look something like this: microsoft.com or your.companyname.net. Click the Add button under the DNS Service Search Order to add DNS servers. Finally, click the Add button for the Domain Suffix Search Order. Add any domain suffixes you want to add. Using a domain suffix can slow your system down when trying to connect to network resources. It appends the suffixes to the end of every failed connection. So if you mistakenly type WWW.mcirosoft.com, NT will try to connect to WWW.mcirsoft.com—then it will add your domain suffixes to the end of the search and try to connect to those sites. It will time out only after all suffixes have failed. Figure 4-2 shows a properly configured DNS tab.
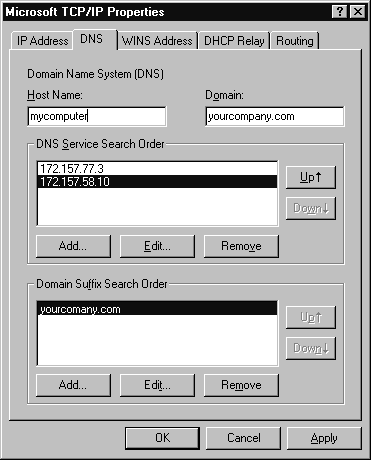
Figure 2: DNS tab
If you use WINS for name resolution on your network, you’ll need to configure the WINS Address tab. As with the IP Address, you’ll need to select the proper adapter if you have a multihomed machine. Enter at least a Primary WINS Server IP address. If you have two WINS servers on your network, you should fill in the Secondary WINS Server text box. On this tab you can Enable DNS for Windows Resolution. If you check this box, a DNS server will be used to resolve your Windows network names. Since DNS (unlike WINS) is not dynamic, it will be too difficult to manage a large Windows network using only DNS. If you only have a couple of Windows-based computers on your network, there are some advantages to using DNS for Windows Resolution. First, you won’t have to install a WINS server, which uses resources on the server where it is installed. Second, you can enable LMHOSTS Lookup. To use an LMHOSTS file, make sure the Enable LMHOSTS Lookup check box is marked, then click Import LMHOSTS. Choose the LMHOSTS file you want to import and click Open. Finally, you can set a Scope ID. All computers must have the same scope ID to communicate on a TCP/IP network. If you change the Scope ID of your server, all computers on your network must be changed to have the same scope ID. Figure 4-3 shows a fully configured WINS Address tab.
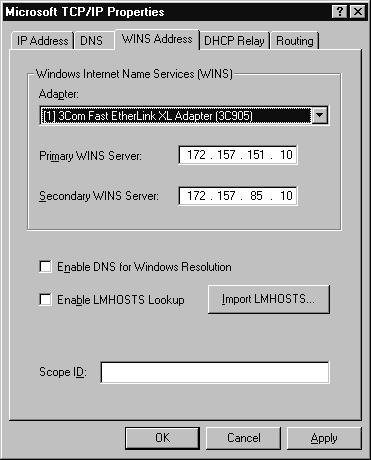
Figure 3: WINS Address tab
The DHCP Relay tab is used to forward DHCP request through a router. If your router isn’t able to forward DHCP requests, you can use this service to broadcast the request to other subnets. This service only supports clients on the local physical subnet. Simply click the Add button and enter the IP address of the DHCP server. If the Add button isn’t an available option, you first must install the DHCP Relay Agent. The DHCP Relay tab is shown in Figure 4-4.
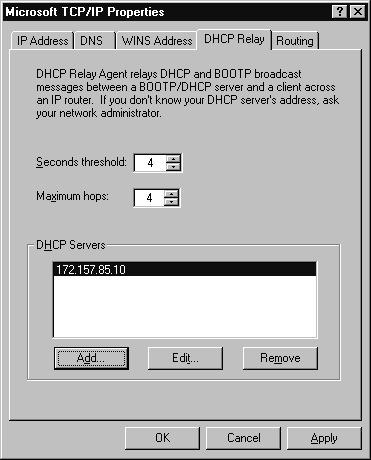
Figure 4: DHCP Relay tab
The Routing tab has only one check box. If you have a multihomed computer and you want use static IP routing between the two NIC's, you need to check this box.
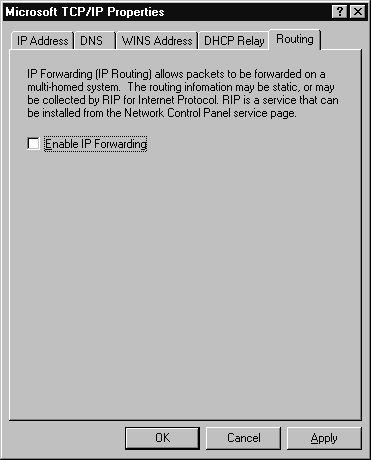
Figure 5: WINS Address tab
NT ships with several TCP/IP services, allowing NT to host many common UNIX server-based services. DHCP, WINS, and IIS services included with Windows NT Server 4.0 are described in the following sections.
As mentioned earlier, DHCP is used to assign TCP/IP configuration parameters on networked clients. DHCP is similar to BootP, except it leases IP addresses instead of giving out a new address every time the computer boots. The DHCP server administrator configures a scope for which a set of valid IP addresses are assigned. Each physical subnet that uses DHCP must have an active scope for that subnet if it is using DHCP. The routers also must be configured to broadcast DHCP requests.
When configuring a scope you need to enter the following items:
| A range of unique IP addresses (called a pool of IP addresses) | |
| A valid subnet mask for each pool of IP addresses | |
| Excluded IP addresses from the pool | |
| Duration of the lease (default 3 days) |
DHCP can also be used to set the configuration information for the clients. The following configuration information is commonly set for Windows-based networking clients:
| Router (Default Gateway) is mandatory | |
| WINS/NBNS Servers | |
| WINS/NBT node type (must be set to 0x8 [h-node]) | |
| DNS Servers | |
| Domain name |
DHCP options can be set for Global or Scope. Global settings apply to all the scopes on the DHCP server and a Scope setting applies to the selected scope. Exercise 4-2 teaches you how to configure Global and Scope options for a DHCP Server.
The number one fallacy and misunderstanding among NT administrators surrounds something called NetBIOS—what it is and what to do with it. In NT, NetBIOS is extremely important (even critical, you might say). It must be present if you want NT to function on the network. The perceived fallacy is that NetBIOS is a transport protocol——that NetBIOS is NetBEUI or that NetBEUI is NetBIOS (or some kind of an enhanced version of it).
Let’s take these misconceptions one at a time. NetBIOS is not a transport protocol inside NT. NetBIOS, as it applies to NT is a set of 19 API calls at various levels in the NT networking model. We repeat, it is not an NT transport protocol. Unfortunately, some LAN network operating systems (NOS's) use a transport protocol called "NetBIOS." In fact, an early Microsoft/IBM NOS used a transport protocol called NetBIOS, but this is not it.
That brings us to the transport protocol called NetBEUI. Interestingly enough, the acronym NetBEUI stands for NetBIOS Enhanced User Interface. So that makes NetBIOS just a subset of NetBEUI, which a transport protocol. Which by inference (if A=B and B=C, then A=C) makes NetBIOS a transport protocol within NT, right? WRONG! Read on, MacDuff.
Microsoft ships three transport protocols with NT: NetBEUI, NWLINK and TCP/IP. When you install any of these protocols, each installs its appropriate NetBIOS layer automatically. Remember that NetBIOS is a set of API calls. This layer must be present with each protocol stack that you install. You do not want to disable this.
OK, next fallacy. The reasoning goes, "if we must have the NetBIOS layer and if NetBEUI is sort of NetBIOS (which it is not; read the previous paragraphs if you are unsure), then we must have NetBEUI protocol always installed. Right? WRONG! We cannot tell you how many certified technicians—who claim to be NT-literate—have told us this. We go to sites where clients are running both TCP/IP and NetBEUI protocols. When we ask why, we get the above explanation. To demonstrate the fallacy, we remove the NetBEUI protocol and ask the administrator to show us what doesn’t work after it is removed. We actually have an administrator at one client who still insists, two years later, that something is missing, but he just hasn’t found it yet!
Yes, you do need the NetBIOS layer. No, NetBIOS and NetBEUI are not the same thing, although the names are misleading. Yes, the NetBIOS layer is loaded for each transport protocol stack you load. You now know more than many MCSE's.
WINS resolves computer names to IP addresses on a windows based network. WINS performs the same role as DNS, except it is dynamic. Whenever a client computer starts, it registers its name and IP address with the WINS Server. Then, when a client tries to locate another computer, it asks the WINS database to resolve the requested name to an IP address. WINS uses several configuration parameters to govern the WINS client behavior. Table 4-1 describes each configuration option. Table 4-2 describes each advanced configuration option.
| Option | Description |
| Renewal Interval | Specifies how often a client registers its name. Default is six days. |
| Extinction Interval | When it is marked it specifies the interval between an entry marked as released and extinct. Default is 6 days. |
| Extinction Timeout | Specifies the interval between an entry marked extinct and when it is deleted (scavenged) from the database. Default is 6 days. |
| Verify Interval | Specifies the interval in which the WINS server must verify that names owned by another WINS server are still active. |
Table 4-1: WINS Configuration Options
| Advanced Option | Description |
| Logging Enabled | Turns on logging of the J50.log files |
| Log Detailed Events | Turns on verbose logging. Events are written to the system event log. This requires a lot of computer resources. |
| Replicate Only with Partners | Only allows your WINS server to replicate with its configured push-and-pull partners. This prevents unauthorized/unwanted WINS servers from pushing or pulling to your database. |
| Backup on Termination | Backs up the database whenever WINS stops, but not when the system is shut down. |
| Migrate On/Off | Specifies that static unique and multihomed records in the database are treated as dynamic when they conflict with a registration or replica. |
| Starting Version Count | Used to fix a corrupted database. Enter a higher version number than what appears for a version number on all replication partners. This only needs to be set if you have a corrupt database. |
| Database Backup Path | Specifies a local directory where the WINS database is backed up. If a path is specified, WINS automatically backs up the database every 24 hours. |
Table 4-2: WINS Advanced Configuration Options
IIS provides FTP, Gopher, and Web services. When you install NT you are asked if you want to install IIS. You can also install IIS from the Network Control Panel Services tab. After installing IIS you configure it using Internet Service Manager (ISM). You can find ISM through the program group, Microsoft Internet Server (Common). Figure 4-6 shows the Internet Service Manager.
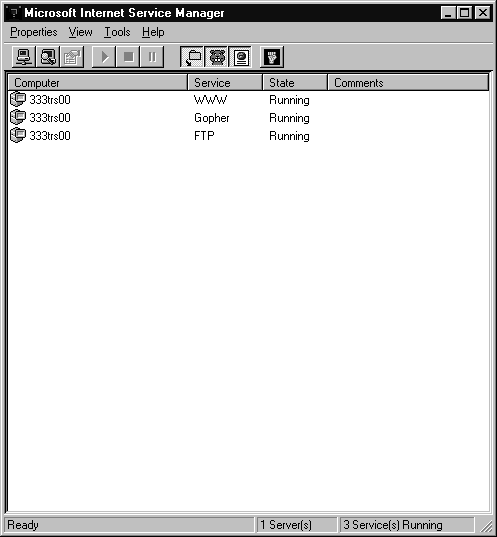
Figure 6: Internet Service Manager
After starting ISM you can have it search your network for other computers running IIS. If you have proper rights to these computers you can manage them from your computer using ISM. To configure a service, simply double-click the service you want to modify. Exercise 4-3 teaches you how to configure the World Wide Web Service.
| TCP Port: You should leave this at 80 since it is the standard port that Web browsers use; if you need to change it for security reasons, just enter a new port number. | |
| Connection Timeout: The amount of time that the client can remain idle before the service kills the connection. | |
| Maximum Connections: Change this number to set the maximum number of computers than can connect to your server through the WWW service at a single time. Anonymous Logon. | |
| Password Authentication: You can choose Allow Anonymous, which doesn’t require a logon account; Basic (Clear Text), in which anyone with a sniffer program can intercept your passwords; and Windows NT Challenge/Response, a more secure way of authenticating users. | |
| Comment: Use this space to describe your service on the network to other administrators. |
Figure 7: WWW Service tab
| Directory: Lets you specify the directories that the service has access to. | |
| Enable Default Document: Allows you to use a default file name for the directory so the user doesn’t have to type in the entire URL. | |
| Directory Browsing Allowed: Allows users to browse the directory via his Web browser. |
Figure 8: WWW Directories tab
| Enable logging: Lets you specify the type of log file, how often to start a new log, and the directory where the log files are stored. | |
| Log to SQL/ODBC Database: Lets you log directly to a database by providing a proper User ID and password. |
Figure 9: WWW Logging tab
| The first option, By default, all computers will be: Granted Access or Denied Access, allows you to specify how access is to be granted. By using the list box, you can allow only certain IP addresses access or you can deny only certain IP addresses access. | |
| The second option, Limit Network Use by all Internet Services on this computer, lets you specify the amount of network use (in KB/Sec) that this service can use. |
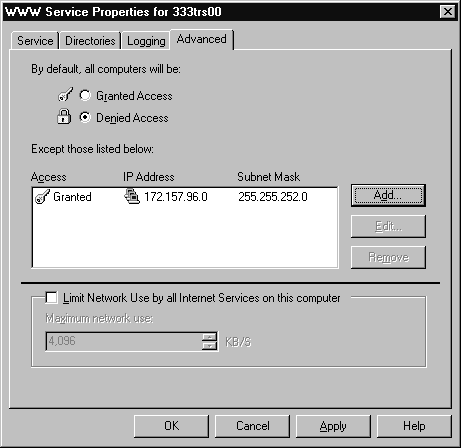
Figure 10: WWW Advanced tab
Most peripheral devices can be configured with the Control Panel; however, some may require a vendor-specific setup program.
The Control Panel has many applets that control device drivers. Figure 4-11 shows what our Control Panel looks like. As you add programs to your system, your Control Panel may change in appearance because some programs add Control Panel applets. Some of the applets are user-specific and others are computer-specific. User-specific applets allow each user to set NT to operate the way they prefer. The computer-specific applets affect all users and can only be changed by an administrator. The Control Panel accomplishes this by interacting with the registry. The user-specific applets control HKEY_CURRENT_USER subtree and the computer-specific applets interact with the HKEY_LOCAL_MACHINE subtree. We’ll discuss the registry and subtrees in more detail later in this chapter. The following are user-specific applets: Display, Accessibility Options, Internet, Telephony, Console, Regional Settings, Keyboard, Mouse, Printers, Sounds, Dial-up Monitor, and certain parts of the System application.
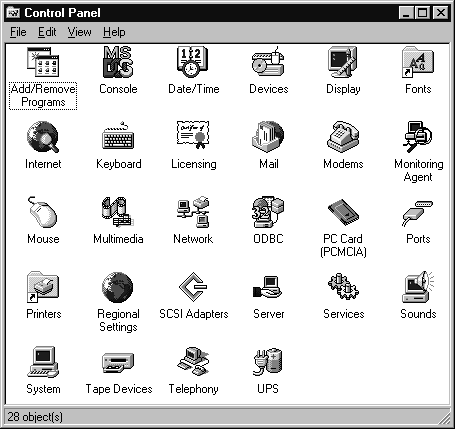
Figure 11: Control Panel
The following exercises step you through using these applications. Each exercise starts by assuming you have the Control Panel open on your desktop. The first, Exercise 4-4, teaches you how to change your display adapter, resolution, and color depth.
You use the Add/Remove Programs applet to remove NT components. Exercise 4-5 shows you how to remove WordPad from your computer.
You can increase the performance of your machine by spreading your page file out across several disks, especially if you have more than one disk controller or a controller that performs concurrent I/O. To spread you page file across multiple disks follow the steps in Exercise 4-6.
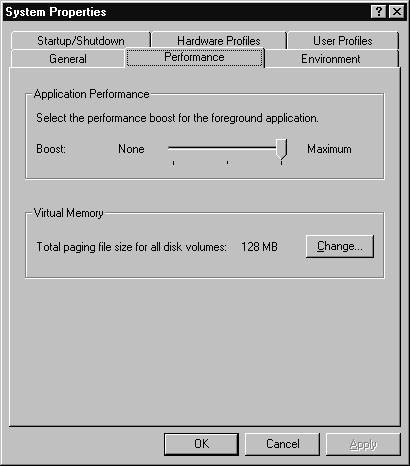
Figure 12: System Performance tab
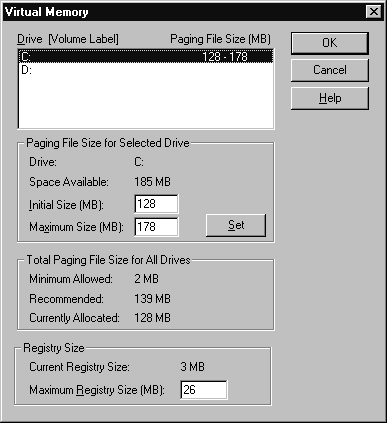
Figure 13: Modifying the page file drive
NT supports tape back-up drives for disaster recovery purposes. Adding a tape device is simple. Follow Exercise 4-7 to add a tape device.
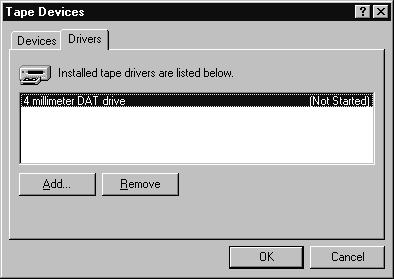
Figure 14: Adding a tape device driver
The SCSI Adapters Control Panel applet is used to install SCSI adapters, but it is also used to install IDE CD-ROM drivers. This may confuse you when you are adding an IDE CD-ROM device and need to find the proper Control Panel applet to execute. Just remember to use the SCSI Adapters applet for both SCSI and IDE devices.
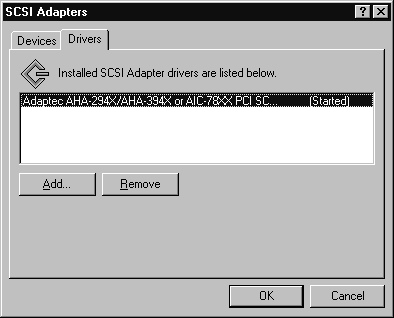
Figure 15: Adding a SCSI adapter driver
You use the Modems Control Panel applet to add and remove modems. Exercise 4-9 teaches you how to add a modem.
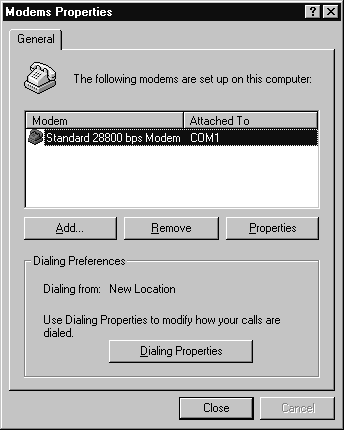
Figure 16: Adding a modem
An UPS is an important part of fault tolerance. If you have an UPS you can use NT’s UPS Control Panel applet to configure it. Before you can configure it you’ll need to connect a serial cable connected to your computer and the UPS. By configuring the UPS you can have NT automatically shut down when power is lost, execute a command, and notify all connected users. Figure 4-18 is the UPS Control Panel applet screen.
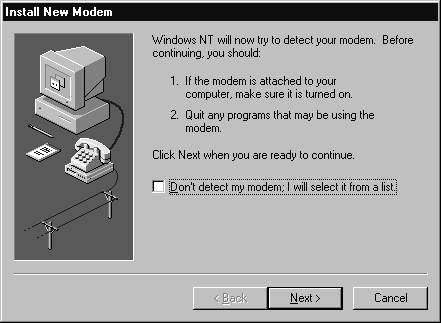
Figure 17: UPS Control Panel Applet
The first step in configuring an UPS is to click the check box next to the option: Uninterruptible Power Supply is installed on. Choose the port it’s connected to in the drop-down box. Configuring the rest of the UPS depends on the type of UPS you have and how the manufacturer has designed it. In the UPS Configuration group box , you can choose whether a negative or positive signal is sent during an active state. In other words, the signal you choose is the type that's normally sent; it changes when a power failure occurs. You’ll need to use the Owner’s Manual that comes with your UPS to obtain the correct values.
You can have NT run a command file when a power failure occurs. Just click next to the Execute Command File check box and type the name of the file you want to execute when the power fails. The command file must execute completely within 30 seconds, or NT terminates the command. Therefore, your command file shouldn’t contain any dialog boxes because they require user intervention and would probably take more than 30 seconds to complete. The command file must be placed in your %systemroot%\System32 folder and be an executable file type (.exe, .com, .cmd, .bat).
The UPS Service group box enables you to set the duration of power outage that triggers a message to connected users, as well as the time interval that should pass before subsequent warning messages are issued.
The UPS Characteristics group box enables you to set the battery run time (Expected Battery Life) and the recharge rate (Battery recharge time per minute of run time). If you set the Expected Battery Life too long and your UPS doesn’t support a Low battery signal, your UPS may not shut down in time. Be careful when setting your expected battery life.
If you’re familiar with MS-DOS, you have probably used FDISK.EXE in the past to partition your hard disk. Rather than FDISK.EXE, NT uses a program called Disk Administrator to create and manage partitions. Disk Administrator is considerably easier to use than FDISK.EXE. Exercise 4-10 helps you start Disk Administrator for the first time. After starting Disk Administrator, you can create and delete partitions; you can also manage stripe sets, volume sets, stripes sets with parity, and mirror sets.
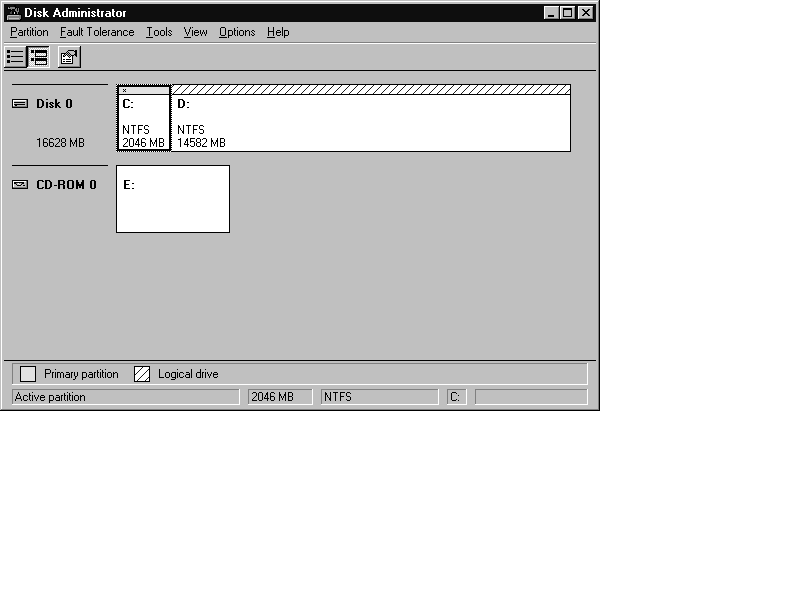
Figure 18: Disk Administrator
No signature found on Disk 0. Writing a signature is a safe operation and will not affect your ability to access this disk from other operating systems, such as DOS.
If you choose not to write a signature, the disk will be inaccessible to the Windows NT Disk Administrator program.
Do you want to write a signature on Disk 0 so that the Disk Administrator can access the drive?
NT uses two special partitions called the system and boot partitions for its start-up procedure. The definition of these partitions may sound backwards, but it is correct. The system partition contains the boot files such NTLDR and BOOT.INI. The boot partition contains system files such as the WINNT folder and the SYSTEM32 folder. The system partition can be set to active. When the system partition is set to active your computer will boot from that partition. If you have more than one system partition you can change the active partition—thereby changing which partition you boot from. Exercise 4-11 shows how to change the active partition of your system.
Before you can access your hard disks, they first must be partitioned. You can create either primary partitions or extended partitions. A primary partition can be used as a system partition (set to active). Each hard disk can have up to four primary partitions. If you use an extended partition on a disk, you can only have three primary partitions on that disk The key is you are only allowed to have a total of four partitions (not including logical drives) on a disk. A logical drive is a method of subdividing an extended partition. Unlike a primary partition, an extended partition can be divided into many logical drives. This enables you to have many more than four drive letters per disk.
Figure 4-19 shows a computer configured with two hard disk drives (Disk 0 and Disk 1) and one CD-ROM. Disk 0 has one primary partition (C:) and one extended partition that contains three logical drives (E: to G:). Disk 1 has one primary partition (D:), one extended partition with four logical drives (I: to L:), an Unknown partition (it’s a partition that runs the Linux operating system, a version of UNIX that you don’t need to know for the test), and 502 MB area of free space. You’ll notice that drive C: has an * above it, which means it’s marked as active (the system partition).
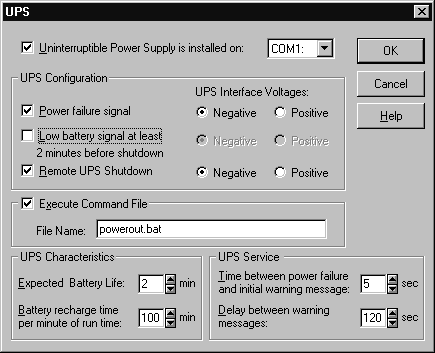
Figure 19: Primary and Extended Partitions
Exercises 4-12 through 4-14 show how to manage and configure partitions using Disk Administrator.
Volume sets combine 2 to 32 areas of free space on one or multiple hard disks. Use volume sets to combine different sized areas of free space as a single volume (drive letter) from any type of hard disk (IDE, SCSI, or ESDI). Volume sets don’t provide any fault tolerance or performance gains. They are simply used to combine multiple areas of free space as one logical drive. You can also extend your volume set if you format it using NTFS. If your volume set is formatted with the FAT file system, you’ll need to convert it to NTFS if you want to extend it. Extending a volume set allows you to format more areas of free space into an existing volume set without destroying the data. Although you can increase the size of a volume set, you can never decrease it. Exercise 4-15 teaches you how to create a volume set and Exercise 4-16 shows you how to increase the size of your volume set.
Stripe sets without parity are like volume sets except they provide performance gains. They can combine 2 to 32 areas of free space as a single logical drive; however, the free space must be on different hard disks and each hard disk must contain the same amount of free space. If you have two disks—Disk 1 one with 100 MB free and Disk 2 with 200 MB free—you can use 100 MB free space from each disk, and ignore the remaining 100 MB available on Disk 2.
The data is written to a stripe set in 64 KB blocks, going disk by disk. If you use multiple controllers or if your controller supports concurrent I/O, you can see significant speed improvements because you can access your data by reading from more than one drive at a time.However, stripe sets without parity have a disadvantage: when a hard disk fails, all your data is lost. Since each disk contains a portion of the data, you lose all the data if any one disk fails. Exercise 4-17 teaches you how to create a stripe set without parity. This exercise requires you to have at least two hard disks with an equal area of available free space.
Assigning drive letters is easy in NT. You use Disk Administrator to assign or change drive letters. Be very careful when changing drive letters on drives that are already in use. Although the drive letter changes, the registry settings for programs that are set up on that drive are not updated and users may lose access to files. Exercise 4-18 shows how to change the drive letter for your CD-ROM drive.
If you’ve worked with computers for very long, you probably already know that they break. In fact the hard disk is one of the most commonly broken components in a computer. In order to increase your computer's uptime (the amount of time it is online) you should consider using RAID (Redundant Array of Inexpensive Disks). NT Supports software RAID levels 0, l, and 5, in which the operating system controls how the data is written to the physical drive. Hardware redundancy is more expensive, but it provides better performance. Windows NT HCL contains a list of hard disks supported for software RAID. RAID level 0 is a stripe set without parity, which was just discussed. This is the only level of RAID that doesn’t provide fault tolerance, because it doesn't include a parity bit that can be used to reconstruct the data set.
Raid level 1 is disk mirroring, in which two hard disks contain identical information. If one drive fails, the other drive can still be accessed; since it contains identical information, no data is lost. Software RAID 1 can be used on the system and boot partition, whereas software RAID 5 can’t be used on these partitions. Exercise 4-19 shows you how to create a mirror set and Exercise 4-20 shows how to repair a damaged mirror set using Disk Administrator.
Disk duplexing is exactly like mirroring except that it uses two disk controller cards. This provides redundancy in case one of the controllers fails. Duplexing eliminates the single point of failure that comes with using a single controller card.
RAID 5, also called a stripe set with parity, uses 3 to 32 drives with the same size partition. It manages the data just like a stripe set, except it writes a parity bit across all the disks. Table 4-3 shows the order in which data is written to a stripe set with parity. RAID 5 uses this parity bit to reconstruct the data on a disk if that disk fails. If more than one disk fails, there isn’t enough information to reconstruct the missing data; therefore, you shouldn’t rely on RAID 5 alone—you’ll also need to perform regular backups. The more disks you include in a stripe set with parity, the more economical it is. The amount of space lost to parity is 1/n (where n is the number of disks in the set). Unlike mirroring, software RAID 5 can't be used on the system or boot partitions. Exercise 4-21 shows you how to create a stripe set with parity and Exercise 4-22 shows how to repair a stripe set with parity.
| Disk0 | Disk1 | Disk2 | Disk3 | |
| Stripe1 | Parity 1 | 1 | 2 | 3 |
| Stripe2 | 4 | Parity 2 | 5 | 6 |
| Stripe3 | 7 | 8 | Parity 3 | 9 |
| Stripe4 | 10 | 11 | 12 | Parity 4 |
Table 4-3: Stripe Set with Parity
One reason NT has been so successful is because of its support for many different clients. NT can communicate with MS-DOS with Network Client 3.0, Windows 95, Windows 3.11 for Workgroups, NT Workstation, OS/2, LAN Manager, Macintosh, NetWare, and UNIX clients.
Not all clients operate in the same way with NT. Table 4-4 shows the network protocols supported by the clients. Table 4-5 shows the supported TCP/IP protocol-related services.
Client |
NetBEUI |
IPX/SPX |
TCP/IP |
DLC |
| MS-DOS Network Client 3.0 | X |
X |
X |
X |
| Windows 95 | X |
X |
X |
|
| Windows 3.11 | X |
X |
X |
|
| LAN Manager 2.2c for MS-DOS | X |
X |
X |
|
| LAN Manager 2.2c for OS/2 | X |
X |
||
| Windows NT Workstation | X |
X |
X |
X |
| NetWare 3.11 | X |
Table 4-4: Supported Network Client Protocols
Client |
DHCP |
WINS |
DNS |
| MS-DOS Network Client 3.0 | X |
||
| Windows 95 | X |
X |
X |
| Windows 3.11 | X |
X |
X |
| LAN Manager 2.2c for MS-DOS | X |
||
| Windows NT Workstation | X |
X |
X |
Table 4-5: TCP/IP Related Protocol Services
The Network Client Administrator tool gives administrators the ability to customize the way they install networking clients. You can make a network installation startup disk or an entire installation disk set, copy client-based network administrative tools, and view Remoteboot client information. The Network Client Administrator tool is located in the Administrative Tools program group.
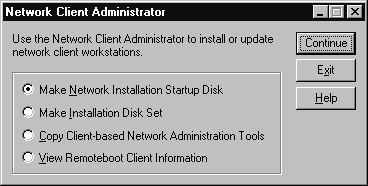
Figure 20: Network Client Administrator
This option allows you to create a bootable floppy disk that will connect to an NT Server and download the files necessary for installing the selected operating system. Windows NT Workstation, Windows 95, and Microsoft Network Client 3.0 for MS-DOS are all supported.
This option makes a complete installation disk set for the selected network operating system. You can make installation disks for Microsoft Network Client 3.0 for MS-DOS, LAN Manager 2.2c for MS-DOS Client, LAN Manager 2.2c OS/2 client, and Windows 95.
This option makes the NT administration tools available via the network. The list of tools you can execute depends on which operating system you are running.
The Windows NT Workstation tools are as follows:
| Server Manager | |
| DHCP Manager | |
| WINS Manager | |
| User Manager for Domains | |
| Remoteboot Manager | |
| Services for Macintosh | |
| System Policy Editor | |
| RAS Administrator |
The tools for Windows 95 are as follows:
| Server Manager | |
| Event Viewer | |
| User Manager for Domains | |
| User Manager extensions for NetWare Services | |
| NTFS File permissions tab | |
| Print Security tab |
Allows an administrator to view the remoteboot information provided by an NT Server running the Remoteboot service. Remoteboot service boots MS-DOS and Windows-based computers via the network.
NT uses a computer browser service to locate other computers on the network. Each protocol you have installed takes up resources in the computer browser service because each one must have its own browse list. There are four types of browsers: domain master browser, master browser, potential browser, and non-browser.
The domain master browser is responsible for maintaining a list of master browsers on all subnets. It combines each subnet’s master browser’s list into one list for the entire domain. This list is forwarded back to the master browser on each subnet. By default, the PDC serves as the domain master browser.
Each subnet for the domain or each workgroup has a computer, known as the master browser, responsible for maintaining the browse list. Every time a computer starts, it registers itself with the master browser. The master browser records all registered computers in a list and forwards it to the domain master browser.
The backup browser helps the master browser by giving its browse list to clients who request it. The master browser gives its browse list to a backup browser so the backup browser can give the list to local clients. Whenever a master browser goes offline, a backup browser becomes the master browser.
A potential browser is a computer that isn’t acting as a browser, but can do so if requested.
No matter what, this computer can’t serve as a browser.
Browser elections occur whenever a client or backup browser can’t find a master browser. The browser election tries to find the most robust computer to be the master browser. A computer initiates an election by sending an election datagram out to the network. When a browser receives an election datagram, it examines the election criteria set on that datagram. If the browser has better election criteria it sends out its own election datagram. This continues until no more election datagrams are broadcast. When a browser can't send an election datagram because it doesn't have better criteria, it attempts to find the new master browser. Some of the criteria used to determine the master browser are:
| Operating system NT Server scores higher than Workstation; Workstation gets a higher score than Windows 95; and Windows 95 higher than 3.11. | |
| Version NT Server 4.0 scores higher than NT Server 3.51; and NT Server 3.51 higher than 3.5. | |
| Current Browser Role Backup browser gets a higher score than a potential browser. |
You can use the MaintainServerList parameter in the registry to tell your server whether it should always try to become the master browser, never become the master browser, or be a potential browser. Edit the registry key:
HKEY_LOCAL_MACHINE\System\CurrentControlSet\Service\Browser\Parameters
MaintainServerList (set to Yes, No, or Auto)
Setting the MaintainServerList parameter to Yes forces your server to always try to become the master browser. The value No causes the computer to never become the master browser, and Auto sets it to be a potential browser.
First, a warning: Editing the registry can severely damage your NT configuration. It’s not like an .INI file where you can go back and correct your mistakes. If you damage your registry by editing the wrong key by mistake, you may have to reload NT. Before editing your registry, you should run the RDISK utility to make sure you have a current Emergency Repair Disk.
The registry contains all your system and program configuration parameters. It is a very powerful database that controls your computer. The registry is a much better way to maintain configuration information about your computer than .INI files were. First of all, .INI files were flat and couldn't contain subcategories within sections, whereas the registry can. Also .INI files couldn't apply security as the registry can. The registry offers a centralized place for configuration information, whereas .INI files were far from centralized—remember WIN.INI and SYSTEM.INI? Finally, the registry is very flexible. .INI files could only hold ASCII text, but the registry can hold binary values, hexadecimal values, and even executable code.
However, the registry does have its critics. It’s very hard to navigate and understand. It’s very easy to get lost in the plethora of directories and subdirectories. The registry is also a very deadly tool because one mistake can wipe out your entire system.
You should try to avoid editing the registry with regedt32.exe. You can save yourself a lot of trouble by using the proper tools designed for editing the registry. The Control Panel is a common tool used for editing the registry. When you change values using a Control Panel applet you are usually changing registry values. You can also use the administrative tools that come with NT to edit the registry: User Manager, Event Viewer, and Server Manager. If you must edit the registry, Exercise 4-23 and Exercise 4-24 teach you how to get started.
Hardware profiles allow you to boot your computer using different configurations—most commonly laptops and docking stations. If the laptop is docked, it has one type of hardware configuration; when it isn’t docked, it has a different configuration. By using hardware profiles you can specify which configuration to use when your system boots. NT uses the registry key HKEY_CURRENT_CONFIG to maintain the information about the hardware profile you selected at startup. You can create or edit hardware profiles using the Hardware Profiles tab in the System applet of the Control Panel.
User profiles store configuration information for a specific user. Users can choose many of their own environment settings without changing the environment for other users. Different environment settings for user profiles are stored in different files and locations within NT. The file NTUSER.DAT contains most of the registry information for a user profile; however, much of the information is also stored in folders located in %winnt%\profiles folder. This folder contains information such as recently used files, shortcuts, startup programs, and desktop configuration.
There are two types of user profiles: roaming and local. Roaming profiles allows users to log on to any NT Workstation or Server and have the same user profile. To set a roaming profile you need to set a profile path in User Manager. Roaming profiles can be mandatory. A mandatory profile doesn’t allow the user to change his environment. To create a mandatory profile, you must specify a profile path in User Manager. Then copy a profile to the users profile directory using the Copy To button in the System applet. After the profile is copied, rename the file NTUSER.DAT to NTUSER.MAN. The .MAN extension makes the file read-only so that any changes the user makes to his environment won’t be saved when the user exits.
A local profile resides on the local machine. Any changes made to the profile are updated locally. The first time a user logs on, NT uses the local default user profile to create a profile for the new user, unless the user has a roaming profile. If a user has a roaming profile, it is downloaded to the local machine.
You can configure the startup value of the devices on your system by using the Devices applet in Control Panel. There are five types of device you can configure:
| Boot Has a start value of 0 in the registry; devices assigned this value start as soon as the kernel is initialized. Examples: Tape and disk devices. | |
| System Has a start value of 1; these devices start after the boot devices have finished starting and after the HKEY_LOCAL_MACHINE subtree is built. Examples: CD-ROM, serial mouse, and video drivers. | |
| Automatic Has a start value of 2; these devices start just before the WINLOGON dialog box appears. Examples: Parallel and serial ports | |
| Manual Has a start value of 3. These devices never start without an administrator to manually start the device. | |
| Disabled Has a start value of 4. These devices can’t be started without first changing their startup type. |
The registry is made up of a hierarchy that can be visualized as a tree. At the top of the hierarchy is the subtree. Each subtree appears in its own window when using REGEDT32. There are five subtrees:
| HKEY_LOCAL_MACHINE | |
| HKEY_USERS | |
| HKEY_CLASSES_ROOT | |
| HKEY_CURRENT_USER | |
| HKEY_CURRENT_CONFIG |
The next order in the hierarchy is the hive—a collection of registry keys which has a corresponding file saved on the hard disk. This gives the registry fault-tolerance. If the registry is corrupt, it can read the affected hive from a file on the hard disk.The registry keys appear as folders when using the registry-editing tool. A key is a category that can contain subkeys. At the bottom of the hierarchy are the values.
There are five different types of data value that you can store in the registry.
| REG_BINARY Indicates that the data is binary. | |
| REG_DWORD Indicates that the data is stored in a word (four-byte number). | |
| REG_SZ Indicates that the data is a string (text). | |
| REG_MULTI_SZ Indicates the data is a multiple string (list). | |
| REG_EXPAND_SZ Indicates the data is an expandable string (variable). |
This chapter had many exercises in it. In order to pass the exam you’ll need to know how to perform all these tasks, so if you skipped any of the exercises be sure to go back and complete them before taking the exam.
The chapter began with instructions to configure TCP/IP. You need to know that TCP/IP must be configured, and that you can use DHCP to automatically configure your clients. DHCP and WINS are two services that you’ll probably use on a Microsoft TCP/IP network. DHCP Server can automatically assign IP addresses and configuration information on your clients. WINS is used to resolve computer names to IP addresses dynamically.
The chapter contains many exercise that use Disk Administrator. One common element in all of the exercises was the fact that you had to commit your changes before applying new modifications to your partitions. NT forces you to do this, so that you can always undo your changes in case you make a mistake. The chapter also discussed RAID levels 0, 1, and 5. RAID level 0, a stripe set without parity, does not provide fault tolerance. RAID level 1, disk mirroring, uses two disk drives and keeps the exact same information on each disk. RAID level 1 can be used for boot and system partitions. RAID level 5, a stripe set with parity, can’t be used on system and boot partitions. It uses 3 to 32 disks to provide fault tolerance by writing a parity bit that is spread across all the disks in the set. This parity bit is used to reconstruct the data if one of the disks fails.
You'll need to know how various clients can connect to NT via which protocols. The Network Client Administrator is used to install network shares for client installations and NT Administrative Tools. It can also be used to view the Remoteboot client information for networks that boot clients from a server.
Finally, the chapter described discussed the registry and its subtrees. The registry can be visualized as a tree. Each window in the tree (called a subtree) has branches called keys. These branches eventually end with leaves, which are the actual data values.
| NWLink does not require any configuration. By default it uses Auto Detect to detect the frame type. | |
| If you use WINS for name resolution on your network, you’ll need to configure the WINS Address tab. | |
| All computers must have the same scope ID to communicate on a TCP/IP network. If you change the Scope ID of a server, all computers on the network must be changed to have the same scope ID. | |
| The DHCP Relay tab is used to forward DHCP request through a router. | |
| If you have a multihomed computer and you want use static IP routing between the two NIC's, you need to check the box in the Routing tab. | |
| DHCP is used to assign TCP/IP configuration parameters on networked clients. | |
| DHCP is similar to BootP, except it leases IP addresses instead of giving out a new address every time the computer boots. | |
| The DHCP server administrator configures a scope for which a set of valid IP addresses are assigned. Each physical subnet that uses DHCP must have an active scope for that subnet if it is using DHCP. | |
| WINS resolves computer names to IP addresses on a Windows-based network. WINS performs the same role as DNS, except it is dynamic. | |
| The computer-specific applets affect all users and can only be changed by an administrator. | |
| You can increase the performance of your machine by spreading your page file out across several disks, especially if you have more than one disk controller or a controller that performs concurrent I/O. | |
| The SCSI Adapters Control Panel applet is used to install SCSI adapters, but it is also used to install IDE CD-ROM drivers. | |
| NT uses two special partitions called the system and boot partitions for its start-up procedure. | |
| Volume sets combine 2 to 32 areas of free space on one or multiple hard disks. Use volume sets to combine different sized areas of free space as a single volume (drive letter) from any type of hard disk | |
| A primary partition can be used as a system partition (set to active). Each hard disk can have up to four primary partitions. | |
| If you use an extended partition on a disk, you can only have three primary partitions on that disk. | |
| A logical drive is a method of subdividing an extended partition. | |
| Disk duplexing is exactly like mirroring except that it uses two disk controller cards. This provides redundancy in case one of the controllers fails. | |
| The domain master browser is responsible for maintaining a list of master browsers on all subnets. | |
| Each subnet for the domain or each workgroup has a computer, known as the master browser, responsible for maintaining the browse list. | |
| The backup browser helps the master browser by giving its browse list to clients who request it. | |
| Whenever a master browser goes offline, a backup browser becomes the master browser. | |
| The file NTUSER.DAT contains most of the registry information for a user profile. | |
| There are two types of user profiles: roaming and local. | |
| A hive is a collection of registry keys which has a corresponding file saved on the hard disk. |