![]()
![]()
![]()
| Chapter 5 * |
| Managing Resources * |
| Certification Objectives * |
| User and Group Accounts * |
| User Manager * |
| User Accounts * |
| Exercise 5-1: Creating a New User Account * |
| Exercise 5-2: Copying a User Account * |
| Exercise 5-3: Disabling a User Account * |
| Exercise 5-4: Deleting a User Account * |
| Exercise 5-5: Renaming a User Account * |
| Exercise 5-6: Creating User Directories * |
| Exercise 5-7: Setting Logon Hours * |
| Exercise 5-8: Modifying Dialin information * |
| Group Accounts * |
| Trust Relationships * |
| Group Administration * |
| Local Groups vs. Global Groups * |
| Group Administration Strategies * |
| Groups within Groups * |
| Creating and Managing Groups in User Manager * |
| Local Groups * |
| Exercise 5-9: Creating a Local Group * |
| Administrators * |
| Users * |
| Guest * |
| Server Operators * |
| Print Operators * |
| Backup Operators * |
| Account Operators * |
| Replicator * |
| Global Groups * |
| Exercise 5-10: Creating a Global Group * |
| Domain Administrator * |
| Domain Users * |
| Domain Guests * |
| System Policies * |
| Exercise 5-11: Changing Account Policies * |
| Exercise 5-12: Modifying User Rights * |
| Exercise 5-13: Enabling Auditing * |
| Exercise 5-14: Creating a Network Share * |
| Exercise 5-15: Setting File System Permissions * |
| System Policy Editor * |
| Exercise 5-16: Hiding the Network Neighborhood icon * |
| Registry Mode * |
| Policy File Mode * |
| Templates * |
| Policy Order * |
| Restriction of Control Panel Options * |
| Desktop Customization * |
| Network Settings * |
| Network Logon * |
| Start Menu Options * |
| User Profiles * |
| User Profile Options * |
| Types of User Profiles * |
| System Default * |
| User Default * |
| Local * |
| Server-based * |
| Exercise 5-16: Creating a Roaming User Profile * |
| Mandatory * |
| Managing User Profiles * |
| Profile Shortcuts * |
| Exercise 5-17: Copying a User Profile * |
| Logon Scripts * |
| Administering Remote NT Servers * |
| Network Neighborhood * |
| Windows NT Diagnostics * |
| Server Manager * |
| Printers Utility * |
| User and Group Accounts | |
| System Policies | |
| User Profiles | |
| Administering Remote NT Servers |
This chapter deals with a very challenging aspect of administering a Windows NT network: managing resources. Resources can mean a lot of things in Windows NT, such as users, groups, workstations, servers, disks, and memory, but for this chapter we are going to narrow the scope to users and groups. Without users to use the resources there would not be such a demand for people like us to manage them. They are the reason we have been hired. We know how to use Windows NT and make life easier for these users by giving them access to resources that they require to do their jobs. We also know how to group users according to function, so we can better manage them. When these users are grouped in a logical fashion like, it makes administration easier. We can easily apply restrictions and polices to the group, without having to modify each user account. Having the option of controlling access on a per-user basis is very powerful. Not only can we create policies for groups, we can create them for specific users, to control what we want them to see and do on the network. Although this sounds restrictive, we can use these conventions to make the user’s life easier through the use of profiles and logon scripts, which can customize a user’s computer environment to access his resources more efficiently. We close the chapter with some discussion on managing server resources that are not discussed in other chapters.
Let’s face it: if not for the users, we would not have much to do on the network as administrators. Everything we do as administrators revolves around the user in some way. Next time you are having fun configuring that RAID array, remember that its purpose is to increase the performance for the user. Since everything revolves around the user, it makes sense to begin the discussion of managing resources with the user account.
The user account is what gives a user access to the network. If you do not have a user account, you aren’t allowed to log on to the network. Since the account is based on the user, it makes sense that a new account must be created for each user. This can be time consuming, but it is necessary. Once the user account is created and configured, you don’t have to do much housekeeping with the user accounts, unless their situation changes, or they get locked out of the system. At the time of creation, the user account should be placed in the proper groups.
Group accounts are for grouping together users who perform the same function or require access to the same resources. If it were not for group accounts, you would have to grant access to resources on a per-user basis. It is entirely possible to use group membership for resource access without having to grant access on a per-user basis, but it’s nice to know you can grant or deny access down to the user level.
Your grouping should mirror the way users are logically grouped in your organization. Say you have an organization with a sales force, support engineers, and technicians. If you group the users according to their job function, it makes it easier to do things such as granting access to resources and sending notifications to group members. You can send a memo to the sales force informing them of sales-related information, which would not be of interest to your engineering staff. Perhaps the sales staff is the only group you would like to give Internet access to.
User and group accounts seem very logical, but we see later in the chapter how this can quickly become confusing for administrators. It’s just like a computer to go and make things more confusing than they need to be!
The User Manager is where most of your user and group management takes place. From here you create, modify, and delete accounts, and assign rights. This is one of the most important utilities to the administrator of a network. You will be here every day. In this chapter, we cover everything you need to know to become efficient at managing users and groups within User Manager. User Manager is located in the Administrative Tools under the name User Manager for Domains in Windows NT Server, and the name User Manager in Windows NT Workstation.
Figure 5-1 shows the user accounts and groups on a domain. You can tell by looking at the icon next to the group whether the group is local or global. An icon of two users and a computer is a local group. An icon of two users and a globe is a global group. You might specify whether a group is local or global in the group name, such as Sales Local. This is so other users can place accounts accordingly. You learn more about local and global groups later in the chapter.
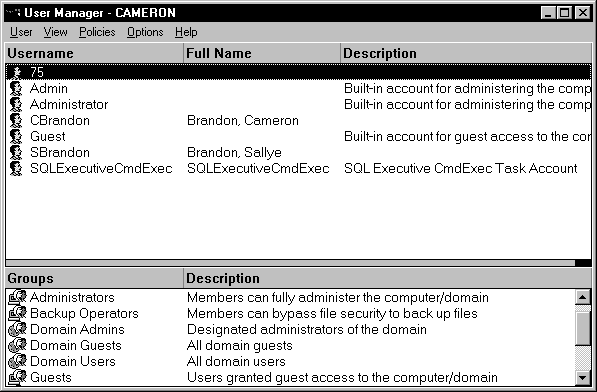
Figure 1: User Manager icons show whether a group is local or global.
User accounts represent users who access the resources on the domain. User accounts do not have to represent individuals; they can also be accounts for services, such as the SQL Server account I have in my list of user accounts. You should have a naming convention in place if you are just starting your domain, or you should adhere to the convention already in place if you are administering an established network. The most common naming convention is the first initial and full last name, such as GCramer for Garth Cramer. However, this naming convention is not a good security practice, so it is not recommended. If a hacker can figure out your username, he is halfway to cracking your account.
In Figure 5-2 you notice the full name has been in the last name, first name format. This is to facilitate searching by last name. User Manager for Domains can display users by their username, such as SBrandon, or by their full name. If you entered the full name as Sallye Brandon, you won’t find it with a search of last names. This is extremely important if you have a large number of users in your domain.
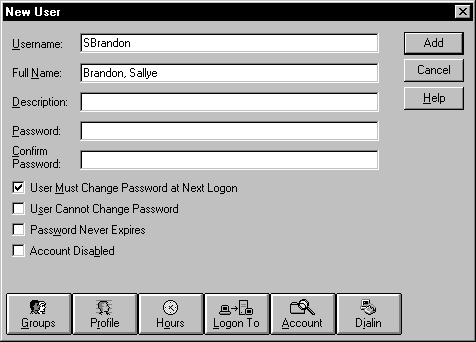
Figure 2: In the New User window, enter last name first in the Full Name field.
In this exercise we add a new account to the domain. If you are using User Manager from Windows NT Workstation rather than NT Server, you are creating a local machine account.
If you have already made a user account that you would like to use as a template for subsequent users, you can make use of the copy feature. This feature does not copy the Password, Full Name, or Username, but it does copy the password settings. It also copies the Description, Groups, Profile, and Dialin information.
Disabling a user account is a function to be used when a person has not logged on to the system recently, but may still be a part of the company. You should disable, rather than delete, the account, just in case the user returns. We use a third-party utility at our company to tell us when the user logged on last. If the last logon has been longer than three months, the account is disabled. If the last logon has been longer than six months, the account is deleted. You want to minimize the risk of others accessing the network through these unused accounts.
You need to delete an account if a user is no longer with the company, or will no longer be needing network access. Make certain it is safe to delete the account, because it cannot be recreated with the existing rights and permissions. You can recreate the name, but that does not undelete all of the prior user’s information. This is because accounts are created with a security identifier (SID). You cannot recreate this SID for security reasons. The new account may have the same name, but the SID is different, therefore the account is different. This provides security against someone trying to recreate an account that had been deleted and gaining access to all of the existing information.
Renaming an account is especially useful if a user is replaced by another person, who must retain the same security settings. To illustrate the usefulness of renaming an account with existing permissions, we will make this exercise more extensive.
The User Environment Profile dialog box, shown in Figure 5-3, is for managing profiles, as well as a user’s home directory. It is accessed by clicking the Profile button on a user’s account in User Manager for Domains.
There is nothing in the User Environment Profile dialog box that is mandatory; it is all optional.
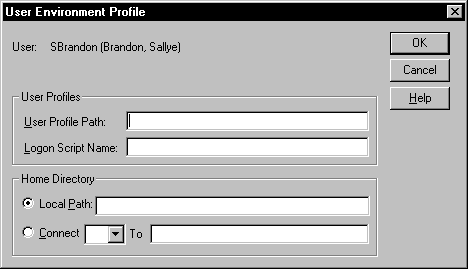
Figure 3: The User Environment Profile dialog box is for managing profiles, as well as a user’s home directory.
In this exercise we create user directories for users to store their personal information. In this example we use a directory at the local computer, rather than a network share.
C:\WINNT\USER\%username%
With User Manager, you can limit the hours a user is able to access the domain. This is to prevent misuse, or to clear the network for events such as tape backup. The Logon Hours dialog box, shown in Figure 5-4, can be accessed by clicking the Hours button for the specific account in User Manager for Domains. The configuring of logon hours is only available on a domain controller.

Figure 4: At Logon Hours, you can limit the hours a user is able to access the domain.
In this exercise we specify the times users are allowed on the network.
By default the user is allowed access at all hours. We will give our user access to the network only during business hours Monday though Friday.
Another impressive feature of Windows NT security is to disallow users to log on from machines other than their own. At the Logon Workstations dialog box, shown in Figure 5-5, you can allow users to log on to all workstations, which is the default, or specifically restrict a user to one or more workstations.
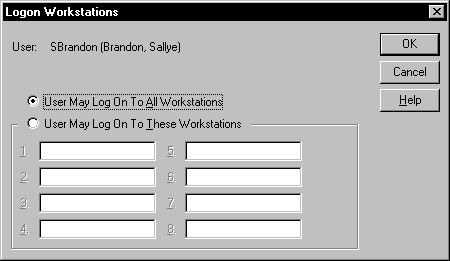
Figure 5: At Logon Workstations you can allow users to log on to all workstations, or restrict them to one or more.
The Account Information dialog box, shown in Figure 5-6, is useful for granting temporary accounts for consultants or contractors that require temporary access to the network. For maximum security you can have this account expire after a contract has expired. You also can specify the account type, which is global by default. You should specify a global account if this user is a member of another domain, or if the account will be used in another domain. Specify a local account if you know the user will not require access to other domains.
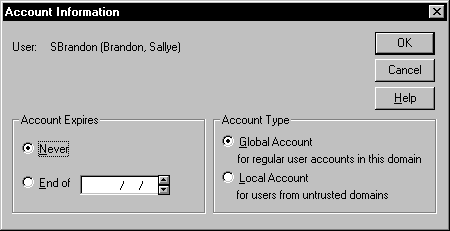
Figure 6: At Account Information you can grant temporary accounts for consultants or contractors that require temporary access to the network.
In order for users to access the network via Remote Access, they have to be given permission. This can be done either from the Remote Access Service Manager, or User Manager for Domains. See Figure 5-7 for the Dialin Information dialog box. When permission is granted, a choice is made among three options regarding the call back feature:
| The user does not get called back | |
| The user gets called back at the number he specifies. This option is convenient for travelling users, who call from different locations. | |
| The user gets called back at a predetermined number. This option is the most secure, because the phone number is entered by the administrator. |
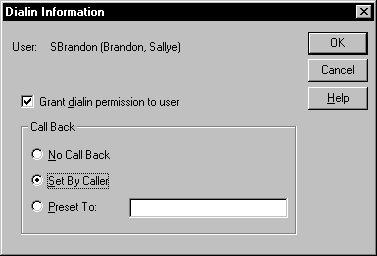
Figure 7: At Dialin Information, choose from three options regarding the call back feature.
The Group Memberships dialog box, shown in Figure 5-8, is used to modify the groups that the user is a member of. The user inherits more rights by virtue of being in multiple groups. However, if a user is a member of a group that has access to a resource, and of another group that does not have access to that same resource, access is not given. This should be taken into consideration when assigning users to groups.
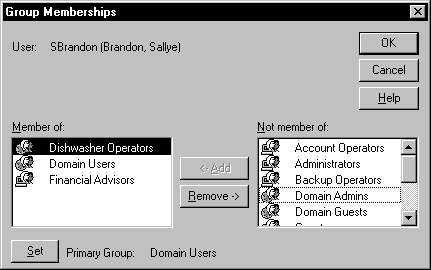
Figure 8: At Group Memberships, add or remove a user from a group.
Trust relationships are a very complicated issue for Windows NT domains. Luckily, they are not covered in depth on the Windows NT Server exam. (They are covered in extreme detail in the Windows NT Server on the Enterprise exam.) For now, we will discuss a few things concerning rudimentary trust relationships and how they relate to user and group administration.
In order to access resources from another Windows NT domain, there must be a trust relationship between the two domains. This can be a one-way trust, or a two-way trust relationship. When the trust relationship is in place, users from one domain can access resources in the other domain. Trust relationships are added and removed in User Manager for Domains. Later in this chapter you learn which user and group accounts can access resources in other domains.
Now that you realize the importance of using groups for administration, you need to understand some techniques for proper group administration, and for making sure users are placed in the right groups. Users are placed in groups according to their function and your overall group strategy.
Understanding the difference between local and global groups requires knowledge of the Windows NT domain structure. If you are unfamiliar with domains in general, you may benefit from reviewing their purpose before continuing further into this section. It’s a subject that can quickly become confusing.
Place users in a local group for resource access within the domain. If you have created a local group called Marketing, you can place users from within the same domain into this group and everything will be fine. You cannot take this group and give them access to resources on another domain. This is why it is called a local group. Just remember that local groups are local to the domain.
Global groups can be created to access resources, not just within the domain, but outside of the domain as well. This is the type of group you would use if you had a multiple-domain model, and were giving access to resources outside of the domain.
Now is an opportune time to explain a strategy for group administration that is often discussed in MCSE newsgroups. The tip to remembering the local versus group method is this acronym: AGLP.
A = Accounts.
G = the Global group, in which accounts are placed.
L = the Local group, where the global group is placed.
P = Permissions are set for the Local group.
Global groups are to organize the users, and local groups are to assign permissions and rights.
With that in mind, follow along with this guide to making decisions about group assignments:
| I only have one domain and I need to assign permissions or rights… | Use a local group. This is the correct group if you only have one domain. You can add users, and also other global groups if you need to give permissions to members of another domain later. |
| I need to place a group within... | Use local. Only local groups can contain a global group. In fact, that is the only way one group can be placed in another group. |
| I need to give users permissions on workstations or member servers... | Use a global group. You cannot create a global group on a member server or workstation, but you can add this global group to the member server or workstations local group. You can then grant permissions to the local group. |
| I need to group users so they can access resources from another domain... | Use a global group. Global groups can be placed in the other domain’s local groups. The other domain can then grant permissions to the local group. |
| I need a group to include users from other domains... | Use a local group. Although the group cannot be used outside the local domain, it can be used to hold global groups that contain users from other domains. |
When it comes to placing groups within groups, you can only place global groups within local groups. This is the only way you can use nested groups. Here is what is not accepted when it comes to nested groups:
| Local groups cannot be placed in local groups. | |
| Global groups cannot be placed in global groups. | |
| Local groups cannot be placed in global groups. |
In order to understand the nested group rule, let’s create a scenario involving two domains. One domain is your local domain called BRANCH1. This contains a group of users known as SALES_LOCAL. This group contains user accounts from your domain. Since you are a branch office, you have a corporate domain called CORPORATE. There is a global group on the CORPORATE domain called SALES_GLOBAL, which contains users from the CORPORATE domain. If members of the SALES_GLOBAL group are coming to your BRANCH1 domain to train your users, you can quickly place the SALES_GLOBAL group within your local SALES_LOCAL group, to give them access to the resources that have been given to the SALES_LOCAL group.
Here is a rundown of the options you have in User Manager for Domains concerning groups:
| Double-click the group to see the members and to add or remove members. | |
| Double-click the user and click the Groups button to add or remove them from groups. | |
| Select New Global Group from the User pull-down menu to create a new Global group. | |
| Select New Local Group from the User pull-down menu to create a new Local group. | |
| To delete a group, highlight it and press Delete, or select Delete from the User pull-down menu. |
Local groups, as we have discussed, are for resource access within your domain. If you know beyond the shadow of a doubt that you will not be accessing resources in another domain, then go ahead and use local groups for everything. Place global groups and users from your domain directly into a local group. This can be helpful if you do find yourself needing to give access to groups from other domains. You will have to make new global groups for granting access to resources in other domains, if you find yourself with more than one domain.
You may not have to create many groups, because Windows NT comes equipped with built-in groups to help organize users with various tasks. Of course, it doesn’t come with built-in groups like Sales or Marketing, but it includes some groups to relieve the administrative burden. Before we discuss the built-in groups, let’s demonstrate the creation of a new group. Refer to Figure 5-9 for the New Local Group dialog box.
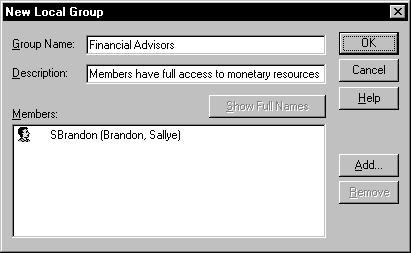
Figure 9: At the New Local Group dialog box, create a local group on the domain.
This exercise creates a local group on the domain. If you are using Windows NT Workstation, this is the only type of group you can create.
The Administrators local group is the most powerful of all of the groups. As you would expect, you have full control of the computer by virtue of being in this group. For this reason, only those trusted with this great responsibility should be members of this elite group. By default, the Domain Admins global group is a member of the local Administrators group. You can remove this global group if you desire.
The Users local group has enough rights for users to get work done at their workstations, but not much else. Users don’t have the right even to log on at a Windows NT Server. The Domain Users global group is a member of the Users local group by default, but can be removed.
The Guest group is even more limited than the Users group. It should be used for one-time, or temporary access to resources. Users can log on using the built-in workstation Guest account, or by using the domain built-in Guest account. Either way, they are restricted in the tasks that they can perform. The Domain Guests global group is by default a member of the Guest local group, but you can remove it.
The Server Operators group is intended to relieve the burden on the Administrator. Members of this group can shut down servers, format server hard disks, create and modify shares, lock and unlock the server, backup and restore files, and change the system time. Although its purpose is to decrease the administrator’s workload, it may increase his paranoia. Members of this group should be well trained in Windows NT, because they have rights that can be very damaging to the network. The Server Operators group only exists on a Domain Controller.
Print Operators have the ability to create, delete, and modify printer shares. These will most likely be on print servers, which the members of the Print Operators group can log on to, and shut down if need be. The Print Operators group only exists on a Domain Controller.
Members of the Backup Operators local group can backup and restore on the primary and backup domain controllers. Just like the Print Operators, they can log on to, and shut down the server, if needed.
Account Operators have permissions to add, modify, and delete most user and group accounts in User Manager for Domains. They do not have the ability to modify any of the default groups mentioned above, nor can they modify any member that belongs to any of these groups. They can also use Server Manager to add computers to the domain. The Account Operators group only exists on a domain controller. Members have the right to log on at domain controllers, and also have the right to shut them down. I once was an Account Operator at Intel, and I didn’t even work there! I was a contractor for another company.
The Replicator group contains the Replicator user account for the replication services. This group should not be used for any other purpose. In other words, users other than your replicator service account should not be added here.
Global groups give users access to resources in other domains. Global groups were designed to move the people to the resource, since you can’t move the resource to all the people. This is accomplished by adding the global group to the local group where the resource is located.
You have now seen the purpose of global groups, and learned when they should be chosen over local groups. If you are using Windows NT Workstation rather than Windows NT Server, you don’t have the option of creating global groups.
The Domain Admins global group is a member of the Administrators local group on every computer in the domain by default. (Actually, this is just for computers running Windows NT, because operating systems like Windows 95 do not use groups to administer the local machine.) Having the Domain Admins global group in the Administrators local group by default gives an administrator full control to modify computers in the domain. You can revoke this right by removing the Domain Admins group from the Administrators local group on the machine.
The Domain Users global group contains all subsequent accounts created in the domain. This gives users the ability to access resources in other domains. The Domain Users global group is by default a member of the Users local group on every Windows NT computer in the domain. This gives users the ability to access non-domain controller computers and workstations in the domain. If you do not wish them to have this ability, remove the Domain Users group from the Users local group on the specific machine.
The Domain Guests global group is intended to provided limited and/or temporary access to the domain. By default, the Domain Guests global group is a member of the Guests local group.
In this section we focus on the ways you can implement policies on your domain for activities such as account restrictions, desktop settings, and network settings. Using these policies you can fine-tune users’ access and abilities on the network. Although system policies are very effective in what they accomplish, they can add more work for the administrator of the network. Not only must the administrator learn the various utilities for system policy, he must decide what to restrict, verify that the restrictions work, and explain to users why they have been restricted.
Most system policy restrictions are considered optional, but one that should always be adjusted is the Account Policy found in User Manager for Domains. This feature, illustrated in Figure 5-10, contains settings for passwords and lockout features for security, and should not be ignored. You have to determine which settings are appropriate for your organization. The more policy restrictions you implement on your network, the angrier users get. For example, the password restrictions, such as expiration and password uniqueness, are sure to upset users over time. At my company, where the computer remembers an employee’s last six passwords, and passwords expire every month, not a day goes by that I don’t hear users complaining about the inconvenience of these restrictions. I have to explain that these settings apply to everyone, from the president of the company right down to the hourly employees. NT should let us differentiate account policy for groups, rather than the entire domain.
The Account Policy dialog box is reached through User Manager for Domains by selecting Account from the Policies pull-down menu.
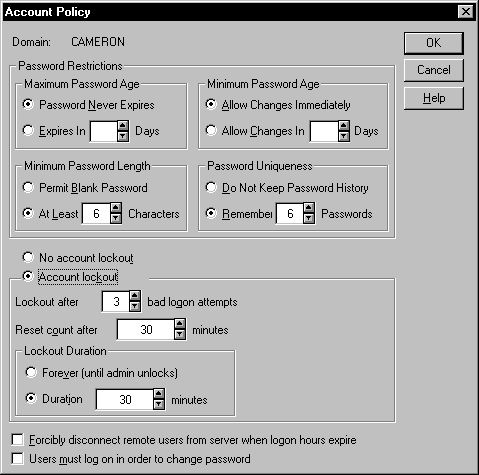
Figure 10: The Account Policy dialog box contains settings for passwords and lockout features.
In this exercise we adjust some important settings for the Account Policy.
Another area for adjusting policy is through the User Rights Policy, illustrated in Figure 5-11. This is also found in User Manager for Domains. Administrators don’t make adjustments to most of these rights, with the exception of two: Log on Locally, and Access This Computer From Network. We will adjust these settings in the next exercise.
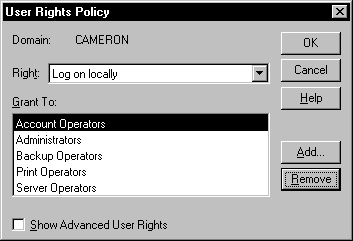
Figure 11: The rights most commonly adjusted in User Rights Policy are Log on Locally and Access This Computer From Network.
Here are some examples of situations where you have to modify these system policies. If a user calls you and tells you he got a message saying, "the local policy of this system does not allow you to log on interactively", you know you have to adjust the Log on Locally setting for the computer. At my own company, Access This Computer From Network was once stopping our backup program from attaching to a user’s computer and backing up a folder on their hard disk.
In this exercise, we will enable auditing, which logs events that we specify in the Security portion of the Event Viewer. This feature lets you determine who succeeded or failed at accessing resources. The more events you log, the larger the log file grows, and the more work it is for you, the administrator, to sort through the events. It would be wise to spend some time auditing events as a trial to determine whether or not you would benefit from those events being logged. Try to find a good balance of useful information against administrative and log file overhead. Be careful, because the audit settings are used by all domain controllers in the domain. Also, auditing is only available on NTFS-formatted partitions, not FAT-formatted partitions.
As you can see, there are many things you can audit, and a range to the depth at which you can audit them.
In this exercise we create a network share and specify who is allowed to access it. This will be a fairly common occurrence in your role as network administrator.
With Windows NT on an NTFS partition, you can restrict access on folders and even files. This will be another common occurrence in your role as network administrator. File System permissions, combined with share permissions, can greatly secure your files from unwanted guests.
Here is an important bit of advice: Do not check Replace Permissions on Subdirectories unless you know what you are doing! I once spent a couple of hours untangling a mess, because a user with full control over a directory checked this box after giving someone else access to the directory. This option doesn’t just give the user permissions to subdirectories underneath; it replaces the permissions on every folder under it with what you see in the dialog box. All of the custom permissions you might have made deeper in the directory are replaced.
With the System Policy Editor you can create a policy that restricts users, groups, or computers on the local domain. If you do not have the System Policy Editor icon in your Administrative Tools program group, check in your Winnt directory. If you still do not see it there, it can be found on the Windows NT Server CD-ROM, under Clients\Srvtools\Winnt\I386\Poledit.exe.
Creating a system policy is simple with the graphical System Policy Editor. Most of the settings are self-explanatory, or have a description of what the restriction implies. In order to make sure we understand the System Policy Editor, and can take advantage of its features, we will, in the next exercise, implement a policy for our user account. Refer to Figure 5-12 for and illustration of the Policies tab. Hopefully, your NT Server is set as a domain controller.
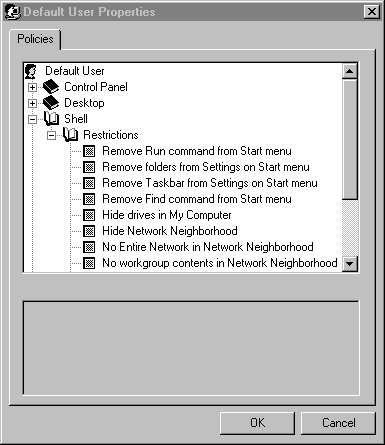
Figure 12: At the Policies tab, you can create a policy that restricts users, groups, or computers on the local domain.
Of course the Network Neighborhood icon is important, so you may want to uncheck the box in the System Policy Editor to retrieve the icon. Feel free to experiment with the other options available in the System Policy Editor. You may find some settings that are appropriate for members of your family, or for users on your network. One setting that I found especially useful was No Entire Network in Network Neighborhood. We had a problem with a user who browsed another domain, found some games on a remote machine, and e-mailed every user on the network with the shortcuts to the games. Needless to say, the president of the company was not impressed with that e-mail. With an adjustment to the System Policy Editor, this need never happen again.
If you open the System Policy Editor in Registry mode, you can edit the Registry of the local computer by selecting the Open Registry option under the File menu. You don’t have all the options you would see with Regedit or Regedt32, since you can only edit the values that are present in the System Policy Editor. In other words, if you do not see the setting you would like to modify for the local Registry within System Policy Editor, you cannot modify it using this tool. You must use the Registry editors. Think of Registry mode as a limited graphical Registry Editor.
When you open System Policy Editor in Policy File mode, you are creating a policy that overwrites a user’s Registry values with the ones you have specified. This policy file that you create can be used for as many users as you like. If you want the policy file to be downloaded automatically when a user logs on, call the policy NTconfig.pol and place it in the Netlogon share on a domain controller. Windows NT automatically applies the appropriate information if this file is found.
A System Policy Template file (.ADM) presents you with the available categories that you can configure for your policy file. You can see which template files are in use on your computer by selecting Policy Template from the Options menu.
| The COMMON.ADM template is for options common to both Windows 95 and Windows NT 4.0 machines. | |
| The WINNT.ADM template is for Windows NT 4.0 machines only. | |
| The WINDOWS.ADM contains settings specific to Windows 95. |
It is important to understand the order in which policies are applied to users and groups, especially those users belonging to multiple groups. The groups are listed from top to bottom in order of priority, as shown in Figure 5-13.
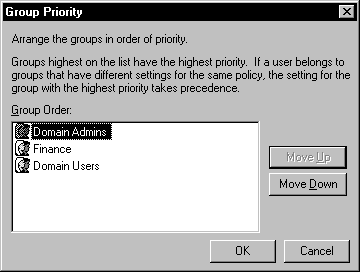
Figure 13: In the Policy Order window, groups are listed in order of priority.
| Members of the Domain Admins group receive all of the settings for each group. Settings are applied from lowest priority (bottom) to highest priority (top). Any settings that appear in a higher-priority policy overwrite the lower-priority policy. The settings for the Domain Admins policy override any other policies. | |
| Members of the Finance group receive the settings of the Domain Users group, then they receive the settings for their own group. The Finance settings, if any, overwrite the Domain Users settings. | |
| The Domain Users group receives only this policy. |
When you select a user (and not a machine) in the System Policy Editor you have the option to hide display settings for the user or group. These include every tab that is visible in the Display applet, such as Background, Screen Saver, Appearance, and Settings. Hiding these settings restricts a user from changing any of the settings, and so maintains a uniform desktop throughout the organization.
With the Desktop settings (also by selecting a user and not a machine) you can select a wallpaper to appear on all users’ desktops. You can also set a color scheme that the user will not be able to modify.
When you select a machine rather than a user, you can modify network settings for the machine. These include the capability to create hidden drive shares for server and workstation, as well as the update method for your system policies. If you select the Automatic Update mode, the policy file should be located in the default folder, which is the Netlogon folder. If you select the Manual Update mode, you have to enter the path to the policy file that you created.
You can adjust a number settings for the network logon. These might include something like creating a custom logon banner to warn users that unauthorized access will not be tolerated. You also can specify whether the Shutdown button is visible during logon. It is visible by default in NT Workstation, but not for NT Server. It is too risky to enable a shutdown button on NT Server that anyone can click. You have the option of not displaying the username of the last user logged on to the system, although this option may be an annoyance to a person who uses the same machine all day. He would have to retype his username at every logon.
There are many options for restricting Start menu features and icons. These options are accessed by clicking a user, expanding the Shell tree, and then expanding the Restrictions tree. Applying most of these options can cripple a machine. For example, you can remove the Run and Find commands from the Start menu, as well as the Shut Down command. This makes it less likely that a user will shut down or restart your system.
User Profiles contain the preferences for each user logged on to the system. Since NT requires a user account for every user that logs on to the system, a user profile is created for every user. These profiles can be located on the local machine, or stored on a server. You can have a different user profile for each computer that you log on to. Each user retains his custom settings, even though many other users log on to the same machine. If he has not logged on to this specific computer before, the settings for the default are used to create the new user profile. While the user is logging off, the user profile is copied and saved.
When you are creating a User Profile for a user or a group of users, you should know what options you have that are configurable. This allows you to create a snapshot of the environment to be applied to the default or mandatory profile. The following is a list of settings saved in the user profile:
| Program Manager groups, items, and properties | |
| Printer connections and settings | |
| Window position and arrangement | |
| Screen colors | |
| Network connections and settings | |
| Application settings | |
| General desktop appearance | |
| Online Help bookmarks |
User profiles are how users retain their current desktop and network settings when they log off the machine. There are a number of user profile types that can be used to suit your administrative needs, including the option to let the user customize the profile.
The System Default profile is what is used when no user is currently logged on to the computer. This profile is stored in the Winnt\System32\config\default folder. You have to edit the Registry to make adjustments to this profile. You should experiment with the System default profile, because you may be asked to create a screen saver to be used when no one is logged on.
The default user profile is used as a template for any subsequent users that log on to the system. This profile does not affect users that currently have a profile on the system. To create a default user profile, log on a sample account, such as CONFIG, and configure the environment as you wish. Log on as the administrator and use the User Profile tab in the System applet to copy the account that you just created to the NETLOGON folder of the PDC. Here is an example of the path you would type:
\\myserver\netlogon\default user
When you specify the default user folder, it is created automatically, and the Ntuser.dat file is stored there.
A local profile is local to the computer that is being used. Any changes to this profile are not reflected if a user logs on to another machine. The user just creates another separate local profile on the other machine. If you want the changes to be reflected on every machine you use, you must enable a server-based, or roaming, profile.
A server-based (or roaming) profile is stored on a server, so it is available to the user regardless which machine the user logs on to. Any changes to a roaming profile are saved to the server, to be retained for the next logon.
In the next exercise we create a roaming user profile. It may not appear as if we are creating a roaming profile, but when you check the System applet in the Control Panel you will notice NT automatically makes our profile roaming. You have the option of changing it back to local if you prefer.
\\133\Profiles\Administrator
First start with the two backslashes, and then type the server name where the profile is located. You can see that my computer’s name is 133. Next is the Profiles folder name. Do not use the true path of Winnt\profiles, because Profiles is a shared directory. (We will create a shared directory later in the exercise.)
If everything goes according to plan, no dialog box appears. You know it did not work if you get a dialog box upon starting that says your roaming profile could not be found.
You will learn more about local and roaming profiles later in the chapter.
In the User Environment Profile dialog box, you also have the option to specify logon scripts for users. Enter the name of the logon script in the field provided. For the logon script to work, there has to be a logon script of that exact name in a certain directory. Specify the name of a batch file you would like to use for a logon script, such as SCRIPT.BAT. If you use the name SCRIPT.BAT, then there must be a batch file called SCRIPT.BAT in the default location for logon scripts, which is C:\Winnt\system32\Repl\Import\Scripts. Your system root may not be C:\, as mine is. Please note that your logon script does not have to be called SCRIPT.BAT. To test the logon script, create a simple batch file such as one that contains just the word pause, and then close all programs and log on again to see whether the prompt that verifies your logon script works correctly.
When a user cannot change the settings in his profile, it is called a mandatory user profile. You can specify a user or group of users that are restricted by the mandatory user profile. These profiles can be stored on the local machine, but more commonly they are stored on a server, where they can be accessed by a number of users, and give the administrator centralized access to configuring these profiles. Here is a list of the items you can restrict with mandatory profiles:
| Explorer settings | |
| Control Panel | |
| Taskbar | |
| Accessories | |
| Network Neighborhood | |
| Printers | |
| Desktop | |
| Favorites |
User Profiles can be managed from the System applet in the Control Panel, as well as User Manager for Domains, as you saw earlier in the chapter. As you can see from Figure 5-14, you can delete, copy, and change the profile type for a user. You can change a profile from local to roaming, or vice versa.

Figure 14: At the User Profiles tab, you can delete, copy, and change the profile type.
| If you do not want to use a local or roaming profile for a user anymore, delete the profile path within User Manager for Domains. | |
| If you want to delete the entire user profile, use the User Profiles tab in System Properties. |
Earlier in the chapter you saw how you could copy a user account in User Manager for Domains to simplify account creation. You can copy user profiles to other users in this same fashion, but this procedure is not performed in User Manager. It is done through the System applet in the Control Panel. When you copy a profile to another user, he receives the identical profile the first time he logs on. After the initial logon, the settings are saved to the new user’s profile. In the next exercise, we copy a user profile to another user.
\\server\share\profile_directory
You can also click the Browse button and use Network Neighborhood to select the computer, and find the user’s profile directory. It should be under the systemroot\Winnt\profiles\profile_directory.
Logon scripts can be used to start applications or set environment variables for a computer upon startup. They are optional, and can be implemented on a user, group, or entire network basis. If you are using logon scripts, you have to enable and configure the replication service to replicate the logon scripts to all domain controllers. Logon scripts increase administrative overhead while being created, especially if they are customized for individual users. They do, however, provide a number of advantages that should be considered:
| Backward Compatibility In most cases a user’s logon script can still be used. | |
| Limited Management Once the scripts are created, there is little administrative overhead. | |
| Ease of Use Logon scripts can be simple to create. | |
| Personal Profiles Needed for Common Settings You can customize scripts for individual users. | |
| Residence of Scripts Logon scripts are located and replicated to domain controllers. |
Logon scripts are enabled in User Manager for Domains, as described earlier in the chapter.
There are a number of ways to remotely administer your Windows NT Servers. Microsoft’s System Management Server greatly increases your ability to administer remote servers, but Windows NT Server has built-in utilities for some remote administration. These utilities are not located in one area, which is unfortunate. Here are a number of ways you can administer remote servers.
| The Event Viewer in Administrative Tools lets you open the event logs of remote computers. | |
| Server Manager lets you view the properties of remote computers by letting you open files and resources, create alerts, and remotely disconnect users. Server Manager also lets you create, modify, and delete shares, as well as adjust the number of users allowed, and the permissions associated with the shares. You can stop and start services as if you were directly in front of the machine. The remote computer’s Services dialog box appears exactly as your local services utility, with no features disabled. | |
| The Registry Editor lets you connect to remote computers to modify Registry values. | |
| Windows Explorer enables you to map to remote drivers to add, modify, or create files and directories. | |
| System Policy Editor can modify the Registry on remote computers. |
For clients other than Windows NT, you can use the client administration tools provided with Windows NT. With these tools you have access to User Manager, Server Manager, and Event Viewer from your 16-bit Windows-based client. There are two ways to give users access to the client administration tools:
| You can share the server tools directory from the Windows NT Server CD-ROM. | |
| You can use Network Client Administrator to copy the server tools to a share on the server’s hard disk. |
The option you would choose from the Network Client Administrator is Copy Client-based Network Administration Tools. Then specify a path to the tools to share, or copy those files to a new share. You then have to run the SETUP.EXE from the client that you would like the tools to be placed on.
When using the client administration tools, you accomplish the same tasks from the client (Windows 95 or Windows NT) as you would with the NT Server administration tools.
The Network Neighborhood icon on the desktop is where you view computers in the workgroup or domain, and access the resources they are sharing. Double-clicking the globe for Entire Network displays other networks and domains that you can access. Once you share a folder on your computer, if a user clicks your computer the share will be visible, and may or not be accessed, depending on the permissions you configured for the share.
This Windows version of Microsoft Diagnostics displays most of what you need when it comes to configuration. Windows NT diagnostics does not allow you to configure devices; it is read-only. Many of the settings displayed in Windows NT Diagnostics are available elsewhere, such as the various Control Panel applets. There are a few bits of information located here that you should be aware of:
| The Resources tab devices have settings such as IRQ, DMA, I/O port, and memory address. | |
| The Display tab has video subsystem information that can also be viewed from the Display applet in the Control Panel. | |
| The Memory tab has information on physical memory, usage, and paging file information that can also be viewed form Task Manager. | |
| The Environment tab has current environment information that can also be viewed from the System applet in the Control Panel. | |
| The Services tab has the same information as the Services Control Panel applet, except for the fact you cannot stop or start services. | |
| The Network has detailed information not located anywhere else, regarding network usage and settings. |
Become familiar with the Windows NT Diagnostics utility, because it is the central repository for information that you can quickly access. You can be sure of its accuracy, because the information is coming directly from the Registry.
Server Manager is a utility not only for managing servers, but for managing workstations and the domain. Server Manager is located in Administrative Tools with the other administrative utilities. When you first start Server Manager you see the servers and workstations in your domain. You have the option of displaying only servers, displaying only workstations, or displaying both. You can see the status of each server or workstation by looking at the icon next to the computer. If the icon is transparent, the computer is not currently on the network. This is helpful for eliminating computers that are no longer active on the network. I usually have to delete computers from this utility on a weekly basis, because their names have been changed, or the computer has permanently been taken off the network. Be careful, because laptops can appear as transparent icons, also. This can mean the laptop is not currently on the network, so care must be taken when deleting computer accounts.
When you would like to see the properties of a selected machine, just double-click it and bring up a dialog box just like the one you see in the Control Panel when you click the System icon. You can also highlight the computer and select Properties from the Computer pull-down menu. This dialog box displays shared resources, the users connected to them, open resources, alerts, and replication information. These properties can be helpful when you need to see who is connecting to the computer, without having to be seated in front of it.
When you highlight the selected computer and select Shared Directories from the Computer pull-down menu, you see shared resources that resemble the Properties dialog box. However, you have greater control of these shared directories. You can quickly see which directory is the source for the shared directory. This may seem obvious when you have a share like C or D, but it can quickly become confusing when you have a share called NETLOGON, that maps to the source directory of Winnt\System32\Repl\Import\Scripts. From this dialog box, you can also create new shares by clicking the Add button, or delete a share by clicking the Stop Sharing button. If you were to double-click the shared directory, or highlight the shared directory and select Properties, you can make a comment for the share, or set a maximum number of users allowed. Clicking the Permissions button allows you to add, modify, or delete users and groups that have permission to access this shared directory.
Managing services for remote computers is probably the most useful of the features provided by Server Manager. By highlighting a computer and selecting Services from the Computer pull-down menu you bring up a list of services on the machine. These services may be started, and you can see how they are configured for startup: disabled, manual, or automatic. If you wanted to start a service on the remote computer, just highlight the service and select Start. Follow the same procedure for stopping a service, except you select Stop. If you would like to change the way a service is started, select the service and click the Startup button. You can change the startup type to disabled, manual, or automatic, and also select the user account used for the service. This can be the internal system account, or another account of your choice. If the computer has hardware profiles, you can choose which services are to be started and how they are started for each profile specified. You can also specify parameters to be used when the service starts up by entering them in the Startup Parameters portion.
Starting and stopping of services remotely came in very handy for our company when we were troubleshooting the BackOffice product, Systems Management Server. We had a few computers that would not inventory themselves correctly. We had to map a drive to the computer and adjust a setting in an .INI file, then stop and restart the service for the change to take effect. This computer was in another building, and would have taken up too much valuable time to go there and stop and start the service.
You also use Server Manager to add and delete computers from the domain—another common activity for an administrator. If you are creating accounts for the computers to use, you would enter them here. When you begin installing Windows NT or Windows 95 you select the name that you previously entered in Server Manager for the machine name. This way you can enter the names in advance (with your administrative rights) and instruct the users to use that name when they configure their computer name, so it can join the domain. If you are the one installing and configuring Windows NT on the workstations, you specify your administrative name and password to create an account in the domain during installation when it asks you for the computer name. It is for security that only administrators, or those users and groups that have the Add Workstation to Domain right, can join the domain.
| If you highlight the Primary Domain Controller in the Server Manager window, you have the option of synchronizing this computer with the entire domain from the Computer pull-down menu. | |
| If you highlight a backup domain controller in the Server Manager window, you have the option to Promote to Primary Domain Controller, or synchronize with the primary domain controller. | |
| If you highlight a workstation or stand-alone member server, you don’t have any of these options. |
You are not restricted to managing just servers and workstations in this domain. From the Computer pull-down menu, you can also select another domain to administer.
I had no idea that, as a network administrator, I would be spending as much time with printers as I do. But, second to the phone line going out, the worst thing for users is a printer being down. Users get very upset when they cannot print, and even get upset when they have to walk some distance to another printer. You are expected to fix the problem, no matter what it is. Fortunately, the printers utility can fix many problems.
Start by selecting Printers from the Control Panel, or by opening My Computer and selecting Printers. If you have any printers installed, either local or remote, they are visible here. You also see the Add Printer option. To see the status of a printer, double-click it. This shows you the print queue and any documents that are waiting to be printed. If you select Properties from the Printer menu you have the option of changing many of the devices settings. The General tab is where Print Test Page is located, which allows you to verify the correct installation and configuration of the printer.
You witnessed in this chapter just how many options you have for user and group management. It may seem overwhelming, but most of the other options, such as logon scripts, roaming and mandatory profiles, and system policy settings are not required on your network. However, a strong knowledge of creating, modifying, and deleting user and group accounts is very important. You should become familiar with User Manager for Domains and Server Manager, as these two are your first choice for user, group, and computer resource management. Become familiar with the capabilities of the optional methods for user and group management, because you may find yourself in a situation where you have to restrict user access, or require a standard desktop. With a grasp of these options, you will know how to implement these policies.
The various utilities for administering your computers remotely, such as Server Manager, Event Viewer, and the Client-based Administration Tools, make your life as an administrator easier, and save you time. However, you must what each utility is capable of. Spending time with these utilities now will save you time in the future when you are administering your own Windows NT domain.
| The user account is what gives a user access to the network. | |
| Group accounts are for grouping together users who perform the same function or require access to the same resources. | |
| The User Manager is where most of your user and group management takes place. From here you create, modify, and delete accounts, and assign rights. | |
| In order for users to access the network via Remote Access, they have to be given permission. | |
| Local and global groups (as well as trust relationships) are not covered in much depth during the Windows NT Server 4.0 exam. They are covered in great depth in the Windows NT 4.0 Server on the Enterprise exam. However, it is very important to understand the differences between the two. | |
| Local groups are for resource access within your domain. | |
| Global groups give users access to resources in other domains. | |
| Using System Policies you can implement policies on your domain for activities such as account restrictions, desktop settings, and network settings. | |
| With the System Policy Editor you can create a policy that restricts users, groups, or computers on the local domain. | |
| User Profiles contain the preferences for each user logged on to the system. | |
| For the exam, make sure you know how and why to configure a roaming profile. | |
| On the exam, you may be asked how the mandatory profile reacts in the event of a server crash. | |
| User Profiles can be managed from the System applet in the Control Panel, as well as User Manager for Domains. | |
| Logon scripts can be used to start applications or set environment variables for a computer upon startup. | |
| Windows NT Server has built-in utilities for some remote administration. | |
| A number of people who have taken the NT Server exam reported being asked how to change file permissions on a Windows NT Server from a Windows 95 machine. One of the answers provided is Server Manager, which is part of the client administration tools, but this is not the correct answer. It seems tricky, but you use Windows Explorer to assign file permissions. | |
| The Network Neighborhood icon on the desktop is where you view computers in the workgroup or domain, and access the resources they are sharing. | |
| Become familiar with the Windows NT Diagnostics utility, because it is the central repository for information that you can quickly access. | |
| Server Manager is a utility not only for managing servers, but for managing workstations and the domain. | |
| The printers utility can fix many printing problems. |