![]()
![]()
![]()
| Chapter 6 * |
| Windows NT 4.0 Security * |
| Certification Objectives * |
| NT Security Model * |
| Logon Authentication * |
| Account Lockout * |
| Exercise 6-1: Changing Account Lockout Settings * |
| Implementing Permissions and Security * |
| Microsoft Object Security Terms * |
| Access Control List (ACL) and Access Control Entries (ACE) * |
| Security Accounts Manager (SAM) * |
| Security ID (SID) * |
| Access Token * |
| NTFS Security * |
| Exercise 6-2 Taking Ownership of a File or Folder * |
| Permissions When Copying and Moving Files * |
| Viewing and Changing Permissions * |
| Exercise 6-3 Changing Access Permissions for a Directory * |
| Command Prompt * |
| Exercise 6-43 Using CACLS to Change Access Permissions * |
| Assigning Rights to Users and Groups * |
| Exercise 6-5 Modifying User Rights * |
| Shared Server Resources * |
| Permissions for Shared Directories * |
| Exercise 6-6 Sharing a Directory for the First Time from the Desktop * |
| Command Prompt * |
| Assigning Permissions to Shared Directories * |
| Exercise 6-7 Assigning Directory Permissions * |
| Exercise 6-8 Connecting to a Shared Resource * |
| Exercise 6-98 Creating a Network Share Using Server Manager * |
| Shared Printer Security * |
| Event Auditing * |
| Exercise 6-10 Auditing Attempts to Take Ownership * |
| Exercise 6-11 Auditing Attempts to Take Ownership * |
| Setting Registry Keys * |
| Adding a Security Warning Message * |
| Exercise 6-12 Changing the WinLogon Security Notice * |
| Disabling the Default Username * |
| Exercise 6-13 Disabling the Default Username * |
| Disabling the Shutdown Button * |
| Exercise 6-14: Disabling the WinLogon Shutdown Button * |
| Certification Summary * |
| Two-Minute Drill * |
| Self Test * |
| NT Security Model | |
| Implementing Permissions and Security | |
| NTFS Security | |
| Shared Server Resources | |
| Event Auditing | |
| Setting Registry Keys |
Security is a key element of a networked operating system, especially if the system can be accessed from the Internet. If you have a networked computer that's vital to your company’s mission, you need to use the right level of security. Hackers break into computer systems every day; the United States, which has the most computer systems, is the biggest target. Often administrators don’t think security is important until something happens—then it’s too late. Unfortunately, many supervisors think you are doing a good job if you catch break-ins after they occur, but that is the wrong type of thinking. A good administrator will implement security that doesn't allow break-ins. Of course, it’s always possible to break into a networked system, but you should still take reasonable steps to stop intruders.
Making the system secure is only part of the equation. Meeting the mission is equally important. If you apply too much security, so it is impossible for your users to do their jobs, you’ve failed to apply the proper security. Security is an art form. You need to know how much is required to secure the system and at what level your mission suffers. This chapter explains NT security and the steps you should take to secure your system. The amount of security you implement depends on your company’s policies and yourability to sell the need for security.
The NT security model has four main components: logon processes, local security authority, security account manager (SAM), and the security reference monitor. I’ll give a brief explanation of each component, then explain their functions in more depth. Log-on processes include interactive logons at the computer console and remote network logons. The log-on process gives the user access to the system. The local security authority is the heart of the security subsystem. It creates security access tokens, authenticates users, and manages the local security policy. The SAM database maintains all user, group, and workstation accounts in a secure database, and Local security authority validates user logons against the SAM database Finally, the security reference monitor verifies that the user has permission to access the requested object, then performs the requested action. It also provides audit messages when needed.
The first type of logon we’ll discuss is a local logon. A local logon occurs when you’re logging on to a computer from that computer’s console. NT workstation security starts at logon. Before any user can get onto your system they must provide a username and a password. The exact process starts when the user presses Ctrl-Alt-Del to activate the winlogon process. The winlogon process prompts for a username and password, and lets you choose whether to log into the local machine or a specific domain .
If you choose to log in to the local machine, winlogon passes the username and password you supply to the security subsystem. At the heart of the security subsystem is the local security authority (LSA). The LSA generates access tokens, manages the local security policy, and provides interactive user authentication services. The LSA also controls audit policy and logs the audit messages generated by the Security Reference Monitor. The security subsystem verifies your username and password against the Security Access Manager (SAM) database. The SAM is actually a hive in your registry where all user account information is stored. If your information passes verification, the security subsystem creates an access token and passes it back to the winlogon process. Winlogon calls the win32 subsystem to create a new process and provides the access token, which is attached to the newly created process. The access token is then used as your "ID card", so your username and password are no longer needed.
The next type of logon we’ll discuss is remote logon. A remote logon occurs when someone accesses your computer via the network. Your workstation receives an encrypted username and password from the requesting computer via the netlogon service. Then your workstation’s security subsystem processes the request just as if it were a local logon. The one exception is that the netlogon service replaces the winlogon process.
When you log on to a domain, you must choose the domain you want to log on to when you enter your username and password. If your workstation is a member of that domain, it logs on using the domain logon method; otherwise, it uses pass-through authentication. Domain logon starts when you submit your username, password, and a domain name to the winlogon process. Winlogon identifies your request as going to the network, so it passes it to the netlogon service. The netlogon service establishes a secure communications channel with the firstavailable domain controller that recognizes the workstation as a member of its domain. The netlogon service on the domain controller passes the request to the domain controller’s security subsystem, where the username and password are verified against the domain’s SAM database. If the username and password are correct,the domain controller creates an access token and informs your workstation of a successful match.
The final type of logon you need to know is pass-through authentication. Pass-through authentication occurs when you choose a domain to log on to from your NT workstation, but your workstation doesn’t have an account in that domain. When your workstation starts (before the winlogon process even begins) it creates a secure communications channel with the domain controller for which it is a member. The connection provides the winlogon process with the list of domains available to the workstation. Only the member domain and all trusting domains are displayed in the initial logon list box. This is the same domain controller that responds to the logon request to the domain in which your workstation is a member. However, it serves a different role when you choose to log on to a trusted domain. When logging on to a trusted domain, your request is passed from the domain controller where your secure communications channel exists to the trusting domain’s domain controller. That domain controller then processes the logon and returns a token to your domain controller for you. Logon then occurs just as it does in domain logon between the trusted and trusting domains, except that another step occurs, in which your member domain controller notifies your workstation of a successful logon.
You can set NT to lock out an account after a certain number of unsuccessful logon attempts. (Three bad attempts is a common choice.) This prevents hackers from breaking into your account with a hacking program. Hackers have programs that use wordlists and brute strength password crackers on accounts. If you don’t set NT to lock out accounts after a number of bad attempts, the hacker is free to run a program to attack your accounts. You can set the account to be locked out forever, which requires the administrator to unlock the account, or you can have it automatically reset after a certain period of time.
This exercise teaches you how to change the account policy on NT.
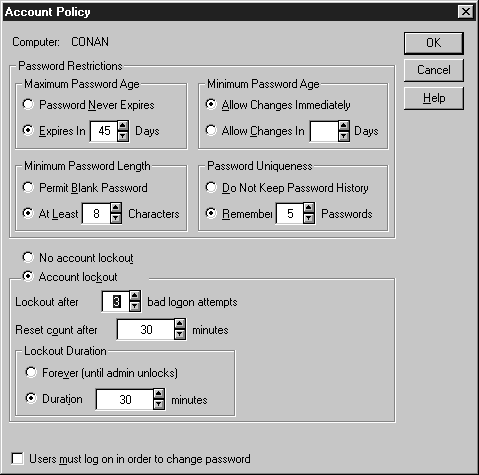
Figure 3: Account Policy dialog box
NT implements security by placing controls on objects. Security is an attribute on an object. NT uses Access Control Lists (ACL) and Access Control Entries (ACE) attributes to secure objects. Once a user is logged on they receive an access token. This access token (also known as a security token) is used to identify the user to the operating system whenever requests are made. The access token is compared against the ACL to ensure the user has permissions to that object. If they do, access is granted. If the user doesn't have sufficient permissions, access is denied. Remember, if at any point an object has a NO ACCESS attribute, access permissions will not be granted to that object.
To really understand NT security you need to understand objects. In NT just about everything is an object. A file is an object and so is a window. NT controls access to objects. A program asks the NT operating system to perform specific tasks to objects. For example, if you open a text file in Notepad called HELP.TXT, Notepad makes a request to NT to open the object HELP.TXT. NT then verifies your access permissions and, if you have the proper permissions, it opens HELP.TXT. Programs are NOT allowed to directly access the hardware. This is why many MS-DOS programs won’t work on NT. The most common type of object is a file object, but just about everything you can think of is an object; named pipes and processes are also objects.
The type of object you are setting permissions for determines the type of permissions that may be set. For example, you can read, write, and delete a file; however, on a printer you can manage documents, purge documents, and view the printer queue.
There are two classes of objects: container objects and noncontainer objects. A container object can contain other objects; a noncontainer object doesn’t contain other objects. A container object can inherit permissions from its parent container. This will be explained in more detail later in this chapter.
Any object that can be secured has a security descriptor. The security descriptor, which describes the security attributes for the object, has four parts.
| Owner security ID: identifies the owner of the object, which allows that person to change the permissions for the object | |
| Group security ID: only used by the POSIX subsystem | |
| Discretionary access control list (ACL): identifies the groups and users who are allowed and denied access. Owners control the discretionary ACL.System ACL: controls the auditing of messages the system will create. The security administrators set system ACLs. |
ACLs and ACEs were mentioned earlier; now let’s look at how they work. ACL stands for an Access Control List, which is comprised of Access Control Entries (ACE). The ACE specifies auditing and access permissions for a given object for a specific user or group of users.
There are three different type of ACEs: AccessAllowed, AccessDenied, and SystemAudit. AccessAllowed and AccessDenied are discretionary ACEs which grant and deny access to a user or group of users. SystemAudit is a system security ACE which logs security events to the event viewer. The access validation process is summarized in Figure 6-4.
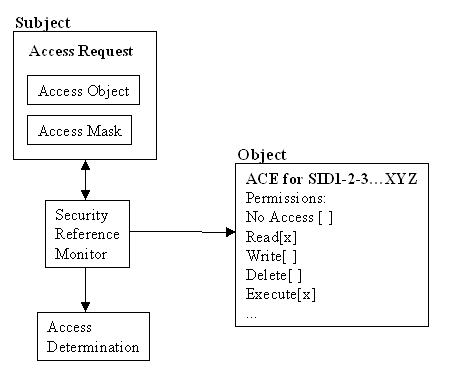
Figure 4: Access validation
Every ACE must have an access mask. An access mask tells the ACE which attributes are available for a particular object type. The ACE can then grant permissions based on that mask. For example, a file can set Read, Write, Execute, Delete, Take ownership, and Change permissions because an access mask defines these attributes.
Whenever an ACL is evaluated. every ACE is processed and evaluated in the following order:
To understand this difference, look at two different examples.
In the first example, a user MikeS wants to delete a file called J:\JESSE\Help.txt. Figure 6-5 shows the groups MikeS belongs to and the discretionary ACL applied to the file.
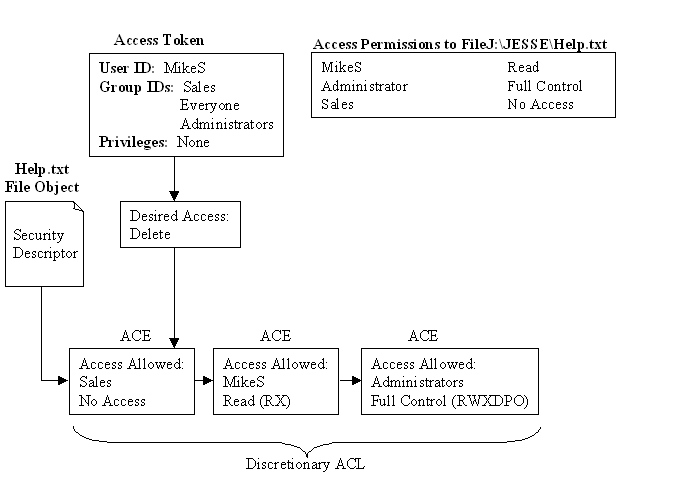
Figure 5: Delete request denied
In Figure 6-5 the desired operation of delete is not carried out. The user MikeS wants to delete the file J:\JESSE\Help.txt. NT reads the discretionary ACL and evaluates it in the following way:
In Figure 6-6 user MikeS is granted access to delete the file Help.txt.

Figure 6: Delete request allowed
Since NT stops processing the ACL as soon as the desired access mask is matched, it is important that the No Access ACE is always processed first.
The SAM (also called user account database) is a database that maintains all user, group, and workstation accounts in a secure database. The local security authority validates user logons against the SAM database, and thesecurity subsystem verifies your username and password against the SAM database. The SAM is actually a hive in your registry where all user account information is stored. If you run regedt32 and look at HKEY_LOCAL_MACHINE, you'll see a key named SAM. Inside that key is a subkey—also called SAM—which is grayed out. It's grayed out because it is secured from all users, even administrators. When you create an emergency repair disk, a compressed copy of your server's SAM is placed on the disk. This is why you must protect your emergency repair disk just as if it were a server.
A SID is used to uniquely identify each user, NT Workstation, and Server on the network. NT creates a new SID for each user that is added to your system. The SID is never changed and can never be recreated. Because a SID can never be recreated, you need to be very careful when deleting user accounts. In fact, it is common practice to disable accounts for a period of time before you delete them. This saves you time later if you really didn’t need to delete the account. For example, let's say that Betty, a receptionist in marketing, gets mad one day and tells her boss that she quits. Her boss notifies you that her account must be deleted immediately since it has access to sensitive information. You immediately follow your customer’s order and delete her account. The next day Betty’s replacement, Robert, comes in and needs access to all the same information that Betty had access to. So you create a new account and try to assign him to the same groups and rights that Betty had.This could be a considerable task. What should you have done instead of deleting Betty’s account? You should have disabled the account. This would prevent Betty from logging in and doing unsavory things to her boss’s sensitive files. When her replacement came in, you should have renamed the account, changed the password, and then enabledthe account. This would give Robert the same access that Betty had, and it would have kept your system secure by preventing Betty from logging on.
An access token is created every time a user logs on to your computer, whether via the network or console. Once the user is validated, an access token is created containing the user’s security ID (SID) and the SIDs of the Everyone group and other groups to which the user belongs. It also contains user rights (to be discussed later) assigned to the collected SIDs. If a user is logged on to your server when you change his group and rights to your system, the changes won't take effect until the user logs off and then logs on again.
The type of file system you choose determines what level of file security you can use on NT. FAT will not allow folder or file permissions, whereas NTFS will allow permissions on folders and individual files. If you’re concerned about security, NTFS is the file system to use —unless you have a RISC processor. RISC systems require the system partition to be formatted with NTFS; however, other partitions may also be formatted with NTFS. For RISC systems you can secure the system partition with Disk Administrator to allow only administrators access to the system partition.
As previously mentioned, NTFS allows folder- and file-level access permissions. The owner can set the following permissions for file-level permissions:
| No Access—The user isn’t able to access the file at all. This takes precedence over all other permissions. If a user is assigned to a group which is allowed Read Access and a group with No Access, the user will not be able to read the file because No Access always takes precedence. | |
| Read—Allows the user to read or execute the file. No modifications may be made to the file. | |
| Change—Allows the user to read, write, execute, or delete the file. | |
| Full control—Allows the user to read, write, execute, delete, change permissions, and take ownership of the file. | |
| Special Access—allows the owner to choose individual access permissions read, write, execute, delete, change permissions, and take ownership of the file. |
Table 6-1 summarizes the file-level permissions available with NTFS.
| Access Level | Permissions |
| No Access Read Change Full Control Special Access… |
None RX RXWD RWXDPO Custom |
Table 1: File-Level Permissions
Permissions Key: (R)ead, (W)rite, e(X)ecute, (D)elete, change (P)ermissions, take (O)wnership
The owner can also set folder-level permissions. The following permissions are available:
| No Access—Completely restricts the user from accessing the folder and its files. No Access takes precedence over all other permissions set for the user. | |
| List—Allows the user to view the files and folders list within the directory, but the user cannot access the files and folders. | |
| Read—Allows the user to read files within the folder but doesn’t allow the user to save changes. | |
| Add—The user can’t list or read the files in the folder, however, the user can write new files to that folder. | |
| Add & Read—Allows the user to list, read, and write new files within the folder. The user can read, but not save changes to existing files. | |
| Change—Allows the user to list, read, write new files, modify, and delete existing files within the folder. The user can also change attributes and delete the folder. | |
| Full Control—Allows the user to list, read, change, and delete the folder and the files within the folder. The user can also take ownership and change permissions of the folder and its files. | |
| Special Directory Access—Allows the owner to set custom access to the directory. | |
| Special File Access—Allows the owner to set custom access on the files within the folder. |
Table 6-2 summarizes the folder-level permissions available with NTFS.
| Access LevelFolder Access Permissions | File Access Permissions | |
| No Access List Read Add Add & Read Change Full Control Special Directory Access… Special File Access… |
None RX RX WX RXW RWXD RWXDPO Custom Custom |
None N/A RX N/A RX RWXD RXWDPO Custom |
Table 2: Folder-Level Permissions
Permissions Key: (R)ead, (W)rite, e(X)ecute, (D)elete, change (P)ermissions, take (O)wnership
Who is the owner of a file or folder? Each NTFS file and folder has one user account designated as its owner. The owner is the person who created the file or folder. By default, the owner of a resource is the only account that has the right to access a resource, modify its properties, and secure it from outside access. The file’s owner can give an administrator no access to a file; however, an administrator can always take ownership of the file. Once the administrator is the owner he has full control of that file. Normally a user is the owner of a resource, except when that user is an administrator. When a user with administrator privileges owns a file, the group Administrators is the owner of that resource. Ownership can only be taken; it can never be forced on someone. This helps protect people from malicious administrators.
The person who created the file or folder is the owner and is responsible for securing those files and folders. It isn’t only the administrator’s job to ensure security of files and folders. This type of access control is called discretionary access.
You must be careful when copying and moving files on NTFS partitions. The permissions will change depending on the type of operation being performed. When you copy a file or folder, the new copy inherits the permissions of its parent folder. As previously mentioned, a container object can inherit permissions from its parent container; this is known as inherited permissions. For example, when you copy a file from a directory with full control to a directory with read permission, the copied file will have read permission only. This also applies when creating new files and folders. However, it isn’t quite as easy when moving files and folders. When you move a file or folder from one partition to a different partition, the file or folder will inherit the parent folder’s permissions. But here’s the twist—if you move a file or folder within the same partition it keeps its previous security permissions. This doesn’t occur when you move a file between partitions because NTFS copies the file to the new partition then deletes the old file. When NTFS moves a file within the same partition it simply changes the master file table (MFT), which does not affect the permissions of the file. The MFT is a special file that points to all other files on the NTFS volume. NTFS uses the MFT to locate all other files on the partition.
In the next exercise you will learn how to change permissions on a directory. You will remove the Everyone group from the directory and give your user account full control. Before you begin you must have an NTFS-formatted volume on your system. If you don’t have an NTFS volume you must run the command:
CONVERT drive: /FS:NTFS
where drive: is the letter of the drive you want to convert to NTFS.
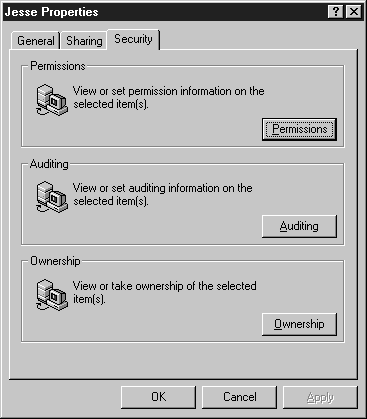
Figure 7: Security tab
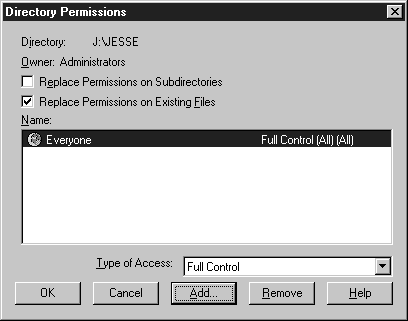
Figure 8: Directory Permissions dialog box
Figure 9: Add Users and Groups dialog box
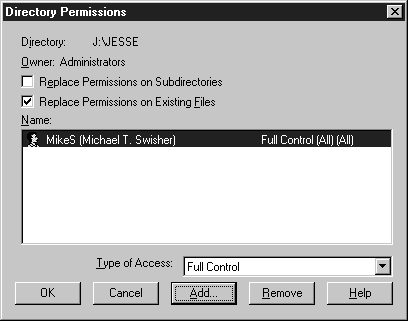
Figure 10: Directory Permissions dialog box
You can also use the command prompt for changing permissions on directories. The NT command shell has a built-in command called cacls.exe. The following are the available switches:
CCACLS filename [/T] [/E] [/C] [/G user:perm] [/R user [...]] [/P user:perm [...]]
[/D user [...]]
filename Displays ACLs.
/T Changes ACLs of specified files in the current directory and all
subdirectories.
/E Edit ACL instead of replacing it.
/C Continue on access denied errors.
/G user:perm Grant specified user access rights.
Perm can be: R Read
C Change (write)
F Full control
/R user Revoke specified user's access rights (only valid with /E).
/P user:perm Replace specified user's access rights.
Perm can be: N None
R Read
C Change (write)
F Full control
/D user Deny specified user access.
The completed command prompt is shown in Figure 6-11.
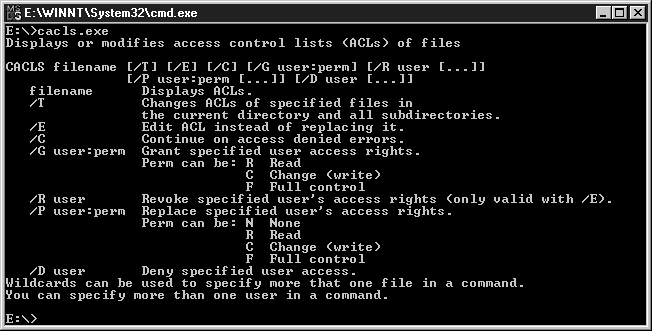
Figure 11: Command prompt
Now let’s change back the permissions on the folder you changed in the previous exercise. You will need to remove your username and put the Everyone group with full control on the desired folder.
Notice that this is a two-step process. Step 1 changes the permissions on the folder. In order to change the permissions on every file in that directory you must use wild card characters. That is step 2. If you used the /T switch it would replace the permissions on the files, but it would also replace permissions on all files and subfolders under that directory.
User rights are used to control the actions a user can perform. If the computer is a domain controller, the rights are allowed on all domain controllers. If the computer is a member server, the rights are computer-specific. Rights are different from permissions because they apply to the system as a whole, not just certain objects on the system. Rights can override permissions. If you deny access to a file for a specific user, but that user is also a backup operator with the rights to back up your system, the user is still able to back up your system including the denied access file. This is possible because backup rights take precedence over all file permissions. You manage user rights using User Manager if your server is a member server, or User Manager for Domains if it is a domain controller. Figure 6-12 shows you what User Manager should look like (except for the user and group accounts that I've created) and Figure 6-13 depicts the User Rights Policy dialog box.
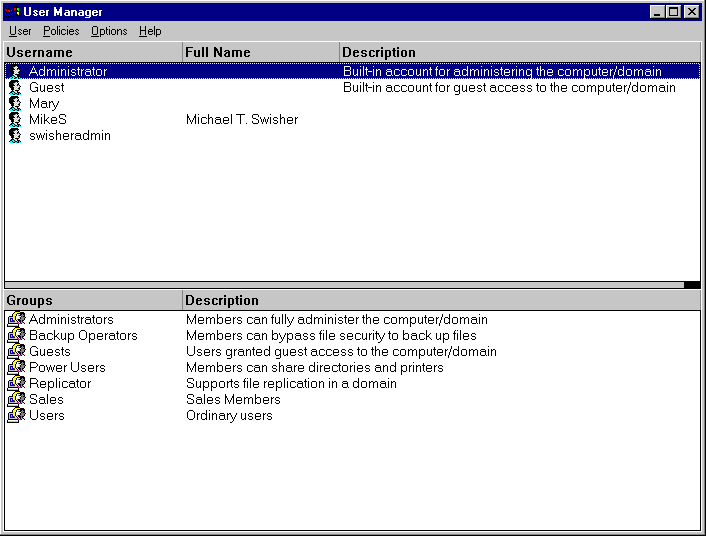
Figure 12: User Manager window
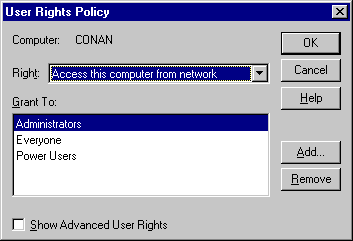
Figure 13: User Rights Policy dialog box
Table 6-3 describes the basic user rights you can manage using the User Rights Policy and Table 6-4 describes the advanced user rights
| User Right | Permits User to | By Default Assigned to |
| Access this computer from network | Connect over the network to the computer | Administrators, Server Operators, Everyone |
| Add workstations to domain | Add a workstation to the domain, allowing the workstation to recognize the domain's user and global group accounts | Administrators, Server Operators |
| Back up files/directories | Backup files and directories. This right takes precedence over file and folder permissions | Administrators, Backup Operators |
| Change system time | Set the time for the computer's clock | Administrators, Server Operators |
| Force remote shutdown | A user to shut down a remote computer | Administrators |
| Load/unload device drivers | Install and remove device drivers | Administrators |
| Log on locally | Log on at the computer's console | Administrators, Backup Operators, Guests, Server Operators, Users |
| Manage audit and logs | Specify what to audit, but doesn't allow the user to turn auditing on and off—only an administrator can turn auditing on and off. View and clear the security log. | Administrators |
| Restore files/directories | Restore files and directories. This right takes precedence over file and folder permissions | Administrators, Backup Operators |
| Shut down the system | Shut down NT | Administrators, Backup Operators, Server Operators, Users |
| Take ownership of files or objects | Take ownership of files, folders, and other objects on the computer | Administrators |
Table 3: Basic User Rights
| User Right | Permits User to | By Default Assigned to |
| Act as part of operating system | Perform as a secure, trusted part of the operating system. Some subsystems are granted this right | None |
| Bypass traverse checking | Change folders and travel through a directory tree, even if the user has no permissions for those directories | Everyone |
| Create pagefile | Create a pagefile | Administrators |
| Create a token object | A user or program can create access tokens. Only the local security authority can do this | None |
| Create permanent shared objects | Create special permanent objects, like \\Devicename | None |
| Debug programs | Debug various low-level objects such as threads and processes | Administrators |
| Generate security audits | A user or program to generate security audit log entries | None |
| Increase quotas | Reserved for future use | N/A |
| Increase scheduling priority | Boost the priority of a process | Administrators, Server Operators |
| Lock pages in memory | Lock pages in memory so they cannot be paged out to a backing store, such as Pagefile.sys | None |
| Log on as a batch job | Reserved for future use | N/A |
| Log on as a service | A process to register with the system as a service | None |
| Modify firmware environment values | Modify system environment variables stored in nonvolatile RAM on systems that support this type of configuration. | Administrators |
| Profile single process | Perform profiling (performance sampling) on a process. | Administrators, Server Operators |
| Profile system performance | Perform profiling (performance sampling) on the system | Administrators |
| Replace process-level tokens | Modify a process’s security-access token. This is a powerful right, used only by the system | None |
Table 4: Advanced User Rights
In the next exercise you'll learn how to modify the user right "log on locally". By default NT allows users to log on to the server locally (except for domain controllers, which only allow server operators and administrators to log on by default). In order to make your system more secure you should only give the right to users who need to log on to your system that right. Let's remove all users and groups who can log on to your server, except administrators.
Share-level security is used to give other users access to your hard drive via the network. Any file system that is available on NT can use share-level security. You can share folders many different ways, but using Explorer or My Computer is probably the easiest. In order to share a folder on a Windows NT workstation computer you must be a member of the Administrators or Power Users group. This is one right that can’t be modified. You can’t grant any other groups the ability to share folders, nor can you take away the power users' ability to share folders. A user must also have permission to list the directory contents to share it. This only applies to NTFS formatted partitions.
Permissions for shared directories are much like NTFS file permissions, but not as granular. You can’t set special permissions on shares as you can in NTFS. The four types of share permissions are No Access, Read, Change, and Full Control.
| No Access—The user is allowed to connect to the share, but no files or folders are listed. They receive the message "You do not have permissions to access this directory". | |
| Read—Allows the user to read or execute files or folders in that shared folder. | |
| Change—Allows the user to read, write, execute, or delete files and folders in that shared directory. | |
| Full control—Allows the user to read, write, execute, delete, change permissions, and take ownership of the files and folders in that share. Change permissions and take ownership of the file only applies to shares on NTFS partitions. |
Table 6-5 summarizes the folder share-level permissions.
| Access Level | Permissions |
| No Access Read Change Full Control |
None RX RXWD RWXDPO |
Table 5: Folder Share Level Permissions
Permissions Key: (R)ead, (W)rite, e(X)ecute, (D)elete, change (P)ermissions, take (O)wnership
Let’s set up a shared directory. Use the same directory you used for changing permissions. Assign your user account Read access via a network share.
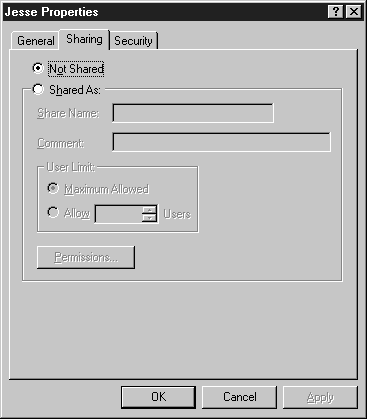
Figure 14: Properties screen with Sharing tab open
Choose the Shared As: option button. The name of the folder will default to the share name. Change the User limit to 1. On NT workstation the max users are 10. You should change it to 1 because your account is the only one that will be given access, so there is never any need for more than one connection. This helps improve security by thwarting hackers trying to get into that directory while you are logged on. You will also be alerted of a problem if you try to connect to the share and you can’t because someone else is connected. Then Click the Permissions button (Figure 6-15).
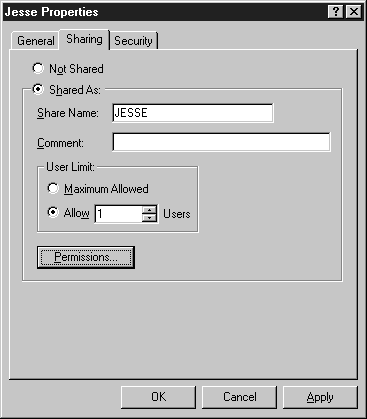
Figure 15: Completed Sharing tab
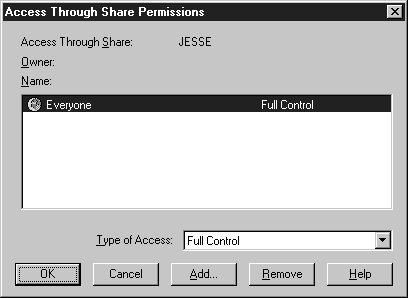
Figure 16: Access Through Share Permissions dialog box
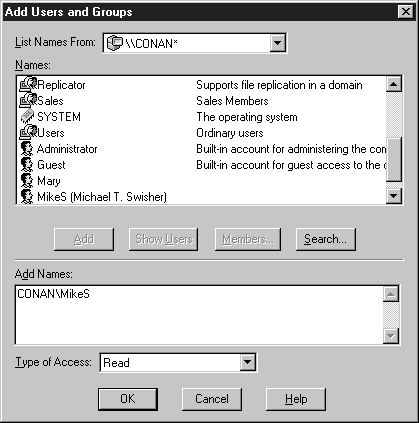
Figure 17: Add Users and Groups dialog box
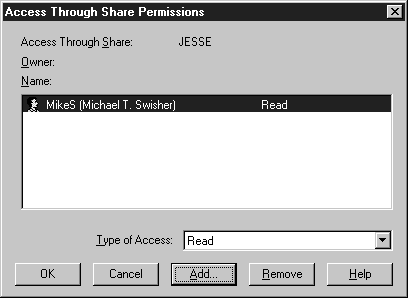
Figure 18: Completed Access Through Share Permissions dialog box
You can also share a directory via the command prompt. To do so you must use the net share command.
NET SHARE sharename
sharename=drive:path [/USERS:number | /UNLIMITE
[/REMARK:"text"]
sharename [/USERS:number | /UNLIMITED]
[/REMARK:"text"]
{sharename | devicename | drive:path} /DELETE
The proper command for sharing the same directory as above is:
E:\>net share jesse=J:\jesse /USERS:1
This shares the directory for one user but it puts it at the default Everyone group with full control.
To delete a share via the command prompt,type:
E:\>net share jesse /Delete
If you share a directory on an NTFS partition you can get more granular with your permissions. You’re still stuck with the four types of share permissions, but you can change permissions on the files and folders for added security.
Let's say you need to share a program on your NTFS formatted hard drive, which surveys your customers. Everyone with access to your computer via the network is your customer. In order to conduct your survey you need to give all the users Read, Write, and Execute permissions. How can you do this without allowing users to delete the files in that directory?
There are several ways to connect to a shared resource. You can map a drive using Explorer or the net use command. You can also access shared folders via network neighborhood or the Start | Run button. For the next exercise we’ll connect to a shared resource by mapping a drive via Explorer. You’ll need two computers networked together— at least one running NT server and the other Windows 95, NT server or workstation.
You can also share a directory using Server Manager. If you are an administrator who needs to share a directory on a server to which you don't have physical access, you should use Server Manager to share the directory.
You can share printers on the network much like you can share directories, but the permissions you can assign are different. There are four types of permissions allowed for sharing printers: No Access, Print, Manage Documents, and Full Control. By default, the creator is the owner of his own document; therefore, users can delete their own print job. Table 6-6 describes the permissions allowed for printers.
| No Access | Manage Documents | Full Control | ||
| Print Documents | X |
X |
||
| Control settings for documents | X |
X |
||
| Pause, resume, restart, and delete documents | X |
X |
||
| Pause, resume, purge printer | X |
|||
| Change printer properties | X |
|||
| Delete printer | X |
|||
| Change printer permissions | X |
|||
| Change print order of documents | X |
Table 6: Printer Permissions
After learning about directory and file security, you now have your system file permissions secured as required, but there is one major step missing. You need to audit who is accessing your sensitive files. NTFS allows you to audit access to your files and directories. Auditing allows you to trace which users accessed files on your system. This is a good way to ensure your permissions are properly set up on your system.
Before you can audit events in NT you first must turn on auditing. Exercise 6-10 shows you how to enable auditing on your system. To activate auditing, you must be a member of the Administrators group.Begin Exercise
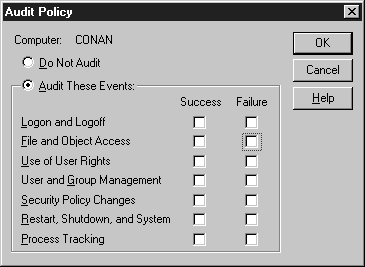
Figure 19: Audit Policy dialog box
Table 6-7 explains all the events you can audit.
| Event | Definition |
| Logon and Logoff | Logs all logons and logoffs both local and remote |
| File and Object Access | Logs successful actions to file, folder, and printer objects. Must be on NTFS to audit file and folder objects. |
| Use of User Rights | Use of anything requiring user rights |
| User and Group Management | Any user accounts or groups created, changed, or deleted. Any user accounts that are renamed, disabled, or enabled. Any passwords set or changed. |
| Security Policy Changes | Any changes to user rights or audit policies |
| Restart, Shutdown, and System | Logs all shutdowns and restarts of the local system |
| Process Tracking | Tracks program activation, handle duplication, indirect object access, and process exit |
Table 7: Audit Events
Auditing isn’t a substitute for virus protection; however, it can assist you in identifying a virus. If you are auditing write processes to a drive and you notice an unusual amount of writes to it, you should check to see if it could be a virus. You’ll still need a good virus protection program, but new viruses are being developed every day and auditing can be a useful tool for identifying viruses.
You should take careful consideration when planning your audit policy. How much you should audit depends on your security requirements. If you have no security requirements at all you don’t need to audit, but if you have very sensitive files requiring great security you should audit every applicable event. Be careful when auditing because it slows your system down and it causes your hard drive to fill up with audit logs.
In this exercise we are going to audit for anyone taking ownership on J:\JESSE\Help.txt file. You’ll see how to turn auditing on and how to check if someone takes ownership of the file.
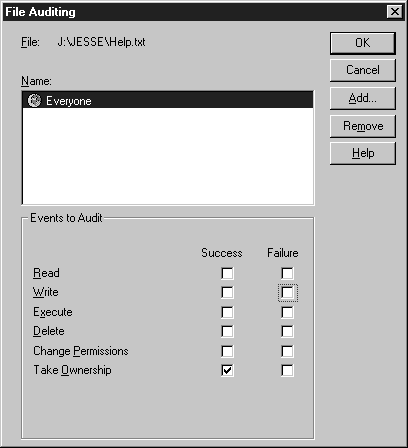
Figure 20: File Auditing dialog box
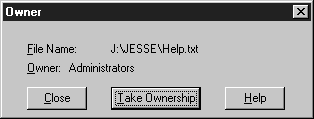
Figure 21: Owner dialog box
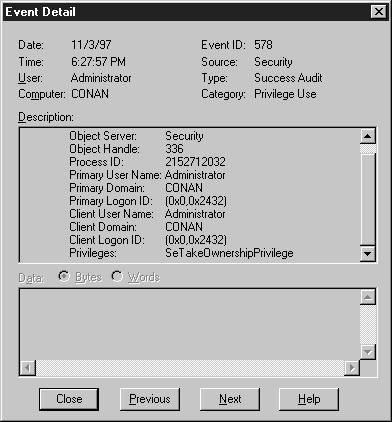
Figure 22: Figure 6-22: Event Detail dialog box
In order to make your system more secure you need to edit the registry. Be very careful when editing the registry--you can make your system unstable if you make a mistake. By editing the registry you can enhance physical security by adding a security warning message, disabling the default user name, and disabling the shutdown button.
You can have NT give a security notice before logging on to your system. This is important if you want to prosecute charges against a hacker. The government lost a case against a computer hacker because the logon screen said Welcome. Exercise 6-12 explains how to enter a security notice.
Another security measure is to not display the username of the last user who logged on. You need two things to break into an account: a username and a password. Security is improved when the intruder has to guess both a username and a password. Exercise 6-13 shows how to disable the default username.
By default NT workstation allows users to press Ctrl-Alt-Del and shut down the system. You can disable this by editing a registry key. You may be thinking,"Why would I want to disable the shutdown button.?"Well, let's say you have a computer where your sales team enters data on the sales floor. You can lock the CPU and power supply up in a cabinet to keep customers from turning it off, but what if they can just press Ctrl-Alt-Del and click Shutdown. By disabling this feature you can help protect your system against unauthorized shutdowns.
This chapter described the NT security model and its four components. It also explained how logons occur and the role that the local security authority plays in the logon process. You learned about the four logon types: local, remote, domain, and pass-throughYou also learned about ACLs and ACEs and how they interact with access tokens.
File and directory security is an important topic that you will continuously apply as you use NT. This is how you protect your most common shared resources on the network. There are various levels of permissions for files and directories, but you need an NTFS formatted partition to use them. Another type of security is shared security. It can be applied to any type of file system. Sometimes you need to combine shared security with NTFS file and directory security to get the right level of permissions assigned for sharing files on the network.
Finally, we discussed auditing and making your system more secure by editing the winlogon registry key. Take what you’ve learned in this chapter with you after you pass the exam. As the Internet grows and more companies put their networks on the Internet, the more our systems are vulnerable to attack. We must apply security to our systems before we are attacked; otherwise it is too late.
| The NT security model is made up of four main components: logon processes, local security authority, security account manager (SAM), and the security reference monitor. | |
| There are four types of logons that NT supports: local, remote, domain, and pass-through authentication. | |
| You can set NT to lock out an account after a certain number of unsuccessful logon attempts. | |
| NT uses Access Control Lists (ACL) and Access Control Entries (ACE) attributes to secure objects. | |
| The ACE specifies auditing and access permissions for a given object for a specific user or group of users. | |
| There are three different type of ACEs: AccessAllowed, AccessDenied, and SystemAudit. |
| Local security authority validates user logons against the SAM database. | |
| A SID is used to uniquely identify each user, NT Workstation, and Server on the network. | |
| An access token is created every time a user logs on to your computer, whether via the network or console. | |
| The key to assigning and removing a user to a group is that the user must be logged off before the change can take effect. | |
| NTFS will allow permissions on folders and individual files. If you’re concerned about security, NTFS is the file system to use. | |
| File Delete Child is a POSIX function that allows a user who has Full Control of a folder to delete a top-level file within that folder, even though the user doesn’t have permissions to delete that file. | |
| Container objects can inherit permissions from their parent container; this is known as inherited permissions. | |
| If you move a file or folder within the same partition, it keeps its previous security permissions. | |
| User rights are used to control the actions a user can perform. If the computer is a domain controller, the rights are allowed on all domain controllers. If the computer is a member server, the rights are computer-specific. | |
| Rights are different from permissions because they apply to the system as a whole, not just certain objects on the system. Rights can override permissions. | |
| Share-level security is used to give other users access to your hard drive via the network. | |
| The four types of share permissions for Shared Directories are: No Access, Read, Change, and Full Control. | |
| There are four types of permissions allowed for sharing printers: No Access, Print, Manage Documents, and Full Control. | |
| NTFS allows you to audit access to your files and directories. Auditing allows you to trace which users have accessed files on your system. | |
| Be very careful when editing the registry—you can make your system unstable if you make a mistake.Begin Self Test |
1. The _______________ creates security access tokens, authenticates users, and manages the local security policy
A) local security authority
B) SAM
C) ACL
D) ACE
2. What maintains the database of all user, group, and workstation accounts?
A) local security authority
B) SAM
C) ACL
D) HKEY_LOCAL_MACHINE
3. NT supports which of the following logons? (Choose all that apply)
A) local
B) pass-through authentication
C) remote
D) domain
4. Why must you press Ctrl-Alt-Del to log on to NT?
A) Reboot the system to refresh the memory.
B) Reboot the system to clear the security logs.
C) Prevent Trojan Horse viruses.
D) Erase the last username from the logon dialog box.
5. Which of the following are objects? (Choose all that apply)
A) file
B) window
C) process
D) keyboard
6. A __________ is used to uniquely identify each user account.
A) SID
B) GUID
C) Group ID
D) ACL
7. If you delete a user account how can you get it back?
A) You can’t undelete an account. You must create a new account.
B) Choose undelete from the file menu.
C) Run the command account /undelete.
D) Use the recycle bin.
8. Which tool should you use to share a folder on a remote computer? (Choose all that apply)
A) My Computer
B) Server Manager
C) User Manager
D) Permissions property page
9. User JesseS belongs to the local group marketing. The permissions on the file dictionary.doc are as follows: JesseS has Change(RWXD) permission and the marketing group has No Access permissions. When user JesseS tries to read the file what access will he be granted?
A) Change
B) Read
C) Read and Execute
D) No Access
10. Which ACE does NT process first?
A) AccessAllowed
B) ReadControl
C) WriteDenied
D) AccessDenied
11. User MaryS is assigned to the local group sales. Mary has Read permissions for all files on your system. The group sales has special permissions of write on all the files in the folder called reports. If Mary requests Read and Write permissions at the same time what will happen?
A) Access will be denied because she doesn’t have enough access in any individual group.
B) Access can’t be resolved.
C) Access will be granted.
D) Access will be granted, but an administrator must approve it first.
12. If you want to limit the people who can access a folder on your system while they are using the console, how must your hard disk partition be formatted?
A) NTFS
B) FAT
C) HPFS
D) CDFS
13. Why is there a special utility to secure the boot partition of RISC computers?
A) RISC computers can’t be physically secured, so it requires extra protection.
B) RISC computers are more secure than Intel based computers because they can access. more security subsystems.
C) RISC systems must boot on a FAT partition.
D) Microsoft just hasn’t compiled the utility for other systems yet.
14. What command allows the user to change file permissions from a command shell?
A) NET PERMISSIONS
B) SET FILE
C) CACLS
D) ACE
15. If you want to audit access to files stored on your NTFS formatted hard drive, what must you do first?
A) Turn on auditing using User Manager.
B) Turn on auditing for the folder by using Explorer.
C) Do nothing;NT automatically audits all file access once NTFS is installed.
D) Use the program Security Manager to enable auditing.
16. If you change a user's rights on a domain controller, which of the following statements are true? (Choose all that apply)
A) The users rights will only be applied to the server you used to apply the changes.
B) All domain controllers will be modified to reflect the new rights.
C) All domain controllers and member servers will be modified to reflect the new rights.
17. Who is the owner of a new file on a FAT partition?
A) Administrator
B) System
C) Whoever created the file
D) FAT doesn’t support Owners.
18. Who is the owner of a new file on an NTFS partition?
A) Administrator
B) System
C) Whoever created the file
D) NTFS doesn’t support Owners.
19. (True/False) Only administrators can give someone ownership of a file.
20. When moving a folder from drive c: to drive d: what permissions will the folder have? (Assume both drives are formatted with NTFS)
A) The folder will keep its original permissions.
B) The folder will inherit the permissions of drive d:
C) NTFS will reset the folder to everyone full control
D) NTFS doesn’t support permissions between drives.
21. Which file systems support Share level security?
A) FAT
B) NTFS
C) CDFS
D) All of the above
22. Which one is NOT a type of share permission on an NTFS partition?
A) Read
B) No Access
C) Full Control
D) Special Access
E) None of the above
23. How can you share a folder on the network to allow everyone to read, write, and execute files, but not delete any files?
A) You can’t.
B) Give everyone group Change share permissions.
C) Give everyone group Read, Write, and Execute share permissions.
D) Give everyone group Change share permissions and Read, Write, Execute Special File permissions on NTFS.
24. Which of the following are negative results from auditing all file object accesses on your system? (Choose all that apply)
A) Slows your computer’s processor down
B) Creates more disk access
C) Fills your security log up too fast
D) None of the above
25. What auditing function must be turned on to allow you to audit writes to your NTFS directories?
A) Logon and Logoff
B) File and Object Access
C) Use of User Rights
D) Process Tracking
26. User RyanB is given share level access of Full Control to share SalesRPT; however, the NTFS permissions are set to Read for the group sales. RyanB is a member of the group sales. When she connects to the share SalesRPT what type of access will she have?
A) Full Control
B) Read
C) No Access
D) None of the above
27. User MarcieJ is a member of Domain Users. She attempts to log on to a domain controller at the console, but she can't be validated. Whenever she tries to access the server through the network she connects without any problems. What is the most likely cause of this problem?
A) She is using an incorrect password.
B) She doesn’t have an account on the domain.
C) Her account is locked out because of too many bad logon attempts.