![]()
Chapter 3
*Configuring Windows NT Workstation 4.0
*Services
*Modems Icon *
Tape Devices Icon *
Network Icon *
UPS icon *
Ports Icon *
Add/Remove Programs Icon *
SCSI Adapters Icon *
Server icon *
Sounds Icon *
Mouse Icon *
Keyboard Icon *
Windows NT Registry
*Certification Summary
*Two-Minute Drill
*Self Test
*
Chapter 3
Configuring Windows NT Workstation 4.0
![]()
| Control Panel | |
| System Settings | |
| User Settings | |
| Hardware Configuration | |
| NT Registry |
After the initial installation of Windows NT Workstation, the majority of the configuration of software and hardware is done in the Control Panel. We will explore the options in the Control Panel for configuring system settings, which are available to all users on the system, and user settings, which are customized on an individual basis. We also will learn how to configure various hardware devices such as network cards, SCSI and IDE adapters, and CD-ROM drives for use with Windows NT. The chapter concludes with an overview of the Registry, which is the central repository for hardware and software settings configured via the applets in the Control Panel, or by accessing the Registry itself.
The Windows NT Control Panel is where the majority of your NT Workstation configuring is done. If you need to adjust a setting in Windows NT, chances are you will do it here. The Control Panel is basically a front end to the Registry, the central repository for configuration information (discussed later in the chapter). The icons in the Control Panel represent applets where specific changes can be made to the hardware or software through a graphical interface. See Figure 3-1 for an illustration of the Windows NT Control Panel.
If you have been using Windows 95 you are used to the Control Panel already. Some of the icons are unchanged, but a few icons were not in Windows 95, such as Devices, SCSI Adapters, Server, and Services. These require extra attention, whereas the features in the other icons remain the same as they did in Windows 95. Some of the icons that were in Windows 95 are not available in Windows NT, the most notable being the Add New Hardware icon. This was used in Windows 95 to detect new hardware, and since NT is not plug and play at this time, the icon has no use in NT. One of the most commonly used areas of the Control Panel in Windows 95 was the Device Manager, with which you could view and configure all the devices in your system in one area. The exclusion of Device Manager in NT was disappointing to many.
It is very common to see other icons in the Control Panel other than those provided by Windows NT. Third-party programs and utilities can add an icon in the Control Panel to centralize the configuring of hardware and software. A computer purchased from a leading manufacturer with software preinstalled most likely has a few vendor-specific icons. As you continue on towards your MCSE, you will find Windows NT Server will have more Control Panel icons for server-related configurations that NT Workstation does not provide. Some of these include icons for configuring Novell NetWare related services. And finally, some Control Panel icons are not present until certain hardware or software is installed in your system. For example, the Open Database Connectivity (ODBC) icon will not become available until you install a database application, such as Access or SQL.
As an NT administrator you must not be afraid of the Control Panel. You should be familiar with everything that the Control Panel is capable of. Even if you are not familiar with some of the less popular areas of the Control Panel such as UPS, Telephony, Tape devices and Ports, you will use these as a support professional. The more time you spend with the various applets now, the less time you will have to spend when you are in the field as an MCSE.

Figure 1: Windows NT Control Panel, showing the icons through which changes can be made to hardware or software.
There are a number of ways to access the Control Panel, and chances are you will use most of them. Here are a few ways you can access the Control Panel:
| From the Start menu, under Settings (the most common way). | |
| Through the My Computer icon on the desktop. | |
| At the bottom of the left pane in the Windows NT Explorer. |
Anyway you go, you get to the same place. However, there a number of ways to get to the various applets contained in the Control Panel:
| By right-clicking the desktop and selecting Properties, you are brought to the Display Control Panel applet. | |
| Right-clicking the Network Neighborhood icon on the desktop and selecting Network will lead you to the Network Control Panel applet. | |
| When you right-click the My Computer icon and select Properties, you will be brought to General tab of System Properties. | |
| Double-clicking the time in the taskbar will bring up the Date/Time properties. | |
| Double-clicking the PCMCIA icon on the taskbar will bring up the PC Card properties. |
Not only can you access the Control Panel from the above methods, you can make a desktop shortcut to the entire Control Panel, or you can make shortcuts to the various applets that are contained within the Control Panel.
The Printers icon in the Control Panel is actually a shortcut. You can access the printer information from this shortcut, or you can use the icon that is provided in the My Computer icon. You also can access the Printers from the Start menu by selecting Settings and clicking the Printers icon. We will discuss printers and printing issues in later chapters, but it important to know where to access this applet because you will use this in your job as an NT Administrator often. One thing users cannot live without is the ability to print, and when they cannot print you hear about it in a hurry. You are expected to fix the problems, so be sure and spend plenty of time learning the configuration and troubleshooting of printers. This is one weapon you want to have in your MCSE arsenal.
Since I access the Control Panel so much, I found that using the keyboard can be a fast way to maneuver. For example, if I were going to access the Control Panel from the desktop, I would use Ctrl-Alt to open the Start menu, press S for the Settings menu, press the right arrow to open the Control Panel, and press Enter. If you practice, you can get there fast. The best part is that the keyboard shortcuts work on most NT Workstations and Servers. Once I reach the Control Panel, I press the letter that corresponds to the icon I want to access, such as N for Network, and then I press Enter.
System Settings Vs. User Settings
You should be aware of the distinction between system settings and user settings, because some configuration settings in the Control Panel affect every user that uses the system, and others affect only a specific user. For example, as an Administrator I log on with administrative rights to the system that I use to configure a user’s system. I need to know which settings are system settings and which are user settings. If I adjust system settings, I know they affect every user on the system. If the settings I adjust are user settings, I have to decide if those settings that have been changed are just for me, or available for every user’s profile. When I install a program I need to remember to make a shortcut to the program to be accessible for all users. Usually, I do this by placing a shortcut in the Winnt\profiles\all users\desktop, or Winnt\profiles\all users\Start menu. If I don’t remember to make those shortcuts, when the user logs in he doesn’t see the application I just installed. For example, if I adjusted the paging file setting on a user’s computer I know that I don’t have to replicate those changes for the other users that access the system, because it is a system setting.
Since the configuring of system settings is critical, only Administrators should be given the rights. Too many things can go wrong if you give a user who is not as well trained as you the ability to configure these settings. You could either log on to the user’s computer as the Administrator of the local machine, or log in as yourself (with administrative rights) if you are participating in an NT domain. You will learn more about rights and permissions, as well as NT domains in later chapters, but for now it is important to know that only administrators should be configuring system settings.
The icons that are highlighted in Figure 3-2 represent the settings that a user may change for his user profile. Changing mouse, keyboard, and display drivers affects other system users, and these changes cannot be performed without privileges.
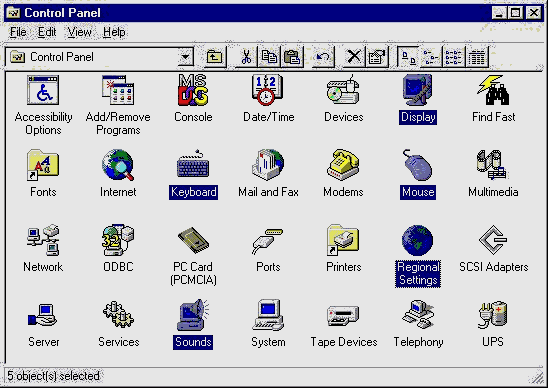
Figure 2: The icons selected are those that are commonly configured on a per-user basis.
Learning the differences between system and user settings is critical before you assign rights and permissions to other users. When you grant explicit rights to users you want to know what they can and cannot do when it comes to system and user settings. It may not be your intention to give a user the right to configure system settings. In later chapters you learn about rights and permissions that allow you to assign rights to special users that you would like to have configure system settings. Only a select few on the network should have the ability to change system settings, and they should be trained professionals like yourself.
I encourage you to create a user on your system that does not have administrative rights and see what this user can and cannot do. Sometimes it’s tricky, because some icons, buttons, and tabs do not appear for a user without rights. Many options are grayed out, as well. I once tried to have a user adjust a setting that he said was not there. I insisted that it was there, and he should look harder. I was getting frustrated until I realized he did not have the rights to the setting. For him, it was not there. When we are the administrators of our local machines we take for granted all of the system and user settings we can modify. Change a setting as an administrator, then log in as the user, with fewer rights, and see if the changes affected the user’s profile. This is good practice for when you have administrative rights on your own NT network.
The system properties dialog box contains advanced settings that should not have to be reconfigured very often. There are some tabs that contain very important configuration information, as you will see later in the section. As mentioned before, you can also reach the System Properties by right-clicking the desktop as well as the icon in the Control Panel. Just because this applet is called System does not mean that it is the only place where you can configure system settings. Many of the applets in the Control Panel can be used to configure system settings that are reflected for all users logging in to the system.
The general tab of the System applet, illustrated in Figure 3-3 gives you a quick reference for information such the operating system version you are running, how much memory is installed, and who the product is registered to. I mostly use it to see the total amount of RAM in a user’s system, or to see if a service pack is installed, and jump directly to the Performance tab to make paging file settings based on the size of the RAM I just received. One thing I noticed after installing Microsoft’s Internet Explorer 4 is that it registered itself with this General tab, with the version and build number of the product. There is nothing on this tab for you to modify.
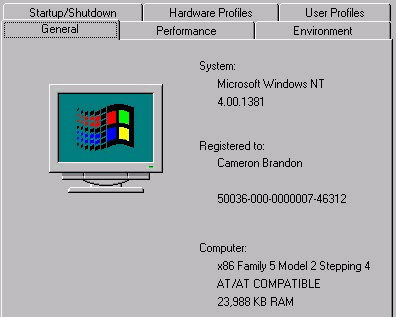
Figure 3: General Tab
The two settings that can be adjusted in the Performance tab, as you can see in Figure 3-4, are the Application Performance and Virtual Memory settings. You won’t spend much of your time configuring these settings after your initial NT Workstation is configured. However, if you are serious about performance-tuning your system, you should be familiar with these settings.
In order to understand the effect of the Application Performance setting, you must understand how a user interacts with the application. When you are using an application, it is in the foreground and most often the title bar is dark blue rather than gray. The computer boosts the program’s priority to increase the response for the user. Priority is the number assigned to represent the importance of tasks in relation to one another. They are ranked on a scale of 1 to 31, with 31 being the most critical. When the user switches to another application, the program that was in the foreground now loses its boost in priority. For example, when you have an application in the foreground, by default it receives a priority of 9. When it becomes a background application, it loses two priority levels and drops down to a level of seven. The Application Boost setting will affect how the foreground application responds when multiple applications are running. If you feel the background applications are not getting enough processing time, you can reduce performance boost for the foreground application. However, if you feel the foreground application is not receiving enough processing time, you can increase the performance boost for the foreground application.
The Virtual Memory setting is extremely important to have configured correctly. The rule is to set the initial paging file size to the size of your RAM plus 11 – 12MB. You can see that I have 24MB of RAM, so the initial paging file size is set to 35MB. I may be in need of some more RAM because I received an error message a few minutes ago, indicating that I was out of memory while I had a few applications open. Even with a maximum of 85MB I still ran out of memory. This is to show you that NT really does require plenty of RAM, and a correctly set paging file. If NT has to expand the paging file size, you’ll notice, as this is not a good thing. You should allow a considerable maximum paging file size so NT doesn’t have to expand the paging file size while you are working with several applications open.
There are two guidelines for configuring the paging file size. The first has been addressed in the previous paragraph. The rule for the initial paging file size can be flexible if you have a large amount of RAM in the system, preferably 64MB or more. You then can decrease the size of your paging file. The other guideline is that placing the paging file on separate drives can increase performance. Both disk drives are accessing information at the same time with increased throughput. The paging file does not have to be one file. If the recommended paging file size for your system is 35, you can have two 18MB paging files located on separate drives that function collectively as a paging file. There is one other small rule about the minimum paging file size. It is recommended that your paging file be at least 22MB. If the paging file size recommendation is 11 – 12MB plus the size of your RAM, that would mean that your installed RAM would equal 10MB. For Windows NT that is a scary thought.
Those are the basic rules that govern the use of the paging file. Remember, a paging file is no substitute for plenty of RAM in your system. Information is read from RAM much faster than a hard disk. With the prices of RAM decreasing, it is a good investment to make, and your paging file will thank you.

Figure 4: Use the Performance tab to adjust Application Performance and Virtual Memory settings.
The term "virtual" refers to something that appears to be working although it is not. In the case of virtual memory, it means using the hard disk or paging file to simulate RAM when you have run out. NT uses pages that are swapped to the hard disk and brought in and out of memory as needed. Of course, the hard disk is much slower than RAM. If you receive the error message, "Your system is running low on virtual memory," you need to increase the size of your paging file. The paging file is actually a file called PAGEFILE.SYS, and is located in the root directory of the drive you specify in the Virtual Memory dialog box. Look at Figure 3-5 for an illustration of the Virtual Memory dialog box on my system. You can see in my E: root directory in Explorer a 35MB PAGEFILE.SYS. (Explorer first had to be configured to view hidden files, because the PAGEFILE.SYS is hidden.)
Windows NT makes better use of the paging file than any of the Windows predecessors, so don’t let past experiences with adjusting and using the paging file worry you. (This file used to be called the swap file. You could create permanent swap files that used the same space each time, or temporary swap files that were created at each system startup. The temporary swap file could be scattered all over the disk. If you ran out of disk space, this scattering could be problematic. It took longer for the hard disk heads to read from a fragmented swap file.) The Windows NT paging file also can become fragmented and yield the same result: poor performance. Here is a quick exercise in what you could do to improve your system performance if your paging file is fragmented:
This exercise requires a second hard disk, or at least another partition to work effectively.
- Open the Control Panel and select System.
- Click the Performance tab.
- Click the Change button.
- Highlight the currently allocated paging file.
- In the Initial Size box, enter the number 0.
- Click the Set button.
- Select the drive or partition on which you want to place the new paging file.
- Enter the initial size for your paging file. This could be the recommended size of 12MB plus the size of your installed RAM.
- Click the Set button.
- You have to restart the computer for the changes to take effect.
What this exercise accomplished was to move the paging file from a possibly fragmented region of your disk or partition, into a new partition or onto a new disk where the paging file is covering contiguous space.
You can use NT’s Performance Monitor to view paging file activity and determine the correct size for the paging file. (You will learn more about the Performance Monitor in later chapters. For now we are configuring our paging file based on the recommendations provided by Microsoft, which will be sufficient for most users.) When your system experiences paging, NT is accessing the paging file in order to read, from the hard disk, required information that is not in RAM. The Performance Monitor also indicates whether excessive paging is decreasing system performance, requiring additional RAM. When paging gets really bad, the system begins thrashing. (That definitely sounds worse than paging!)
At the Virtual Memory window, shown in Figure 3-5, you can see how your currently allocated paging file size compares to the recommended paging file size. It is best to make the paging file size equal to or greater than this recommended size, unless you have a significant amount of memory, as described earlier.
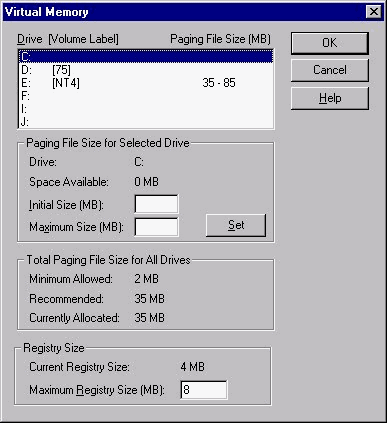
Figure 5: Control paging file size from the Virtual Memory dialog box.
The last setting in the dialog box is for the Maximum Registry Size. This is not a grave concern. You have two options: Limit the Registry to a certain size (Not suggested), or just let it grow larger. I cannot think of a reason why you would want to limit the size. The Registry is growing for a reason. It is storing more hardware, software, and security settings.
The Startup/Shutdown tab is used to adjust the settings for startup, but also allows you to adjust recovery settings. See Figure 3-6 for an illustration of this dialog box. The System Startup section is a graphical means of modifying the BOOT.INI, which is a read-only text file in the root directory of the system partition. Everything that you can do in the System Startup section you can do in the BOOT.INI. In fact, there are many more features that can be changed that are not shown in the System Startup section. The BOOT.INI is covered in later chapters, and should be thoroughly understood.
The operating system shown in the Startup window is selected as the default operating system—the one that is started once the allotted 30 seconds have passed. Be sure to select the operating system in which you spend most of your time. If you boot the system unattended, you want your main operating system to appear when you return after the timer has expired. You can change the default operating system by selecting another from the Startup pull down window. The 30 second timer is also adjustable. You could lower the timer to give yourself just enough time to select the proper operating system, but not too much time where NT takes too long to boot. If you have installed Windows NT Workstation on the same computer as Windows 95, you can see that it did an excellent job of creating the system startup menu with a selecting for Windows 95. This was the smoothest operating system addition I have ever seen. But if you go the other way—installing NT Workstation first, and then going back and installing Windows 95—the process won’t go as smoothly, because Windows 95 overwrote the nice system startup and Master Boot Record for NT. It’s not that difficult to revert to the old NT system startup menu, which you can read about elsewhere in this book.
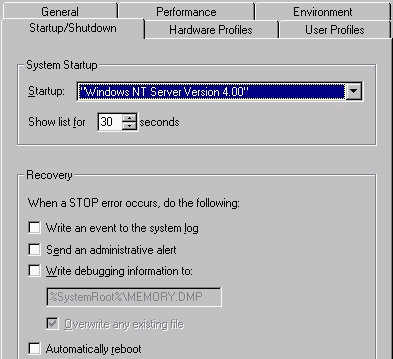
Figure 6: At the Startup/Shutdown tab, adjust setting for startup and recovery.
The Recovery section of the Startup/Shutdown dialog box allows you to configure your system to act in the case of a critical STOP error. STOP errors do not happen often, but you should know the available recovery options.
| The event can be written to the system log. In a business setting, you want to have the event on record to know when the STOP error occurred. A home user usually sees the error take place, and doesn’t need to write the event to the system log. | |
| An administrative alert can be sent. In a business setting, the administrator should be notified immediately if a computer has experienced a STOP error. In a home setting the user is the administrator, so sending this message is unnecessary. | |
| Debugging information is something you probably are not trained to interpret. It is a detailed analysis of everything happening at the time of the Kernel STOP error. This dump could be sent for analysis to Microsoft Support personnel, to determine the cause of the STOP error. In later chapters on Troubleshooting, you learn which tools to use to view the memory in the dump. |
You can configure your system to perform all of the above recovery options or none. A home user doesn’t need most of them. However, if you are responsible for a corporate NT network, you should select most, if not all of the recovery options. System downtime is costly in the business world, and these options enable you to react promptly in an emergency.
The environment table allows you to modify system variables for the computer. See Figure 3-7 for an illustration of the Environment dialog box. Some variables seldom have to be modified. For example, why would you want to change the PROCESSOR_ARCHITECTURE from x86 to anything else? The PATH statement is the exception. With this statement, you dictate the path of directories that is followed to find information when the computer cannot find a file. The system searches the directories you specify in the order you specify, until it finds the desired file. If the file is not found, an error message is issued. The PATH statement was very popular for use with DOS and older Windows operating systems. It’s still important, even if you don’t see it so much anymore.
Here is one trick I have found useful with respect to the Path statement: If I install a fresh copy of NT in another directory, I modify the PATH statement to look in the existing Winnt\System32 directory for the files it needs to run Windows applications. Before I came up with this idea, I used to reinstall the applications so that the correct files could be placed in the new system directory. I would run the application, and if a DLL file was indicated as missing, I would find it in the old directory and copy it to the new system directory. Then I would start the application again. If I got another error message, I would move the DLL file again. This process would continue until the application started properly. But what if the program did not indicate which DLL is missing? Well, then I was out of luck. In any case, why add the files again when I can just tell NT to look elsewhere for them? This trick of modifying the PATH statement fixes everything. (If only I had been an MCSE earlier!) In the next exercise we will adjust the PATH statement to add another directory to the search path. Let’s use the Program Files directory to practice adding another directory.
- Open the System tab in the Control Panel.
- Click the Environment tab.
- Scroll down until PATH is visible.
- Highlight the PATH statement. At the bottom of the dialog box the current path is displayed in the Value edit box.
- Move to the end of the path displayed in the Value edit box and add the following: ;C:\Program Files
- Click the Set button.
Notice that the directories in the Value field are separated by a semicolon. The computer uses the %SystemRoot% statement to insert the drive on which your system root is located—in this exercise, the C drive.
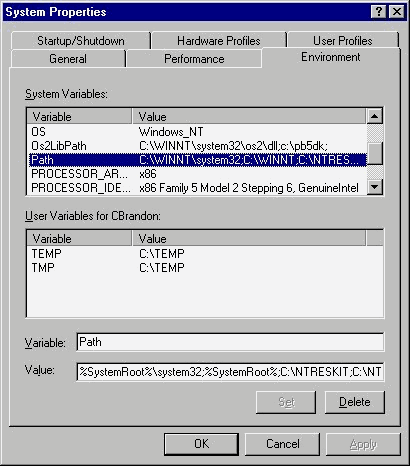
Figure 7: The PATH statement in the Environment tab gives the system another means to find a required file.
The other common user variable that you can modify in the Environment tab is the TEMP directory setting. Most people leave the TEMP directory as the default. The purpose of the TEMP directory is to place files that are currently being used by the operating system. In most cases Windows automatically deletes them when it is finished. This is not always the case, though. If you look in your TEMP directory right now, chances are you have files left over for unknown reasons. You should not delete them unless you know what they are. They could be TEMP files for an application that is currently running. (I recently had to break this rule when I was called to help a user who had run out of disk space. His TEMP directory held about 50MB of stuff, and all of the leftover files began with the tilde symbol, so it did not appear that he was using it as anything other than a TEMP directory. I deleted all of the temp files while the system was running, because he only had a few kilobytes of disk space left. I bet you can’t wait until you are an MCSE to encounter these situations!)
A hardware profile is an alternate configuration you can select from a startup to specify various options. Laptop users employ one hardware profile for the docked configuration, and another for the undocked, or travel configuration. I have seen other users specify one profile for network connectivity, and another for the local system. This is reminiscent of the old days when we tried to conserve valuable conventional memory, when playing a computer game that demanded a lot of memory, by creating a different profile that loaded only the drivers required to play a game. I found hardware profiles to be especially helpful when troubleshooting a machine, or testing different configurations without destroying the original working configuration. For example, if I am installing a modem and its resources are conflicting with the mouse, I can make a hardware profile for the original configuration in which the mouse worked. This way, I can have something to fall back on should the modem installation make the situation worse, which it usually does. After I am done troubleshooting, I use one hardware profile most of the time. I delete the other to avoid the Hardware Profiles menu on bootup.
To make a new hardware profile, just copy the existing hardware profile, which is called Original Configuration (Current). You can rename the new hardware profile. If NT cannot decide which profile to use for startup, it asks you which profile you would like to boot to. You can configure NT to wait a specified period of time before it boots to the default hardware profile, or you can have NT wait indefinitely for you to make a choice.
There is much more to the User Profiles tab than first appears. From this dialog box you can copy and delete profiles, or change the type of profile that is used. Before we continue, we need to understand user profiles and the different types available. (You learn more about user profiles in later chapters.)
A user profile stores user preferences such as screen savers, last documents used, and environmental settings such as program groups and network connections. When you log off, the changes are saved so that the next time you log in, the settings are just as you left them. The profile starts as the default user and then becomes saved in the user’s logon name in the system root, which is usually C:\Winnt under Profiles.
You can see in Figure 3-8 where NT will store user preferences. This is good for administrators to know, whether they make applications and files available to everyone on the system, or just to a select few. All Users is the default that is used as a model for all users who log on to the system. Just select the user that you would like to have a program or shortcut, and copy it to the Desktop or Start menu, whichever you prefer. This is the kind of thing I do on a daily basis when installing software as an NT Administrator, so you may want to practice it.
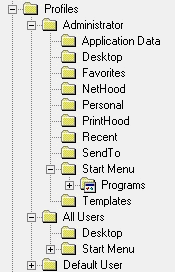
Figure 8: Copy User Profiles to Desktop or Start Menu under All Users.
You have the option of making a profile a roaming profile, which is a profile stored on another computer, most likely a server. The roaming profile enables you to keep your user preferences in one location so that any changes you make to the profile are used on any computer that you log into. If you did not have a roaming profile, you would have a profile for each computer you log into, and any changes you make to that profile are not accessible on other computers. I usually make my profile into a roaming profile so I can have shortcuts to commonly used areas available regardless of the user’s machine. This way I don’t have to browse the network to find everything I need while the user is watching impatiently. You enable a roaming user profile by specifying a path to the profile in User Manager.
Clicking the Services icon in the Control Panel brings up the window shown in Figure 3-9. This feature is new to users of Windows 95. It shows you what services are running on the system. Not only can you stop, start, or pause services, you have the option of configuring them for system startup.
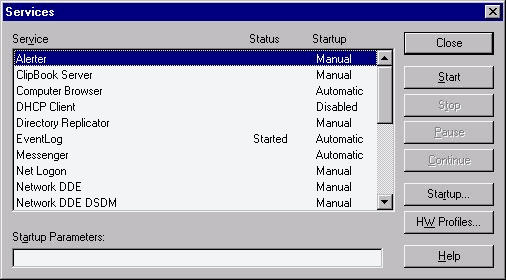
Figure 9: From the Services Applet, you can start, stop, pause, and configure services.
Services are important because they run even when a user is not logged on. This enables NT to perform tasks such as replication and scheduling in the background. Although it appears that NT is not doing anything when no user is logged in, many services are running. This is especially true of NT server. The Services icon becomes much more valuable when you are using Windows NT Server, due to the number of services added when you install the various BackOffice products such as SQL Server, SMS, and Exchange. These products install services that have to be monitored as well as stopped and started for various reasons. You have to stop services when updating the software, or when installing applications requiring the use of that particular service. Many times you have to stop and start a service for a configuration change to take effect. Pausing the service allows the existing users to continue their work without allowing any new users to access the resources. This is an effective and considerate way to let users access the resources without abruptly stopping the service and causing potential data loss. You even can send the users a polite message notifying them the system will be taken down for maintenance, and give them opportunity to save the data they are working on.
Here is an example of how the skills you learn while becoming an MCSE help you to solve problems in the real world: I have been using the Services applet, trying to troubleshoot an application. Whenever I try to start the service I get an error message. I can’t use that portion of the application if the service is not running. In this case the application is Microsoft’s Exchange Server. The service will not start, because I have an Exchange database that is corrupt. I make adjustments on the database, and try to start the service. If the service starts correctly, I have fixed the problem. If it does not start, I still have work to do. You can see how useful the Services applet can be when troubleshooting problems.
Figure 3-10 is the dialog box showing the three startup configuration options for a service: automatic, manual, and disabled. Automatic starts the service without your intervention. Manual configures the service to not start until you choose to start it. Disabled means the service will not start at all until you change the setting to automatic or manual.
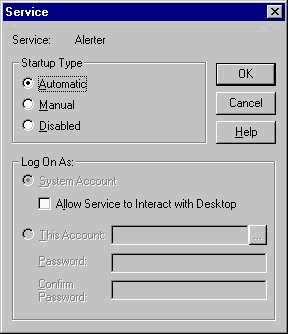
Figure 10: The Startup dialog box for a service, showing the three configuration options.
Earlier in the chapter you learned about hardware profiles. The H/W Profiles button in the Service startup allows you to configure the services for the various hardware profiles that you have enabled on the system. This means you can specify one hardware profile that is to have the service started, while another profile will not start that service. You can isolate hardware profiles while you adjust system settings so as not to affect the other hardware profiles.
I wanted to share another example of a situation in which you might use services. Recently, when I was renaming a file, I received the following message: "There has been a sharing violation. The source or destination file may be in use." At first I thought I had renamed the file to a name that was already being used. Not finding another file with that same name, I looked to see what applications might be open and using that same file. No other application was open. Finally, I remembered the services. Once I stopped the service, I could rename the file.
Here is another situation that could have taken a turn for the worse if not for my knowledge of services: I was restoring data from a tape backup. (No, I did not accidentally delete anything. I was testing the backup and restore process just in case I did accidentally delete something!) I was using one backup program that could not restore the data, so I quit that application and started another backup program. I received an error message upon opening the second program saying the tape device driver was loaded, but the backup device could not initialize. I made sure that the other program was not running, but still had no luck. Restarting the computer did not solve the problem, either. When I went to the Services icon in the Control Panel, I saw that the first program had services that were started automatically. Once I stopped these services, the other backup program started correctly.
An inexperienced NT user, unfamiliar with services, might not have solved the problem. If another person were to try to use the second backup program later and received the error message, he could have torn apart the entire system looking for the answer. With a grasp of services, you can quickly diagnose and solve such problems.
This icon allows you to adjust the date and time of your system, as well as the time zone. This applet can also be reached by double-clicking the clock in the task bar. Adjusting the date and time is self-explanatory, so I will not spend a lot of time with configuration. However, you should note that you have the option of automatically adjusting for daylight savings, or manually making the adjustment. If you support hundreds of computers, you don’t want to go around to each computer and manually adjust the time every six months. The date and time are important for updating file stamps such as last accessed, scheduled events, and e-mail messages. These don’t sound that important, but what if an internal NT system procedure had to check the timestamps of files during synchronization, or replication? The computer may not get updated correctly, because the timestamp would show a date later than the other computers.
Sometimes I get called out to adjust the time setting on an NT workstation, because the user did not have the appropriate rights. If you need administrative rights to change the setting, chances are it is a system setting that affects every user who logs into the system. I once had an e-mail correspondent ask me to send him a newspaper so he could place some bets. I had no idea what he was talking about until another person told me my e-mail messages were being time stamped with a date two months in the future! I had made an adjustment to find out what day of the week my birthday would fall on, and had forgotten to set it back.
From the Display icon, the user can customize desktops, icons, screen savers, and pointers. An NT Administrator often helps less experienced users with these settings. There is also an area in the Control Panel where graphics card manufacturers place several more tabs of configurations relating to the features of their cards. Don’t be surprised if you see upwards of eight tabs of configuration settings for the adapter and display environment. With the installation of Microsoft Internet Explorer 4, a tab called Web was added to the Display icon. It allows you to view your desktop as a web page. This is the new feature of the Internet browser that makes your desktop active so you can view web pages directly on it.
The background tab lets you choose a pattern or wallpaper to be used for your background (what some refer to as the desktop). Once you choose an image, you can tile the image to cover the entire background, or leave it as one tile in the middle of the screen. If you use pattern for the background, the option to tile or center will be grayed, because a pattern is a small picture already tiled.
There is nothing complex about the screen saver tab. It allows you to choose a screen saver, and to password protect the screen saver. If you set the Password Protect option, a password dialog box is displayed when you interrupt the system while the screen saver is running. This may be a nuisance for home users, but in a corporation it is considered a security feature. Just imagine if you left your computer suddenly while logged in as Administrator, and someone came along and deleted every file on the computer. This is an important feature when you become an MCSE and you are the Administrator of your own network. Follow this next exercise to make sure you know how to select a new screen saver.
- Open the Display icon in the Control Panel.
- Click the Screen Saver tab.
- Use the Screen Saver pull down menu to select the screen saver you wish to use. Click the preview button to see if you like it.
- Check the Password Protect button.
- Set the time to wait before the screen saver becomes active.
- Click OK to exit.
I don’t use screen savers that use too much system resources, especially on Windows NT Server. The CPU-intensive screen savers may look cool, but at the price of precious CPU cycles. I also don’t use screen savers that often, because of too many instances when Windows 95 and some laptops didn’t wake up when I tried to access the computer again. I know Windows NT is much better, but I hate rebooting just because the screen saver locked up the system.
The appearance tab lets you change all of the default colors of the dialog boxes, icons, and borders. Someone could probably spend hours in here trying all the different settings. This area is also important for visually impaired users who require special settings. It allows the user to change the size, color and brightness of dialog boxes and icons to improve legibility. Just like the Sounds icon in the Control Panel, the Appearance tab lets you load schemes, or create and save your own schemes.
The Plus! Tab is left over from the Windows 95 Plus Pack enhancements to the display applet. It lets you change the default icons for desktop icons such as My Computer and the Recycle bin. Since the enhancements are self-explanatory, here are some of the available options:
| Smooth edge of screen fonts. | |
| Use large icons. | |
| Show window contents while dragging. | |
| Show icons using all possible colors. | |
| Stretch background wallpaper to fit the screen. |
Of all the sections available in the display applet, the Settings tab will be the most important to you. As your tastes change (or your eyes get worse) you can change the resolution of the desktop to suit your needs. I found that I usually require a large desktop to maintain multiple windows, so I have selected the resolution of 1024 by 768. The larger the resolution, the more can be displayed on the screen at once. Windows 95 (without third-party utilities) would require you to reboot the computer for the changes to take effect, but NT can adjust the resolution immediately. However, NT cannot adjust the color depth immediately, and will require a reboot for those changes to take effect. This is a nice feature if you frequently require resolution changes for the different applications you are using. The color depth is not changed as frequently as the screen resolution. A color depth of 65k or more should be sufficient to make images pleasant to look at. Remember, these settings are all conditional upon your graphics subsystem. The better your card, the larger the resolution and deeper the color depth you can use. A good graphics card could enable you to use a resolution of 1280 or greater with a color palette of 65k or more. Use the test feature to see what is the maximum your graphics card and monitor can handle and adjust accordingly. If you have not discovered for yourself already, the Settings tab of Display Properties (shown in Figure 3-11) appears when you right-click the desktop and select Properties.
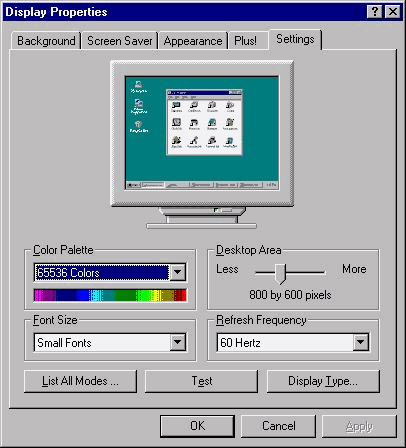
Figure 11: With the Settings tab, change the desktop resolution to suit your needs.
The List All Modes button is useful for selecting a mode that is supported by the system. This area displays all of the modes available, including various color depths, resolution and refresh frequency. I use this as an alternative to adjusting each of the settings from the main Settings window. Sometimes you have the refresh rate and color depth you want, but when you select the screen resolution size it changes the values that you had previously adjusted.
The most important configuration you can make in this section is the adding and removing of display adapters. The display adapters are system settings present for every user on the system. Only Administrators can change the display adapter. In the next exercise you change the video adapter. Please note that there are many different types of adapters, offering many different options.
- Access the Control Panel Display icon.
- Click the Settings tab.
- Choose Change Display Type.
Information on your current adapter is shown. Note that you can change the monitor type from here also.
- Choose Change.
- In most cases, a dialog box with the compatible devices appears. If the driver you would like to use is not on this screen, select Show All Devices.
- All of the available manufacturers and models of video adapters are displayed. Select the driver that matches the hardware you want to install. If you want to select a safe display driver that is compatible, select the Standard Display Adapter (VGA) from the Standard Display types at the top of the Manufacturers list. If the display adapter you would like to use is not shown on the list, select the Have Disk button and insert the vendor provided disk.
- You now see the driver that you have just chosen in the Adapter type window.
- Select the Close button.
- You now are at the Settings window, and you may be able to select Change the Screen Resolution and Color Depth for the new adapter.
- When you select the Close button, you may be prompter to restart the computer, depending on the changes you have made.
If you have made an incorrect choice when configuring your display driver and the system will not boot, Windows NT has the capability to boot in VGA mode. VGA mode can be selected from the Windows NT Startup menu, and will enable a universal VGA driver that let’s you boot into Windows, where you can restore the original display adapter, or correct any action that caused the incompatibility. This makes it very easy to recover from a display mishap. I used this capability recently when a user received an error from the monitor during bootup concerning a scan rate. I thought the monitor had gone bad and was almost ready to replace it when I decided to boot into VGA mode. Once I accessed the Display properties while I was in VGA mode, I saw that the resolution size was set to 1152 and the refresh frequency was set to 72Hz. I made changes and rebooted the system and it worked fine. Another thing to be mindful of is the refresh frequency. If you set this too high, whenever NT reboots it may bring you back to the Display Property tab.
The Modem icon in the Control Panel is where you configure the modem for use with the computer. This applet is one of the few areas where Windows NT detects your hardware. You are prompted for Windows NT to try to detect your modem if you have not configured one already. Since the installation of a modem is fairly straight forward, we need do only a brief overview of the procedure.
When you click the Modem icon in the Control Panel, either you are prompted for NT to try to detect a new modem, or you see the screen in Figure 3-12, with a modem already configured. If you do not have a modem configured and would like to install one, you have the option of letting NT try to detect your modem, or to select your modem from a list. If you are selecting your modem from a list and your device is not listed, click the Have Disk button to provide a disk supplied by the manufacturer for your modem. Once you have selected a modem, you are prompted for a COM port that you would like to install the modem on. After you have selected the port, NT either completes the installation or prompts you for Telephony settings, if this is the first time you have configured them.
Telephony settings are used by TAPI-compliant devices and applications to store settings for such things as locations, calling cards, and area codes. Each of these devices can access the settings, which are stored in a dialing location that is comparable to a profile. You can define a dialing location can be defined for each place you dial from, and configure it with appropriate information so you do not have to adjust the setting each time you make a call. For example, you can include the number nine as a prefix for one dialing location to enable you to access an outside line. You could configure another dialing location to let you use your calling card. Dialing locations are also referred to as Dialing Properties. If you did not configure these locations when you installed the modem, you can always set them up later through the Telephony icon in the Control Panel. If you connect to various sources, such as an Internet provider, a remote work site, or several different bulletin board systems (BBSs), you can define each of them and then select the one you would like to use for a particular session. When I set a Dial-Up Networking property for my Internet provider, I pulled the settings for the provider onto the desktop in plain sight so my wife could find them easily. (She’s not an MCSE like me!) You also can click the Dialing Properties button on the Modems Properties page to modify how your calls are dialed.
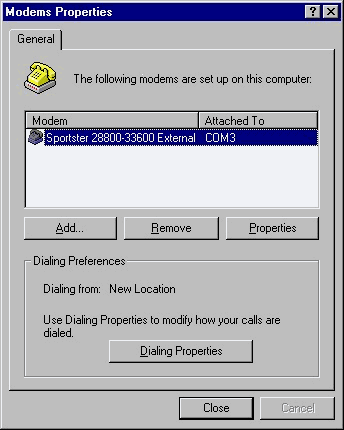
Figure 12: The Modems Properties dialog box displays all modem configurations.
As Figure 3-12 illustrates, you can add and remove modems by clicking the appropriate button in the Modems Properties box. Each time you add a modem it’s as if you never had a modem in the system. NT asks if you would like it to detect the modem, or if you would like to select one from the list. If you click the Properties button you can view and configure some of the modem settings, such as the maximum speed. A friend told me his 28.8 modem was so fast, he could connect to his Internet provider at 115200bps. I was going to explain to him that this is the speed at which your computer is communicating with the port and not the actual speed of the modem, but I decided not to burst his bubble. Don’t worry if you didn’t know either. I am guilty of the same thing. The computer must communicate with the port at a higher speed because it has to compress and uncompress the data before it is transmitted.
If you need to, you can configure the connection settings such as the data bits, parity, and stop bits for the modem under the Connection tab in the properties of a particular modem. You probably will not have to adjust any of these settings. There is even an Advanced tab with flow control and error control settings that you will also probably never have to configure. There is more concerning these settings and the serial port overview under the section on the Ports icon in the Control Panel.
An important feature of the Modems icon in the Control Panel is that once you have configured your modem, it will be accessible by all the applications that require a modem, such as your Dial-Up Networking (DUN) and Remote Access Service (RAS). These programs call upon the properly configured modem to communicate. Here is a good way to understand the relationships among all these devices and programs that we just learned:
| You click a hypertext link from a Word document. This link is a URL on the Internet. | |
| Word requires RAS or DUN, because the request is not local. | |
| RAS or DUN initializes the modem. | |
| The modem dials according to the telephony properties. |
In order to use the Windows NT built-in backup utility, you need to have a compatible backup device installed. You install and configure the backup device by clicking the Tape Devices Icon, which brings up the dialog box shown in Figure 3-13. NT actually detects the device and installs the appropriate driver. Installing the tape device is the easy part of backing up. The difficult part is configuring NT to backup, restore, and catalog. Or even worse, you could be using a third-party product that has too many features to keep straight.
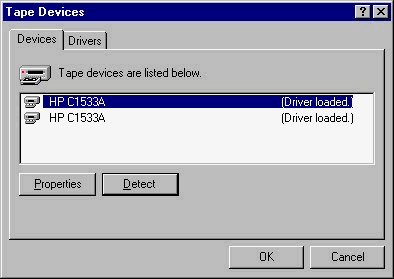
Figure 13: Click the Tape Devices Icon to configure and install a backup device.
This tab in the Tape Devices windows shows you the tape devices currently in the system. You can select the Properties button to view the settings such as SCSI port, bus number, and target ID. The Detect button automatically detects and installs the appropriate driver. You can see that the status of the device driver also is displayed.
This next exercise demonstrates how to add a tape device and the appropriate device driver to Windows NT. For the purpose of the exercise, we’ll assume that you do not already have a tape device on your system. (If you already had such a device installed, you could skip the step for installing the physical device.) We’re not using the Detect feature of Windows NT in this exercise, because we’re assuming there would be nothing for NT to detect.
- Begin by physically installing the tape device. Make any settings changes to jumpers if necessary. This would include setting the SCSI ID, or setting the Master/Slave settings for IDE devices.
- Start the computer and boot to NT Workstation.
- Access the Tape Devices icon in the Control Panel.
- Select the Drivers tab.
- Click Add.
- Select your device from the list of manufacturers and models available. If the driver for your device is not present, click Have Disk and supply the disk with the driver provided by the manufacturer.
- Click OK.
- Provide the path to the NT Workstation CD-ROM if necessary.
- Restart the computer for the changes to take effect.
If you do not have a tape device and you were installing a driver just for the exercise, you can use that driver for the next exercise, in which we will remove a tape device driver.
- Open the Control Panel and select the Tape Devices icon.
- Select the Drivers tab.
- Highlight the device you want to remove, and select the Remove button.
- Confirm your intention to remove the device.
- The driver for the tape device is now removed.
As you witnessed in the last two examples, the Drivers tab is where the installation and removal of device drivers takes place. Since a device driver can be thought of as controlling the device, adding or removing a driver essentially removes your ability to communicate with the device. The next step in removing the driver, if you were not going to use the device anymore, would be physically removing the device from the system.
When I was installing a third-party backup utility, I was prompted to remove the device and drivers from NT so that I could have sole ownership of them. I don’t understand why this is necessary. I would have to go a catalog and order tape that was backed up using Windows NT backup before the upgrade. This is the sort of thing to anticipate if you are going to be an NT Administrator, or any network administrator for that matter. You must stick with one solution, or else risk not having other devices or programs (or in this case, previous backup tapes) remain compatible with your new solution. Being aware of the ramifications of a decision will make you a great Administrator.
The Network icon in the Control Panel may be the most important applet available. If you do not participate in a network, it’s of no use to you. But to other users, such as network administrator s, this applet is essential to everyday survival. I am not exaggerating when I say that I visit the box illustrated in Figure 3-14 every few hours at my job. Here are a few examples of what you can configure in the Network applet:
| Install and configure a network adapter. | |
| Configure the TCP/IP protocol, and add support for other protocols such as IPX/SPX, and NetBEUI. | |
| Change the computer name and the domain in which it will participate. | |
| Bind and unbind protocols to adapters | |
| Add support for the Remote Access Service (RAS) and Simple Network Management Protocol (SNMP). |
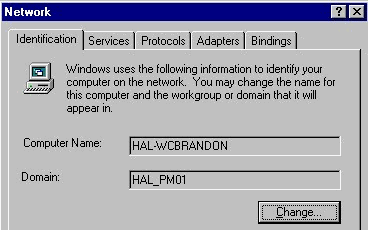
Figure 14: The Network Identification dialog box, where a network administrator spends a lot of time.
Anything that has to do with network hardware and software for your workstation can be configured here. In the next exercise we install a network adapter, which gets the ball rolling for the other network options covered in later chapters, such as adding protocol support. Refer to Figure 3-15 for an illustration of the Adapters tab box.
In order to complete this exercise, you must have a network adapter card to install and configure. If you don’t have a network card, you can install the MS Loopback Adapter located with the other network drivers. With this adapter, you can add protocols and services just as you could with any other driver provided by Windows NT.
- Open the Control Panel by selecting Start, and then Settings.
- Click the network icon to bring up the network configuration applet.
- Click the Adapters tab.
- Click Add.
- A list of network adapters appears. Select the correct adapter for the card you are installing. If your network card is not in the list of adapters, choose Have Disk. If you do not have a network card to install, choose the MS Loopback Adapter.
- Depending on your card, you get a dialog box that will display additional configuration information that you have to provide.
This can be the difficult portion of the install. Most likely, the dialog box will ask you for IRQ and Port Address for the card. These settings can be ascertained by using the configuration diskette that shipped with the network card. It is very important not to lose network adapter card diskettes with the utilities for configuring the card. I usually turn off the system, install the new network adapter, and then boot with system disk (if the network utility disk is not bootable) and run the configuration utility. This allows you to assign an IRQ, port address, transceiver type, and duplex type, among other things. If you don’t use this diskette to configure your network adapter card, you have to guess at the network card’s settings. If NT were plug and play, this installation would be much different.
- If you chose the MS Loopback Adapter for your card, then you have to specify the frame type. It doesn’t matter in this case, because we aren’t using the card. Just accept the default.
- The network card is now installed. In order for the settings to take effect, you have to reboot the computer.
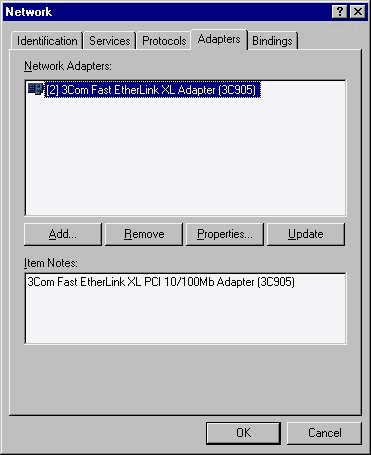
Figure 15: Install a network adapter at the Adapters tab of the Network icon in the Control Panel.
An unfortunate incident happened to me once as a result of an improper network card setting. I had the misfortune of downing the entire network, and I don’t mean a network of 3-5 computers. Our network has about 20 servers and over 200 workstations. When the phone began ringing and the users were looking out of their cubicles at me, I knew I was in trouble. Not knowing the cause of the problem, I called everyone I could think of for a solution. The main Ether switch had no more blinking lights indicating activity. We got out the switch documentation to find out what each light represents. We thought the switch itself might have gone bad, until we saw that the collision light had come on. After a few minutes, someone remembered I had just started installing NT Server on another computer. He proposed that the network card might be bad and could be chattering on the network. When he unplugged the network cable from the card, the Ether switch collision light turned off, and the blinking activity lights began appearing. When he plugged the cable back in to the card, the light for 100MB throughput on the card was on, rather than the 10MB light. He asked if I had configured the card to auto detect the network speed, and I remembered not even checking the speed while I configured the card. This situation could have had devastating results. I will always pay more attention when I am configuring devices. I hope you will too.
If you receive the error, "At least one service or driver failed during system startup. Use Event Viewer to examine the event log for details", just after configuring the card, the settings are not correct. Open Event Viewer in the Administrative Tools to verify this. You might not get the exact reason why the device failed, but at least you will know where to begin troubleshooting the problem.
The settings you choose in Windows NT must match the settings that the device is physically set to. This is very important for network cards, as well as modems and sound cards. Don’t try guessing. Use the utilities provided with the card, and please do not throw the utilities away after you are finished. You will need them again if you have to adjust the card at a later date. You should write down the settings and attach them to the computer, so the next person who has to configure that device knows at a glance what device is installed and how it is configured.
Removing a network adapter is simple, but you should make a note of the settings such as DNS, WINS, and TCP/IP information before you remove the card. Knowing these will make configuring the next card much easier. You learn much more about these settings in later chapters. In this next exercise we remove an adapter from your system. This can be the adapter you installed in the previous exercise.
- Open the Network icon in the Control Panel.
- Click the Adapters tab.
- Select the adapter you want to remove from the list.
- Click the Remove button.
- A message will ask you to confirm your actions. Click Yes to continue.
The icon with the battery and the power cord is the icon for the Uninterruptible Power Supply, or UPS. Clicking this icon brings up the dialog box in Figure 3-16. The UPS is a device connected through the serial port that keeps power running to a system in the event of an emergency, such as a blackout. UPS can keep a computer running for several minutes while you shut it down correctly. The computer can also be configured to allow a safe shutdown without Administrator intervention, rather than remaining on until the UPS runs out of power. A power surge or spike can be fatal to a computer, so you should protect critical computers, such as servers, with UPS devices. You use this feature more when you are an Administrator of an NT network, because most of the important computers are protected by a UPS system.
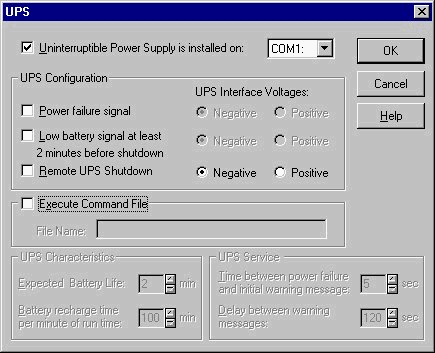
Figure 16: UPS protects the system in the event of power failure.
Since most of us do not have access to a UPS, we will configure the settings as if UPS is present in the system.
- Click the UPS icon in the Control Panel.
- Add support for the UPS by specifying which COM port the UPS is connected to. This allows more configuration options to become available.
- You want the UPS to send a signal if the power supply fails, so check the box marked Power Failure Signal in the UPS Configuration area.
- You also want to be notified when the UPS is running low on battery power, and how much time you have before the battery is depleted. Check the Low Battery Signal At Least 2 Minutes Before Shutdown box.
- If you would like the option to remotely shut down the UPS, check the box marked Remote UPS Shutdown.
- If you have a file or alert that you have made specially for this situation, enter the filename in the Execute Command box.
- The UPS Characteristics portion of the dialog box depends on your UPS, because the amount of battery life varies by model. Consult the documentation provided with the UPS.
- The UPS Service portion is used to configure the initial and subsequent attempts to send warning messages to the Administrator and the users.
In addition to the UPS icon in the Control Panel, the UPS vendor may provide another Control Panel icon for viewing the status of the UPS devices. Here you can find valuable information concerning self-tests, diagnostics and logging, as well as some of the features provided with the Control Panel UPS icon. (On the Control Panel for my company’s server, which has the UPS device installed, there is not even an icon for the UPS anymore! The vendor must have removed the icon because it conflicts with device settings already present in their software. This might be a good idea to consolidate configuration utilities.)
This icon yields a number of windows (shown in Figure 3-17) from which you can configure the serial ports. Not only can you add and remove serial ports, you can also adjust the baud rate, data bits, stop bits, parity, and flow control. The advanced option lets you manually adjust the resources for the port, including the IRQ and I/O port address. You won’t want to override the default port values unless you are an experienced user. These settings can also be overridden in the Modem properties dialog box.
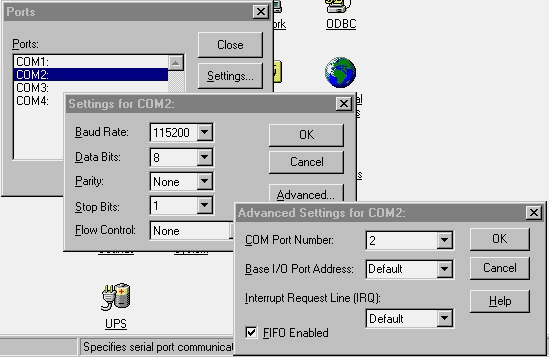
Figure 17: The many configurable settings in the Ports icon.
If you are not very familiar with serial ports, here is a quick summary. Serial ports, or communication ports (COM ports) are, of course, used to communicate. Note that a mouse is considered a communications port. Serial ports use asynchronous communications, which append stop and start bits to the data to signal the beginning and end of a byte. The receiving computer strips off the start and stop bits and reassembles the data. Synchronous communication requires that the two communicating devices share the same clock signal so they do not waste the overhead of appending start and stop bits to each byte of information. That is why synchronous communication is much faster. In the Ports icon you can configure the port for the amount of data bits, use of the stop bit, and parity for error detection if necessary. If you are not experienced with serial communications, you should leave these settings at the default. The other device would have to be set exactly like your device in order to communicate. (Just in case you were wondering, FIFO Enabled means First In, First Out buffer—the first data in the buffer will be the first out when the buffer becomes full.)
You can use the Ports icon to see the ports you have available before you install a communications device such as a modem. If the modem requires manual configuration such as jumpers, you can jumper the modem accordingly. If you can’t use the default IRQ or I/O assignments for your ports because of conflicts with other devices, you can change them. This flexibility allows you to cater the NT port assignment settings to older legacy devices that were not very configurable. You must match the settings on both the device and in the ports icon for the device to work. That is the most difficult portion of the installation of these devices. It would be easier if you only had to configure the device one time. This is why you must keep your configuration diskettes after you configure your devices. You will need them later if the devices settings have to be changed. This is also why some companies have hardware inventory stickers on the sides of computers, showing the contents and configuration of the devices. When you see a computer that you are not familiar with, how are you going to know what brand network card it is, let alone what the card is configured for? You must be prepared for these situations. Learn where to go to find this information, and gather the correct information from the utility to be effective.
The Add/Remove Programs icon is for the adding and removing of software, including the components that are part of the operating system, as well as third-party programs. Unfortunately, only 32-bit Windows applications that register themselves can be removed automatically by Windows, and not many applications do this. Microsoft is good about making most of their software capable of being removed from this uninstall window. And it is becoming more popular for software makers to have an item in their program group that uninstalls the application, rather than forcing the user to access the Add/Remove Programs icon. You should check all these areas to be sure the application can be removed safely, before you try to remove the program manually.
For this exercise you must have an application that you are willing to remove from your system. You could use the program that you just installed in the preceding exercise. I will be using Microsoft’s Office 97. I chose this because, rather than removing the entire Office suite, it brings up the setup program used when installing Microsoft Office. This lets me reinstall, add or remove software, or remove all components from the system.
- If you are not in the Control Panel Add/Remove programs, click the Start menu, select Settings, and then Control Panel. From there, select Add/Remove Programs.
- On the Install/Uninstall tab, select the program that you want to remove.
- Click the Add/Remove button
What you see next depends on the application. Some programs begin uninstalling themselves immediately, and others bring up the setup program you used when you first installed the program. When I choose Office 97 to remove, it brought up the setup program and I chose Add/Remove software. The next screen is the Options list of available components of the Office suite. I choose to uninstall Outlook, so I deselect it and select Continue. The setup program now begins removing Outlook. Mastering uninstalling and adding or removing components is important with Microsoft products, because they have so many. You may find that you don’t need all the components you got when you installed the program, and want to remove them. This can easily be done in this utility.
The Install/Uninstall tab (shown in Figure 3-18) is one of the many ways you can install software. Just because you install software by this method does not mean that Windows automatically can remove it. This is reserved for 32-bit applications that were mentioned in the previous section. I usually don’t use this method for installing applications. Opening My Computer and selecting the drive that contains the setup information is easier. But what is nice about installing applications via this Install/Uninstall tab is that it searches the floppy drive and CD-ROM drive for the setup program.
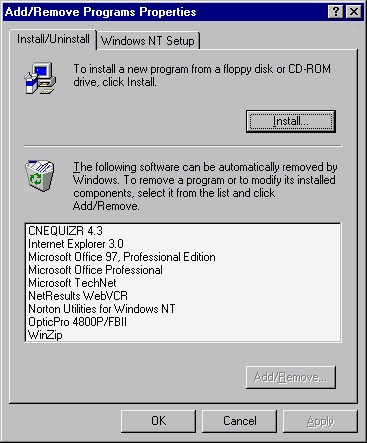
Figure 18: You can install software with the Install/Uninstall tab, but it’s not always the best way.
This exercise demonstrates the installation of an application via the Add/Remove Programs feature. This means you do not have to search through Explorer to find the correct executable, because NT will search for the setup program for you. Even if you don’t install applications this way, it is always helpful to know all of the different methods of installing applications.
- Open the Add/Remove Programs icon in the Control Panel.
- Click the Install button.
- Insert the floppy disk or CD-ROM containing the program you want to install.
- NT will search the floppy and the CD-ROM for the executable to start the program.
- If NT is unable to locate the setup program, it prompts you to enter the path to the file. You also can select the Browse button to find the file yourself.
- Once NT finds the correct setup program, click Finish to begin the installation of the program.
With the advent of AutoPlay, it is becoming much easier to install software. All you have to do in some cases is insert the CD-ROM, and click one or two buttons, and the application is installed. Installing a program may not be the hard part, because most programs have good default choices that make installation easier. However, you should learn all of the options available with the software to make an intelligent decision on whether to deviate from those default options. A case in point is the installation of Windows NT Workstation. Should you use the typical or the custom setup? You should know the differences and try them both. There may come a time when you need to install NT Workstation with special features not available in the typical setup.
The Windows NT setup tab (See Figure 3-19.) allows you to go back and add or remove Windows components. This is an easy way to remove a component from Windows that is no longer needed. Or you might use this feature if you forget to install the correct components when NT initially was installed. You have to provide the Windows NT CD-ROM to install applications not previously installed. It is a wise investment to have the source files on the hard disk, or out on a network share where you do not have to provide the CD-ROM every time something is added to NT. This is especially important in large companies.
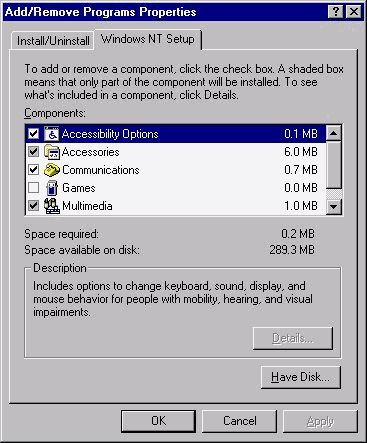
Figure 19: Windows NT Setup tab offers an easy way to remove components that are no longer needed.
Table 3-1 gives you a quick summary of the components that are available to add or remove.
| Accessibility Options | no additional components |
| Accessories | Calculator, Character Map, Clipboard Viewer, Clock, Desktop Wallpaper, Document Templates, Imaging, Mouse Pointers, Object Packages, Paint, Quick View, Screen Savers, WordPad |
| Communications | Chat, HyperTerminal, Phone Dialer |
| Games | FreeCell, Minesweeper, Pinball, Solitaire |
| Multimedia | CD Player, Jungle Sound Scheme, Media Player, Musica Sound Scheme, Robotz Sound Scheme, Sample Sounds, Sound Recorder, Utopia Sound Scheme, Volume Control |
| Windows Messaging | Internet Mail, Microsoft Mail, Windows Messaging |
Table 1: Components Check Boxes
The most important fact to remember about the SCSI Adapters applet in the Control Panel is that, in addition to SCSI adapter information, it contains information about IDE devices. This sounds strange, but it’s true. If you have IDE devices in your system you can view them through this dialog box, but you are limited in what you can configure. SCSI devices, on the other hand, enable you to do much more.
Most home users other than power users will not use SCSI devices, since they cost more and are more difficult to configure. However, SCSI devices are popular in the business environment for their performance and expandability. An MCSE often comes across SCSI devices and is responsible for supporting them, so you must learn to install and configure them. Here are a few of the concerns about SCSI installation and configuration that you should be aware of:
| SCSI devices needed to be terminated correctly. This includes both ends of the bus. | |
| SCSI devices need to have proper device ID numbers assigned. Since a SCSI adapter can support seven devices, it becomes more difficult to assign device ID numbers properly. | |
| There are more compatibility concerns with NT than with IDE devices. Find out if your SCSI device is on the hardware compatibility list before you install the device. | |
| If your boot device is a SCSI device, it has to be configured before Windows NT can boot properly. |
SCSI devices provide many advantages once they are properly configured. Here are a few of the advantages of SCSI:
| Faster than IDE | |
| Can have up to seven devices per adapter. IDE can have four. | |
| Has a controller onboard to do some of the processing. | |
| Allows use of more external devices such as scanners, CD-ROMs, optical drives. |
The devices tab is where you see the SCSI and IDE devices in your system. Notice how the devices are arranged according to the device to which they are connected. You can see that the Dual-Channel PCI IDE Controller in Figure 3-20 has a Quantum Fireball and a Conner hard disk as master and slave on the primary IDE controller. There is also a Matshita CD-ROM as the master of the secondary IDE controller. SCSI devices are no different. They are shown just like the IDE devices, with the adapter and the devices that are connected to the adapter. This is a good graphical representation of how the devices are configured in your system. You can view the properties of each of the devices by highlighting the device and selecting the Properties button. The Devices window will show you the settings the device is using, such as target ID, SCSI port, and bus number. You can also view the resources for devices by selecting the Resource tab. This will show you resources such as Input/Output Range, and Interrupt Request. Actually, in my current setup nothing in the Devices tab of the SCSI Adapters utility is configurable. You may have different devices that can be configured. I have two IDE controllers, a SCSI controller, a SCSI hard disk, and an IDE CD-ROM drive.
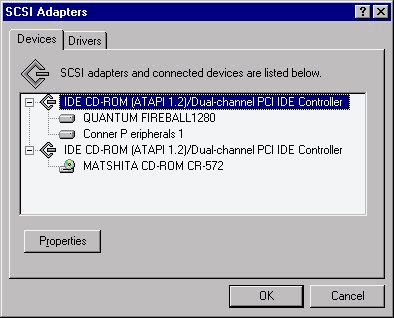
Figure 20: SCSI Adapters dialog box displaying IDE devices and their interrelationships.
The Drivers tab of the SCSI Adapters dialog box is where you add and remove device drivers. Choose this tab when you want to make upgrades, since you need to remove the old driver (in the sense that you remove its ability to communicate with a device) and add a new one. If you are removing an existing driver to add a new device, you must also physically remove the old device from your system. We use the Drivers tab to add and remove drivers in the exercises that follow.
If you are having difficulty configuring SCSI devices, Microsoft has provided a SCSI utility with Windows NT called the SCSI Investigator. It only supports the two major SCSI adapter manufacturers Adaptec and Buslogic, but these two manufacturers comprise the majority of the SCSI adapter market. SCSI Investigator lets you configure your devices properly to avoid conflicts and termination problems. The next exercise covers the creating of the SCSI tool disk. For the exercise, you must have a DOS-based computer to make the boot disk. If you do not have any SCSI adapters in your system, you can still make the SCSI tool disk, but it will be of no use to you.
- Boot to DOS. If your NT workstation does not have DOS installed, use a computer that does.
- Use the SYS C: A: command to transfer the system files from your C: drive to your A: drive to make the disk bootable.
- Insert the Windows NT Workstation CD-ROM. (Please note that your CD-ROM drivers have to be loaded to access the CD-ROM.)
- Insert a 1.44 floppy disk into the drive.
- Change to the drive that your CD-ROM is located on.
- Change to the SCSI tool directory by typing: CD \SUPPORT\SCSITOOL
- Type MAKEDISK to begin.
For the next exercise we use the SCSI Investigator to verify the correct settings for our installed SCSI adapters. You are limited in what you can configure with the SCSI Investigator, but it still is a great tool to have around for viewing SCSI device settings.
- Reboot the computer that has the SCSI devices installed that you would like to verify or configure.
- Select your choice from the following startup menu:
- The SCSI Investigator begins loading drivers required for operation
- If prompted to continue, select Yes and wait as the SCSI investigator detects your SCSI devices.
- It should find the SCSI adapters, and display the settings.
- Click SCSI Devices to view all of the devices currently connected to the SCSI adapter.
- Verify that the settings are correct and that all of your devices are detected.
- You can print the settings for your records if you like, or you can view and print the SCSI.TXT file that was created.
Installing and configuring a SCSI adapter can be very challenging. With more experience, you become more comfortable with the procedures. If you learn how to use the SCSI Investigator, you can use it when you are configuring SCSI devices. Keep a copy of this disk with you, or add it to your computer toolkit for troubleshooting devices. You may feel you know the settings of your SCSI devices inside and out, but what happens when you try to troubleshoot someone else’s? You need to be aware of what the current configuration is in order to resolve conflicts.
The next exercise will involve installing a SCSI adapter. If you do not have a SCSI adapter to install, try to visualize the steps as we go.
- Manually configure the SCSI adapter if it is required. In order to find an available address and IRQ assignment, you could use NT diagnostics. You have to configure the termination for the device you are installing in relation to the other SCSI devices in your system.
- Physically install the device.
- While your computer boots up, access the software configuration program. This is usually done by a certain keystroke, such as CTRL-A.
- Configure the device based on the available settings you gathered from NT diagnostics.
- Reboot again, this time to Windows NT.
- Select the SCSI Adapters icon from the Control Panel.
- Select the Drivers tab.
- Click Add.
- Select the driver for the device you just installed. If a driver is not provided, click the Have Disk button and insert the vendor-provided disk with the device driver.
- Enter the path for the Windows NT CD-ROM if prompted.
- Restart your computer for the changes to take effect.
One thing to keep in mind is that most SCSI problems occur from improper termination. You have to terminate the last device correctly. Luckily, devices are becoming autoterminating, which removes the hassle of determining which device should be terminated. The best way to get used to configuring SCSI devices is just to get a few and try different combinations of settings and configurations. You don’t want to be in MCSE field without a grasp of SCSI devices, because configuring them requires experience and a thorough understanding.
For the next exercise, we will be removing a SCSI adapter. This could be the SCSI adapter that you just installed. Once again, if you don’t have a SCSI adapter in your system, try to visualize these steps.
- Click the SCSI Adapters icon in the Control Panel.
- Click the Driver tab.
- Select the driver that you wish to remove.
- Click Remove.
- If you are prompted to confirm your intentions, select Yes.
- Click Close.
- Shut down the system, remove the device, and restart your system for the changes to take effect.
Although NT does a great job of detecting your CD-ROM drive at installation, there comes a time when you have to replace your obsolete drive and add a new one. Unfortunately Windows NT is not plug and play as of yet, so you have to install and configure the CD-ROM yourself. This is not very difficult. You actually can go through the installation of the CD-ROM in the next exercise with us, or you can pretend that you have installed the drive already, and are now configuring the driver.
- Enter the SCSI Adapters applet in the Control Panel.
- Click the tab for Drivers.
I currently have an IDE CD-ROM ATAPI (1.2)/Dual-channel PCI IDE Controller that I am removing and reinstalling for this exercise.
- Choose the Add button to add a driver.
- Select your driver from the list. If it is not on the list, select the Have Disk button and provide a disk supplied by the manufacturer for your device.
I received a message informing me that the drivers are currently installed on the system, and asking if I would like to use them rather than copying them from disk. You probably do not receive this message and have to reboot the system for the changes to take effect.
This next exercise involves removing a CD-ROM drive—more specifically, a driver that controls the device. Use this option if you are upgrading your CD-ROM and removing the older drive from your system.
- Open the SCSI Adapters icon from the Control Panel.
- Click the Drivers tab.
- Highlight the driver you would like to remove
- Click the Remove button.
You have now removed the driver from your system. You now can shut off the system and physically remove the device, if you are actually preparing to upgrade the CD-ROM.
The Server icon in the Control Panel fooled me at first, because I thought it was only for Windows NT Server. This is not the case. If you are making shares accessible to other users, your computer is acting like a server. This applet gives you a summary of which shares are available to users, and which users are currently accessing shares. You have the resources that others are accessing. You would like to know who is accessing your system, how many files they have open, and how long they have been on. This applet is for just that purpose. The Usage Summary in the first dialog box, shown in Figure 3-21, has the following dynamic (updated continually based on usage) resource settings:
| Sessions—the number of remote users currently accessing the computer. | |
| File Locks—the number of file locks by users. | |
| Open files—the number of open files by the users. | |
| Open Named Pipes. A named pipe allows one process to communicate with another remote or local process. You learn about Named Pipes in later chapters. |
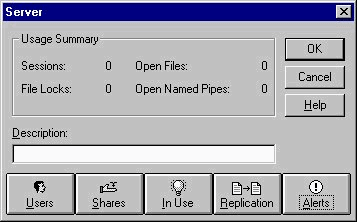
Figure 21: The Server applet, for managing your shares and keeping track of current system usage.
Clicking the Shares button displays the shares that you currently have available and number of users connected to each share. You can see how long a user has been using your shared resources. If there are users connected that you do not want, you can highlight and click the disconnect button, or you can disconnect all users. Before disconnecting users, send them a message. If you disconnect when they are in the middle of a download, for example, they will lose data.
The icon for Replication is used to replicate files or directories that you have in your export directory to other computers. You use this feature if you needed to have data that has to be in sync, such as a login script. You also use this to distribute files or folders—anything you put in the export directory is exported to computers that you specify. From the replication window, you select the files or folders you want to replicate, and the computers you want to replicate with. Replication is much more of an issue with Windows NT Server.
The last button that you might find helpful is the Alerts button. This is the list of computers or users you would like to receive administrative alerts when they occur on the system. Alerts can be sent if someone accesses a specific resource, or in the event of problems such as server shutdown. A few prerequisites, such as starting the Alerter and Messenger services, must be fulfilled. The Messenger service has to be installed on the receiving computer.
The Sounds icon is for assigning sounds to various system events, such as opening and closing of windows, errors, startup, shutdown, and critical stops. You can modify the default Windows sound scheme, or you can create you own custom sound assignments and save them as schemes. If the sound files provided with NT are not enough for you, there are plenty of useable sounds located on the Internet. This icon is not for installation or configuration of any devices. In the next exercise, we change a sound event.
- Click the Sounds icon located in the Control Panel.
- In the list of events, select an event you want to change, or to which you want to add a sound association.
- If an event has the yellow sound icon to the left of it, click that to preview the sound.
- Use the scroll down bar to select a sound, or click the Browse button to search the directory tree for more sounds.
- When you are satisfied with the sounds associated with the events, click the ‘Save As’ button to save your custom scheme.
With the mouse icon, you adjust the parameters of your mouse, including programming the buttons, adjusting speed, and changing drivers. If you have a type of mouse other than the default two-button mouse, you can configure the special features as well. For example, the Microsoft Intellimouse® has a wheel between the two buttons that can be customized. You can adjust the speed of the wheel, the direction of the wheel, and whether to allow the wheel to be used as another mouse button. There are seven tabs in my Mouse icon for configuring the device.
The Buttons tab can be used for configuring the primary and secondary buttons on the mouse. (They are referred to as primary and secondary for the sake of left-handed mouse users. Right-click is a secondary mouse click for right-handed users, but a primary mouse click for left-handed users. Primary/secondary terms can avoid confusion.) If you have a three-button mouse, this tab is where you program the third button. Most three-button mouse users program the third button to be a double-click.
The double-click speed area of the buttons tab adjusts the rate to suit your needs. Some users double-click very fast, while others take more time in between clicks. Use the test to select the rate comfortable to you.
The Pointers tab is most often used to configure the mouse pointer with animated cursors. The Microsoft Plus! Pack for Windows 95 introduced desktop themes that used different cursors, in addition to desktop wallpaper and custom icons. NT provides some additional cursors and pointers, and you also can get plenty of animated and custom cursors on the Internet. In the next exercise, we select a new pointer scheme from the available library supplied by NT.
- From the Start menu, select Control Panel.
- Select the Mouse icon
- Select the Pointers tab.
- Select the drop down menu box for Schemes and select a scheme you wish to use. If there are no schemes present here, you did not install them. You need to go to the Add/Remove Programs icon and install the mouse pointers which are located under Accessories.
- If you choose not to use the whole scheme, you can double-click the pointer that you wish to change, or select the Browse button and a browse window will appear. Here is where you can select additional individual pointers, rather than using a new scheme. If you cannot decide which pointers to use, and would just like to keep the original default scheme, select the Use Default button, or select None from the scheme pull down box.
The Motion tab includes the Pointer Speed and Snap To default options. The pointer speed adjusts the speed of your mouse pointer, which can be thought of as the amount of distance covered by the mouse. If you adjust the slider bar to Slower, it takes more physical movement by the user to move the mouse from one side of the screen to the other. Faster, on the other hand, can enable the mouse to cross the entire screen with just an inch or two of movement on the mouse pad.
The Snap To default enables the mouse to jump to the default button in any dialog box—usually OK or Apply. This can save a user time navigating through various windows, but also can be annoying. The mouse jumps all over the screen as each dialog box is opened, making it difficult to keep track of the mouse cursor.
The General tab is where you install a new driver for the mouse, as the next exercise demonstrates.
This exercise covers the changing of a mouse driver. The driver has to be changed when a new mouse is added to the system. You should practice accessing this icon and changing the mouse driver without the use of a mouse. If the changing of the mouse driver is not successful, you have to return to this window to change the driver again, this time without the use of the mouse. You might be surprised how lost you are without the mouse.
- Open the Mouse icon from the Control Panel.
- Select the General tab.
- The Select Device window will appear. If the mouse driver you would like to install does not appear, select Show All Devices.
- You see a screen with available manufacturers and models for which NT provides driver support. Select the driver for the mouse you are installing.
- If the driver for the mouse you are installing is not present, click the Have Disk button. Insert the disk supplied by the manufacturer into the drive, or select the Browse button to select an alternate source, such as a network path.
- You have to reboot your computer for the changes to take effect.
Most mice are either serial mice, or PS/2 mice. PS/2 mice are becoming more popular because they do not take a communications (serial) port, and therefore will not likely conflict with a modem, or another communications device. PS/2 mice are built into most leading brand systems purchased today.
Serial mice are attached to the computer via a serial port, so we should understand what happens with serial ports and Windows NT during system startup. When NT is booting, NTDETECT searches for devices on the serial port, such as a mouse. If it does not find a device, NT disables the port. You might not want this to happen. If the port is disabled, it doesn’t appear in the Ports icon in the Control Panel. In the next exercise, we disable the serial mouse detection using the BOOT.INI file.
- Find the BOOT.INI file in the root directory of your system partition, and remove the Hidden, System, and Read-only attributes. If it is hidden you have to change the View options in Explorer to Display All Files. Back up the BOOT.INI, because this file is critical.
- Open the BOOT.INI file with any text editor.
- Add the /NoSerialMice switch to the end of the entry in the [operating systems] for the operating system you don’t want to use the automatic detection. The switch is not case sensitive.
Here is an example of a BOOT.INI with the switch added:
[boot loader]
timeout=5
default=multi(0)disk(0)rdisk(0)partition(1)\WINNT
[operating systems]
multi(0)disk(0)rdisk(0)partition(1)\WINNT="Windows NT Server Version 4.00" /NoSerialMice
multi(0)disk(0)rdisk(0)partition(1)\WINNT="Windows NT Server Version 4.00 [VGA mode]" /basevideo /sos /NoSerialMice
There are a few variations on the /NoSerialMice switch that might be useful to you. The switch that we have seen in the above example disables detection on all serial ports on the system. Here are the other two variations:
The BOOT.INI in the preceding example uses what is known as the ARC naming convention. This is used to designate the path to the installation of Windows NT. Understanding the ARC naming convention is important for troubleshooting, and for the NT Workstation exam. The very first question on my exam was a complex ARC naming question. Be prepared!
The Keyboard icon is where you adjust parameters such as speed, and where you add various input locales and keyboard mappings. The keyboard is one of the devices that you can customize heavily according to your preferences. This icon also lets you change the driver for the keyboard, as we see in the next exercise.
- Open the Keyboard icon in the Control Panel.
- Select the General tab.
- Click the Change button.
- A dialog box of Compatible Keyboard Driver will be displayed.
- If the driver you would like to add is not present, select the Show All Devices radio button.
- Select the driver for the keyboard model you want to add. If the driver you want to add is not present, choose the Have Disk button. This prompts you to insert the vendor-provided driver disk.
- You might have to reboot the computer for the changes to take effect.
The Speed tab is used for adjusting the keyboard’s response. The first option is the Character Repeat Delay. This slider bar adjusts the time the computer waits while you are holding a key down before it begins to repeat the character. A mid-range setting should be fine for most users.
After this delay, but while you still hold the key down, the repeat rate takes effect. The computer begins repeating the character at a rate based on your adjustment of the slider bar. The slower the setting, the slower the characters will continue to appear. This setting is most apparent when you are using the backspace key to erase words and lines. If you set the speed too fast, you will backspace too far. If the setting is too slow, erasing a sentence or two would be time-wasting.
The Input Locales tab is where you can set up keyboard layouts for different languages. There are about 70 input locales, including Spanish, German, English, and French. These keyboard layouts include language-specific characters not available on most users’ standard keyboards. You can alternate between input locales by setting a hot key. You can see which input locale you are in by looking at the abbreviation in the taskbar. On my taskbar, there is EN for English, and ES for Spanish. I admit to having never used this feature until a co-worker was writing a letter in Spanish, and wanted to know where the upside-down question mark (¿) could be found. I had to switch input locales to enable the keyboard to remap in the desired language. Since there was no visible key on the keyboard for the ¿ key, I had to press every key in the new input locale until I typed the key that this character was mapped to, in this case the + key.
The General tab lets you change the keyboard driver, just as it did with the mouse. You won’t be in this area often. It is nice to know, however, that NT Workstation supports the extended 101/102-key enhanced keyboards, with the Start Menu key added.
While you are making adjustments through the various areas of the Control Panel, a central repository called the Registry is keeping track. The Registry contains your system’s hardware and software configuration. Previous versions of Windows NT used the Registry to store information, as does Windows 95. Before that, hardware and software settings were maintained in .INI files. Windows had its own major .INI files such as SYSTEM.INI and WIN.INI. The Registry is far more efficient than the older text-based .INI files. Sure there are ASCII values in the Registry, but it also can support binary entries. The Registry is hierarchical, as Figure 3-22 illustrates. There are subkeys found under keys, which were not possible with the flat, non-hierarchical .INI files. What’s more, the Registry is a consolidation of configuration information, whereas .INI files could be scattered all over the disk.
Great as the Registry is, it is much easier and safer to make adjustments to your system using the various applets in the Control Panel than it is to modify them directly in the Registry. You will see in a moment just how cryptic the Registry can be. Users of Windows 95 and previous versions of Windows NT have a grasp of the role the Registry plays in configuring hardware and software, but a new user could be somewhat overwhelmed. It took me months to grow confident enough to maneuver in the Registry and make changes. Of course, I never modified system settings that I was not familiar with. (Well, almost never.) After spending some time in the Registry, you will find yourself memorizing the paths to commonly configured values.
You also can use the Registry to view and modify a remote user’s Registry settings. This is a handy feature if you don’t want to get out of your chair, or you are the only Registry expert around. It’s also a dangerous feature, because I can access your computer’s Registry and modify a few settings and you won’t be able to start your system. Of course, you could do the same to me unless I don’t enable the Server service on my computer. When you are using REGEDT32 to view the Registry of a remote computer, you only see the HKEY_LOCAL_MACHINE and HKEY_USERS keys. This is for safety reasons. Those two keys will be more than enough for modifying. If you need to modify any other keys that are not supported in remote Registry accessing, you have to go directly to the machine and modify the Registry locally, or call the other user and have him make the adjustments for you.
Always use caution when you are editing the Registry. It is so dangerous that Microsoft issues a warning before each mention of the various parameters that are adjustable in the Registry. Please note that once you have made a change in the Registry, it is final. However, if you remember the original value you can always reenter it. To reduce the amount of accidental modifications to the Registry, you can open it in read-only mode. This is the safer method if you are just curious and won’t be making any adjustments while you are there. I know I keep saying that the Registry can be disastrous, but it’s nothing a LastKnownGood can’t fix. You learn more about the LastKnownGood later in the chapter. Along with the LastKnownGood, there is an option to backup the Registry from NT backup. This should be done prior to modifying Registry contents to ensure that you are fully capable of returning to your original values, in case of a modification cripples the system. Unfortunately, the NT backup only can save the Registry to tape, not to another directory or a floppy disk, which hampers efforts for a smooth restore, should something go wrong. Backing up to floppy disk would be out of the question anyway, as most Registries soon grow larger than the capacity of a floppy.
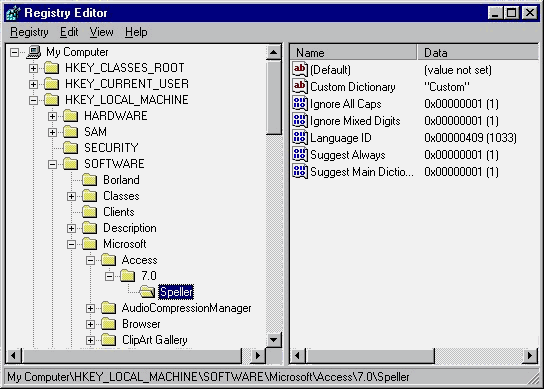
Figure 22: The Windows NT Registry is a hierarchical record of all the configurations on a system.
In Figure 3-22 you can see two of the three components of a value entry. For example, Ignore All Caps is the name, and the value is 0x00000001 (1). We cannot see the data type (REG_DWORD).
Table 3-2 gives a quick reference for each of the five main keys found in the Registry.
| Key Name | Description |
| HKEY_LOCAL_MACHINE | Contains information about the hardware and operating system. The most common key for making modifications. |
| HKEY_CLASSES_ROOT | Contains file associations and Object Linking and Embedding information (OLE). |
| HKEY_CURRENT_CONFIG | Contains configuration data for the current hardware profile. |
| HKEY_CURRENT_USER | Contains the user profile for the user that is currently logged on. |
| HKEY_USERS | Contains all loaded user profiles, including the current user. |
Table 2: Registry Folders
If you use the Registry editor a lot, it would be beneficial to make a selection for the editor on your Start menu. This next exercise does just that. Also, note that any program can be substituted in the following exercise if you want to place a selection on the Start menu. We will discuss two ways to do this.
- Open the Start menu, and select Settings.
- Select Taskbar.
- Select the tab for Start Menu Programs.
- Click the Add button.
- Click the Browse button to find the Registry Editor.
- Select the Winnt directory.
- REGEDIT will be in this directory. However, if you would like to make a Start Menu selection for REGEDT32 instead, change to the System32 directory.
- Select Open after you have made your choice. The command line should now show the path to the Registry Editor.
- Click Next.
- At this point you choose which folder to place the shortcut in. We’re placing it in the Start Menu folder.
- Click Next.
- Change the name of the shortcut if you desire, or accept the default.
- The shortcut now is placed in the Start menu. Click Start to verify.
The other way to place a shortcut on the Start menu is as follows:
- Open up Explorer by right-clicking the Start menu and selecting Explore.
- Open the Winnt folder and find the icon for REGEDIT, or you can open the Winnt\System32 folder and find the icon for REGEDT32.
- When you see the icon for the Registry Editor, right-click and drag the icon to the Start menu. Drop the icon on the Start menu.
- The program now is a shortcut on the Start menu.
You can search for keys and values rather than manually navigating the Registry by opening keys. Remember that REGEDIT lets you search for values as well as keys, and REGEDT32 lets you search for keys. The next exercise illustrates the point of searching for keys and values in the Registry using REGEDIT.
- Open the Start menu and click Run.
- Type REGEDIT in the run box and click OK.
- Click Edit, then select Find. Or you can accomplish the same thing by using Ctrl-F.
- In the space provided, enter the word "Canada".
- After searching the Registry, REGEDIT comes up with the first few occurrences. Some of the occurrences found are on the right side of the screen. These are the values. Some occurrences are on the left pane of the screen. These are keys that contain the word. REGEDT32 would not be able to find the occurrences in the right pane of the screen.
The main key in the Registry is the HKEY_LOCAL_MACHINE. Figure 3-23 shows the hierarchy of the main key. Here is a summary of the five keys found under this area.
The HKEY_LOCAL_MACHINE\Hardware key contains information about the components installed in the system and their associated configuration settings. This is an important key to know about when you are configuring and adjusting the Registry contents. It contains mostly binary information, so you’re not likely to tamper with the settings. This key is important to your system because it contains information about the hardware components that was collected during startup. Each time the system stops, the settings under this key are lost. They are computed when the system restarts.
The HKEY_LOCAL_MACHINE\SAM key is for the security accounts of users and groups. SAM stands for the Security Account Manager. This is another area where you should not attempt to adjust the settings directly. As with the Hardware key mentioned above, it is in binary format, which is a deterrent to curious users. These security settings can be adjusted from User Manager, which is much easier to configure, and less destructive.
The HKEY_LOCAL_MACHINE\Security key houses the security for the computer, such as group memberships, user rights, and password settings. There is also a subkey under the Security key that maps to the SAM key, so settings in one key automatically appear in the other. Not only is the information here in binary format, it is grayed out to avoid tampering. That is how important this Registry subkey is to system security. The settings in this key can be adjusted from the User Manager administrative tool.
The HKEY_LOCAL_MACHINE\System key works with the Hardware key to maintain startup information, but unlike the Hardware key, which computes its settings at startup, the settings under the System key are stored for future use. This key has a few subkeys that are very important to proper system startup
| The ControlSet000-ControlSet003 subkeys contain information used to start the machine correctly. There is more than one set for the purpose of fault tolerance. A backup copy is made of the ControlSet. | |
| The Hardware Profiles subkey holds the profile information for the different hardware profiles you created in the System icon of the Control Panel. We learned about hardware profiles earlier in the chapter. | |
| The Select key is crucial to maintaining the correct control set. The first value in the Select key is Current. This is the control set that is currently being used by the system. The Current value of 0x1 corresponds to the ControlSet001 in the left frame. The second value is Default. This value indicates which control set the system uses during boot when you have not manually overridden the value yourself. It is possible to override the default by entering a value manually that corresponds with a ControlSet here, or by invoking the LastKnownGood. My default is 0x1, which corresponds to ControlSet001 in the left frame. The Failed value indicates which ControlSet was replaced if you invoked the LastKnownGood. It does not correspond to any ControlSets on the left frame. Finally, the LastKnownGood value is a good copy of a control set that worked. In this case, the LastKnownGood corresponds to ControlSet003 in my system. |
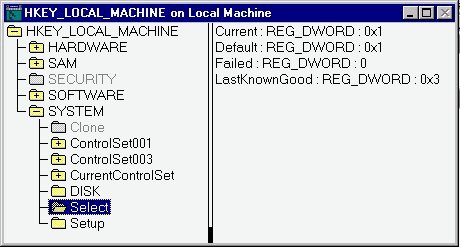
Figure 23: HKEY_LOCAL_MACHINE, the main key of the Registry, and its subkeys.
If you are still interested in learning more about the Registry, there are several books that show all of the available modifications to the Registry. If you are a programmer, there are books for Registry programming, showing how to make your applications create keys and values, or even register themselves. There are a few neat things you can do with the Registry that have not made their way to the Control Panel or any other front-end configuration utilities. Here are a few that I have found useful for personal and business reasons:
| Don’t display the last username that logged into NT. If someone knows your username, he is halfway to cracking your account. (The password is the hard part, though!) | |
| Log in as the Administrator automatically, without using the CTRL-ALT-DEL. This is especially good for home users who get tired of logging in to NT all the time. | |
| Modify where NT looks for the source installation files. If you install from a CD-ROM, you can tell it later to look on the network when it needs another file from the CD-ROM, rather than finding the NT Workstation CD-ROM. | |
| Add custom messages before a person logs on. This can give a warning such as: "Use of this system in an unauthorized manner will not be tolerated." |
The difference between the two Registry editing tools is minimal in terms of modifying keys and values. They differ in some important features, though. REGEDIT can search for specific values in the Registry, whereas REGEDT32 cannot. REGEDT32 can search only for keys. Only REGEDIT has secondary mouse-click support. You can right-click a key or value to bring up a context sensitive dialog box. If you click a key, you can expand and collapse the keys. You can search, delete, and rename keys this way. You also have the option called Copy Key Name, which copies the key to the clipboard, and lets you paste it to another area. When you right-click a value, you can modify it, delete it, or rename it. If you don’t click a value on the right pane of the screen and right-click any empty area instead, you have the option of creating a new value. These are some handy features for the Registry expert.
REGEDT32 has the advantage of being capable of supporting the security provided with the Registry that REGEDIT cannot. REGEDIT is the version of the Registry editor for Windows 95, which does not support security information as Windows NT does. With REGEDT32 you actually can assign permissions to Registry keys, just as you would for any folder or file in Explorer. You also can audit Registry keys, just as you would audit any other attempt to access resources, either as successful attempts or unsuccessful attempts. There are many events you can audit. However, I don’t think this feature will prove all that useful. (But if Junior ever makes a successful attempt to enumerate the HKEY_CLASSES_ROOT\Esconfig.Binding.1\CLSID subkey, he’s busted!)
The biggest visual difference between the two editing tools is the way the keys are positioned in the window. See in Figure 3-24 how in REGEDIT the keys are all contained within one window. They appear as subdirectories under the My Computer icon. REGEDIT must be familiar to those users who have migrated from Windows 95. If you used REGEDIT in Windows 95, the REGEDIT provided with Windows NT presents no problem.
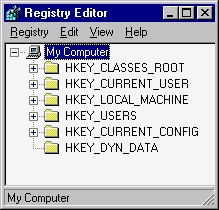
Figure 24: The REGEDIT utility displays all the keys in one window.
In REGEDT32, shown in Figure 3-25, the keys appear as separate windows of information, or hives. This is the older style and is not as easy to use. Notice the Security pull down menu. This is where you configure the permissions on the various keys.
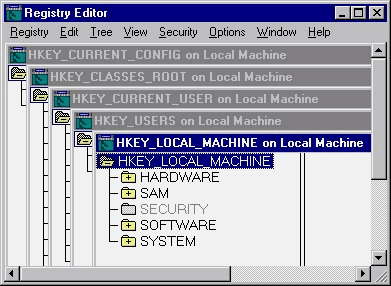
Figure 25: The REGEDT32 utility displays the keys in separate windows.
Whichever Registry editing tool you use, you should become very familiar with the Registry. Being able to modify Registry parameters can set you apart from other Administrators. If you can customize environments, and tune, monitor, and troubleshoot Windows NT problems via the Registry, you will be highly regarded. This is a wonderful feature that will be around for a long time, so you might as well begin mastering it now. But remember, you won’t usually make your modifications through the Registry! Windows NT provides many alternatives to Registry editing to make your life easier. Study them well and use them.
In this chapter, we have done a thorough review of the many facets of configuring Windows NT Workstation 4.0. Configuring can be done at two levels, system settings and user settings, and in two places, the Control Panel or the Registry. The Control Panel is the better place from which to configure your system, because it is safe and easy to make modifications there.
The Registry keeps track of the entire system’s configuration and displays all settings in hierarchical form. It provides an overview of the entire system. You should get to know your way around the Registry, but its cryptic elements, such as expressing a configuration as a numerical value, make it a dangerous place for adjusting configurations.
Always keep a hardcopy record of your system configuration. This saves future troubleshooters or administrators a lot of time, effort, and guesswork.
| The Control Panel is the "front end" to the Registry, where all NT configuration occurs. | |
| NT uses environment variables for information not stored in .INI files and the Registry. | |
| System settings affect every user in the system, whereas user settings only affect a specific user. The applets in the Control Panel can configure user or system settings or both. System setting will require administrative rights to configure. | |
| UPS is a device connected through the serial port that keeps power running to a system in the event of an emergency, such as a blackout. UPS can keep a computer running for several minutes while you shut it down correctly. | |
| A user profile stores user preferences such as screen savers, last documents used, and environmental settings such as program groups and network connections. A roaming profile is a user profile that is kept in one location so that any changes you make to the profile will be used on any computer that you log into. | |
| The recommended initial paging file size should be the size of your RAM plus 11 – 12MB, and can be split among different drives for increased performance. Virtual memory is the use of swapping pages of memory to the hard disk when you are out of RAM. The paging file can be used to simulate RAM when you run out. | |
| Services can be configured to start as automatic, manual, or disabled, and can also be stopped, started, and paused. | |
| Tape devices are one of the few hardware devices that NT will try to detect. | |
| The SCSI Adapters icon is for adding and removing SCSI devices and adapters as well as for IDE devices. | |
| The Registry is a collection of information about the system hardware, software, system settings, and user settings. | |
| NT provides two files, REGEDT32.EXE and REGEDIT.EXE, to edit items not controlled through the NT user interface. | |
| REGEDIT.EXE can search for keys, values, and data. REGEDT32.EXE can only search for keys, and is the only editor that allows users to change security options. | |
| The main Registry keys are: | |
| HKEY_CLASSES_ROOT | |
| HKEY_CURRENT_USER | |
| HKEY_LOCAL_MACHINE | |
| HKEY_USERS | |
| HKEY_CURRENT_CONFIG | |
| The HKEY_LOCAL_MACHINE key contains the most useful information about the local system. The five subkeys found under HKEY_LOCAL_MACHINE are: | |
| Hardware | |
| SAM | |
| Security | |
| Software | |
| System |
- The Virtual memory button in the Performance tab of System Properties.
- The Performance button of the Virtual Memory tab in System Properties.
- The Change button on the Performance tab in System Properties.
- The Set button on the Virtual Memory tab in System Properties.
- What utility lets me search the Registry for the value of "AutoAdminLogon"?
- REGEDT32.
- REGEDT.
- REGEDIT.
- You cannot search for values in the Registry.
- Which file does the Startup/Shutdown tab modify in System Properties?
- BOOTUP.INI
- BOOT.INI
- BOOT.CFG
- START.INI
- What is the recommended paging file size for a computer with 32MB of RAM?
- 40MB
- 42MB
- 44MB
- 48MB
- Where would you place a shortcut so that it appears on all users’ desktops?
- Winnt\All users\Desktop
- Winnt\Profiles\All users\Desktop
- Winnt\Profiles\Desktop\All users
- Winnt\All users\Profiles\Desktop
- The paging file is actually a file called ____________, and is located in the root directory of the drive you specified in the Virtual Memory dialog box.
- Which tab of the System Properties dialog box shows how much RAM is installed in a computer?
- General
- Performance
- Memory
- Environment
- 17 is a higher priority thread than 23.
- True
- False
- On the main Services screen, which button do you click to configure a service to start up automatically on bootup?
- Disabled
- Manual
- Startup
- Automatic
- The _________ tab of the SCSI adapters dialog box is where you add and remove drivers for the devices.
- Which is the only valid Registry key?
- HKEY_CLASS_ROOT
- HKEY_CLASSES_USER
- HKEY_CLASSES_ROOT
- HKEY_CLASS_USER
- The Advanced option of the Ports icon in the Control Panel lets you adjust the baud rate, parity, and flow control.
- True
- False
- Which option is not available from the UPS Configuration dialog box?
- Remote UPS Shutdown.
- Power failure signal.
- Send Administrative Alert.
- Execute Command File.
- Low battery signal at least two minutes before shutdown.
- Which is not a subkey of HKEY_LOCAL_MACHINE?
- Software
- Classes
- SAM
- Hardware
- Which menu would you select to find a key or value in REGEDIT?
- Tools
- File
- Find
- Edit
- Which subkey of HKEY_LOCAL_MACHINE holds the CurrentControlSet key?
- Hardware
- SAM
- System
- Software
- You click the Install/Uninstall tab to remove components of Windows NT.
- True
- False
- Location, calling cards, and area code are examples of __________ settings.
- The ____________ adapter can be used if you want to configure network settings but do not have an adapter in your system
- Where is the SCSI Investigator found on the Windows NT Workstation CD-ROM?
- TOOLS\SCSI
- SUPPORT\TOOLS\SCSI
- SCSITOOL
- SUPPORT\SCSITOOL
- From which Control Panel icon do you configure a MIDI adapter?
- Devices
- Multimedia
- Sounds
- Adapters
- The entry in the BOOT.INI file to disable serial mouse detection on COM1 is _______________ .
- _____________ communication uses stop and start bits appended to each byte of information.
- The ________ tab is where you change the display driver.
- Which is not an available button on the Server Service main dialog box?
- Sessions
- Alerts
- In Use
- Users
- What is not an option in the Advanced Ports dialog box?
- Base I/O
- COM port
- Flow Control
- FIFO enabled
- UPS stands for ________________ .
- Which portion of the HKEY_LOCAL_MACHINE key is grayed out to avoid tampering?
- The SAM key.
- The Special key.
- The Security key.
- None is grayed out.